IJ PUMP OPERATION AND MAINTENANCE MANUAL
BO2660-01 3-18
5. Before epoxy grout is set but after it is apt to flow, remove cloth from around foundation
bolts, exposing threads.
6. Allow epoxy grout to set for period specified by epoxy manufacturer, then:
a. remove cloth from around foundation bolts, back off leveling screws until completely
free of baseplate (or soleplates) and tighten holddown nuts on foundation bolts; or
b. leave leveling blocks and shims in plate and tighten holddown nuts on foundation bolts,
whichever is applicable.
7. Complete step 9 under GROUTING WITH CEMENT AND SAND above.
3.3.3 INSTALLING NOZZLE EXTENSIONS
When the nozzles are on the bottom of the case, it may be necessary to weld an extension onto the
discharge nozzle and/or the suction nozzle to connect the plant piping. Since this requires removal of
the pump from the cradle and it is unlikely that pump can be reinstalled in the exact same spot on the
cradle, welding should precede the first cold alignment. Generally, the major steps for installation of
the nozzle extensions are as follows:
1. Verify that soleplates are grouted in and grout has cured.
2. If pump and cradle have been separated from soleplates, proceed as follows:
a. Lift pump and cradle as outlined in RECEIVING by:
(1) instructions for Soleplate-Mounted Barrel Pump or
(2) instructions for Soleplate-Mounted Single-stage Pumps, whichever is applicable to
your situation.
b. Set pump and cradle on soleplates and install all cradle-to- soleplate holddown bolts with
washer under each head. Tighten only enough to keep cradle from shifting.
3. Remove pump-to-cradle mounting bolts.
4. Lift pump from cradle as outlined in RECEIVING, by:
a. step 2 under Soleplate-Mounted Barrel Pump or
b. instructions for Soleplate-Mounted Single-stage Pump, whichever is applicable to your
situation.
5. Hold pump directly above cradle at height necessary for welding extension nozzles and
complete welding task.
6. Lower pump onto cradle, reinstall pump-to-cradle mounting bolts and tighten them down.
7. Remove hoist, lifting apparatus, and clevises.
8. Reinstall anything removed or disconnected in accordance with instructions in RECEIVING
to facilitate safe lifting.
3.4 COUPLING PUMP AND DRIVER
All adjustments during alignment should be made to the driver; the pump should be fixed in position
on the baseplate or soleplate(s) as shown by the OUTLINE drawing in the back of this manual. To
emphasize the importance of the procedure, driver mount pads are machined low on a baseplate
where both driver and pump mount, making it necessary to shim under the driver feet in order to raise
Summary of Contents for IJ
Page 2: ...IJ PUMP INSTALLATION OPERATION MAINTENANCE ...
Page 3: ......
Page 5: ...IJ PUMP OPERATION AND MAINTENANCE MANUAL BO2660 01 iv ...
Page 11: ...IJ PUMP OPERATION AND MAINTENANCE MANUAL BO2660 01 x ...
Page 13: ...IJ PUMP OPERATION AND MAINTENANCE MANUAL BO2660 01 xii ...
Page 17: ...IJ PUMP OPERATION AND MAINTENANCE MANUAL BO2660 01 xvi ...
Page 25: ......
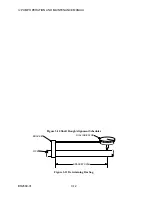
Page 35: ...IJ PUMP OPERATION AND MAINTENANCE MANUAL BO2660 01 2 10 Figure 2 1 Foundation Bolt ...
Page 65: ......
Page 79: ......
Page 83: ......

