


4-24
I
NSTALLING
ALINTE
4
PAGE
E
QUIPMENT
AND
S
OFTWARE
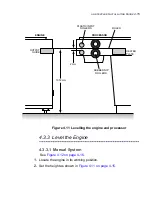
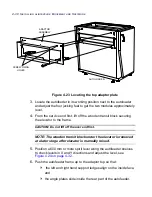
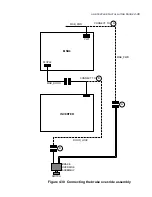
4.4.3 Level the Trolley and Cassette
NOTE: It is very important that the cassette lid is closed cor-
rectly after loading plates, and that both latches are holding the
lid in place. Failure to do this will result in plate loading or paper
handling errors.
1.
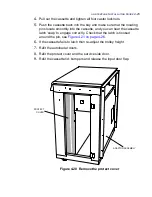
Prepare the autoloader and cassette as follows:
A
)
Remove the cassette lid.
B
)
Remove the two side bumpers from the cassette platen (3-off
M4 screws).
C
)
Tape the cassette input door to the top cover so that it is held
open.
D
)
Temporally remove the service side autoloader door and open
the paper bin door.
E
)
Remove the protect cover on the users side (2-off, M4 screws)
so that there is a clear side view of both cassette locating pins
on the autoloader. See
Figure 4.20 on page 4-25
.
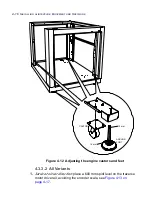
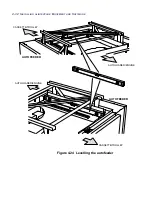
CAUTION: At this stage, make sure you push the trolley into the
autoloader very carefully to avoid damaging autoloader components.
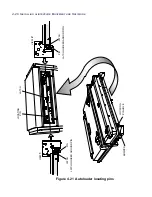
2.
Carefully push the trolley into the autoloader bay and check from
each side if the two cassette locating pins line up with their two holes
on the cassette interface, see
Figure 4.21 on page 4-26
.
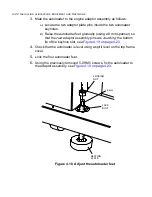
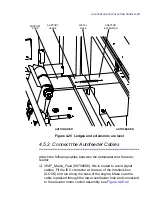
3.
Adjust the trolley height as follows (see
Figure 4.22 on page 4-27
):
A
)
Using an adjustable spanner (up to 30 mm jaw span), loosen
the four locknuts on the castors.
B
)
Adjust the castor wheel height by turning the wheel hood
(clockwise to raise).
C
)
Put a 600 mm spirit level lengthways on the platen and keep
adjusting the height and level of all four wheels until the
locating pins are lined up with the cassette holes, see
Figure 4.22 on page 4-27
.
D
)
If the adjustment length on the bolt is not enough (trolley needs
to go higher), then remove the castor and refit with the
locknuts below the pads.
Summary of Contents for alinte4page
Page 1: ......
Page 12: ...PRELIMINARIES...
Page 29: ...ALINTE4PAGE INSTALLATION GUIDE 2 7 Figure 2 5 Autofeeder elevator warning label...
Page 40: ...2 18 SAFETY ON THE ALINTE4PAGE Figure 2 13 Location of interlock covers alinte4page SAL 2 1...
Page 48: ...2 26 SAFETY ON THE ALINTE4PAGE...
Page 56: ...3 8 UNPACKING AND HANDLING...
Page 98: ...4 42 INSTALLING ALINTE4PAGE EQUIPMENT AND SOFTWARE Figure 4 32 Removing transit fixing view 2...