background image

Chapter 3 - page 1

MC work mode

3.   Working with operations or cycles

3.   WORKING WITH OPERATIONS OR CYCLES

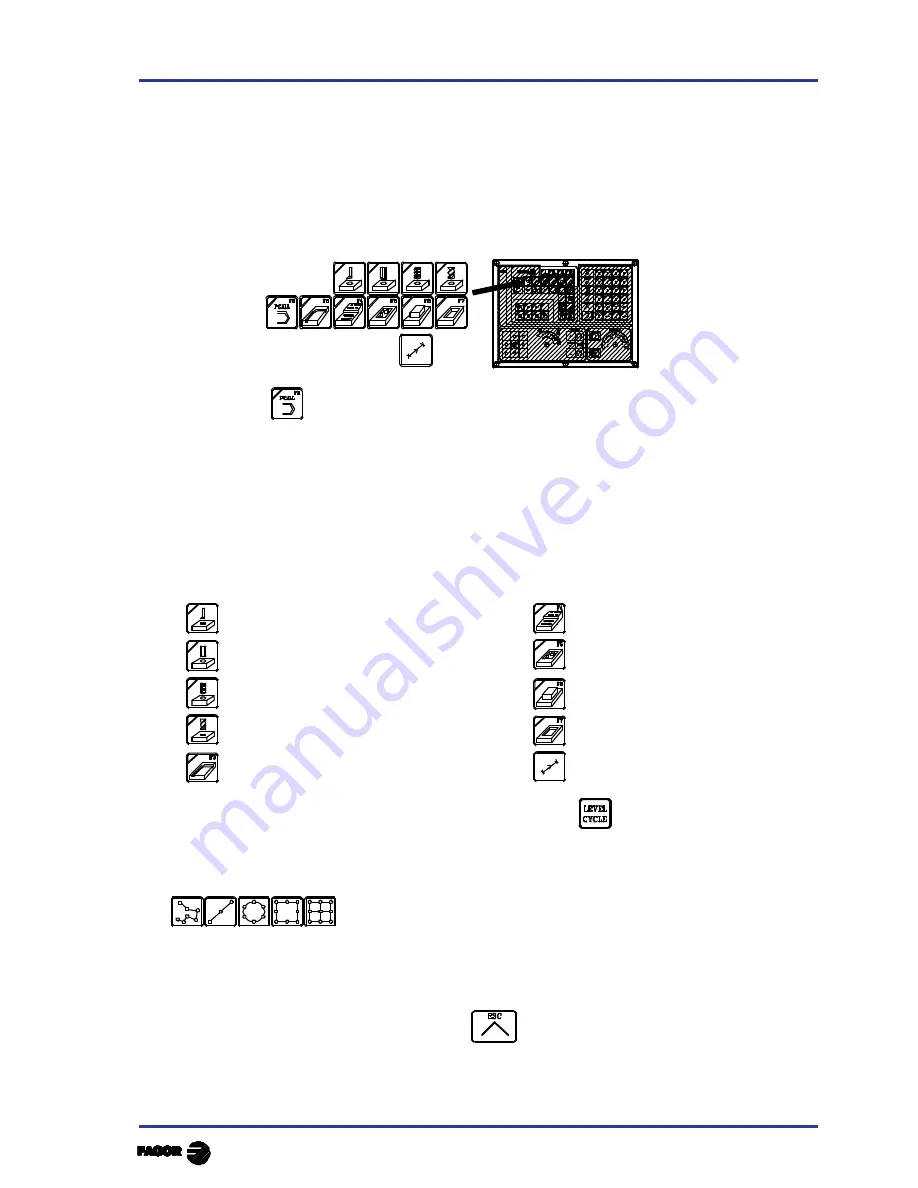
The following keys of the CNC must be used to select the machining operations or cycles:

When pressing 

 the CNC shows all the user cycles defined by the machine manufacturer using

the WGDRAW application.

The user cycle is edited like any other standard cycle of the MC mode.

Once all the necessary data has been defined, the operator may Simulate or Execute the cycle
just like any other standard cycle of the MC mode.

When pressing any other key, the CNC selects the corresponding machining operation or cycle
changing the display and lighting up the indicator lamp of the key just pressed.

The operations or cycles that can be selected with each one of these keys are the following:

Boring operation (2 levels)

Surface and slot milling

Reaming operation

Pocket with 2D and 3D profile

Tapping operation

Rectangular & circular boss

Drilling (3 levels) & center punching

Rectang. (2) & circular (2) pocket

Profile milling operation (2 levels)

Positioning (2 levels)

When the machining operation or cycle has several levels, the 

   key must be pressed to select

the desired cycle level:

The Boring , Reaming, Tapping, Drilling and Center punching operations may be carried out at the
position occupied by the tool or they could be associated with a positioning by means of

With this CNC, it is possible to combine ISO-coded blocks with standard and/or user-defined
machining operations to create part-programs as described in the chapter on "Part-program storage".

To deselect the cycle and return to the standard display, press the key corresponding to the selected

cycle (the one with the indicator lamp on) or 

Note: the operations or cycles can modify global parameters 150 through 299 (both included).

Summary of Contents for 8040 MC CNC

Page 1: ...REF 0307 SOFT M 7 XX SOFT M 7 1X 8040 CNC NEW FEATURES...

Page 2: ...Page 2 of 2 8040 CNC NEW FEATURES SOFT M 7 XX SOFT M 7 1X...

Page 3: ...ry home search 13 22 Change of active tool from the PLC 14 23 Synchronize a PLC axis with a CNC axis 14 24 Error register 15 25 Path JOG mode 15 26 Tool inspection 17 27 New instructions in the config...

Page 4: ...offset 45 5 New management of the distance coded reference mark I0 46 6 Improved look ahead 46 7 Leadscrew error compensation in both directions 46 8 Parameters accessible from the oscilloscope or OE...

Page 5: ...DNC and it can only be used inside a tool change subroutine OPMODE Variable This variable also returns the following code Probe canned cycle for surface measurement PROBE 3 The moving direction with...

Page 6: ...It starts the spindle if programmed The axes move at maximum feedrate F0 regardless of the F that was programmed and it may be varied with the Feedrate Override switch 2 Sampling period From this vers...

Page 7: ...ate the external switch to update the software version as indicated in section 2 2 of the Operating Manual To update the CNC software proceed as follows Remove the Memkey Card and insert the Memory Ca...

Page 8: ...offsets geometry user parameter OEM parameter etc Read global and local arithmetic parameters individually using variables GUPn and LUP a b The installation and programming manuals describe how to use...

Page 9: ...via serial line or via modem select the telediagnosis option b of the WINDNC application From this moment on the CNC may be governed either from its own keyboard or remotely from the PC keyboard The P...

Page 10: ...guration The bit will be 1 when the relevant configuration is available From now on bits 24 25 26 indicate the type of monitor and bits 27 28 the CPU turbo board being used MPGn MP X C n MPSn MPSSn MP...

Page 11: ...it is only enabled at the CNC Only programs located in RAM memory may be consulted If the defined program number does not exist it issues Error 69 Program does not exist If the defined block number do...

Page 12: ...for the X C axis Is read only from the CNC DNC and PLC BSIN X C B signal of the CNC sinusoidal feedback for the X C axis Is read only from the CNC DNC and PLC ASINS A signal of the CNC sinusoidal feed...

Page 13: ...RAM memory containing the two blocks defined by the N labels If parameter P is not defined the CNC interprets that the portion to be repeated is located in the same program If the defined program numb...

Page 14: ...ng the O attribute On the MC and MCO models when using OEM parameters in the configuration programs these programs must have the O attribute If they don t an error will be issued when editing a user c...

Page 15: ...feedrate of the axes and the spindle turning speed FLIMIT P75 SLIMIT P66 The a m p FLIMIT sets the maximum feedrate for each axis and the s m p SLIMIT sets the maximum turning speed for each spindle F...

Page 16: ...on it is recommended to manage from the PLC the variables associated with speed limits as shown in the following example A new part program cannot be executed without previously entering the speed lim...

Page 17: ...program in execution AND CPS R102 NE 0 and the S has been limited from MDI MOV R101 R201 it copies the number of the program in execution MOV R102 R202 and the S limitation from MDI M102 If same progr...

Page 18: ...cally in the tool magazine proceed as follows 1 Cancel the tool TOOL 0 and TOD 0 2 Assign the relevant position using the TMZT variable When trying to write in variables TOOL NXTOOL TOD and NXTOD chec...

Page 19: ...ogic outputs of all the axes it also cancels the synchronization To end synchronization cancel the SYNCHRO general input of the PLC axis To assure that the PLC axis recovers its position after the syn...

Page 20: ...ction is on or off It only moves the selected axis and in the indicated direction Considerations It assumes as axis feedrate the one selected in JOG mode and it is affected by the override If F0 is se...

Page 21: ...ered in each field When trying to enter a greater value the relevant message will be displayed Warning 27 New instructions in the configuration language The new token UNMODIFIED of the configuration l...

Page 22: ...plane there is an intermediate vertical movement and at an angle greater than 270 it is recommended to check the CNC s behavior as shown next At the beginning of the compensation the tool should be p...

Page 23: ...look ahead has been increased From 50 blocks to 75 The extreme cases have been improved such as small blocks of a few microns in order to machine faster and more smoothly Jerk control can now be appl...

Page 24: ...of blocks executed and assign the resulting value in microseconds to g m p TLOOK P161 We recommend the use of the oscilloscope function and verify that the internal variable VLOOKR remains constant w...

Page 25: ...brate the tool length Measure or calibrate the tool length on its shaft It is carried out with the spindle stopped It is useful for drilling tools ball end mills or tools whose diameter is smaller tha...

Page 26: ...the tool offset selected in the tool offset table If the dimension of each cutting edge was requested N parameter the measured values are assigned to global arithmetic parameters P271 and on Once the...

Page 27: ...tool with another one of the same family It sets the rejected tool indicator status R It activates the general logic output PRTREJEC M5564 P299 measured length theoretical length L L theoretical leng...

Page 28: ...If the dimension of each cutting edge was requested N parameter the measured values are assigned to global arithmetic parameters P271 and on 31 3 Measure or calibrate the tool radius and length It may...

Page 29: ...them it issues a tool rejected message and acts as follows D Radius or distance referred to the tool shaft being for length measurement or calibration With D0 on the tool shaft and if not programmed o...

Page 30: ...a password How to operate To access the Oscilloscope mode select Op Mode Diagnosis Adjustements Scope Define the variables to be analyzed the trigger conditions and the machine parameters of the CNC o...

Page 31: ...following softkeys 32 1 Configuration To define the variables to be analyzed the trigger conditions and the machine parameters of the CNC or the drive to be modified It offers 2 screens one to set th...

Page 32: ...er Editing screen the CNC machine parameter table and the drive s work parameters are updated The Save Parameters softkey is also activated on the Configuration Parameters screen We suggest to access...

Page 33: ...feedrate FTEO X C Theoretical X C axis feedrate FLWE X C X C axis following error ASIN X C A signal of the CNC sinusoidal feedback for the X C axis BSIN X C B signal of the CNC sinusoidal feedback for...

Page 34: ...are synchronized Sample T It indicates the sampe period or the time period between data captures It is given in milliseconds integers between 1 and 1000 between 1ms and 1s When analyzing CNC variable...

Page 35: ...te P27 MINANOUT Immediate P28 SERVOFF Immediate P29 BAKANOUT Immediate P30 BAKTIME Immediate P37 MAXVOLT Immediate P38 G00FEED Beginning of the next block P59 ACCTIME2 Beginning of the next block P60...

Page 36: ...e list on the screen If the configuration makes not sense for example because the CNC does not have an axis that that configuration refers to the CNC will warn the user and it will only load the porti...

Page 37: ...n them t To select the first or second cursor use the teclas keys to place the focus in the C1 or C2 fields respectively Then use the keys or page up page down to move the signal or press one of these...

Page 38: ...me as the ones edited last the softkey disappears until a new modification is made 32 5 Actions It is available on the following screens Parameter Editing Analysis and Scales Offsets It is very useful...

Page 39: ...utine 9998 is executed before the part program and subroutine 9999 after the part program 34 MC model Maintain F S y Smax on power up MAINTASF P162 This g m p indicates whether on CNC power up the F S...

Page 40: ...and modify its I K and D data Change the active tool T xx Start Rest of cases program neither in execution nor in tool inspetion When editing the active tool it is possible Modify all the data Change...

Page 41: ...efine up to 4 auxiliary M functions in each one The auxiliary functions are executed at the beginning of the stage where they have been defined roughing or finishing To use this feature set g m p CODI...

Page 42: ...of several points Repeat previous coordinate If a coordinate is left blank the cycle will assume that it is a repetition of the previous one Example Incremental coordinates The coordinates of each po...

Page 43: ...e defined Ds Safety distance for the probe approach F Probing feedrate A Type of calibration or measurement Calibrate the length or measure the tool length wear along its shaft Calibrate the length or...

Page 44: ...in this zone To select the desired one position in the Machine Parameters Programmable Parameters field and press the a key d When the length calibration or measurement is done on the tip it indicates...

Page 45: ...User notes NEW FEATURES SOFT M 7 XX Page 41 of 48 8040 CNC...

Page 46: ...User notes NEW FEATURES SOFT M 7 XX Page 42 of 48 8040 CNC...

Page 47: ...It admits TTL and differential TTL feedback Connector X10 X11 X12 and X13 Feedback inputs for the axes It admits 1Vpp TTL and differential TTL feedback Value Work units Format in degrees Format in mm...

Page 48: ...and G51 E0 1 a program with many small blocks at least 1000 For example X0 1 Y0 1 Z0 1 Measure the program execution time making sure that the machine does not vibrate Divide the execution time by 100...

Page 49: ...s m p FFGAIN P25 should be set to zero This may be done by setting the range of gains through g m p ACTGAIN2 P108 with the bit corresponding to G75 G76 4 Square corner or round corner machining when...

Page 50: ...leadscrew error compensation From this version on it is possible to define a different leadscrew compensation for each moving direction This is defined in the leadscrew compensation tables Each row of...

Page 51: ...arameters modifiable from the oscilloscope can also be changed from an OEM program using the following variables The new values are updated according to the tables described in chapter 32 Oscilloscope...

Page 52: ...User notes NEW FEATURES SOFT M 7 1X Page 48 of 48 8040 CNC...

Page 53: ...Operating Manual MC option Ref 0204 ing...

Page 54: ...he information described in this manual may be subject to variations due to technical modifications FAGOR AUTOMATION S Coop Ltda reserves the right to modify the contents of the manual without prior n...

Page 55: ...ing with an Electronic Handwheel 10 2 4 4 FEED HANDWHEEL 11 2 4 5 Master Handwheel 12 2 5 Tool control 13 2 5 1 Tool change 14 2 5 1 1 Variable tool change point 15 2 5 2 Tool calibration 16 2 5 2 1 D...

Page 56: ...s 38 3 13 2 Multiple positioning in a straight line 39 3 13 3 Multiple positioning in an arc bolt hole pattern 41 3 13 4 Multiple positioning in a parallelogram pattern 43 3 13 5 Multiple positioning...

Page 57: ...ts character R Specific keys for the MC model Enable Selection and definition of Machining Operations Governing external devices Selecting the spindle s operating mode Selecting single or automatic ex...

Page 58: ...Warning Programs P999997 and P999998 are associated with the software version Fagor Automation shall not be held responsible of any possible malfunction if programs P999997 and P999998 contained in u...

Page 59: ...of a line is as follows Nr of text explanatory remark not displayed Text to be displayed Examples General text The CNC treats this as a remark 44 Feedrate M MIN The CNC treats this as a remark 44 M MI...

Page 60: ...ogram P999997 cannot be found because it has been erased it is re initialized like after power up After modifying the texts of program P999997 turn the CNC off and back on to assume the new texts When...

Page 61: ...o access this operating mode press any key If there is no page 0 the CNC will display the standard screen for the selected work mode There are two operating modes MC mode and M mode To switch from one...

Page 62: ...itting the keystroke sequence To recover the video signal just press any key On the other hand when receiving any message PLC program etc the CNC also recovers the display 1 6 HANDLING THE CYCLE START...

Page 63: ...Chapter 2 page 1 MC work mode 2 Operating in JOG mode 2 OPERATING IN JOG MODE The standard MC operating mode screen is If one presses key The CNC displays the special MC operating mode screen...

Page 64: ...following data The X Y Z coordinates of the axes In small characters the axis coordinates referred to machine zero reference home This values are very useful when allowing the operator to set a tool...

Page 65: ...spindle The actual spindle speed S The condition of the spindle This is represented by an icon and can be turning to the right to the left or idle The of the spindle speed being applied The active spi...

Page 66: ...ws the lines of the program being executed 5 The X Each axis has the following fields available COMMAND States the coordinate programmed that is the position that the axis must reach ACTUAL States the...

Page 67: ...conds hundredths of second Whenever the execution of a program is started even though this is repetitive this variable assumes value 0 TIMER States the reading of the clock enabled by the PLC It is ex...

Page 68: ...y for the axis required or The CNC will frame the position for said axis to indicate that this is selected 2nd Enter the value required for preset of the axis To exit coordinate preset press 3rd Press...

Page 69: ...part zero or zero offset that is active at the time A home search routine general machine parameter P34 other than 0 has to be defined Otherwise the CNC will display the relevant error Home search on...

Page 70: ...ic input the movement will be made in the following way If the PLC sets this mark at a low logic level 0V the axis will only move while the relevant JOG key is pressed If the PLC sets this mark at a h...

Page 71: ...s at a time To do this press the JOG key for the direction of the axis to be moved Each time a key is pressed the corresponding axis moves the amount set by the switch This movement effects the F feed...

Page 72: ...on is available the selection of the axis to be moved can also be done in the following way Press the push button located on the rear of the handwheel The CNC will select the first of the axis and dis...

Page 73: ...et with values 21 29 Example The machine has a button to activate and deactivate this feature feed handwheel and the feedrate control is carried out with the second handwheel CY1 R101 0 Resets the reg...

Page 74: ...vates or deactivates the master handwheel mode through logic CNC input MASTRHND M5054 M5054 0 Standard handwheel mode ON M5054 1 Master handwheel mode ON The PLC must indicate the type of jogging path...

Page 75: ...mber T of the selected tool The offset number D associated with the tool The coordinates for the tool change point The CNC does not display this window when text 47 of program 999997 is not defined To...

Page 76: ...ge for requesting tool change M0 Program stop and wait until START is pressed MSG Erases previous message IF P102 EQ 1 GOTO N10 Recovers turning direction of spindle IF P101 EQ 0 RET M3 RET N10 M4 RET...

Page 77: ...be modified by the operator at any time the subroutine associated with the tools must take these values into account Arithmetical parameters P290 P291 and P292 contain the values set by the operator a...

Page 78: ...hics for the tool calibration 3 Window for tool calibration 4 Current machine status Actual real X Y Z coordinates actual axis feedrate F actual spindle speed S and T tool currently selected 5 Tool nu...

Page 79: ...has been measured the CNC updates the L and K fields The CNC assumes R I as the real tool radius and L K as the real tool length To set these values select the corresponding field using the key in th...

Page 80: ...I value to the radius R and the K value to the length L for calculating the real dimensions R I and L K to be used Every time the R or L value is defined the CNC sets the I and K fields respectively...

Page 81: ...orresponding to it and resets its K field to 0 The tool radius R has to be entered manually To calibrate another tool Select at the machine number Approach the tool to the part and touch it with it Th...

Page 82: ...tical spindle speed being applied To change this percentage press 4 Spindle status turning clockwise turning counterclockwise or stopped To change the spindle status press 5 Currently selected spindle...

Page 83: ...eys The relevant Register bit will have value 1 when the key is pressed and value 0 when this is not pressed The Register bit for each one of the keys is as follows The status of the light for each on...

Page 84: ...in the JOG mode When accessing the ISO mode a special screen comes up where up to 6 program blocks may be edited in ISO code or in high level language Example ISO G95 G96 S120 M3 G0 Z100 G1 X30 F0 1 O...

Page 85: ...oring operation 2 levels Surface and slot milling Reaming operation Pocket with 2D and 3D profile Tapping operation Rectangular circular boss Drilling 3 levels center punching Rectang 2 circular 2 poc...

Page 86: ...ation 6 Machining conditions for the operation The CNC will highlights an icon a coordinate or one of the operation or cycle defining data To select another icon data or coordinate one can a Use the k...

Page 87: ...this data key in the desired value and press Spindle speed S Place the cursor over this data key in the desired value and press Spindle turning direction Place the cursor over this data and press Mac...

Page 88: ...ace Part surface It is defined with parameter Z The tool moves in rapid G00 to the safety plane Zs it keeps on going in rapid to the approach plane up to 1mm off the part surface and finally it moves...

Page 89: ...wn screen and the main window of the cycle indicates with tabs the available levels and which one is currently selected To change levels use the key or the Page up and Page down keys to scroll up and...

Page 90: ...xecution mode Press to switch from the Editing mode to the Execution mode Press one of these keys to switch from the Execution mode to the Editing mode The operation or cycle can be simulated in any o...

Page 91: ...e operation being edited in the background cannot be executed or simulated nor the current axis position be assigned to a coordinate To inspect or change a tool while background editing proceed as fol...

Page 92: ...n Yn and the machining conditions in Z Zs Z P I Fz On the other hand in the data area for the roughing operation one must define whether the milling operation is to be carried out with or without tool...

Page 93: ...all 12 definition points the first unused point must be defined with the same coordinates as those of the last point of the profile Machining conditions in Z Zs Z P I Fz The machining conditions are...

Page 94: ...st edited Enter the desired comment and press If no comment is desired press Modify an existing Profile program To modify a Program key in its number and press The CNC will display the profile current...

Page 95: ...he roughing operation and the finishing stock z in the data area for the finishing operation Slot milling operation One must define The type of slot milling the starting point X1 Y1 the dimensions of...

Page 96: ...the corner where it will start milling Possible values The E and data are defined one by one Go to the relevant window key in the desired value and press When programming an E value smaller than the t...

Page 97: ...alue and press When programming parameter E with a smaller value than the tool radius the CNC executes the planning with an E value equal to the tool radius Machining conditions in Z Zs Z P I Fz The m...

Page 98: ...Chapter 3 page 14 MC work mode 3 Work with operations or cycles 3 4 Surface and slot milling operations Milling the different slot types clockwise...

Page 99: ...fileand orthose of the non vertical islands up to a maximum of 4 Programming pockets with 2D profiles When defining the Profile one must specify the contour or contours of the islands besides the outs...

Page 100: ...peration in Z is defined by means of The coordinate of the safety plane Zs Coordinate of the part surface Z Pocket depth P Roughing pass in Z I1 Penetration feedrate in Z Fz Semi finishing pass in Z I...

Page 101: ...responding window roughing or finishing operation key in the desired value and press Lateral penetration angles Place the cursor in the corresponding window roughing or finishing operation key in the...

Page 102: ...quests a comment to be associated with the Profile Program just edited Enter the desired comment and press If no comment is desired press Modify an existing Profile program To modify a Program key in...

Page 103: ...hamfer 15 Enter Escape Finish Save Profile Example of how to define a 2D profile with islands 2D Pocket Profile 2 Recall Configuration Abscissa axis X Ordinate axis Y Autozoom Yes Validate Profile out...

Page 104: ...3D Pocket 2 P XY 4 Recall Configuration Abscissa axis X Ordinate axis Y Autozoom Yes Validate Profile outside profile Starting Point X 20 Y 0 Validate Straight X 20 Y 40 Validate Straight X 145 Y 40 V...

Page 105: ...nd the machining direction In the finishing area define the finishing stocks and z the number of finishing passes and the machining direction Circular boss cycle One must define The center coordinates...

Page 106: ...rial to be removed They are defined one by one The center coordinates Xc Yc are defined like the starting and end points To define the rest of the values R Q place the cursor in the corresponding wind...

Page 107: ...ctangular pocket cycle Level 2 One must define The starting point X Y the dimensions of the pocket L H the inclination angle a the type of corner and the machining conditions in Z Zs Z P I Fz In the a...

Page 108: ...ing direction Circular pocket cycle level 2 Useful for machining pre emptied pockets or rings One must define The center coordinates Xc Yc the inside radius Ri the outside radius Re and the machining...

Page 109: ...rounding or chamfer is not possible the CNC will make a chamfer or rounding with the largest possible value Circular pocket Center coordinates and radii They are defined one by one The center coordin...

Page 110: ...s carried out from the center of the pocket out and following the first machining path The passes are carried out as often as needed and the operation always concludes at the center of the pocket In t...

Page 111: ...ifferent ways Level 1 One must define Thetargetpoint X Y Z theaxesmovementsequenceandthetypeoffeedrate Level 2 One must define The target point X Y Z the axes moving sequence the type of feedrate and...

Page 112: ...pper right hand window Press Axes moving sequence All three axes at the same time First the Z axis and then in the plane X and Y axis at the same time Firs in the plane X and Y at the same time and th...

Page 113: ...the quill it is possible to orient the spindle and retract the quill before the exit movement thus avoiding scratching the part One must define The machining point X Y the coordinate of the safety pl...

Page 114: ...ing conditions are defined one by one The Zs and Z values are defined like those of the machining point To define the rest of the values P t place the cursor in the corresponding window key in the des...

Page 115: ...by one After placing the cursor over the axis coordinates one can a Enter the value by hand Key in the desired value and press b Assign the current axis position Jog the axis to the desired point wit...

Page 116: ...he safety plane Zs the coordinate of the part surface Z the total machining depth P and the dwell at the bottom t and the type of Tapping The Tapping operation can be carried out in the indicated posi...

Page 117: ...tool position at all times Press for the selected data to assume the value appearing in the upper right hand window Press Machining conditions in Z Zs Z P t The machining conditions are defined one b...

Page 118: ...ane Zs the coordinate of the part surface Z the total machining depth P and the dwell at the bottom t and the type of center punching Drilling operation Level 1 One must define The drilling point X Y...

Page 119: ...ng operation Level 3 It is possible to set the withdrawal position Zr after each penetration One must define The machining point X Y the coordinate of the safety plane Zs the coordinate of the part su...

Page 120: ...hand window Press Machining conditions in Z Zs Z Zr P I t B The machining conditions are defined one by one The Zs and Z values are defined like the coordinates of the machining point To define the r...

Page 121: ...s the CNC selects the corresponding type of positioning and it changes the display It keeps the lamp ON of the key corresponding to the selected operation Boring Reaming etc and the bottom of the scre...

Page 122: ...The coordinates are defined one by one After placing the cursor over the axis coordinates one can a Enter the value by hand Key in the desired value and press b Assign the current axis position Jog t...

Page 123: ...of points N 3 The coordinates of the first point X1 Y1 The inclination angle Total distance from first to last point L Distance between points I 4 The coordinates of the first point X1 Y1 The inclinat...

Page 124: ...Enter the value by hand Key in the desired value and press b Assign the current axis position Jog the axis to the desired point with the handwheel or the JOG keys The upper right hand window shows the...

Page 125: ...coordinates of the first point X1 Y1 The center coordinates Xc Yc The number of points N The angle of the last point 4 The coordinates of the first point X1 Y1 The center coordinates Xc Yc The number...

Page 126: ...one After placing the cursor over the axis coordinates one can a Enter the value by hand Key in the desired value and press b Assign the current axis position Jog the axis to the desired point with th...

Page 127: ...in X and Y Nx Ny The rotation angle The rotation angle To select the desired one place the cursor over the icon and press Point definition The coordinates are defined one by one After placing the curs...

Page 128: ...in X and Y Nx Ny The rotation angle The rotation angle To select the desired one place the cursor over the icon and press Point definition The coordinates are defined one by one After placing the curs...

Page 129: ...ned in the chapter on working with operations or cycles This chapter explains how to operate with these part programs and has the following sections and subsections for this purpose List of programs s...

Page 130: ...are stored in the CNC s memory When there are more programs than those displayed in the window use keys and to move the pointer over the list of programs To go forward or backward page by page use th...

Page 131: ...each one of the columns and to change the column After selecting an operation the CNC allows Seeing the operation in detail Erasing the operation Moving the operation to another position Modifying th...

Page 132: ...OR CYCLES A block or cycle can be added at the end of the program after the last operation or inserted between 2 existing operations To store the block or cycle follow these steps Define the desired...

Page 133: ...ake the following steps Press to access the list of part programs stored Use the pointer to select in the left hand column the part program to be copied Press At the bottom the CNC will display a mess...

Page 134: ...peration selected and update the right hand column If you press the operation is not erased and the erasing operation is left 4 6 2 MOVING AN OPERATION TO ANOTHER POSITION To move an operation to anot...

Page 135: ...operation Modify all the data required To store the modified operation again Press to access the list of part programs stored The CNC displays the pointer over the same operation To select another po...

Page 136: ...tion can be done from beginning to end or alternatively press key for this to be executed or simulated step by step The CNC enables execution or simulation of Any operation or cycle A part program An...

Page 137: ...ing mode Execution Mode Simulation The operation or cycle can be simulated in both operating modes To do this press The CNC will display the graphic representation page for the M model Execution An op...

Page 138: ...be executed or simulated in the right column Press to simulate the part program and to execute it Warning Whenever a section of the part program is executed the CNC does not execute the initial subrou...

Page 139: ...ating mode screen After selection the operation or part can be executed as many times as necessary To do this after execution once more press During execution of the operation or part one can press to...

Page 140: ...CNC displays the Tool Calibration screen It is possible to change the tool dimensions offsets I K to compensate for tool wear or the values for tool geometry To exit this screen and return to the pre...

Page 141: ...ecting a new display zone the CNC erases the screen showing the axes or the unmachined part The zone displayed cannot be modified during execution or simulation of the piece In this case stop executio...

Page 142: ...s At the top right hand side of the screen use keys to select the type of path and the keys to select the color to be applied For the CNC to assume said values press Erase screen When this option is s...

Page 143: ...Self teaching Manual MC option Ref 0112 ing...

Page 144: ...Keyboard description 4 3 1 3 Description of the standard screen 6 3 1 4 Description of the auxiliary screen 7 3 2 Home search 8 3 2 1 Maintaining the part zero 8 3 2 2 Without maintaining the part zer...

Page 145: ...5 7 Boring operation 9 5 8 Reaming operation 10 5 9 Threading operation 11 5 10 Drilling and Center punching operations 12 5 11 Multiple positioning at several points 14 5 12 Multiple positioning in a...

Page 146: ...5 Rectangular pocket 7 Step 6 Center punching multiple positioning at several points 8 Step 7 Center punching multiple positioning in parallelogram pattern 9 Step 8 Drilling multiple positioning at s...

Page 147: ...Chapter 1 Theory on CNC machines...

Page 148: ...CNC machines This chapter describes How to name the axes of the machine What machine reference zero and part zero are What Home Search is What travel limits are How to preset a part zero Which are the...

Page 149: ...g Manual Chapter 1 Page 3 MC Model Theory on CNC machines The orientation of the axes depends on the type of machine and are established by the rule of the right hand 1 1 Machine Axes Axes orientation...

Page 150: ...manual uses the following axes configuration Two types of movements can be distinguished on a machine those of the machine X Y and that of the tool itself Z But for programming them let us assume the...

Page 151: ...OP They are the references the machine needs in order to work Machine ref zero OM It is set by the manufacturer and it is the origin point for the axes Part zero OP It is set by the operator It is th...

Page 152: ...hing home the axes move to the home point set by the manufacturer and the CNC assumes the value of the coordinates set by the manufacturer for that point NOTE With the new feedback systems with distan...

Page 153: ...hysical limits There are two types of limits Hard limits Mechanical limits set on the machine to prevent the carriage from moving beyond the ways cams and hardstops CNC limits Set at the CNC by the ma...

Page 154: ...art is different for each one A different program would be needed for each part By programming from Part zero OP it would be independent of the actual location of the part Programming gets complicated...

Page 155: ...machines 1 6 Work units Programming units They are set by the manufacturer and may be in millimeters or inches Sindle speed The spindle turning speed is programmed in RPM Axis feedrate The feedrate of...

Page 156: ...Chapter 2 Theory on tools...

Page 157: ...Theory on tools This chapter describes What the tool turret is What the tool table is and what information it contains What tool presetting is Defects due to errors in the tool table Due to wrong too...

Page 158: ...y be placed in a tool magazine Depending on whether the machine has or not a tool magazine the tool change may be carried out as follows If the machine does not have a tool magazine the tool change is...

Page 159: ...e tool data is stored in the tool table When a tool change takes place the CNC assumes the data set for that tool The data shown in the table is T TOOL NUMBER D OFFSET ASSOCIATED WITH THE TOOL It defi...

Page 160: ...rried out FAMILY Tools with similar characteristics STATUS Tool type N Normal S Special Tool status A Available E Expired Real life Nominal life R Rejected by the PLC This data is updated by the CNC T...

Page 161: ...tion Tool calibration refers to the operation used to indicate to the CNC the length of the tool This operation must be carried out properly so the parts come out with the right dimensions and the sam...

Page 162: ...el Theory on tools Z1 Real dim Z2 Wrong dim Z2 Real dim Right part dimensions Wrong machining Tools calibrated wrong Proper machining Tools calibrated right Part to be machined Tools DEFECTS DUE TO WR...

Page 163: ...Manual Chapter 2 Page 8 MC Model Theory on tools DEFECTS DUE TO WRONG RADIUS VALUES Wrong radius Residual stock There is a residual stock due to different radii Real radius Real profile Desired profi...

Page 164: ...Chapter 3 Hands on training...

Page 165: ...earch Maintaining the part zero Without maintaining the part zero How to operate with the spindle What the speed ranges gears are How to jog the axes Handwheels incremental and continuous JOG etc How...

Page 166: ...reen and keyboard description 3 1 1 Power up On power up the CNC will display the following screen Screen for the MC mode NOTE Refer to the Operation Manual Chapter 2 Section 2 3 If this screen is not...

Page 167: ...MC Model Hands on training 3 1 2 Keyboard description 1 Keys to define the machining operations 2 Keys for external devices 3 Alphanumeric keyboard and command keys 4 Operator panel NOTE Refer to the...

Page 168: ...s jogging keys 2 Work mode selector Continuous JOG incremental JOG or with handwheel 3 Selection of spindle turning direction and start up Spindle speed override percentage 4 Keys for CYCLE START and...

Page 169: ...Reset and PLC messages 2 CNC messages 3 Tool position referred to part zero and to home Actual real spindle rpm 4 Selected axis feedrate and applied override 5 Tool information 6 Spindle information...

Page 170: ...information Movement target point COMMAND current tool position ACTUAL remaining distance TO GO and difference between the theoretical axis position and its actual position FOLLOWING ERROR or axis lag...

Page 171: ...ved while the CNC was off A Home Search can be carried out in two ways 3 2 1 Maintaining the part zero The Home Search is carried out on the three axes at the same time The CNC does not know the posit...

Page 172: ...earch is carried out on one axis at a time The CNC does not know the position of the axes Home search on the Z axis Press Home search on the X and Y axes Press Press Tool Ref NOTE Refer to the Operati...

Page 173: ...e can have a gear box By means of RANGES we can choose the best gear ratio for the programmed spindle speed RANGE 1 RANGE 2 Constant Power Constant Power Power If the work speed is between N1 and N2 R...

Page 174: ...formation Start the spindle clockwise Stop the spindle Start the spindle counter clockwise Increase or decrease the override percentage applied to the spindle turning speed Use the following keys of t...

Page 175: ...ctor switch JOG keys Each key is used for moving the axis in one direction according to the axes of the machine Section 1 1 Handwheel It can have one two or three handwheels The axes move in the turni...

Page 176: ...the handwheels If the machine has 1 handwheel Select an axis with the JOG keys The machine moves the axis as the handwheel is being turned If the machine has 2 or more handwheels The machine moves an...

Page 177: ...is moves at the feedrate of the selected feedrate F override percentage 0 to 120 Enter the feedrate value Feedrate value Modify the percentage of the programmed feedrate 1 0 001 mm 10 0 010 mm 100 0 1...

Page 178: ...movement to a particular position By means of the key an axis may be moved to a particular coordinate Follow these steps Select the axis to be moved at the stantard screen Enter the value of the desti...

Page 179: ...ual tool changer The tool change is carried out like on a conventional machine Change the tool on the machine Press Enter the tool number so the CNC assumes the values of the corresponding tool table...

Page 180: ...calibration Just before calibrating the tools a Home Search must be carried out on all axes Home search on the Z axis Home search on the X and Y axes A flat surface is needed for calibrating the tool...

Page 181: ...C displays the tool calibration screen Height of the part used for tool calibration Data on current tool status Actual position of the axes and cutting conditions Work mode Help graphics NOTE Refer to...

Page 182: ...2 Start the spindle 3 Select the tool to be calibrated The CNC will assign the same tool offset number D tool number 5 Jog the axes until touching the part along the Z axis Press NOTE Refer to the Op...

Page 183: ...values T D R L I K Nominal Life Real Life or Family enter in the calibration mode and press Tool number The CNC shows the data for that tool To change it place the cursor over the value to be modified...

Page 184: ...position Tool change position referred to home Enter the X Y and Z values of the point chosen as the tool change position X value Y value Z value When a tool change is required and if the machine manu...

Page 185: ...r proper calibration Preset the part zero Approach the tool along Y Press Withdraw the tool Part Zero position Start the spindle touch the part surface with several tools and check the values on the s...

Page 186: ...Chapter 4 Automatic Operations...

Page 187: ...ciated with the automatic operations Which are the various work modes Example of an operation and a positioning cycle How to edit the parameters of the operation and what they mean How to simulate an...

Page 188: ...Self teaching Manual Chapter 4 Page 3 MC Model Automatic operations 4 1 Operation keys Layout of the automatic function keys...

Page 189: ...t Rectangular and circular boss Pocket with profile Surface milling Profile milling Operation keys Selection of the cycle level within an operation Used to associate a positioning cycle with Boring Re...

Page 190: ...Work modes There are 2 work modes Edit mode Editing the parameters of the operation or cycle Simulation of an operation or cycle Execution mode Simulation of an operation or cycle Execution of an oper...

Page 191: ...n Help graphics Machining conditions of the cycle Actual axes position Cutting conditions Cycle geometry definition 4 3 1 Edit an operation 4 3 1 1 Rectangular pocket Select the Rectangular pocket ope...

Page 192: ...s The CNC selects the roughing tool Press it again to select the finishing tool Press The CNC selects the roughing S data Press it again to select the finishing S data Press it again to select the max...

Page 193: ...it is a Boring Reaming Threading Drilling or Center Punching operation a positioning cycle may be associated with it After setting the operation choose the type of positioning Each positioning can be...

Page 194: ...hics menu To access the various options press their corresponding keys Function F1 F2 F3 F4 F5 F6 F7 Key To begin simulating press The simulating speed is selected with the FEED selector Other useful...

Page 195: ...cted plane Combined Graphics The screen is divided into four quadrants showing the XY XZ YZ planes and the 3D view Top view It displays a solid XY plane indicating the depth of the part with different...

Page 196: ...as been set press ZOOM It is used for enlarging or reducing the drawing or part of it The new display area is selected by means of a window superimposed on the shown tool path To enlarge or reduce the...

Page 197: ...the simulation speed being applied Tool path colors For changing the tool path colors on 3D XY XZ YZ and Top view graphics Colors for solid graphics For changing the colors of the tool and the part o...

Page 198: ...shows the Cycle Start key and lets execute the operation To start the execution press Once execution has started Interrupts the execution While interrupted if we press Resumes the execution Cancels t...

Page 199: ...essed to get into tool inspection The top of the CNC screen displays the message INSPECTION Jog the tool with the jog keys or the handwheels Once in Tool Inspection it is possible to move the axes JOG...

Page 200: ...iously This option may be executed during tool inspection or while the machine is running Press The CNC shows the table for that tool Use the keys to position the cursor over the I value Key in the I...

Page 201: ...Chapter 5 Summary of work cycles...

Page 202: ...work cycles 5 1 Profile milling operation At this cycle level the profile is defined by points Up to a maximum of 12 points At this cycle level the profile is defined by the profile editor Section 5 1...

Page 203: ...Self teaching Manual Chapter 5 Page 3 MC Model Summary of work cycles 5 2 Surface milling operation NOTE Refer to the Operation Manual Chapter 4 Section 4 4...

Page 204: ...hing Manual Chapter 5 Page 4 MC Model Summary of work cycles 5 3 Pocket cycle with Profile NOTE Refer to the Operation Manual Chapter 4 Section 4 5 The profile is generated with the profile editor Sec...

Page 205: ...f teaching Manual Chapter 5 Page 5 MC Model Summary of work cycles 5 4 Rectangular and Circular Boss milling cycles Rectangular Boss Circular Boss NOTE Refer to the Operation Manual Chapter 4 Section...

Page 206: ...ork cycles 5 5 Rectangular and Circular pocket milling cycles Rectangular pocket At this cycle level the type of pocket corner may be chosen as well as the inclination angle of the pocket NOTE Refer t...

Page 207: ...Self teaching Manual Chapter 5 Page 7 MC Model Summary of work cycles NOTE Refer to the Operation Manual Chapter 4 Section 4 7 Circular pocket...

Page 208: ...Chapter 5 Page 8 MC Model Summary of work cycles 5 6 Positioning At this cycle level auxiliary functions may be defined to be executed before or after the movement NOTE Refer to the Operation Manual C...

Page 209: ...e 9 MC Model Summary of work cycles 5 7 Boring operation NOTE Refer to the Operation Manual Chapter 4 Section 4 9 This operation may be carried out at the indicated position X Y or may be repeated at...

Page 210: ...10 MC Model Summary of work cycles 5 8 Reaming operation NOTE Refer to the Operation Manual Chapter 4 Section 4 10 This operation may be carried out at the indicated position X Y or may be repeated at...

Page 211: ...1 MC Model Summary of work cycles 5 9 Threading operation NOTE Refer to the Operation Manual Chapter 4 Section 4 11 This operation may be carried out at the indicated position X Y or may be repeated a...

Page 212: ...rations NOTE Refer to the Operation Manual Chapter 4 Section 4 12 Drilling At this cycle level one programs the distance the tool withdraws after each penetration drilling peck These operations may be...

Page 213: ...Self teaching Manual Chapter 5 Page 13 MC Model Summary of work cycles NOTE Refer to the Operation Manual Chapter 4 Section 4 12 Center punching...

Page 214: ...l Chapter 5 Page 14 MC Model Summary of work cycles 5 11 Multiple positioning at several points NOTE Refer to the Operation Manual Chapter 4 Section 4 13 1 Only for Boring Reaming Drilling and Center...

Page 215: ...Chapter 5 Page 15 MC Model Summary of work cycles 5 12 Multiple positioning in a straight line NOTE Refer to the Operation Manual Chapter 4 Section 4 13 2 Only for Boring Reaming Drilling and Center...

Page 216: ...anual Chapter 5 Page 16 MC Model Summary of work cycles 5 13 Multiple positioning in an arc NOTE Refer to the Operation Manual Chapter 4 Section 4 13 3 Only for Boring Reaming Drilling and Center punc...

Page 217: ...pter 5 Page 17 MC Model Summary of work cycles 5 14 Multiple positioning in a parallelogram pattern NOTE Refer to the Operation Manual Chapter 4 Section 4 13 4 Only for Boring Reaming Drilling and Cen...

Page 218: ...l Chapter 5 Page 18 MC Model Summary of work cycles 5 15 Multiple positioning in a grid pattern NOTE Refer to the Operation Manual Chapter 4 Section 4 13 5 Only for Boring Reaming Drilling and Center...

Page 219: ...Profile milling cycle and the Pocket with profile cycle With the profile editor it is possible to define straight and circular sections of the profile the editor solves the intersection and tangency...

Page 220: ...Chapter 6 Conversational part programs...

Page 221: ...s chapter describes What a conversational part program is How to edit it How to change it Inserting or deleting operations Simulate execute an operation Simulate execute starting at a particular opera...

Page 222: ...program It is a set of operations ordered secuentially Each operation is defined separately and they are then stored one after the other in a program The name of the part program can be any integer b...

Page 223: ...Conversational part programs 6 2 Edit a part program To edit a part program we first choose the operations needed to execute the part A part may be executed in various ways Drilling Posit in a straig...

Page 224: ...t programs Once the sequence of operations has been chosen the part program is built by editing the operations one by one STANDARD SCREEN Enter number Comment e g 555 SAMPLE PART NOTE The following ke...

Page 225: ...Manual Chapter 6 Page 6 MC Model Conversational part programs Choose the operation and define the parameters Repeat these steps with the other operations In our case the finished part program will be...

Page 226: ...cycle with all its data Modify the operation parameters like in the editing mode The CNC requests an option Choose REPLACE The new operation replaces the previous one The operations making up a part p...

Page 227: ...he Operation Manual Chapter 5 Section 5 6 3 Choose operation New operations can also be inserted into a part program Define the parameters and cutting conditions of the operation to be inserted Press...

Page 228: ...del Conversational part programs The CNC requests confirmation Operations can be deleted from a part program NOTE Refer to the Operation Manual Chapter 5 Section 5 6 1 Select on the right column the o...

Page 229: ...ition of an operation can also be changed NOTE Refer to the Operation Manual Chapter 5 Section 5 6 2 Select the new position Select on the right column the operation to be moved The operation is inser...

Page 230: ...ate execute an operation NOTE Refer to the Operation Manual Chapter 6 Section 6 3 Graphics screen More information about the graphics screen in chapter 4 3 2 of this manual Select on the right column...

Page 231: ...execute a part program NOTE Refer to the Operation Manual Chapter 6 Section 6 2 Graphics screen More information about the graphics screen in chapter 4 3 2 of this manual Select on the left column th...

Page 232: ...ar operation NOTE Refer to the Operation Manual Chapter 6 Section 6 2 1 Graphics screen More information about the graphics screen in chapter 4 3 2 of this manual Select on the right column the operat...

Page 233: ...C Model Conversational part programs 6 7 Copy a part program into another one Select on the left column the part program to be COPIED Key in the number and comment of the new program NOTE Refer to the...

Page 234: ...apter 6 Page 15 MC Model Conversational part programs 6 8 Delete a part program Select on the left column the part program to be deleted NOTE Refer to the Operation Manual Chapter 5 Section 5 4 The CN...

Page 235: ...Appendix I Programming example...

Page 236: ...part program Remember that the tool number may be different depending on the machine The tool used in this example are T1 40 endmill T5 drill T2 25 endmill T6 5 drill T3 10 endmill T7 M 6 tap T4 Cent...

Page 237: ...Self teaching Manual Appendix I Page 3 MC Model Programming example Step 1 Surface milling 1...

Page 238: ...Self teaching Manual Appendix I Page 4 MC Model Programming example Step 2 Machining the profile 2 Other data...

Page 239: ...Self teaching Manual Appendix I Page 5 MC Model Programming example Step 3 Rectangular boss 3...

Page 240: ...Self teaching Manual Appendix I Page 6 MC Model Programming example Step 4 Circular pocket 4...

Page 241: ...Self teaching Manual Appendix I Page 7 MC Model Programming example Step 5 Rectangular pocket 5...

Page 242: ...Self teaching Manual Appendix I Page 8 MC Model Programming example Step 6 Center punching Multiple positioning at several points 6...

Page 243: ...Self teaching Manual Appendix I Page 9 MC Model Programming example Step 7 Center punching Multiple positioning in parallelogram pattern 7...

Page 244: ...Self teaching Manual Appendix I Page 10 MC Model Programming example Step 8 Drilling multiple positioning at several points 8...

Page 245: ...Self teaching Manual Appendix I Page 11 MC Model Programming example Step 9 Drilling multiple positioning in parallelogram pattern 9...

Page 246: ...Self teaching Manual Appendix I Page 12 MC Model Programming example Step 10 Tapping multiple positioning in parallelogram pattern 10...

Page 247: ...Self teaching Manual Appendix I Page 13 MC Model Programming example Step 11 Part program Once the operations have been entered the part program will be like this...

Reviews: