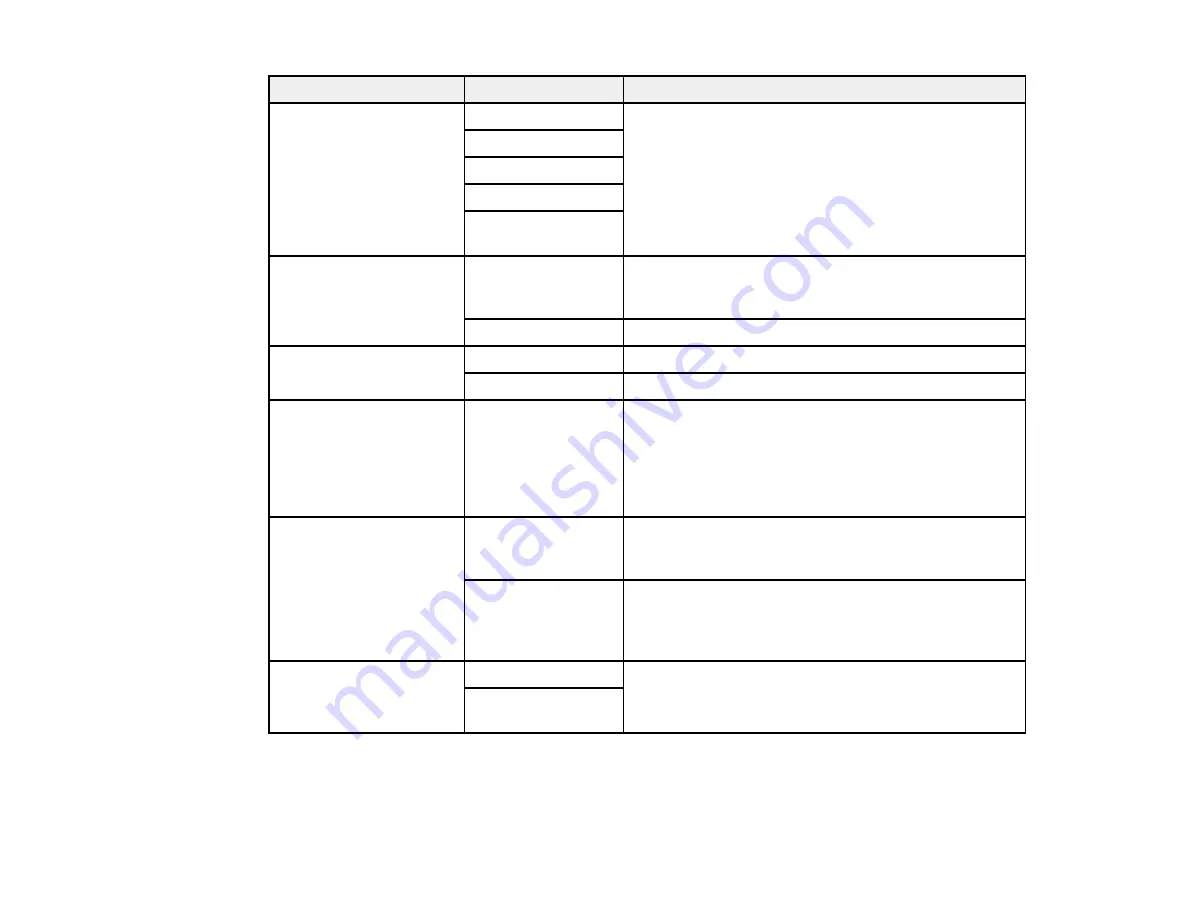
Setting
Options
Description
DRD
All
If you are using a Distinctive Ring Service on your
phone line, your telephone company can assign two
Single
or more phone numbers to the same line and assign
Double
different ring patterns to each. If you use this service,
select the number of rings for your fax number as the
Triple
DRD
setting so your product can receive faxes on the
Double & Triple
correct number of rings.
All
is the default setting and
works for phone lines that do not use this service.
ECM
On
Turns on Error Correction Mode (ECM) to
automatically request retransmission of faxes
received with detected errors (default setting).
Off
Turns off Error Correction Mode (ECM).
V.34
On
Transmits faxes at 33.6 Kbps (default setting)
Off
Transmits faxes at 14.4 Kbps
Rings to Answer
1
to
9
Sets the number of rings before your product receives
a fax. The default setting is
4
. If Auto Answer is turned
on and an answering machine is connected to the
product, make sure this setting is set higher than the
number of rings your answering machine is set to
answer a call.
Dial Tone Detection
On
Automatically dials the phone number you enter to
send a fax when the product detects a dial tone on the
line.
Off
Turns off automatic dial tone detection. This is
necessary if you connected your product to a phone
line on a Private Branch Exchange (PBX) or Terminal
Adapter (TA) system.
Header
Fax Header
Lets you set up the header information for outgoing
faxes.
Your Phone
Number
Parent topic:
Setting Up Fax Features Using the Product Control Panel
Fax Report Options
Select the fax report or list you want to print.
162
Summary of Contents for WorkForce Pro WP-4520
Page 1: ...WorkForce Pro WP 4520 WP 4533 User s Guide ...
Page 2: ......
Page 12: ......
Page 28: ...4 Load a stack of paper printable side down in the cassette as shown 28 ...
Page 50: ...Parent topic Placing Originals on the Product 50 ...
Page 123: ...123 ...
Page 176: ...5 Select Fax Settings for Printer You see this window 176 ...
Page 201: ...3 Open the front cover 4 Push the ink cartridge in then pull it out of the slot 201 ...
Page 214: ...You see one of these windows 214 ...
Page 219: ...You see one of these windows 219 ...
Page 246: ...6 Lower the document cover 7 Raise the ADF input tray 8 Carefully remove the jammed pages 246 ...


