


3. When the Operation Menu appears, highlight
Setup
and press
Enter.
Then see “Setting the Power-on Password”
in Chapter 2 and follow the instructions as if you are going
to enter a new password. However, when you see the
password prompt, press
Enter
immediately. This clears out
the existing password.
Make sure you save your password setting and that you
highlight
* * EXIT AND SAVE * *
when you leave
the Setup program.
4. Turn off the computer and follow the instructions under
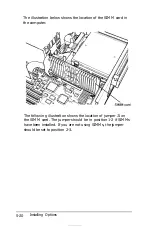
“Changing Jumper Settings” in Chapter 5 to disable the
password skip function by setting jumper J2 to position 2-3.
5. Turn on the computer again. You do not see the key prompt
) and the computer loads MS-DOS.
Later, if you want to create a power-on password, run Setup and
enter a password. The jumper is already in the correct position.
Disabling the password function
If you do not want to use a power-on password anymore, you
can disable the password function. However, if you want to use
the password function later, your old password is still stored as
the current password. If you want to be able to easily set a
password later, follow the instructions in “Disabling an Existing
Password” above.
To disable the password function, follow the instructions under
“Changing Jumper Settings” in Chapter 5 to change the setting
of jumper J2 on the main system board to position 1-2.
A-6
Troubleshooting
Summary of Contents for Equity 386SX PLUS
Page 1: ...m u cl3 0 z E 5 J I 1 al y 8 c 7 5 w ii u l X ...
Page 4: ...EPSON E Q U I T Y 3 8 6 S X User s Guide Y19299100100 ...
Page 20: ...6 Introduction ...
Page 38: ...1 18 Setting Up Your System ...
Page 69: ......
Page 70: ...2 32 Running the Setup Program ...
Page 96: ... 7 R _ ri h 14 3 26 Using the Equity 386SX ...
Page 168: ...5 26 dling Options ...
Page 192: ...B 4 Power on Diagnostics ...
Page 232: ...C 40 Performing System Diagnostics ...
Page 246: ... D 14 Physically Formatting a Hard Disk ...
Page 250: ...E 4 Hard Disk Drive Types ...
Page 282: ...8 I n d e x ...
Page 284: ......