background image

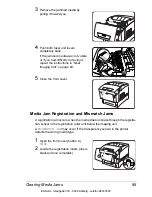
Clearing Media Jams 

89

2

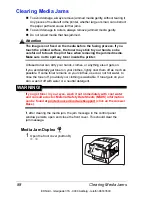
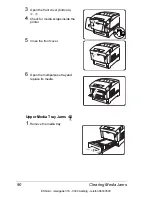
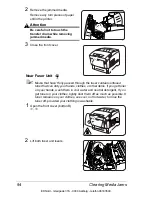
Remove the jammed media.

3

Close the front cover.

Media Jam Feed 

Multipurpose Tray Jams

1

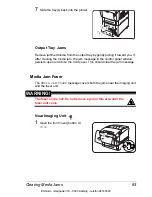
Remove the jammed media from the 
multipurpose tray.

2

Close the multipurpose tray.

EDNord - Istedgade 37A - 9000 Aalborg - telefon 96333500

Summary of Contents for Magicolor 3300

Page 1: ...magicolor 3300 User s Guide 1800738 001A EDNord Istedgade 37A 9000 Aalborg telefon 96333500 ...

Page 2: ...erred to any other media or language without written permission of KONICA MINOLTA BUSINESS TECHNOLOGIES INC Manual Notice KONICA MINOLTA BUSINESS TECHNOLOGIES INC reserves the right to make changes to this manual and to the equipment described herein without notice Considerable effort has been made to ensure that this manual is free of inaccuracies and omissions However KONICA MINOLTA BUSINESS TEC...

Page 3: ...ies Windows Environments 5 Installing Printer Drivers and Utilities Macintosh Environments 5 Some Notes to Consider 5 Macintosh PPDs 6 Macintosh OS 9 PPDs and Utilities Installation 6 OS 9 Step 1 Software Installation 6 OS 9 Step 2 Creating a Desktop Printer 6 USB Connection 6 EtherTalk Connection 7 LPR Connection 7 OS 9 Step 3 System Software 8 EDNord Istedgade 37A 9000 Aalborg telefon 96333500 ...

Page 4: ... Special Note about Custom and Oversized Media 25 Thick Stock 25 Envelopes 26 Glossy Media 27 Glossy Stock 27 Glossy Toner 27 Label Stock 27 Postcards Japanese size 28 Transparencies Uncoated Only 29 Loading Media 31 Preparing the Media 31 Loading and Printing Media 31 Refilling an Upper or Optional Media Tray 31 Refilling a Multipurpose Media Tray 35 Using Media Other Than Plain Paper 36 System M...

Page 5: ...he Printer Introduction 72 Handling the Printer 72 Cleaning the Printer 73 6 Troubleshooting Introduction 80 Printing a Status Page 81 Direct PDF File Printing 82 Adjusting Memory Clients for PDF Printing 82 Printing Preformatted Files Using CrownView 82 Troubleshooting PDF Direct Printing from CrownView 82 Preventing Media Jams 84 Automatic Jam Recovery 85 Understanding the Media Path 86 Understa...

Page 6: ...tection 129 BuzzBox Americas Only 130 What s in the Kit 130 Installing BuzzBox 130 Using the BuzzBox 131 Dual In Line Memory Modules DIMMs 131 Basic Functionality 133 Maximum Performance 133 Installation 133 Duplex Kit Americas Only 136 Emulations Fonts and Other Software 136 Emulations 136 Downloading an Emulation via PageScope Net Care 136 CrownView 137 Downloading an Emulation via a Parallel In...

Page 7: ... View 152 Side View 152 Power Requirements 154 ENERGY STAR Compliance 155 Engine and Controller Specifications 156 Print Speed 156 Engine 157 Controller 158 Electrical 159 Voltage and Power 159 Current 160 Environmental 160 Physical 161 Consumable Life Expectancies 162 Starter Toner Cartridges 162 Replacement Toner Cartridges 162 Transfer Unit 164 Imaging Unit 164 Fuser Unit and Media Feed Roller ...

Page 8: ...72 Administration Communications Resident NIC CrownNet Menu 173 EtherTalk Menu 174 LAN Manager Menu 175 NetWare Menu 176 TCP IP Menu 177 Regulatory Compliance 178 FCC Compliance Statement 178 Canadian Users Notice 179 CE Marking Declation of Conformity 179 Laser Safety 179 International Notices 180 Power Cord 180 Voltage 180 Lithium Batteries 180 Warranty Considerations 181 Index 183 EDNord Istedg...

Page 9: ...Software Installation EDNord Istedgade 37A 9000 Aalborg telefon 96333500 ...

Page 10: ...ous version of system software an error page prints stating Low Release Level This prevents an older version of system software from being downloaded over a newer version The system software update aborts without operator intervention if the system software on the CD ROM is the same as or older than the one currently installed on the printer controller If you are installing new system software you...

Page 11: ...ter Description PPD files allow you to configure options such as memory and informs the computer what options and features are available Readme on the Software Utilities CD ROM Windows PPDs These PPD files allow you to install the printer for a variety of platforms drivers and applications Readme on the Software Utilities CD ROM Linux PPDs These PPDs can be used with third party Linux print filter...

Page 12: ...Readme on the Software Utilities CD ROM PageScope Net Care This utility designed with administrators in mind is a powerful tool allowing centralized management of network printers It is available for Windows and UNIX platforms Refer to the PageScope Net Care Manual in PDF format on the Documentation CD ROM Readme on the Software Utilities CD ROM UNIX Host Software UNIX Host Software compatible wit...

Page 13: ...er firmware also called printer system software Be sure the check the Update Printer Firmware box It s very important to update the printer firmware the first time you install the printer 7 On the last screen choose Finish This returns you to the AutoInstaller s Main Menu screen where you can register your printer review driver or utility documentation or purchase supplies online When you are fini...

Page 14: ...tion a Insert the Software Utilities CD ROM in your Macintosh s CD ROM drive If the CD ROM does not start automatically double click the CD ROM icon on your Macintosh desktop b Double click the Install icon c Follow the instructions on the screen to install the magicolor 3300 PPD and utilities d After the PPD and utilities installation is complete choose Quit e When the system software installatio...

Page 15: ...e second into the printer s Ethernet port b Open the Chooser and select LaserWriter c When your printer boots up it finds a default zone If your network has more than one zone and you want to use a different zone use the Interface Ethernet Ethertalk Name and Zone menus on the printer control panel to specify the new zone The Name and Zone menus allow you to identify 1 zone with a name up to 32 cha...

Page 16: ... ROM does not start automatically double click the CD ROM icon on your Macintosh desktop b Double click the Resources icon c Double click the System_Code folder and then locate the system software file system ps where system is the filename d Drag the system ps icon and drop it on the magicolor 3300 printer icon on your desktop to perform the system software upgrade If your printer s system softwa...

Page 17: ...he PPD and utilities installation is complete choose Quit OS X Step 2 Creating a Printer Queue a Connect the printer to the computer using a USB or Ethernet connection For USB plug one end of the USB cable into the PC and the other into the matching printer port For Ethernet you can connect in either of two ways Plug one end of a crossover Ethernet cable into the Macintosh and the other into the p...

Page 18: ...oj folder g Select the magicolor 3300 PPD Click Choose and then click Add The Printer List opens again h Double click on the printer you just created to open the Print Queue window OS X Step 3 System Software a If it s not already there insert the Software Utilities CD ROM in your Macintosh s CD ROM drive b Double click the CD ROM icon to display its contents Unlike Macintosh OS 9 it is not necess...

Page 19: ...e installation check the Answer Base at printer konicaminolta net support Linux For Linux PPD and PDQ installation refer to the readme files on the Software Utilities CD ROM This readme includes basic information about PDQ XPDQ CUPS and XPP connections and instructions for installing them EDNord Istedgade 37A 9000 Aalborg telefon 96333500 ...

Page 20: ...EDNord Istedgade 37A 9000 Aalborg telefon 96333500 ...

Page 21: ...Using Media EDNord Istedgade 37A 9000 Aalborg telefon 96333500 ...

Page 22: ...e 20 What is the difference between a nonprintable and nonguaranteed area page 20 Print Quality Why have different print qualities page 22 Which print quality is the best page 22 How do I select the print quality page 24 Media Types What are the media types supported page 23 What is the difference between glossy plain paper and coated stock page 24 How do I select the media type page 24 Other Info...

Page 23: ...edia against other objects or placed in an upright position Before purchasing a large quantity or special media do a trial printing with the same media and check print quality What should I watch out for when handling media Attention Do not use the media types listed below These could cause poor print quality media jams or damage to the printer Do not use media that is Coated with a processed surf...

Page 24: ...hed with glue tape paper clips staples ribbons hooks or buttons Acidic Any other media that is not approved Use media that is Suitable for plain paper laser printers such as standard or recycled office paper What should I watch out for when loading envelopes Do not use envelopes that have Sticky flaps Tape seals metal clasps paper clips fasteners or peel off strips for sealing Transparent windows ...

Page 25: ...hat are Coated Warped Designed for inkjet printers Multicolored Preprinted or multicolored may result in printer jamming Use postcards that are Japanese Post Office standard postcards 3 9x5 8 100x148 mm rec ommended for laser printers What should I watch out for when loading transparencies Attention Use only the KONICA MINOLTA approved transparencies Check printer konicaminolta net support click o...

Page 26: ...ckage label indicates the printing side of the media If you can t determine which side of the media to print on remove the media from the tray rotate the stack 180 turn the stack over and then place it back in the tray Attention Do not allow media to go above the fill limit mark inside the tray or the media may not be fed correctly Media Trays Tray Location Media Tray Sheet Capacity for Letter A4 ...

Page 27: ...o Env Monarch 3 88x7 50 98 0x191 0 Envelope M No Executive 7 25x10 51 184 0x267 0 U M H Yes Folio 8 50x13 00 216 0x330 0 U M H Yes Japanese Postcard 3 94x5 83 100 0x148 0 Postcard M No Kai 16 7 28x10 24 185 0x260 0 M Yes Kai 32 5 12x7 28 130 0x185 0 M Yes Legal 8 5x14 0 216 0x356 0 U M H Yes Letter 8 5x11 0 216 0x279 0 U M H Yes Letter Transp 8 5x11 0 216 0x279 0 Transparency U M H No Statement 5 ...

Page 28: ...n top of the printer What is the difference between a nonprintable and a nonguaranteed area There is a 0 157 4 mm nonprintable border for all edges on all media sizes and types Only envelopes have a nonguaranteed area Print orientation is determined by your application Page Margins Margins are set through your application Some applications allow you to set custom page sizes and margins while other...

Page 29: ...ing your data on a plain sheet of paper first to check placement All media is fed on the short edge Test any stock thicker than 28 lb bond 105 g m to ensure that its performance is acceptable You should test the number of sheets of thick stock a media tray can hold to ensure that its performance is acceptable Select Single User Mode or Network Mode job modes to specify how media type requests are ...

Page 30: ...ting a glossy shinier image on plain paper is less expensive and you don t have to load two media types in your trays Test any stock to ensure that its performance is acceptable Print Quality Resolution Dots per Inch dpi Speed Comment Standard 600x600 Full If getting your jobs printed in a timely manner is most important Quality 1200x1200 Full If getting your jobs printed with more gloss and bette...

Page 31: ...tcard N A Transparency N A N A Not applicable Printed from the multipurpose tray only Cannot be manually selected automatically selected when an envelope or postcard media size is selected identified in the driver as Printer Default Duplexing is supported only up to 28 lb 105 g m bond Duplexing is available only on a magicolor 3300 DN or on a magicolor 3300 EN with an optional duplex kit installed...

Page 32: ...ed media Attention Using unsupported media will result in damaging the printer and voiding your warranty How do I select the media type In the Windows printer driver Paper tab Media Type option select Plain Paper Plain Paper Media Type Plain paper Glossy plain Input Tray Upper Multipurpose High capacity input feeder optional trays Capacity Upper 500 sheets of 20 lb bond 75 g m paper capacity for o...

Page 33: ...the printer and voiding your warranty Notes For A5 size media load up to 350 sheets only Printing a glossy shinier image on plain paper Glossy Plain media type is less expensive Input Tray Multipurpose tray only Capacity Up to 50 sheets depending on the thickness of the media Orientation Face down Weight Varies Print Mode to Select Plain Paper Duplexing Not supported Notes Width 3 5 88 9 mm up to ...

Page 34: ...ck such as rigid cardboard maximum 216 g m2 to ensure that the image does not shift Do not mix thick stock with any other media in the media trays as this will cause printer jamming Do not duplex envelopes and postcards Media Type Envelope Cannot be manually selected automatically selected when an envelope media size is selected identified in the driver as Printer Default Input Tray Multipurpose t...

Page 35: ...ucts Check printer konicaminolta net support click on Answer Base for currently approved media Duplexing Not supported over 28 lb 105 g m Notes See What is the difference between glossy plain paper and coated stock on page 24 Media Type Label stock Input Tray Multipurpose tray only Capacity Up to 50 sheets depending on the thickness of the labels Orientation Face down Approved Media Use only media...

Page 36: ...can print continuously with label paper However this could affect the media feed depending on the media quality and printing environment If problems occur stop the continuous print and print one sheet at a time Check your application documentation for other information on printing labels Media Type Postcard Cannot be manually selected automatically selected when a postcard media size is selected i...

Page 37: ...ated transparencies also known as OHP film We recommend Q Media Transparency Media for the magicolor 3300 series letter and A4 sizes only Only media recommended for laser products Check printer konicaminolta net support click on Answer Base for currently approved media Often you can t tell by looking at an unprinted transparency or by looking at the outside of the package which transparencies are ...

Page 38: ...parencies with your bare hands print quality may be affected You can print continuously with transparencies However this could affect the media feed depending on the media quality static buildup and printing environment If you have problems loading a large number of transparencies at a time try loading only 1 10 sheets For the 500 sheet media trays try loading about 100 pages of plain paper first ...

Page 39: ...he stack to prevent static buildup in the paper before inserting it in a tray Loading and Printing Media Refilling an Upper or Optional Media Tray The illustrations show a standard upper media tray however instructions are the same for a high capacity input feeder media tray Attention Except for transparencies do not mix media of different sizes types or weights in the same tray as this will cause...

Page 40: ...edia remaining in the tray 4 If necessary adjust the two side media guides and the end media guide to the proper positions Attention The end media guide must be in direct alignment with the media size mark in the bottom of the media tray If the guide is not in the proper hole automatic paper size detection will not work EDNord Istedgade 37A 9000 Aalborg telefon 96333500 ...

Page 41: ...remove the A5 spacer from the slot and then replace it in the tray 6 Load the media plain or glossy face up with its top toward the back of the printer Often an arrow on the media package label indicates the printing side of the media If you can t remember which side of the media to print on remove the media from the tray rotate the stack 180 turn the stack over and then place it back in the tray ...

Page 42: ...des may cause poor print quality media jams or printer damage The paper should fit easily between the guides Make sure the paper corners are not bent Do not overfill the tray 8 Slide the media tray back into the printer Check the gauge to make sure the tray is registering the loaded media Use this gauge to determine when the tray needs to be refilled EDNord Istedgade 37A 9000 Aalborg telefon 96333...

Page 43: ...nsparency media 2 Open the multipurpose tray Do not place heavy objects on the multipurpose tray 3 Adjust the media guides to the width of the media The tray extender supports long media Attention Make sure the media fits easily between the guides Improperly adjusted guides may cause poor print quality media jams or printer damage Make sure the guides are snug enough to keep the media straight but...

Page 44: ...y affect print quality or reduce engine life How do I load and print envelopes Envelope printing is supported only from the multipurpose tray 1 In the printer driver Paper tab Media Type option select Envelope 2 Select the size of envelope either a Press the MP Size key and scroll to the required envelope size and select it or b On the control panel press the Menu key and select Operator Control M...

Page 45: ...velopes on the front address side only Some parts of the envelope consist of three layers of paper the front back and flap Anything printed in these layered regions may be lost or faded Check your application documentation to determine if the flap should be placed on the left or on the right You can also print a single envelope to check the orientation before printing multiple copies 10 Recheck th...

Page 46: ... to the required label size and select it or b On the control panel press the Menu key and select Operator Control Multipurpose Sz Scroll to the required label size and select it 4 Load the label media face down in the multipurpose tray 5 Adjust the media guides to the width of the label media 6 Print the labels How do I load and print postcards Postcard printing is only supported from the multipu...

Page 47: ...elect Thick 2 105 162 g m2 2 Remove any media in the media tray 3 Load the new media 4 Slide the media tray back into the printer 5 Print the thick stock How do I load and print transparencies Attention Use only transparency media approved for this printer Check printer konicaminolta net support click on Answer Base for currently approved media 1 In the printer driver Paper tab Media Type option s...

Page 48: ...ional Trays Put media face side down in the upper or optional trays Multipurpose Tray Open the multipurpose tray adjust the media guides to the width of the transparencies and then place the transpar encies into the tray with the printing side up Attention Improperly adjusted guides may cause poor print quality media jams or printer damage 4 Print the transparencies Immediately remove the printed ...

Page 49: ... opacity is acceptable Only up to 28 lb bond 105 g m plain paper can be autoduplexed Monochrome Color Simplex Duplex Simplex Duplex Size S Q F S Q F S Q F S Q F Letter A4 256 MB Base memory Legal Notes S Standard print quality 600x600 dpi full speed Q Quality print quality 1200x1200 dpi full speed F Fine print quality 1200x1200 dpi half speed Monochrome Color Simplex Duplex Simplex Duplex Size S Q...

Page 50: ... enough memory is not installed With letter media two sheets are in the media path with legal only one is Therefore it requires more memory to print the two sheets of letter media Attention Duplexing envelopes glossy stock heavier than 28 lb bond 105 g m2 labels postcards thick stock heavier than 28 lb bond 105 g m2 transfer media and transparencies is not supported 1 To print duplex both sides of...

Page 51: ... KONICA MINOLTA approved media Check printer konicaminolta net support click on Answer Base for currently approved media See the Service Support Guide for a complete listing of support telephone numbers EDNord Istedgade 37A 9000 Aalborg telefon 96333500 ...

Page 52: ...EDNord Istedgade 37A 9000 Aalborg telefon 96333500 ...

Page 53: ...Color Printing EDNord Istedgade 37A 9000 Aalborg telefon 96333500 ...

Page 54: ...stration in the top to bottom feed direction The following illustration shows the options available in the Administration Engine Registration menu To verify and or change the side to side color registration use the following control panel sequence ADMINISTRATION ENGINE REGISTRATION REGISTRATION PG MAGENTA YELLOW CYAN YES NO 7 0 7 7 0 7 7 0 7 Press this key until the message windows displays Online...

Page 55: ...nter to online and IDLE If the straightest lines are in a position other than 0 4 in this example continue with these instructions Next Press the Next key until the color you want to adjust is in the message window For example REGISTRATION MAGENTA Select Press Select to see the current registration setting for this color For example MAGENTA 4 Next or Previous Press the Next or Previous key until t...

Page 56: ...o adjust the registration Press Online twice to return the printer to online and IDLE If the straightest lines are in a position other than 0 2 in this example continue with these instructions Next Press Next to go back to the color to be adjusted For example REGISTRATION MAGENTA Select MAGENTA 0 Next or Previous Press the Next or Previous key until the registra tion number of the straightest line...

Page 57: ...INOLTA Color Technology Color management does not mean all devices will match exactly It does ensure the closest possible color transformation The magicolor 3300 technology offers four methods for color matching across devices Automatic color correction Supplied ICC printer profiles Built in color rendering dictionaries CRDs Supplied PANTONE Color matching tables Next or Previous REGISTRATION REGI...

Page 58: ...nter it works well in all computing environments and with most design publishing and office applications Industry standard profiles The magicolor 3300 uses industry standard ICC profiles for compatibility with popular input and output devices Supports host based color management systems Easily disable automatic color correction when using host based ColorSync or ICM color matching Profiles for com...

Page 59: ...Replacing Consumables EDNord Istedgade 37A 9000 Aalborg telefon 96333500 ...

Page 60: ...e may differ from the sheets printed and faces printed statistics in CrownView and on the consum ables statistics page Operator Control Consumables Print Statistics The numbers on the startup page refer to number of sheets faces printed during the lifetime of the printer Item Page What is a consumable page 52 What are sheets faces and pages page 52 When do consumables have to be replaced page 53 W...

Page 61: ...nter for that particular failure or damage Item This item needs replacing after Comment Toner cartridge COLOR TONER EMPTY displays in the message window See How do I replace a toner cartridge on page 58 After you replace a toner cartridge its statistics are automatically reset Transfer unit REPLACE TRANSFER UNIT displays in the message window See Replacing the Transfer Unit on page 60 After replac...

Page 62: ...inted for example text or graphics Starter Toner Cartridges The printer ships with a full set of starter toner cartridges At 5 coverage you can expect to print approximately 4 000 letter A4 simplex pages faces with the starter black toner cartridge and approximately 3 000 letter A4 sim plex pages faces with the starter yellow magenta and cyan toner car tridges However many factors also affect tone...

Page 63: ...er every fourth page of an average size job Intermittent printing with small job sizes requires a cleaning rotation after each one page simplex job and therefore impacts OPC life A toner cartridge contains enough toner to print letter A4 size pages at the percent coverage stated However other factors also affect toner life Transfer Unit with built in waste toner box Approximately 25 000 simplex pa...

Page 64: ...page and replacement menus refer to the Crown Books in PDF on the Software Utili Number of Pages per Job Maximum Simplex Pages or Percent Toner Coverage Four Page Average Maximum Simplex Pages 3 26 000 25 30 20 000 4 Average Size 30 000 20 25 23 000 5 and Above 30 000 Less Than 20 average 30 000 Notes The imaging unit life is dependent on the average number of pages or the toner coverage whichever...

Page 65: ... install them In a cool dry location away from sunlight due to heat The maximum storage temperature is 95 F 35 C and the maximum stor age humidity is 80 without condensation If the toner cartridge is moved from a cold place to a warm humid place condensation may occur degrading print quality Allow the toner to adapt to the environment for about one hour before use Level during storage Do not store...

Page 66: ...ash it out immediately and consult a doctor Material Safety Data Sheets MSDS information can be found at printer konicaminolta net support click on Answer Base 1 Check the message display to see which color toner is out 2 Remove the top cover 3 Gently rotate the toner levers to the unlocked backward position 4 Remove the empty toner cartridge Place the used cartridge in a plastic bag to avoid tone...

Page 67: ...r 6 Holding the cartridge with both hands gently shake it seven or eight times to distribute the toner The toner cartridge should be shaken only at this point before installation and removal of the toner seal in step 9 7 Align the toner cartridge with the cartridge guides Gently push the car tridge into the printer The cartridge should install easily 8 Gently rotate the the toner levers to the loc...

Page 68: ...earest you 10 Replace the top cover You do not need to reset the consumables usage monitor ing system when you replace a toner cartridge Replacing the Transfer Unit How do I replace the transfer unit 1 Turn off the printer Attention Do not touch black transfer rollers They are extremely sensitive to hand oils and scratches both of which reduce print quality This type of damage is not covered by th...

Page 69: ...printer 4 Lock the transfer cartridge into the printer by pushing down on the base of the tabs until you hear a click 5 If you opened the imaging unit cover close it 6 Close the front cover 7 Turn on the printer 8 In the Operator Control Consumables Item Replaced Transfer Unit menu choose Yes to reset the consumables usage monitoring system You must manually reset the consumables usage monitoring ...

Page 70: ... How do I replace the imaging unit WARNING The fuser unit is hot and can cause severe burns When the printer s front cover is opened the fuser unit temperature drops gradually Wait one hour after opening the front cover The imaging unit contains 4 OPCs Optical Photo Conductors 4 developers and an imaging unit transjnfer roller that forms the image that is developed and transferred to the media Whe...

Page 71: ...it cover 4 Remove the used imaging unit WARNING Recycle the used imaging unit by following the instruction sheet included in the new imaging unit carton Do not dispose of used imaging units by burning 5 Remove the new imaging unit from its protective bag A EDNord Istedgade 37A 9000 Aalborg telefon 96333500 ...

Page 72: ...see the circle imprinted on the end the imaging unit must be replaced 7 Carefully remove the protective cover We strongly suggest that you save the packaging materials in case you ever need to move or ship the printer 8 Gently guide the imaging unit straight into the printer following the arrows on the printer to seat the pins Attention You can damage the unit if it is not aligned correctly 26 660...

Page 73: ...he covers 11 Turn on the printer You do not need to reset the con sumables usage monitoring sys tem when you replace an imaging unit After approximately 6 minutes warmup assuming normal temperature and humidity your printer prints a startup page and displays IDLE on the message window This 6 minute warmup happens only when a new imaging unit has been installed Normal warmup time when the printer i...

Page 74: ...opening the front cover How do I replace the fuser unit 1 Turn the printer off 2 Open the front cover button B 3 Pull up the lever to relieve pressure on the fuser unit 4 Open the imaging unit cover The fuser fuses the toner onto the media Replace the fuser unit fuser and media feed rollers when the control panel displays the message REPLACE FUSER UNIT B 1 2 1 2 EDNord Istedgade 37A 9000 Aalborg t...

Page 75: ...printer Dispose of the used fuser according to your local regulations 8 Unpack a new fuser unit lift up both levers grip the fuser unit by the levers align it with the slots in the printer and slowly lower it 9 Completely push down both levers of the fuser unit 10 Lock the fuser unit by sliding the two side locks backwards 1 1 2 2 1 1 EDNord Istedgade 37A 9000 Aalborg telefon 96333500 ...

Page 76: ...bs of the media feed roller cover to open the cover The media feed rollers feed media from the media tray s into the printer When the media feed rollers deteriorate media may not feed correctly from the media tray resulting in media jams Replace the media feed roller in each 500 sheet media tray each time you replace the fuser unit Three media feed rollers are included with the fuser unit If you d...

Page 77: ... both hands align it with the opening in the printer and gently insert it 7 Push the media tray completely back into the printer 8 If you have a high capacity input feeder HCIF repeat steps 1 8 for each media tray 9 Turn the printer on 10 For both the fuser and the media feed rollers in the Operator Control Consumables Item Replaced Fuser menu choose Yes to reset the consumables usage monitoring s...

Page 78: ...EDNord Istedgade 37A 9000 Aalborg telefon 96333500 ...

Page 79: ...Maintaining the Printer EDNord Istedgade 37A 9000 Aalborg telefon 96333500 ...

Page 80: ...es Doing so may damage the printer and cause the print quality to deteriorate Keep media in the output tray at minimum level If the media stacks too high the printer may experience media jams excessive media curl or built up static Remove transparency media as soon as it s printed Handle toner carefully Do not use partially full toner cartridges if they have been removed from the printer and store...

Page 81: ...box until you re ready to install it Any exposure to light should be limited to less than two minutes or permanent damage could result Handle the unit carefully so you don t touch the black surface of the transfer roller Do not cover the printer immediately after using it Turn it off and wait until it cools down When the front cover is opened the fuser temperature drops gradually one hour wait tim...

Page 82: ...nsors 5 120 20 479 32 20 480 25 599 20 25 600 30 720 16 Note The cleaning cycle interval is more frequent as the imaging unit ages This item needs cleaning After By Printer exterior Every month or as necessary User Density sensor ADC SENSOR DUSTINESS WARNING appears in the mes sage window Image Unit Print Count Printer Pauses Every x Simplex Pages EDNord Istedgade 37A 9000 Aalborg telefon 96333500...

Page 83: ... not spill water or detergent into the printer the printer will be damaged and an electric shock may occur Use Avoid Exterior A soft dry cloth to clean the control panel Sharp or rough implements such as wire or plastic cleaning pads any liquid A soft damp cloth to clean the out side of the printer Sharp or rough implements such as wire or plastic cleaning pads Mild neutral detergent to clean the ...

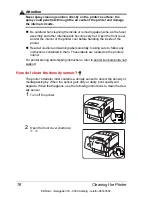
Page 84: ...d all caution and warning labels carefully making sure to follow any instructions contained in them These labels are located on the printer s interior For printer storing and shipping instructions refer to printer konicaminolta net support How do I clean the density sensor The printer s transfer roller contains a density sensor to detect the density of media passing by When the sensor gets dirty o...

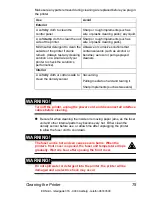
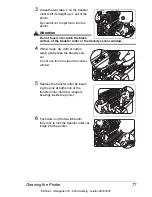
Page 85: ...the density sensor window 4 With a clean dry cloth or cotton swab gently wipe the density sen sor Do not use force to clean the sensor window 5 Replace the transfer roller by insert ing the pins at both ends of the transfer roller into the U shaped bearings inside the printer 6 Push down on the two tabs until they click to lock the transfer roller car tridge into the printer 2 2 1 1 EDNord Istedga...

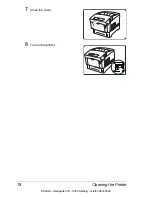
Page 86: ...Cleaning the Printer 78 7 Close the cover 8 Turn on the printer EDNord Istedgade 37A 9000 Aalborg telefon 96333500 ...

Page 87: ...Troubleshooting EDNord Istedgade 37A 9000 Aalborg telefon 96333500 ...

Page 88: ... actions you should take when a specific problem occurs and provides information to aid you in resolving printer problems you may encounter or at least guide you to the proper sources for help You ll also find a problem checklist and the information you ll need to have before placing a service call if one becomes necessary EDNord Istedgade 37A 9000 Aalborg telefon 96333500 ...

Page 89: ...ings fonts and emulations available The document may have many pages depending on the fonts installed Print an advanced status page in case you need to restore any current settings Select the type of status page you want to print through the Administration Special Pages Status Page Type menu Then print it in one of the following ways On the printer s control panel press the Print Status button Use...

Page 90: ...omes your required Host Input memory size In the event that you experience problems you may want to increase the Host Input memory size further The maximum size of PDF files which may be printed on the magicolor 3300 is determined by the amount of installed memory Direct printing of complex or large PDF files may require additional memory RAM and or a hard disk We recommend a hard disk for optimum...

Page 91: ... factory default setting for this timeout is 120 seconds Doubling the value to 60 seconds in the Administration Communications Timeouts PS Wait Timeout menu should correct most problems or the value can be set to 0 seconds which effectively makes the timeout period infinite EDNord Istedgade 37A 9000 Aalborg telefon 96333500 ...

Page 92: ...ose tray but printing side up in the other trays Often an arrow on the media package label indicates the printing side of the media If you can t determine which side of the media to print on remove the media from the tray rotate the stack a half turn turn the stack over and then place it back in the tray Avoid Media that is folded wrinkled or excessively curled Double feeding remove the media and ...

Page 93: ...jammed media printing automatically resumes from the page the printer stopped at when the jam occurred For automatic jam recovery to work it is necessary to leave the printer turned on when you remove the jammed media After the jam is cleared open and close the front door before printing Printing will not resume until you do this EDNord Istedgade 37A 9000 Aalborg telefon 96333500 ...

Page 94: ...r units passed through the fuser and delivered via the paper exit unit to the media exit tray which is the top of the printer Fuser unit Toner cartridges Duplexer Imaging unit Controller Multipurpose tray Output tray Upper media tray Duplexer available on the magicolor 3300 DN or the magicolor 3300 EN with an optional duplex kit installed High capacity input feeder 2x500 HCIF shown in illustration...

Page 95: ...am Access Page Reference MEDIA JAM DUPLEX Duplex area Button B page 88 MEDIA JAM FEED Multipurpose tray Multipurpose tray page 89 Tray 1 Upper media tray page 90 Optional Tray 2 or Tray 3 HCIF media tray s page 92 Output tray Output tray page 93 A misfeed jam may be as simple as a sheet of media not being picked or it may be that the media was picked but not fed properly MEDIA JAM FUSER Near fuser...

Page 96: ...dirty your hands clothes or anything else it gets on If you accidentally get toner on your clothes lightly dust them off as much as possible If some toner remains on your clothes use cool not hot water to rinse the toner off provided your clothing is washable If toner gets on your skin wash it off with water or a neutral detergent WARNING If you get toner in your eyes wash it out immediately with ...

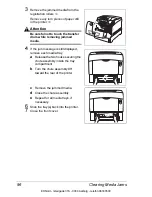
Page 97: ...9 2 Remove the jammed media 3 Close the front cover Media Jam Feed Multipurpose Tray Jams 1 Remove the jammed media from the multipurpose tray 2 Close the multipurpose tray EDNord Istedgade 37A 9000 Aalborg telefon 96333500 ...

Page 98: ...nt cover button A 4 Check for media scraps inside the printer 5 Close the front cover 6 Open the multipurpose tray and replace its media Upper Media Tray Jams 1 Remove the media tray A 2 1 EDNord Istedgade 37A 9000 Aalborg telefon 96333500 ...

Page 99: ...utton A 5 Check for any media scraps inside the printer 6 Close the printer s cover 7 Reinsert the media in the tray printing face up Attention Make sure the media doesn t exceed the media limit mark Check to see if the media width guides are correct 8 Slide the tray s back into the printer The media jam display is cleared A 2 1 EDNord Istedgade 37A 9000 Aalborg telefon 96333500 ...

Page 100: ... 2 Pull out the jammed media in the tray s 3 Open the front cover button A 4 Check for any media scraps inside the printer 5 Close the front cover 6 Reinsert the media in the tray Even up the front edges of the media currently in the tray Ensure that the media is lying flat in the tray s Make sure the media doesn t exceed the media limit mark Check to see if the media width guides are correct A 2 ...

Page 101: ...in the control panel window persists open and close the front cover This should clear the jam message Media Jam Fuser The MEDIA JAM FUSER message covers both the jams near the imaging unit and the fuser unit WARNING The fuser unit is hot Do not remove a jam in this area until the fuser unit cools Near Imaging Unit 1 Open the front cover button A A 2 1 EDNord Istedgade 37A 9000 Aalborg telefon 9633...

Page 102: ...e fuser contains unfused toner that can dirty your hands clothes or other items If you get toner on your hands wash them in cool water and neutral detergent If you get toner on your clothes lightly dust them off as much as possible If toner remains on your clothes use cool not hot water to rinse the toner off provided your clothing is washable 1 Open the front cover button B 2 Lift both fuser unit...

Page 103: ...ose the front cover Media Jam Registration and Mismatch Jams A registration jam occurs when the media does not pass through the registra tion sensor in the registration roller unit below the imaging unit A MISMATCH JAM may occur if the transparency sensor in the printer detects the wrong media type 1 Open the front cover button A 2 Locate the registration rollers one is black and one is metallic A...

Page 104: ...If the jam message is still displayed remove each media tray a Release the two hooks securing the chute assembly inside the tray compartment b Turn the chute assembly 90 toward the rear of the printer c Remove the jammed media d Close the chute assembly e Repeat for all media trays if necessary 6 Slide the tray s back into the printer 7 Close the front cover 1 2 EDNord Istedgade 37A 9000 Aalborg t...

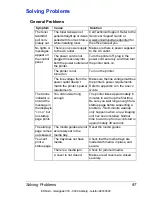
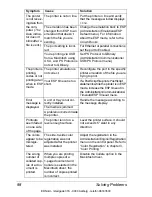
Page 105: ...h the printer s power requirements Make sure the line voltage matches the printer s power requirements Refer to appendix A in the User s Guide The Online indicator is on and the message in the display is IDLE but no startup page prints You did not wait long enough The printer takes approximately 6 minutes to warm up the first time Be sure you wait long enough for a startup page before suspecting a...

Page 106: ...out is too short If a PostScript file prints PostScript statements while the printer is in ESP mode increase the ESP timeout in the Administration Communications Timeouts ESP Timeout menu Error message is displayed A unit or tray is not cor rectly installed Handle the message according to the message display The media is jammed A problem occurred inside the printer Printouts seem faded on one side...

Page 107: ...sent Do not fan large quantities of transparency media Printer pullsmedia from the wrong tray Selected tray is out of media and tray chaining is activated Choose Off in the Operator Con trol Chain Inputbins menu Load media in the correct tray Printer has not recognized a custom size in the MPT tray and pulls the media from the upper tray Set Custom Size in the Operator Control Multipurpose Sz menu...

Page 108: ...ating type etc is being used Use media that is approved for your printer Refer to Media on page 21 The recommended transpar ency OHP or label paper is facing the wrong way in the tray Load the transparencies or labels according to the manufacturer s instructions Coated transparency media has been used Use uncoated transparency media that is approved for your printer Multiple sheets of transparency...

Page 109: ...fed from the upper or optional trays is not feed ing correctly on page 100 Do not duplex envelopes glossy stock heavier than 28 lb bond 105 g m labels thick stock heavier than 28 lb bond 105 g m or transparencies Media may still be jammed Recheck the paper path and make sure you have removed all of the media jams Open and close the front door to reset the printer If you are manually duplexing medi...

Page 110: ...nnected to an outlet with a voltage or frequency that does not match the printer specifica tions Use a power source with the specifications listed in appendix A Printer is not respond ing is dis played in the print monitor The printer is in energy saving mode It takes a little time for printing to start if the printer is in energy saving mode You can change the number of minutes before the printer...

Page 111: ...e this error contact Technical Support Refer to the Service Support Guide or www konicaminolta net printer Not all pages print The printer has the wrong kind of cable or the printer is not configured for the correct cable and port Check your cable The Cancel key was pressed Make sure no one pressed the Cancel key while your job was printing The media tray is empty Check the message window to see i...

Page 112: ...n 28 lb bond 105 g m labels postcards thick stock heavier than 28 lb bond 105 g m or transparencies Make sure that your document has more than one page In the printer driver Properties Layout Duplex Options choose Short Edge flipped as on a clipboard or Long Edge flipped as in a loose leaf notebook Make sure that you are using correct media The printing is on the wrong side of the media The printe...

Page 113: ...age jobs depending on the amount of processing required between pages Wait Printer automatically resumes This process is provided to ensure reliable printer operation with optimum output quality See What are the printer s internal cleaning cycles on page 73 for more detailed information The printer goes into power saving mode The printer automatically switches to power saving mode after one hour o...

Page 114: ...ct For Ethernet or parallel connections set the port to Enabled When the parallel cable is set to Inter active the default and the parallel cable is unplugged then plugged back in communication was lost Set the parallel cable to Non Interactive mode in the Administration Communications Parallel Mode menu Too many sta tus pages print Your printer is set to print the multiple page Advanced Status Pa...

Page 115: ... volt age or frequency that does not match the printer specifica tions Use a power source with the proper specifications Several sheets are being fed at the same time Remove the media from the tray and check for static electricity Fan plain paper and other media but do not fan large amounts of transparencies and replace it in the tray Media is not set properly in the media tray s Remove the media ...

Page 116: ...ove the imaging unit and check for dam age If necessary replace it Media type may be set incorrectly Envelopes glossy stock set as Thick 2 or Thick 3 labels and thick stock have to be set in the correct mode See Media Sizes and Print Area on page 19 The printer is con nected to an outlet with a voltage or frequency that does not match the printer specifications Use a power source with the proper s...

Page 117: ...k printer konicaminolta net support click on Answer Base for currently approved media Media is wrinkled The media is moist from humidity or having water spilled on the paper supply Remove the moist media and replace it with new dry media The transfer roller or fuser unit may be misinstalled or defective Confirm the proper installation of the items and check them for damage If necessary replace the...

Page 118: ...a net support click on Answer Base for currently approved media Small marks occur in or near halftone images The media is too dry Remove the dry media and replace it with new media Store media wrapped and in a relative humidity of at least 30 The transfer roller or fuser unit may be misinstalled or defective Confirm the proper installation of the items and check them for damage If necessary replac...

Page 119: ...r The imaging unit is old or damaged Remove the imaging unit and check for dam age If necessary replace it The printer is con nected to an outlet with a voltage or frequency that does not match the printer specifications Use a power source with the proper specifications The image comes off when rubbed The media is moist from humidity Remove the moist media and replace it with new dry media Unsuppo...

Page 120: ...amaged Remove the imaging unit and check for damage If necessary replace it Unsupported media is being used Use KONICA MINOLTA approved media See What media types are supported on page 23 Check printer konicaminolta net support click on Answer Base for currently approved media Vertical streaking appears The imaging unit trans fer roller or fusing unit may be misinstalled or defective Confirm the p...

Page 121: ...ia See Media Sizes and Print Area on page 19 for a complete list of approved media Check printer konicaminolta net support click on Answer Base for currently approved media Media is jammed inside the printer Remove any jammed media from the printer The printer is not level Put the printer on a flat hard level surface not to exceed 5 slant The paper path is not clean Remove any tape or adhesive tha...

Page 122: ...printer s front door Reset the consumables count in the Operator Control Consumables Item Replaced COLOR Toner menu COLOR TONER LOW The COLOR toner cartridge is low Printing continues even though the warning appears Approximately 100 let ter A4 pages at 5 coverage after detect ing that toner in a car tridge is low the printer displays COLOR TONER EMPTY in the message window and the printer stops T...

Page 123: ...em If necessary reset the consumables count in the Operator Control Consumables Item Replaced menu The imaging unit will automat ically reset its consum ables count X MISSING The indicated item X is missing such as the fuser or transfer unit Replace the indicated item If necessary reset the consumables count in the Operator Control Consumables Item Replaced menu The imaging unit will automat icall...

Page 124: ...oppy disk s or transfer them to your host computer using ftp if available Then reset the account ing files so that new jobs can be accepted If you don t want to use accounting you can dis able it ACC FILES GOT REMOVED The accounting option is disabled and the accounting files are empty After a reset the files are removed This prevents you from wast ing disk space with empty accounting files No act...

Page 125: ...ing you can dis able it ADC SENSOR DUSTINESS X The Automatic Density Control ADC sensor is dusty and an error or warning has been indicated Clean the density sensor See How do I clean the density sensor on page 76 ADJUST INPUT BIN The INPUT speci fied tray is not inserted correctly Adjust the tray CALIBRATING The printer is perform ing an automatic clean ing rotation No action needed CANCEL N One ...

Page 126: ...ated No action needed CREATING XXXXXXXXXXXX FILE WAIT The specified account ing file is created when accounting is enabled and the files are not in existence or these files are created following a Reset Accounting XXXXXXXXXXXX repre sents the Job Account ing or Paper Accounting file Wait No other action needed DISK ERROR This is an internal hard disk error END JOB The Cancel key has been pressed a...

Page 127: ...hed from offline to online No action needed EXTENDED ACC FILE SIZE BY D KB The D size of the non empty accounting file has been increased successfully No action needed FRONT COVER OPEN The cover is open and must be closed Close the cover FUSER LIFE LOW The fuser unit life is low Replace the fuser unit and media feed roller Reset the consumables count in the Operator Control Consumables Item Replac...

Page 128: ...e item X is not valid such as disk selected or paper information Make sure you are input ting or choosing the valid information or value INVALID ID X The printer has detected a nongenuine KONICA MINOLTA consumable toner cartridge fuser unit or imaging unit To resume printing and to prevent permanent damage to your KONICA MINOLTA printer replace the consumable with a genuine KONICA MINOLTA consumab...

Page 129: ...SMATCH JAM Media has jammed near the transparency sen sor Locate and remove the jam Open and close the front door to reset the printer OUTPUT BIN FULL The media has exceeded the limit such as over 250 sheets of 20 lb 75 g m2 bond in the output bin Remove the media from the output bin PRINTING STATUS A status page is printing Wait until after the status page prints and the mes sage clears PUT SIZE ...

Page 130: ...ING ACCOUNTING The reset accounting operation is in process Wait No other action needed SYS UPDATE ERROR X The indicated error X has been reported Verify the update file and send it again or check with printer konicaminolta net support click on Answer Base for the latest code update TRANSFER UNIT MISSING The transfer unit isn t installed correctly Remove and reinstall the transfer unit WAITING FOR...

Page 131: ...be placed to the vendor from whom you purchased the printer If you cannot get service from your vendor see the Service Support Guide for additional contact information This service message means do this CALL FOR SERVICE X An error has been detected with the item indicated X in the service message Reboot the printer This often clears the service message indicator and printer operation can resume If...

Page 132: ...r job 1 Too many transformations 1 State lost 2 Math error 2 Math error 3 Job aborted 3 Job aborted 4 Instruction not recognized 4 Out of memory for macros 5 Wrong number of parame ters 5 Disk full Cannot store fonts 6 Out of range parameter or illegal character 6 13 Internal error 1 8 7 Not used 8 Unknown character set 9 Position overflow 10 Buffer overflow 11 Not used PCLXL Error Code Descriptio...

Page 133: ...a print job Menu Administration Startup Options Do Error Handler Choices Yes Load the Error Handler on reboot No Don t load the Error Handler on reboot Default No Notes Refer to the PostScript Language Reference Manual Third Edition Adobe Systems Incorporated Reading PA Addi son Wesley 1999 ISBN 0 201 37922 8 for information on PostScript errors You must reboot the printer after turning on the err...

Page 134: ...till have problems you can t solve check the Answer Base at printer konicaminolta net support for a solution For current sources of service and support worldwide refer to the Service Support Guide on the Documentation CD ROM or to www konicaminolta net printer EDNord Istedgade 37A 9000 Aalborg telefon 96333500 ...

Page 135: ...Installing Accessories EDNord Istedgade 37A 9000 Aalborg telefon 96333500 ...

Page 136: ...lots 64 128 or 256 MB PC 100 Compliant SDRAM DIMMs up to a maximum of 512 MB Duplex kit Americas only Duplex option and time of day clock for magicolor 3300 EN Emulations Fonts Forms and Other Software CGM PlanetPress forms creation utility QFORM Custom fonts forms and signatures Americas only go to printer konicaminolta net products fontcenter index asp High capacity Input Feeder HCIF 1x500 With ...

Page 137: ... that is plugged in but turned off Never attach the wrist strap to any piece of equipment with an electrical current present Turn off all power switches first Plastic rubber wood painted metal surfaces and telephones are not acceptable grounding points The printer isn t an acceptable grounding point either because it must be unplugged before you perform this task If you don t have an antistatic wr...

Page 138: ...erface box RJ 11 cable Power adapter Velcro attachment Installing BuzzBox 1 If you have a cable attached to the printer s parallel port unplug it from the printer 2 Attach one end of the parallel cable on the interface box to the printer s parallel port The BuzzBox s ribbon cable is designed to be directly attached to the printer s parallel port not to an adapter or an additional cable 3 Use the R...

Page 139: ...buzzer the light or both When the printer goes off line the light flashes and the buzzer sounds until the printer is placed back on line or until the light and buzzer switches are turned off Using the BuzzBox When the BuzzBox lights or buzzes check the printer message window to find out what has interrupted printing See Status Error and Service Messages on page 114 for a list of printer messages a...

Page 140: ...ts For increased collation performance For increased spooling performance How Much Memory Do You Need Check the startup page to make sure the printer has enough RAM installed To allocate the default amount of memory to the memory clients use the Memory Quick Config menu to choose the correct resolution and paper size for your printing refer to the Crown Books for further information Quick Config i...

Page 141: ... Color Simplex Duplex Simplex Duplex Size S Q F S Q F S Q F S Q F Letter A4 256 MB Base memory Legal Notes S Standard print quality 600x600 dpi full speed Q Quality print quality 1200x1200 dpi full speed F Fine print quality 1200x1200 dpi half speed Monochrome Color Simplex Duplex Simplex Duplex Size S Q F S Q F S Q F S Q F Letter A4 256 MB Base memory Legal 288 MB Notes S Standard print quality 6...

Page 142: ...emory settings 2 Turn off the printer and disconnect the power cord and all interface cables 3 Remove the controller board from the printer Loosen two screws one on each end of the I O connector panel and using the tab on the lower side of the connector panel pull the controller board from the printer 4 Position the controller board on a flat surface so the controller board lies flat and the I O c...

Page 143: ... board into the printer s tracks until it is fully seated and then tighten the two screws 8 Reconnect all interface cables IIIIIIIIIIIIIIIIIIIIIIIIIIIIIIIIIIIIIIIIIIIIIII IIIIIIIIIIIIIIIIIIIIIIIIIIIIIIIIIII IIIIIIIII IIIIIIIIIIIIIIIIIIIIIIIIIIIIIIIIIIIIIIIIIIIIIII IIIIIIIIIIIIIIIIIIIIIIIIIIIIIIIIIII IIIIIIIII IIIIIIIIIIIIIIIIIIIIIIIIIIIIIIIIIIIIIIIIIIIIIII IIIIIIIIIIIIIIIIIIIIIIIIIIIIIIIIIII IIIII...

Page 144: ...as an optional emulation This section describes how to download an emulation to the printer s hard disk You must have at least one hard disk internal or external attached to the printer in order to use an optional emulation If more than one hard disk is available the emulation automatically installs itself on the disk with the most free storage space We recommend that you have at least 4 MB of mem...

Page 145: ...artup page in the Administration Emulation printer s configuration menu and on the advanced status page Downloading an Emulation via an Ethernet Interface Before you begin this procedure your printer and PC or UNIX work station must be connected to an Ethernet network running TCP IP and have valid IP addresses 1 Turn on the printer and wait for IDLE to display in the message window 2 If your PC is...

Page 146: ...page in the Administration Emulation printer s configuration menu and on the advanced status page You may want to erase any installation files left on your computer and or workstation and then remove any temporary directories Using an Optional Emulation Refer to the documentation that came with your emulation for configuration and usage instructions Fonts Forms and Signatures KONICA MINOLTA Font F...

Page 147: ...t forms Labels Logos and watermarks KONICA MINOLTA QFORM doesn t support color features QFORM allows you to use existing lineprinter and forms printing applications on your printer This printer resident application gives you the ability to store PostScript forms on the printer s hard disk and fill those forms with your appli cation s ASCII print stream Refer to the documentation that comes in the ...

Page 148: ...D font consists of a large font file that contains all the character outlines and a small CMap file that contains a list of characters encodings and character identifiers Each CID font can support many character set and encoding combinations CID fonts Adobe Morisawa Enfour and Fontworks are supported on your printer High capacity Input Feeder HCIF The high capacity input feeder HCIF is availablein...

Page 149: ...city input feeder with two media trays 500 sheets each 1x500 High capacity input feeder 2x500 High capacity input feeder 1 Remove the HCIF from the shipping carton and place it on a table or flat surface near the printer 2 Remove any tape and packing material from the HCIF We strongly suggest that you save the packaging materials in case you ever need to move or ship the printer 3 Slide open the m...

Page 150: ...e unit does not roll unexpectedly while in operation 8 Turn off the printer and then disconnect the power cord and all interface cables from the printer 9 With another person s help lift the printer Do not tilt it more than 10 in any direction at any time WARNING Your printer weighs approximately 77 lbs 35 kg fully assembled Be sure to have help when lifting and moving it 1x500 High capacity input...

Page 151: ...IF Be sure to align the printer and HCIF as precisely as possible 11Remove the upper media tray 12Remove the media tray cover from the rear of the printer 1x500 High capacity input feeder 2x500 High capacity input feeder EDNord Istedgade 37A 9000 Aalborg telefon 96333500 ...

Page 152: ...ove the printer with the HCIF attached unlock the casters and then move the unit 16Plug the printer in and turn it on 17Readjust the printer s color side to side registration if necessary Refer to chapter 3 Color Printing for instructions 1x500 High capacity input feeder 2x500 High capacity input feeder EDNord Istedgade 37A 9000 Aalborg telefon 96333500 ...

Page 153: ...on on page 133 In addition always handle circuit boards by the edges only When installing or removing a hard disk make sure that the metal support posts on the hard disk do not come in contact with any of the electrical leads on the chips mounted on the controller board The controller board will not function if any of the leads are broken or shorted together 1 Turn off the printer and then disconn...

Page 154: ...e ribbon cable connector and the controller board connector pins are properly aligned Damage to the controller board could result if the pins are misaligned 7 Press down gently but firmly on the cable connector until it is fully seated Attention Do not push or pull with the ribbon cable Use the cable connector 8 Align the support posts with the holes on the controller board and then press down to ...

Page 155: ...ide two main benefits Expanded flexibility to switch media size color and type without having to unload and load media Increased media feed capacity Keep replacement trays close by so you can easily change media by slipping one tray out and another in SC 215 Color Convenience Copier Follow the installation instructions included with the SC 215 Time of Day Clock The time of day clock provides time ...

Page 156: ...e receiving socket on the controller board Damage to the time of day clock and or controller board could result if the pins are misaligned a Locate the time of day clock socket on the controller board and the pin 1 notch or printed label b Locate the pin 1 indicator mark on the top of the time of day clock This mark may be a notch or a slight depression on one end of the clock IIIIIIIIIIIIIIIIIIII...

Page 157: ...n compliance with UL guidelines The appliance inlet is considered to be the main disconnect device The presence of the clock will be automatically sensed 7 Print a startup page The time of day clock is not listed under Installed Options on the startup page but the time does appear as System Date in the Printer Information column For instructions about setting the time of day clock refer to the Cro...

Page 158: ...ection show a 2x500 high capacity input feeder but the same procedures can be used for a 1x500 high capacity input feeder 3 Then attach the HCIF tray covers by hooking the tray covers and at the rear of the printer onto the corre sponding tabs 4 Rettach the tray cover onto the upper media tray EDNord Istedgade 37A 9000 Aalborg telefon 96333500 ...

Page 159: ...Technical Specifications EDNord Istedgade 37A 9000 Aalborg telefon 96333500 ...

Page 160: ...cting the ventillation grilles could present a fire hazard Location Requirements On a surface capable of supporting the printer accessories consum ables and media Top View A 4 100 mm B 24 600 mm C 8 200 mm D 6 150 mm E 4 100 mm F 6 150 mm G 24 600 mm H 8 200 mm Front View Side View Component Weight Printer 65 lbs 29 5 kg Consumables such as toner imaging unit 12 lbs 5 5 kg total D C B A F E H G ED...

Page 161: ...rface is not level Close to an easily accessible grounded power supply on an exclusively dedicated power outlet that meets printer specifications Near your computer at the length 6 5 2 m or less for an IEEE 1284 bidirectional parallel connection With enough space to allow adequate ventilation and easy servicing With an ambient temperature range of 50 90 F 10 32 C and relative humidity range of 15 ...

Page 162: ... Your printer requires a properly grounded AC outlet with a rated line voltage of 120 V or 220 240 V The grounding terminal on the power cable should be connected to a good earth ground to prevent electric shock and fire In compliance with UL guidelines The appliance inlet is considered to be the main disconnect device Power North America 120 VAC 50 Hz 8 amps Europe 220 240 VAC 50 60 Hz 4 amps Lat...

Page 163: ...ut the fuser turns off When a print job is received the printer returns to normal power Printer Draws 8 A at 110 V or 120 V or 4 A at 220 V or 240 V Maximum Electrical Current Required during operation is 8 amps for a 120 V system and 4 amps for a 220 240 V system Noise generating Equipment Should not be connected to the same electrical outlet as the printer Grounding Your printer requires a prope...

Page 164: ... 13 7 9 B5 Thick Stock 3 Custom Paper Size Varies Varies Envelope 13 Executive 26 15 4 13 7 9 Executive Thick Stock 2 13 7 9 Executive Thick Stock 3 Legal 20 13 5 10 6 9 Legal Thick Stock 2 10 6 9 Legal Thick Stock 3 Letter 26 15 4 13 7 9 Letter Thick Stock 2 13 7 9 Letter Thick Stock 3 Letter Sized Label Sheet Letter Transparency Postcard Japanese 13 Duplexing is supported only up to 28 lb 105 g ...

Page 165: ... For increased collation performance For increased spooling performance Toner Type Chemical type Packaging User replaceable toner cartridges Keyed toner cartridges are available from your local vendor or from www q shop com Warm up Typical 1 5 minutes from power on assuming normal temperature and humidity After New Imaging Unit Installed 6 minutes Input sources Standard 100 sheet face up multipurp...

Page 166: ...hat can be scaled from 4 points upward and rotated to any angle in 1 increments all typefaces have multilingual character sets PDF 137 resident PDF fonts HP PCL 5e 5c 89 resident scalable fonts PCL XL 108 resident scalable fonts and 16 resident symbol sets HP GL 40 resident HP GL symbol sets CID Font Support Support for 4 Type 4 and Type 32 bit mapped CID fonts Type 1 Type 3 Support Support for Ty...

Page 167: ...r information about hard disks recommended for your printer see the magicolor 3300 Answer Base at printer konicaminolta net support Time of day clock Optional Job accounting Crown job accounting requires an optional internal IDE hard disk drive Warning function Optional BuzzBox light buzzer printer warning device operates over a parallel connection Americas only Voltage and frequency US 120 volts ...

Page 168: ... Measured in Printing 55 8 dB Regulation 57 dB Max Relative humidity Operating 20 80 RH noncondensing Transportation Storage 10 90 RH non condensing Temperature range Operating 50 90 5 F 10 32 5 C Transportation Storage 32 95 F 0 35 C Altitude Operating 0 8202 ft 0 2500 m Inclination Operating 5 or less slant at any point around the machine 80 60 40 70 50 30 20 0 10 10 20 30 17 5 27 32 5 Optimal O...

Page 169: ...g Unpacked with consumables 77 lbs 35 kg Packed to ship 101 2 lbs 46 kg 1x500 High Capacity Input Feeder Packed to ship W 29 4 746 mm H 12 8 325 mm D 22 5 571 mm Packed to ship 32 lbs 14 5 kg 2x500 High Capacity Input Feeder Packed to ship W 29 4 746 mm H 18 7 476 mm D 22 5 571 mm Packed to ship 49 6 lbs 22 5 kg EDNord Istedgade 37A 9000 Aalborg telefon 96333500 ...

Page 170: ...for example text or graphics Starter Toner Cartridges The printer ships with a full set of starter toner cartridges At 5 coverage you can expect to print approximately 4 000 letter A4 simplex pages faces with the starter black toner cartridge and approximately 3 000 letter A4 sim plex pages faces with the starter yellow magenta and cyan toner car tridges However many factors also affect toner life...

Page 171: ... which requires a cleaning rotation after every fourth page of an average size job Intermittent printing with small job sizes requires a cleaning rotation after each one page simplex job and therefore impacts OPC life A toner cartridge contains enough toner to print letter A4 size pages at the percent coverage stated However other factors also affect toner life Coverage Number of Simplex Pages Fac...

Page 172: ...y 25 000 simplex pages 5 coverage Number of Pages per Job Maximum Simplex Pages or Percent Toner Coverage Four Page Average Maximum Simplex Pages 3 26 000 25 30 20 000 4 Average Size 30 000 20 25 23 000 5 and Above 30 000 Less Than 20 average 30 000 Notes The imaging unit life is dependent on the average number of pages or the toner coverage whichever comes first For example if you print four page...

Page 173: ...ters IPP which is case sensitive is built on top of HTTP which in turn runs over TCP IP a After the driver is installed select Start Settings Printers Add Printer b Click Next then select Network Printer then click Next c Select Connect to a printer on the Internet or on your intranet d Enter the URL for example http iphostname 80 printer_name iphostname 80 printer name in the host table or the pr...

Page 174: ... User name is required b Password is admin all lower case without the quotes c URL is the web address of the file you wish to print to the printer for example http newsite test com testfile ps The Use Proxy check box and the DNS PROXY Settings are fields that will best be addressed by your System Administrator according to your network environment d Once the password and URL have been input simply...

Page 175: ...n via email Notify Select page order PageOrder Save job for reprinting proof and print Reprint Print routing information Routing Print document title Title Print version and revision Version Print header page IncludeFeature header Print trailer page IncludeFeature trailer HP GL Emulation Commands Select enhanced resolution IncludeFeature enhanced Expand plot IncludeFeature expand Select original p...

Page 176: ... Wrap lines IncludeFeature autowrap Set number of lines per page IncludeFeature linesperpage Set margins IncludeFeature lpmargins Set orientation IncludeFeature lporientation Document Formatting Logical page orientation IncludeFeature pageorientation Number up printing IncludeFeature pagegrid Offset logical page IncludeFeature pageoffsets Print borders IncludeFeature border Scale logical page Incl...

Page 177: ...nds Sessions only via network interface Sessions End of document EndOfDocument ESC 12345X PJL Command One PJL command is supported by the magicolor 3300 UEL the Universal Exit Language command This command which is available only via the parallel and USB interfaces signals the printer to exit the current printer language and begin a PJL dialog UEL ESC 12345X EDNord Istedgade 37A 9000 Aalborg telef...

Page 178: ...charts show only the top level menus See the Crown Books for detailed information on menu options Security Menu Operator Control Configuration Administration Security Set Password Enable Password Admin Menu Security Passwrd Operator Menu Set Password Enable Password Note For more menu details and printer configuration information refer to the Crown Books on the Documentation CD ROM EDNord Istedgad...

Page 179: ...onochrome Job Name 1 50 Single User Mode Network Mode Mutipurpose Sz Letter Legal A4 Executive B5 JIS A5 Statement Folio 16 Kai 32 Kai Com10 C5 DL Monarch B5 ISO C6 Chokei 3 Chokei 4 Postcard Custom Media Mode Mode Disk Space ResetAccounting File Segment Accounting For MPT Bin For Upper Bin For Optional 1 Bin For Optional 2 Bin Only on a magicolor 3300 DN or on a magicolor 3300 EN with optional du...

Page 180: ... Saver Operator Control Miscellaneous Disk Operations Save Defaults Restore Defaults Reboot System New System Image Format Disk Backup Hard Disk Capture PrintJob Keypad Language Clock Operations Restore Disk Consumables Start Period Test Page 2 Calibration Page Status Page Type Energy Saver Mgt Toner Low Action Print Quality Registration Density Printer Configuration Do Error Handler Enable Disk S...

Page 181: ... Def Job Prio PS Protocol Spooling HW Config Factory Soft On Address Yes Yes Yes Address Page Reset Reset Ethernet Speed Auto 10 Half Duplex 100 Half Duplex No No No 10 Full Duplex 100 Full Duplex On Input Idle On Idle Note For more menu details and printer configuration information refer to the Crown Books in PDF on the Documentation CD ROM Optional EDNord Istedgade 37A 9000 Aalborg telefon 96333...

Page 182: ...NOLTA Conventional Spooling Zone Part 1 Zone Part 2 HP Zoner Res Both Default Administration Communications Resident NIC CrownNet Disabled Common Note For more menu details and printer configuration information refer to the Crown Books in PDF on the Documentation CD ROM Optional RC Res EDNord Istedgade 37A 9000 Aalborg telefon 96333500 ...

Page 183: ...ame Default Enabled Yes No Administration Communications Resident NIC CrownNet Name Disabled Common Note For more menu details and printer configuration information refer to the Crown Books in PDF on the Documentation CD ROM Optional EDNord Istedgade 37A 9000 Aalborg telefon 96333500 ...

Page 184: ...3 IPX Addr Ether 2 IPX Addr 802 2 IPX Addr Default PServer Name 1 PServer Name 2 PServer Name 3 Job Check Delay Conf Check Delay PServer Name 3 Default Default SNAP IPX Addr Administration Communications Resident NIC CrownNet Configure NDS Common Protocol Enabled Disabled Note For more menu details and printer configuration information refer to the Crown Books in PDF on the Documentation CD ROM Op...

Page 185: ...led Pri WINS Sec WINS NBT Protocol Addr Addr Scope ID SNMP NMS 1 5 Read Write Trap Read Trap None Write Trap Yes No Yes No Yes No Disabled Enabled DHCP RARP Note For more menu details and printer configuration information refer to the Crown Books in PDF on the Documentation CD ROM Optional Pri and Sec WINS Addr are IP addresses of the Primary and Secondary WINS servers default 0 0 0 0 Default for ...

Page 186: ...ield Immunity Voltage Dips and Variations cTick Mark ACA Australia AS NZS 3458 ITE Electro magnetic Emissions EMI FCC USA Title 47 CFR Ch I Part 15 Industry Canada Canada ICES 003 Issue 3 International EU EN 55022 EN 61000 3 2 EN 61000 3 3 EN 300330 2 V1 1 1 Class B Digital Device Class C RF Device Class B Digital Device Class B ITE Harmonic Current Emissions Voltage Fluctuations and Flicker RE SR...

Page 187: ...e limits for a Class B dig ital device pursuant to Part 15 of the FCC Rules Attention Any modifications or changes to this product not expressly approved in writing by the manufacturer responsible for compliance to Federal Regulations could void the user s authority to operate this product within the Laws and Regulations of the Federal Communications Commission Canadian Users Notice This Class B d...

Page 188: ...ot escape from the machine during any phase of user operation International Notices Power Cord The following power cord requirements are in effect for your 220 V printer Voltage Attention Norwegian users This equipment is designed to operate within an IT power system where the line to line voltage does not exceed 240 V Lithium Batteries Attention Swiss users Lithium batteries need to be disposed o...

Page 189: ...n about media Check printer konicaminolta net support click on Answer Base for currently approved media To order approved transparency media go to www q shop com Electrostatic Discharge Failure to protect the printer controller board and any associated daughterboard or module from electrostatic discharge or damage while performing any task involving the controller board Instructions Failure to fol...

Page 190: ...on RMA number Americas only Refer to the Service Support Guide or www konicaminolta net printer for the Technical Support telephone number where you can obtain an RMA number If the RMA number is not prominently visible on the outside of items returned KONICA MINOLTA will not accept receipt EDNord Istedgade 37A 9000 Aalborg telefon 96333500 ...

Page 191: ...ernal IDE hard disk drive 128 Media tray 128 Other software 128 Time of Day Clock 128 Additional memory 131 Administration menu 172 Advanced printing features Memory 132 Advanced status page 136 Antistatic protection 129 Autoduplex 42 Automatic jam recovery 85 B Battery 148 BuzzBox 128 130 Adapter 130 Interface 130 Kit 130 Ribbon cable 130 C Cancel all jobs message 117 Cancel job message 118 EDNor...

Page 192: ... PDF 82 DOC See Document Options Commands Document Option Commands Header trailer page 167 HP PCL 5e emulation commands 167 HP GL emulation commands 167 Job and subjob boundary commands 169 Lineprinter emulation commands 168 Downloading 136 Emulation 136 Via CrownNet 136 Via Ethernet interface 136 Via parallel interface 136 Drivers 2 3 Installing for Macintosh 5 Installing for Windows 5 Dual In Li...

Page 193: ...x stock 26 Installation BuzzBox 130 Drivers and Utilities for Macintosh 5 Drivers and Utilities for NDPS 11 Drivers and Utilities for NetWare 11 Drivers and Utilities for UNIX 11 Drivers and Utilities for Windows 5 Hard disk 145 Linux 11 Macintosh PPDs 5 NetWare 11 NPDS 11 System software 2 UNIX 11 Interfaces 158 International notices Notices International 180 IPP Internet Printing Protocol 165 In...

Page 194: ... tray 18 Fill limit mark 33 Multipurpose 18 Optional HCIF 18 Media type 23 Media type definition 23 Memory modules DIMMs Dual in line memory modules 131 Memory requirements 41 Memory Quick Config 132 Messages 114 MICR checks 139 N NetWare menu 176 Network mode 21 Norwegian user voltage notice 180 Notices Canadian users 179 Norwegian user voltage 180 Swiss lithium batteries 180 O OHP film also know...

Page 195: ...43 120 181 Printing status message 121 PRISM 49 Profile downloader 3 Proof and print 167 PS Wait Timeout 82 Put x paper in any bin message 122 Put x paper in x bin message 121 Q QFORM 139 R Radiation confined 179 Resetting accounting message 122 Resolution 132 157 Return Merchandise Authorization number 182 Returning printer 182 RMA number 182 S Service Messages 114 Service messages 114 Shipping p...

Page 196: ... TCP IP 137 Menu 177 Temperature requirements 160 Thick stock Loading 25 Printing 25 Time of Day clock 147 Timeout 82 Toner 157 Toner value kit 56 Toner cartridges 53 54 162 Life expectancy 54 162 Transparencies 18 29 Continuous printing 30 Loading 29 Printing OHP film 29 Tray 147 A5 spacer 33 Also known as cassette 147 HCIF 31 Lower feeder unit Trays 2 and 3 147 Multipurpose 35 Multipurpose tray ...

Page 197: ...W Waiting for idle message 122 Waiting for idle status message 122 Warming up message 122 Warm up time 157 Warranty 181 Wrist strap for antistatic protection 129 EDNord Istedgade 37A 9000 Aalborg telefon 96333500 ...

Page 198: ...EDNord Istedgade 37A 9000 Aalborg telefon 96333500 ...

Reviews: