42
XTL
®
300
User Guide
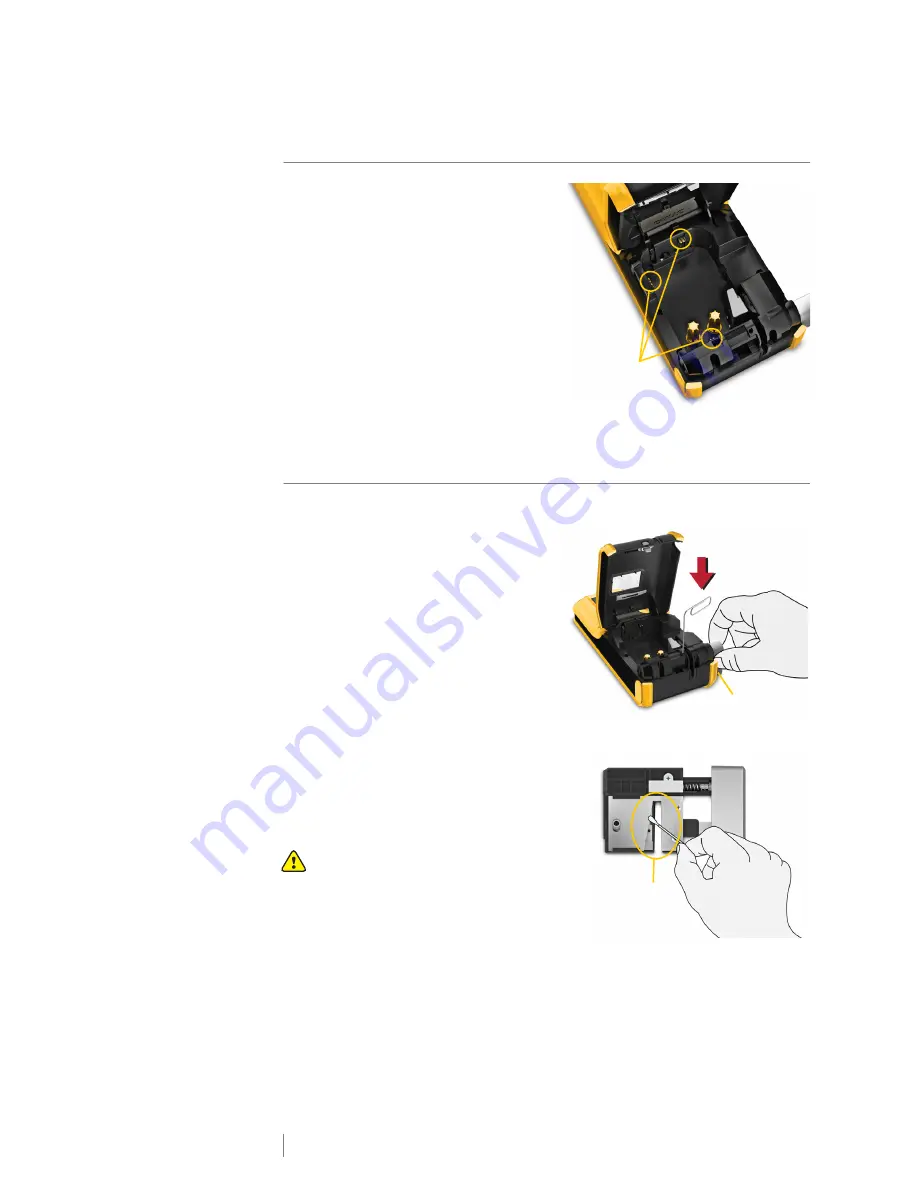
Cleaning the Sensors
Several sensors inside the label
compartment need periodic cleaning to
remove dust and other particles that may
have accumulated.
To clean the sensors
1
Press the label compartment release
and lift the cover.
2
Remove the label cartridge.
3
Remove the cleaning tool from inside
the label compartment cover.
4
Use the sponge end of the cleaning
tool to gently wipe the sensors using
an up and down motion (not side to side). See Figure 12 for sensor locations.
Cleaning the Cutter Blade
Clean the cutter blade each time you replace the label cartridge.
To clean the cutter blade
1
Press the label compartment release
and lift the cover.
2
Remove the label cartridge.
3
Insert a straightened paper clip (or
other pointed object) in the small hole
shown in Figure 13 to release the
cutter mechanism.
4
While pressing the paper clip down,
pull the cutter mechanism straight
out from the side of the label maker.
5
Place the cutter blade on a flat
surface with the blade side facing up.
6
Use a cotton swab and alcohol to
clean both sides of the blade. See
Figure 14.
The cutter blade is extremely sharp.
Use caution when cleaning.
7
After cleaning the blade, insert the
cutter mechanism back into the label
maker and press into place.
Sensors
Figure 12
Figure 13
Pull straight
out
Press and hold
Cutter blades
Figure 14
Summary of Contents for XTL 300
Page 1: ...BC User Guide ...
Page 5: ...5 XTL 300 User Guide 50 Environmental Information 51 Safety Precautions ...
Page 50: ...45 XTL 300 User Guide ...
Page 52: ...47 XTL 300 User Guide Prohibit Fire and Exit First Aid GHS ...
Page 54: ...49 XTL 300 User Guide Arrows Symbols ...
Page 58: ...53 XTL 300 User Guide ...


