


- 162 -
Settings
» Automatic Control Settings » Trip Settings
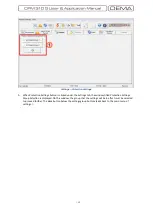
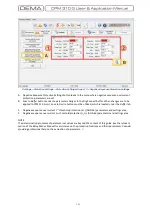
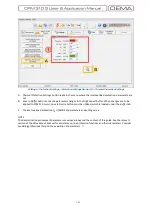
A.
This window is accessed by clicking the
Trip Settings
button in the
Automatic Control Settings
window.
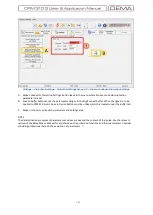
B.
Save to Buffer
button sends the parameter changes to the DigiConnect buffer. When changes are to be
applied to CPM 310 G unit,
Save to Device
button must be utilized, which is located under the
Buffer
tab.
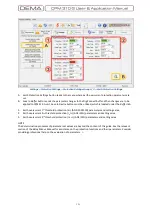
1.
Alternatives in the
Trip Settings
window provide the user to choose whether the defined protection
functions can trigger a trip process or not. As seen on the picture above, the window gives the protection
function titles, the current settings, and
Active
/
Passive
options for the functions to trigger a trip. By
default, the settings are made as
Active
so as to provide all functions to trip the CB; if any of the settings
are changed the
Passive
, the related functions will still run and generate alarms if predefined conditions
occur, but tripping by these functions will be prohibited.
WARNING!
Settings changes made on this menu will directly affect the way CPM 310 G controls the circuit breaker. It
is strongly recommended that settings changes are evaluated and made by only authorized personnel!
□
Summary of Contents for CPM 310 G
Page 1: ...CPM 310 G Digital Overcurrent Protection Relay User Application Manual vEN 2016 03...
Page 2: ...2...
Page 6: ...6 ABOUT DEMA...
Page 11: ...11 INTRODUCTION...
Page 32: ...32 PACKING LABELING INFORMATION...
Page 34: ...34 OPERATING MANUAL...
Page 53: ...53 RELAY MENUS MANUAL...
Page 55: ...55 The Menu Tree...
Page 56: ...56...
Page 57: ...57...
Page 58: ...58...
Page 59: ...59...
Page 60: ...60...
Page 61: ...61...
Page 128: ...128 DIGICONNECT PC PROGRAM MANUAL...
Page 189: ...189 APPLICATION DIAGRAMS...
Page 191: ...191 Sample Power Transformer Protection Application Diagram...
Page 193: ...193 FUNDAMENTAL CABLING DIAGRAM...
Page 203: ...203 APPLICATION DIAGRAM NO 10 RS485 Cabling...
Page 204: ...204 TECHNICAL DATA...
Page 220: ...220 GLOSSARY...