background image

Appendix A  Specifications and Installation

|

ScrEdit Software User Manual


A-10  


Revision Apr. 30th, 2007, 2007PDD23000002 


A.3 Installation 

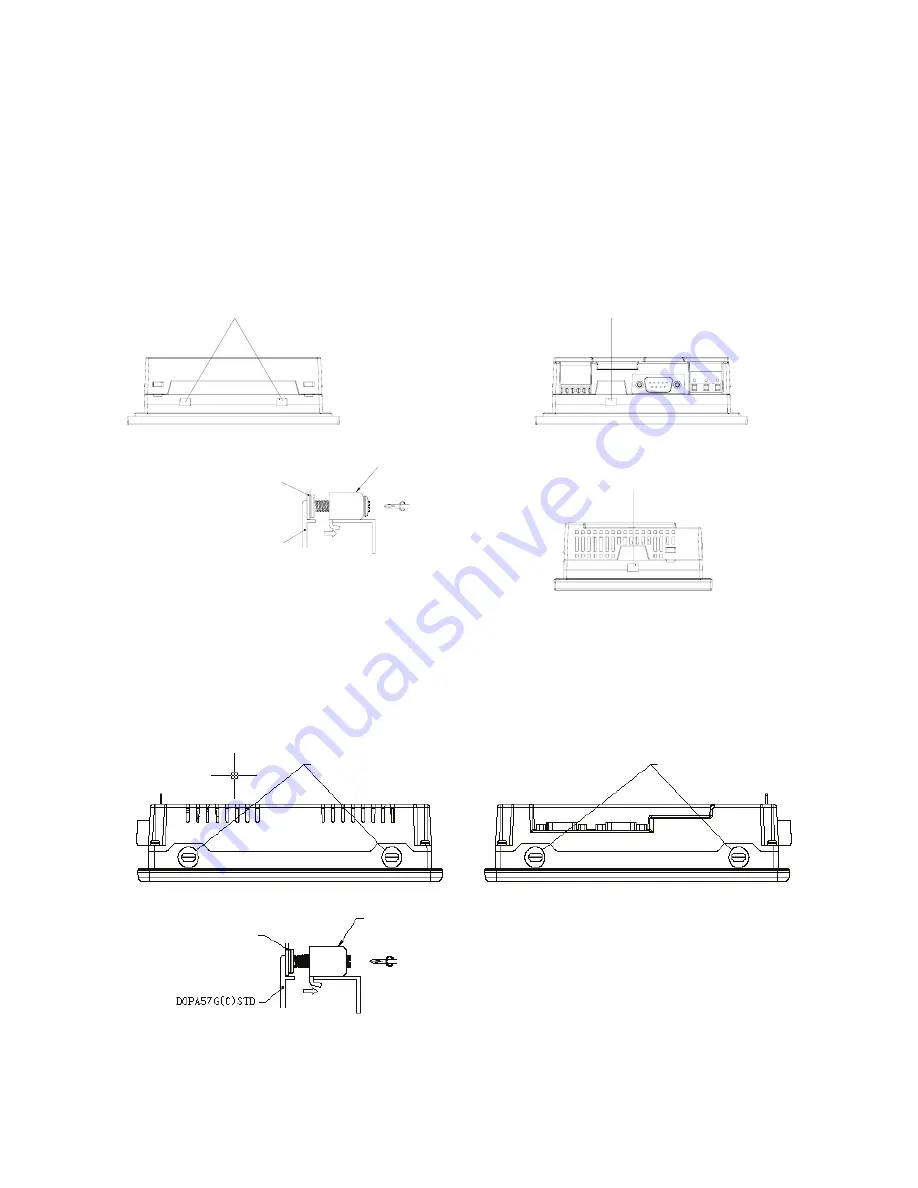
Install the fixed support from the internal side of HMI. 

1.  Do not turn the screw more than its torque specification to avoid damage to plastic box. 

2.  Damage may occur if torque exceeds 0.7N.M 


3.8” Panel (DOP-AS38BSTD(-W)) 

DOPAS38BSTD(-W)


5.7” Panel (DOP-A(E)57GSTD, DOP-A(E)57CSTD,DOP-A(E)57BSTD) 


Top View 

Mounting holes 

Bottom View 

Mounting holes 

Fixed support 

Snap-in panel mount 

Top View 

Mounting holes 

Bottom View 

Mounting hole 

Fixed support 

Snap-in panel mount 

Side View 

Mounting hole 

Summary of Contents for AE80THTD

Page 1: ......

Page 2: ...nstall and operate Delta HMI products and ScrEdit Who should use this manual This user manual is intended for the following users z Those who are responsible for designing z Those who are responsible...

Page 3: ...Preface ScrEdit Software User Manual ii Revision Apr 30th 2007 2007PDD23000002 This page intentionally left blank...

Page 4: ...How to Start ScrEdit 2 5 2 3 Menu Bar and Toolbar File 2 12 2 4 Menu Bar and Toolbar Edit 2 23 2 5 Menu Bar and Toolbar View 2 31 2 6 Menu Bar and Toolbar Element 2 43 2 7 Menu Bar and Toolbar Screen...

Page 5: ...3 13 Alarm Element 3 68 3 14 Graphic Element 3 73 3 15 Keypad Element 3 81 Chapter 4 Macro Function 4 1 4 1 Macro Type 4 2 4 2 Macro Editing 4 7 4 3 Macro Operation 4 14 4 4 Error Messages 4 42 Chapte...

Page 6: ...Table of Contents ScrEdit Software User Manual Revision Apr 30th 2007 2007PDD23000002 Appendix B USB Flash Drive Function B 1 Appendix C Main Menu Operation of HMI System C 1...

Page 7: ...cal support service and information or if you have any question in using the product We are looking forward to serve you needs and willing to offer our best support and service to you Reach us by the...

Page 8: ...Software Except Simplified Chinese traditional Chinese and English languages ScrEdit software also provides those fonts that Windows uses Quick Execution and Communication Macro It can handle complica...

Page 9: ...a or transfer data to another HMI After data transmission the data can be saved into the FLASH memory of HMI History list and alarm message can be also saved in SM card and the user can read these fil...

Page 10: ...of PC screen should be set to 24bit and higher otherwise the simulation function may work abnormally 1 3 Ordering Information DOP AE 10 TH T D W 1 2 3 4 5 6 7 1 Product Name Delta Operation Panel 2 Se...

Page 11: ...Humidity 10 90 no condensation allowed SM Card SM card can be used to save and transmit data Only SM card that formatted by HMI can be used on both HMI and Windows OS system Even it can be read writte...

Page 12: ...uirement CPU Pentium III 500MHz or greater is recommended Memory 256MB and above is recommended Hard Disk Capacity 400MB and above Monitor Support resolution 800 600 or higher full color display Print...

Page 13: ...box to select the desired display language Fig 2 1 2 Fig 2 1 2 Select Language After pressing OK system will setup automatically and you will get the following dialog box to choose destination locati...

Page 14: ...ght the desired directory for the Delta HMI ScrEdit and click OK then Next for the next step If necessary click Back button to take you back through Setup dialog boxes one by one 3 Step 3 After pressi...

Page 15: ...7 2007PDD23000002 Fig 2 1 6 Finish installing ScrEdit 5 Step 5 After finish installing ScrEdit Fig 2 1 6 system will ask you to install HMI USB driver please click Yes to install Fig 2 1 7 Install HMI...

Page 16: ...pr 30th 2007 2007PDD23000002 2 5 2 2 How to Start ScrEdit 1 After setup you can start ScrEdit by clicking Screen Editor 1 05 XX shortcut on the desk Refer to Fig 2 2 1 or from Windows taskbar click St...

Page 17: ...ew V Option O and Help H on the toolbar Fig 2 2 3 Screen without editing file 2 After pressing or click File New it can create a new project and you will get a dialog box as shown in the following Fig...

Page 18: ...ctions for selection File Edit View Element Screen Tools Options Window and Help Toolbar Toolbar Fig 2 2 6 is like those toolbar in Windows program It is easy to use for editing and the user can arran...

Page 19: ...ating and Editing Screens ScrEdit Software User Manual 2 8 Revision Apr 30th 2007 2007PDD23000002 3 Text Format Toolbar 4 Bitmap Toolbar 5 Element Toolbar 6 Build Toolbar 7 Layout Toolbar Fig 2 2 6 Sc...

Page 20: ...00002 2 9 Fig 2 2 7 Move ScrEdit toolbar to the left side of the screen Property Table It provides element property settings for each element Fig 2 2 8 Fig 2 2 9 Please refer to Chapter 3 for detailed...

Page 21: ...iew Output Window All editing actions and output message when compile function is enabled will be shown here Fig 2 2 10 When compiling ScrEdit will detect the error of user program automatically Once...

Page 22: ...apter 2 Creating and Editing Screens ScrEdit Software User Manual Revision Apr 30th 2007 2007PDD23000002 2 11 Work Place Following is an editing example display Fig 2 2 11 Fig 2 2 11 ScrEdit Work Plac...

Page 23: ...ew project open old project close file save current file and save current file to another file name etc options 2 Make and Open external memory data Ext Memory Data 3 Upload the editing display and da...

Page 24: ...I type and connecting base port controller after creating a new project Fig 2 3 2 New project dialog box 2 If other project files already exist and are open the user will get the following dialog box...

Page 25: ...olbar or using keyboard shortcuts by pressing Ctrl O 1 If other project files exist before opening an old project the user will get the Saving dialog box Fig 2 3 3 to remind the user of saving file an...

Page 26: ...p by choosing File Save Fig 2 3 12 or clicking the Save icon Fig 2 3 13 or using keyboard shortcuts by pressing Ctrl S If the project is a new file the Save as dialog box will show up Fig 2 3 15 If th...

Page 27: ...he ScrEdit cannot make screen data and an error message dialog box will show up Fig 2 3 8 Please execute the compilation first and then clicking File Make Ext Memory Data to copy the compiled HMI prog...

Page 28: ...n HMI which is set by clicking Options Configuration Standard Security When entering the correct password the user can get save as dialog box Fig 2 3 7 After inputting project file name the uploading...

Page 29: ...icking Options Configuration Standard Security Update Firmware This option is for upgrading HMI firmware or adding function for HMI Fig 2 3 13 Keeping HMI firmware version to be the most updated versi...

Page 30: ...ll get Fig 2 3 15 dialog box and symbol before Password Protect command If the symbol shows before Password Protect command from File menu it indicates that this dop file is password protected and the...

Page 31: ...ttings Security Print Print current screen by choosing File Print or clicking the Print icon from toolbar Fig 2 3 28 or using keyboard shortcuts by pressing Ctrl P Print Preview Select this function b...

Page 32: ...ion etc several functions Fig 2 3 19 Fig 2 3 19 Print Setup dialog box File Quick Access By default ScrEdit presents a list of the four most recent used files on the File menu for quick access Fig 2 3...

Page 33: ...the ScrEdit Select this function by clicking File Exit If the file has been changed or not saved yet the saving dialog box Fig 2 3 6 will show up to remind the user of saving project If the user pres...

Page 34: ...ndo or clicking the Undo icon from toolbar or use keyboard shortcuts by pressing Ctrl Z All actions are recorded in output window Redo Redo the undo action Select this function by choosing Edit Redo o...

Page 35: ...e keyboard shortcuts by pressing Ctrl A When selecting all the last created element i e the picture on the top will be a square that is filled with blue color and the border is in white The other crea...

Page 36: ...ess Type All Address This causes ScrEdit to find the read and write address Check Box If Match whole word only box is checked only the exact word or phase that the user types will be found If Match wh...

Page 37: ...s causes ScrEdit to find and replace the write address Bit WORD Data Type DWORD The function of replace content data type is enabled only when the replace content type is either read or write address...

Page 38: ...27 Replace Fig 2 4 5 Fig 2 4 6 Group It is used to group elements in ScrEdit Select this function by choosing Edit Group from menu bar or clicking the Group icon from toolbar When two or more element...

Page 39: ...lign Top and Align Bottom commands are available when two or more elements are selected That is because the element only can be left right top and bottom aligned relative to another element Align Vert...

Page 40: ...e time After selecting this function by choosing Edit Duplicate from menu bar the Fig 2 4 7 dialog box will show up The user can enter the number of columns and rows to get the total copy numbers If t...

Page 41: ...Chapter 2 Creating and Editing Screens ScrEdit Software User Manual 2 30 Revision Apr 30th 2007 2007PDD23000002 Fig 2 4 8 Duplicate Example 1 Fig 2 4 9 Duplicate Example 2...

Page 42: ...ese toolbars and docking windows by themselves If not show in front of the toolbar it indicates that the toolbar is hided and not display on the screen The description of each toolbar is introduced in...

Page 43: ...splay current editing states Fig 2 5 2 Status bar Text Format Toolbar Table 2 5 2 Text toolbar Icon Function Description Font Size Display and change text size Font Name Display and change text font A...

Page 44: ...etch the selected picture to the whole range of the element Picture Stretch 1 1 Scale the picture relative to original picture size Original Picture Resize the selected picture to the actual picture s...

Page 45: ...pter 2 Creating and Editing Screens ScrEdit Software User Manual 2 34 Revision Apr 30th 2007 2007PDD23000002 Icon Function Drop down Menu Meter Bar Pipe Pie Indicator Display Movement Input Curve Hist...

Page 46: ...state OFF 1 View State ON 1 Switch and view current state ON 1 Display All Read Write Address Display all read write addresses of all elements Previous windows Select previous windows Next windows Sel...

Page 47: ...gn Top Align the selected elements to top Align Bottom Align the selected elements to bottom Center Vertically Set the element to be the vertical position of the work place Center Horizontally Set the...

Page 48: ...rty Table Element property table Please refer to Chapter 3 for detailed description Fig 2 5 3 Property table Output Window All editing processes during compile operation will be shown here for user s...

Page 49: ...38 Revision Apr 30th 2007 2007PDD23000002 Fig 2 5 6 Output result of compile operation Fig 2 5 7 Error output Zoom In Zoom in to get a close look at the elements on ScrEdit work place Refer to Fig 2 5...

Page 50: ...r Manual Revision Apr 30th 2007 2007PDD23000002 2 39 Fig 2 5 9 Zoom level 300 After Choosing Zoom In command Zoom Out Zoom out to see more look of the elements on ScrEdit work place Refer to Fig 2 5 1...

Page 51: ...or out by clicking icon or or selecting the Zoom level directly Fig 2 5 11 Fig 2 5 11 Zoom level Full Screen As Fig 2 5 12 Full screen provides maximum view to edit in ScrEdit Full screen view will hi...

Page 52: ...the set macro commands Fig 2 5 13 I O Screen Pressing Esc key or left click the mouse can exit Full screen Grid Setup Grid Setup is a function that can help the user to align and position the element...

Page 53: ...Chapter 2 Creating and Editing Screens ScrEdit Software User Manual 2 42 Revision Apr 30th 2007 2007PDD23000002 Fig 2 5 15 Show Gird screen...

Page 54: ...types of elements and there are many styles for each type These 14 types include Button Meter Bar Pipe Pie Indicator Display data display Movement graph display input curve history sampling alarm grap...

Page 55: ...se refer to Chapter 3 for detailed description Create an Element The user can select an element by right clicking the mouse in work place Place your mouse pointer in work place and right click the mou...

Page 56: ...rEdit Software User Manual Revision Apr 30th 2007 2007PDD23000002 2 45 Fig 2 6 5 Select an element by choosing Element command from menu bar Fig 2 6 6 Drag with left mouse button Left click the mouse...

Page 57: ...elease left mouse button to create an element Move an Element The user can use the mouse to move an element Mouse operation is the same as working in Windows operating system When the mouse cursor cha...

Page 58: ...hen the mouse cursor changes to a two arrow icon the user can left click the mouse and modify the element width Fig 2 6 9 Fig 2 6 9 Modify Element Width Modify Element Height The user can also use the...

Page 59: ...a two arrow icon or the user can left click the mouse and modify the element width and height at the same time Fig 2 6 11 Fig 2 6 11 Modify Element Width and Height Simultaneously Input Characters The...

Page 60: ...07 2007PDD23000002 2 49 Right click the Mouse The user can find that different menu will pop up when right clicking the mouse Fig 2 6 13 Fig 2 6 14 and Fig 2 6 15 Fig 2 6 13 Right click the mouse on T...

Page 61: ...their relationship or connection with the addresses of other elements macro commands or system control area The user can see how to choose Cross Reference Table command from menu bar Fig 2 6 16 is one...

Page 62: ...b to switch to the classification that the user wants to view The related addresses and corresponding properties will be listed in each classification Name Describe Write Read address Trigger address...

Page 63: ...xiting In Windows it will exit the current screen by clicking close box and remind the user to save before exiting However in ScrEdit environment the current screen will not be deleted and it will not...

Page 64: ...2 7 4 the user can duplicate paste and cut the screen using the mouse just like the function of Windows Explorer in Windows operating system In Screen Management dialog box the user can right click t...

Page 65: ...Chapter 2 Creating and Editing Screens ScrEdit Software User Manual 2 54 Revision Apr 30th 2007 2007PDD23000002 Fig 2 7 4 Screen Management dialog box Fig 2 7 5 Right click the mouse...

Page 66: ...pboard function The difference is that Microsoft Office Clipboard allows the user to cut text and graphic items and the Cut Screen function only allows the user to cut a whole screen The user can exec...

Page 67: ...tion of delete screen Fig 2 7 9 Fig 2 7 9 Delete Screen Message Export Export an project to BMP format The user can execute this function by clicking Screen Export or clicking the Export icon or use k...

Page 68: ...en Close Macro When Screen Close Macro function is selected the Macro will be executed automatically once the screen is closed Please refer to Chapter 4 for the usage and editing method of Macro Scree...

Page 69: ...ser to determine the function of auxiliary keys in each screen The user can execute this function by clicking Screen Auxiliary Key Auxiliary key set up for each screen can be completed by pressing the...

Page 70: ...fined Auxiliary Keys DOP AS38BSTD 4 DOP A E 57BSTD 4 DOP A E 57GSTD 4 DOP A E 57CSTD 4 DOP A75CSTD 6 DOP AE80THTD 6 DOP AE94BSTD 11 DOP A10TCTD 7 DOP AE10THTD 7 Screen Properties The user can decide t...

Page 71: ...d display on HMI screen 1 Regarded as print screen The printer can print the element created by the user after a compile operation This option is only available in DOP series HMI which supports printe...

Page 72: ...reen to the position the user decided Fig 2 7 17 Sub screen Position Fig 2 7 17 Sub screen position Sub screen Setting Title Bar When the check box next to Use Title Bar is checked the title bar will...

Page 73: ...nter once the user presses the report list button HMI will refer to the setting in Hard Copy Region option and execute the screen printing Top Left Hard Copy Region Right Bottom It is used to set the...

Page 74: ...ile would be produced The user can execute this function by clicking Tools Compile or clicking icon directly or using keyboard shortcuts by pressing Ctrl F7 If this project is a new project it will re...

Page 75: ...ling process 4 Once error occurs the correspondent message will display in output window The user can click the error message and ScrEdit will switch to error element window automatically Download Scr...

Page 76: ...Software User Manual Revision Apr 30th 2007 2007PDD23000002 2 65 Fig 2 8 4 Start to download the progress will be from 0 to 100 Fig 2 8 5 USB open error message Fig 2 8 6 USB disconnect error message...

Page 77: ...download screen data only For the download screen please refer to Fig 2 8 4 above On Line Simulation It is used to simulate DOP series HMI by computer but HMI should also connect to PLC first to driv...

Page 78: ...he purpose of this function is to reduce the loading of the controller and make the register of the controller to be more flexible in use Recipe function provides an easy and quick parameter input met...

Page 79: ...ecked the recipe function is enabled If the user does not enable this function the user can not do this function even the user has downloaded recipe data Address The user can input the starting addres...

Page 80: ...s that the total recipe size should be less than 64K The number of Length x Groups should be less than 65536 If the total recipe size exceeds the limit the user will see a warning message shown as Fig...

Page 81: ...that the recipe file is a 16 bits data or a 32 bits data Do not select the incorrect data format otherwise the program will not work normally Save It is used to save the editing recipe data to be a f...

Page 82: ...an error and a warning message dialog box display on the screen as the user did not input the starting address of the recipe Fig 2 8 18 Cancel It will force the system to exit the Recipe Setup dialog...

Page 83: ...he recipe storage address the length and group number of the recipe the memory format and the integer fractional digit number of the recipe data There are three kinds of memory format provided includi...

Page 84: ...s floating recipe file Press to open a 32 bits floating recipe file The file format can be Recipe 32 bits File rcp and Excel CSV File csv Fig 2 8 23 Please pay close attention to the format of recipe...

Page 85: ...ay the storage address of a 32 bits floating recipe Setup 32 bits floating recipe setup When clicking a 32 bits floating recipe setup dialog box will display and the user can use it to change the sett...

Page 86: ...for more detailed description of the control block This recipe example can be downloaded via the following link http 59 120 64 39 81 phpbb2 files recipe_202 dop The function and explanation of each WO...

Page 87: ...ading Recipe The user can change the recipe value of PLC by triggering this control flag Bit 1 is set to ON Before reading a recipe from PLC the user should designate the recipe number N first Please...

Page 88: ...Recipe Number Register RBIR RCPNO value can be changed The user can use the control flag for changing recipe number of Recipe Control Register RECR to write recipe group number N into Designated Recip...

Page 89: ...ision Apr 30th 2007 2007PDD23000002 Besides in order to perform simulation operation more conveniently the Address of Control Block is set to Internal Memory 0 Your Screen will look like the Fig 2 8 2...

Page 90: ...lowing Fig 2 8 29 220 225 are the destination addresses that are used to store the recipe data Generally the recipe data are set to be stored in the addresses of external controller registers but for...

Page 91: ...NO is set to 2 it means that the using recipe group is 2nd group At this time HMI will move the data of 2nd group and put them in the recipe buffer area RCP0 RCP5 Besides using internal memory address...

Page 92: ...its recipe data the 32 bits floating recipe function also allows the user to save Double Word value But the best advantage is that it makes recipe editing to be easier and more flexible The existing r...

Page 93: ...w to use 32 bits recipe function The example is named as 32 bits recipe dop and it is saved in the Example folder under Screen Editor software installation directory Please click Tools 32 bits Floatin...

Page 94: ...mple of starting screen Besides using internal memory address RCPG and RCPNO the user also can enter into Configuration dialog box and change the address value of recipe register directly No matter wh...

Page 95: ...esses will be 1000 1002 1004 and 1006 5 in green is used to display the status of Recipe Control Register RECR Recipe Write 5 2 button is used to execute recipe write operation When this button is pre...

Page 96: ...Chapter 2 Creating and Editing Screens ScrEdit Software User Manual Revision Apr 30th 2007 2007PDD23000002 2 85 Fig 2 8 35 Fig 2 8 36...

Page 97: ...ant to change recipe data the user have to use RCPNO or RBIR these two registers In the example shown in Fig 2 8 37 below when RCPNO is set to 2 it means that the using recipe group is 2nd group of B1...

Page 98: ...5 is set to the Recipe Control Register RECR and bit 8 bit 15 is defined and used for setting recipe group number There the user should set the designated recipe group exchange the high and low byte...

Page 99: ...nd the other is 32 bits recipe file csv that can be opened and edited in Windows Excel environment The following section will describe how to edit a Excel CSV File csv in Microsoft Excel The definitio...

Page 100: ...Manual Revision Apr 30th 2007 2007PDD23000002 2 89 Fig 2 8 40 32 bits Recipe Example The layout of its csv file is shown as Fig 2 8 41 below The first row shows RCP32 1 0 This is the version of this...

Page 101: ...l represents the setting values of the 32 bits recipe For the connection between the column in Microsoft Excel and the settings of recipe group data please refer to the following table Column 32 bits...

Page 102: ...lbar Options Options Fig 2 9 1 Options Configuration The user can execute this function by clicking Options Configuration This dialog box is divided into five tabs Standard Communication Print Default...

Page 103: ...is 7 and the lowest level is 0 Enable USB updating check This function is only provided in some DOP series HMI which supports USB Host function For the detailed introduction please refer to Appendix...

Page 104: ...ate the Dynamic Optimize function Optimize Type Static When communicating with the controller read the address value and optimize the elements that show on the current screen but will not adjust the r...

Page 105: ...times A communication error dialog box will not appear unless the number of retry count times is reached The range is within 0 255 times Optimize Use this option to enable optimization function If opt...

Page 106: ...one is Hard Copy function which can print the current screen and print one page one time The other is Print Typesetting function If Print Typesetting function is selected no only the screen data but...

Page 107: ...t up Screen Use this option to set the first display screen when HMI is powered on and started up Default Format When creating elements it is used to set the default value format Default Screen When a...

Page 108: ...reen Management option on page 2 52 there is a more detailed description for introducing how to drag the mouse to determine the screen saver display Enable Screen Saver This option should be selected...

Page 109: ...turn to the original screen at that time when the screen saver is enabled 2 Choose screen Specify the screen that will show after the screen saver program ends New Pressing New button can add a langua...

Page 110: ...e if this option is selected The editing interface will be shown as the figure below Multi Language Function Example Example Create a Screen that has English Traditional Chinese and Simplified Chinese...

Page 111: ...Apr 30th 2007 2007PDD23000002 3 Control Block Options Configuration Settings Set the address as 200 and set the size is 8 4 Multi Language Settings Add English Traditional Chinese and Simplified Chin...

Page 112: ...he Simplified Chinese and enter in Simplified Chinese z Double click the Traditional Chinese tab and enter in Traditional Chinese z Double click the English tab and enter Alarm in English 6 In propert...

Page 113: ...Software User Manual 2 102 Revision Apr 30th 2007 2007PDD23000002 8 Select Compile command and execute Off Line Simulation Then the user can see the text of the Set button is changed in different lan...

Page 114: ...e are Delete Modify Import Export and OK buttons for the user to use For more information for the settings of Alarm Setup please refer to the Table 2 9 6 on the following pages and Chapter 3 for more...

Page 115: ...double click a row of the alarm message contents table to edit the alarm property Please note that there are three languages tabs in Alarm Setup dialog box since multi language function is also suppor...

Page 116: ...ncy Data b Alarm Type Example If there are five alarm types the required capacity for saving alarm data is 2 Bytes 5 10 Bytes Enable It is used to enable the alarm moving sign Position It is used to d...

Page 117: ...w long it is to read address one time If the Trigger option is PLC the sampling operation is controlled by the Control Flag Register for Sampling History Buffer The range of the sampling cycle time is...

Page 118: ...a exceeds 65536 when the user uses Windows Excel to open the CSV file an error message will display At this time the user can use Notepad or other text editing tool to open the CSV file If Auto Stop o...

Page 119: ...the second history data 6Bytes 2 2Bytes 20000 8 Bytes 200008Bytes Total require 80008Bytes 200008Bytes 280016Bytes Approx 0 268Mbytes 2 csv file MBytes Bytes a N Size File Actual 1024 1024 240 a Sampl...

Page 120: ...ess 1 Y0 with the word OS just define it in Tag Table option in advance Table 2 9 8 Tag Table Settings Tag Table Dialog Box Open Open a Tag File and import it into HMI Save Save the settings or change...

Page 121: ...exit Cancel Press Cancel to exit without saving Print Typesetting Provide more efficient print layout management function Please refer to the examples on the following pages Print Function Example Pr...

Page 122: ...re User Manual Revision Apr 30th 2007 2007PDD23000002 2 111 3 Configuring Print Setup The user can click Options Configuration Print to enter into Print tab Then use the Print tab to configure the set...

Page 123: ...int typesetting screen cannot be the sub screen Create Printing Report Step 1 Creating a new screen first Click Screen New Screen and set it as Apply Print Screen in Screen Properties tab Click Screen...

Page 124: ...Data function is enabled and all the sampling records and data for the element will be printed out completely Print Screen Layout and Output Step 1 Click Options Print Typesetting Then drag the mouse...

Page 125: ...reate a Report List button on a General View Screen Then use this Report List button to enable the print function Step 3 Set the properties of the Report List option The Report Device can be SMC USB f...

Page 126: ...print Please note that it will take some time when there are too many print screens or the sampling data of the print element is too much Hard Copy Function The Hard Copy function is available only w...

Page 127: ...start to print Picture Bank The user can use this option to import various pictures to enrich the screen selection and make the Picture Bank more plentiful Please Click Options Picture Bank to execute...

Page 128: ...o the designated picture bank The formats of the pictures in the picture bank can be BMP JPG GIF static and ICON pictures When selecting this function the dialog box shown above will display Then the...

Page 129: ...ed text and terms into Text Bank The user can select the text from the Text Bank and enter them on the element more easily and quickly if necessary Table 2 9 10 Text Bank Settings Text Bank Dialog Box...

Page 130: ...initial macro will be executed automatically after the power is applied to HMI power on For the Macro function please refer to Chapter 4 for more details Background Macro Use this option to edit back...

Page 131: ...in this location In order to avoid a system error and failure to find the file we recommend the user not to change this setting if not necessary ToolBars Windows It is used to set if toolbars or duck...

Page 132: ...If ScrEdit ends the editing abnormally the file name will be named as _LOCALTEMP02 PIB _LOCALTEMP03 PIB and vise versa when execute uploading next time The last two numbers at the end of the file nam...

Page 133: ...exit the current window The users can execute this function by clicking Window Close Window If the user wants to display the hidden window please click Screen Open Screen to open an old screen Close A...

Page 134: ...n if this function is executed Previous Window It is used to switch the current window to the previous window If the current window is the first window the current window will not be changed even if t...

Page 135: ...0 3 Screen display after choosing Cascade command Title Horizontal Display all editing windows from top to bottom The user can execute this function by clicking Window Title Horizontal The opened wind...

Page 136: ...te this function by clicking Window Title Vertical The opened windows are displayed vertically as shown as Fig 2 10 5 Fig 2 10 5 Screen display after choosing Title Vertical command Window Summary Scr...

Page 137: ...are User Manual 2 126 Revision Apr 30th 2007 2007PDD23000002 2 11 Menu Bar and Toolbar Help Help Fig 2 11 1 Help option About ScrEdit Display the version information of Screen Editor and the firmware...

Page 138: ...t to understand how to choose an element and the special function of each element in ScrEdit 3 1 How to Choose Element There are three methods for choosing elements when editing the screens 1 Right cl...

Page 139: ...Manual 3 2 Revision Apr 30th 2007 2007PDD23000002 Fig 3 1 2 Choosing Element command from menu bar Fig 3 1 3 Choosing Element icon from toolbar After selecting an element left click and drag the mouse...

Page 140: ...again the state of the setting address will be OFF and execute OFF Macro simultaneously Multistate No Yes Yes There are 1 256 user defined multi states for setting The user can set the execution seque...

Page 141: ...tons After pressing these buttons HMI will transmit ON OFF signal to PLC or the controller There are four types of buttons Set button Reset button Momentary and Maintained buttons Please refer to the...

Page 142: ...Macro function please refer to Chapter 4 for more details Text Text Size Font Text Color The user can set the text text size font and text color provided by Windows to determine the text display on th...

Page 143: ...does not need to exit the dialog box and click Option Picture Bank command again Use the removal tool to remove the color of the element and determine the transparent color of the element The user ca...

Page 144: ...ority that is equal to or higher than the current setting can use this element Set Low Security Use this option to force the current priority to be the lowest after the button is pressed This can prev...

Page 145: ...o set the active time of the button When this option is set the button will be active after pressing the button longer than the setting time Using this option can avoid malfunction The range is within...

Page 146: ...value Write Address The address can be internal memory or the controller address Please refer to Table 3 2 2 Property Description of General Buttons Text Text Size Font Text Color The user can set th...

Page 147: ...r operator InterLock Address InterLock Level When InterLock Address is set to be ON or OFF this is determined by the property of InterLock Level this button can be enabled Before Execute Macro If this...

Page 148: ...After pressing OK button HMI will examine the value by referring to the selected data length and data format User Security Level Use this option to set the user priority for pressing this element Only...

Page 149: ...Picture Bank Name Picture Name Please refer to Table 3 2 2 Property Description of General Buttons Transparent Effect Transparent Color Please refer to Table 3 2 2 Property Description of General Butt...

Page 150: ...acro or external signal the command of this macro will not be executed Goto Screen Previous Page Previous View Buttons Table 3 2 7 Property description of Goto Screen Previous Page Previous View butto...

Page 151: ...ually This dialog box will pop up only when the button function is Goto screen Close Sub Screen When this option is selected it indicates that this Goto screen button is only valid in Sub Screen When...

Page 152: ...nd then execute the command of this macro But if the state of the button is not triggered by pressing the button via macro or external signal the command of this macro will not be executed System Func...

Page 153: ...the following items System Date Time Use this option to set the system date and time of HMI The user only need to press SYS button on HMI panel to enter HMI system setting screen and edit the date tim...

Page 154: ...y trigger the controller address to be ON If the controller address needs to be triggered again the user should set the address to be OFF manually This option is provided in Report List button only Wh...

Page 155: ...ion Buttons After Execute Macro If this option is set when the user presses the button the system will perform the operation of this button first and then execute the command of this macro But if the...

Page 156: ...onvenience for the user to recognize Read Address The address can be internal memory or the controller address Please refer to Table 3 2 2 Property Description of General Buttons Text Text Size Font T...

Page 157: ...ction The digit number is not a real digit number value It is only the display format When the user has input the target value minimum and maximum value after pressing OK button HMI will examine the v...

Page 158: ...nt Please refer to Table 3 2 2 Property Description of General Buttons Border Color It is used to set the border color of the normal bar element Foreground Color Background Color It is used to set the...

Page 159: ...erty table only when the Ranges option in the Detail dialog box is selected If the user sets the low limit value is 30 and the color of low limit region is in green and then set the high limit value i...

Page 160: ...d Also the deviation value will display in the designated color set by the user If this option is not selected the deviation value will be displayed in the foreground color directly on the screen Vari...

Page 161: ...ize Font Text Color The user can set the text text size font and text color that provided by Windows to determine the text display on the element Please refer to Table 3 2 2 Property Description of Ge...

Page 162: ...value by referring to the selected data length and data format Low Region Color High Region Color This option is available and displayed in the property table only when the Ranges option in the Detai...

Page 163: ...of General Buttons The user can decide if the read address is set or not If the read address is set the mobile cursor will display and move just like the water flowing through the pipe For example su...

Page 164: ...emory or the controller address Please refer to Table 3 2 2 Property Description of General Buttons Text Text Size Font Text Color The user can set the text text size font and text color that provided...

Page 165: ...low high limit is a variable value the low limit address is Read Address 1 the high limit address is Read Address 2 and the address of target value is Read Address 3 When the user has input the targe...

Page 166: ...when the value is 0 the indicator will display the text Stop The user also can add a picture into each state of the multistate indicator and then the corresponding picture will show when each state is...

Page 167: ...element can twinkle to remind the user Please refer to Table 3 2 2 Property Description of General Buttons Picture Bank Name Picture Name Please refer to Table 3 2 2 Property Description of General B...

Page 168: ...tor Element Property Description of Simple Indicator Element For the user s convenience simple indicator provides two states ON OFF to let the user change the XOR color of the base picture quickly In...

Page 169: ...Display Element This element will read the value of the setting address and display the read value immediately in the format set by the user Read Address The address can be internal memory or the con...

Page 170: ...Signed Decimal 4 Unsigned Decimal 5 Hex 6 Binary 7 Floating Integral Digits Fractional Digits Use this option to determine the digit number of integer and decimal fraction The digit number Fractional...

Page 171: ...isplay text or character The max string length is 28words Read Address The address can be internal memory or the controller address Please refer to Table 3 2 2 Property Description of General Buttons...

Page 172: ...isplay Element Display HMI system date There are several date formats selectable for the user to use Text Size Text Color The user can set the text size and text color that provided by HMI to determin...

Page 173: ...Description of General Buttons Text Text Size Font Text Color The user can set the text text size font and text color provided by Windows to determine the text display on the element Please refer to T...

Page 174: ...Decimal Unsigned Decimal and Hex four kinds of data format to define the read memory content Add Remove State It is used to set the state numbers of moving sign element If the data length of the valu...

Page 175: ...its size freely Dynamic Ellipse It is used to draw and display a dynamic ellipse on the HMI screen The user can control the X and Y direction to move the dynamic ellipse element and change its size fr...

Page 176: ...he initial state and will not change the picture automatically Auto Change Variation When this option is selected the property of the Read Address will be the condition of changing element picture The...

Page 177: ...Read Address 2 Use the value of Read Address 2 to be the vertical axis position of the animated graphic element Picture Bank Name Picture Name Please refer to Table 3 2 2 Property Description of Gener...

Page 178: ...horizontal position Right of the element i e the second X coordinate on the screen X2 Read Address 3 The value of the Read Address 3 can be used only when Variable Position option is set to Yes It is...

Page 179: ...nt the left top horizontal position Left of the element i e the first X coordinate on the screen X1 Read Address 1 The value of the Read Address 1 can be used only when Variable Position option is set...

Page 180: ...ta Format It provides BCD Signed Decimal Unsigned Decimal and Hex four kinds of data format to define the read memory content Transparent When this option is selected the element will display only wit...

Page 181: ...ment will twinkle If the value is 0 it will not twinkle Please note that when Variable Central Point option is set to No the internal memory address of Variable Radius option will increase one one inc...

Page 182: ...address of the input element is D0 then D0 X D1 Y D2 Width of the Ellipse D3 Height of the Ellipse D4 Color D5 Twinkle 0 not twinkle 1and higher twinkle No matter the dynamic line or dynamic ellipse e...

Page 183: ...corresponding register The maximum and minimum input setting values are all user defined The user can also specify the trigger mode to trigger the designated PLC address before or after writing the se...

Page 184: ...etting value Please note that this function can only trigger the controller address to be ON If the controller address needs to be triggered again the user should set the address to be OFF manually Da...

Page 185: ...Offset b The user can use y a x read address value b this equation to determine the display numeric value y For example if Gain value a is 2 and Offset value b is 3 when the read address value is 3 t...

Page 186: ...Set Low Security Use this option to force the current priority to be the lowest after the button is pressed This can prevent the misoperation made by the user operator InterLock Address InterLock Lev...

Page 187: ...lt text font for the user to use Border Color Background Color Border Color option can be set only when the style of the character entry element is selected as Raised and Sunken The style of the eleme...

Page 188: ...re only 4 elements including display element and input element can be fast refreshed on one screen If the user use this function on too many elements it may affect the normal speed of HMI operation So...

Page 189: ...address read format curve width and color in Detail Setup option to complete the setup The trend graph will continuously read numbers of addresses from the read address set by the user convert the rea...

Page 190: ...if the allowable width range of the created element is 10 sample numbers when the sample number set by the user is higher than 10 the warning dialog box above will display Please note that when the sa...

Page 191: ...the maximum or less than the minimum the system will display the minimum and maximum value still Curve Width It is used to the display curve width The range is within 1 8 and the unit is pixel Curve...

Page 192: ...be set and displayed Sample Number Detail Setup Max Sample Number Sample Number can be set to a constant or a variable value When Sample Number is a constant The sample number represents a curve whic...

Page 193: ...le Number Vert Read Address The address can be internal memory or the controller address Please refer to Table 3 2 2 Property Description of General Buttons The X Y chart will continuously read number...

Page 194: ...be downloaded via the following link http 59 120 64 39 81 phpbb2 files curve dop 1 Please choose Options Configuration on the menu bar to find the Standard tab in Configuration dialog box and set the...

Page 195: ...art i e X Y Clear is 1002 9 5 Create a momentary button which the memory address is set to 1002 0 on the screen and set OFF macro as follows CLRB 1002 8 Create a momentary button which the memory addr...

Page 196: ...Draw 1002 0 is pressed HMI will start to draw the trend graph When Trend Clear 1002 8 is pressed HMI will start to clear the trend graph 7 43 49 represent the X axis data of the X Y chart and 49 56 r...

Page 197: ...table and can be updated immediately for the user to use and read more easily Sampling elements should be used with History Setup The user can click Option History Setup Choosing History Setup comman...

Page 198: ...ched Non Volatile Using this option can enable HMI to save sampling data in SRAM The capacity for saving history data of DOP AS series is 120Kbytes DOP A series is 240KBytes and DOP AE series is 360KB...

Page 199: ...olor Background Color The below element background color is set to black and its border color is set to gray Curve Number 1 8 curves can be set and displayed Logging Buffer Use this option to set the...

Page 200: ...e a real decimal number only when the data format is selected as Floating Time Date Time Format Provide HH MM SS HH MM two kinds of formats Date Format Provide MM DD YY DD MM YY and DD MM YY three kin...

Page 201: ...cted Data Length in Buffer Properties of History Setup Border Color Background Color The below element background color is set to green and its border color is set to gray Data Field Number 1 8 data f...

Page 202: ...ion The digit number is not a real digit number value It is only the display format The digit number will be a real decimal number only when the data format is selected as Floating Historical Event Ta...

Page 203: ...d to set the reading Word data when triggering every time For example if the Data Length option in the History Setup dialog box is set to 3words there are 0 2 data numbers can be selected in this opti...

Page 204: ...Chapter 3 Element Function ScrEdit Software User Manual Revision Apr 30th 2007 2007PDD23000002 3 67 Fig 3 12 2 History Graph...

Page 205: ...s ON or OFF the ON or OFF frequency of the contact will be converted to Alarm Frequency Table element and display on the screen Alarm Moving Sign HMI will monitor and read the read address in a fixed...

Page 206: ...box will also be shown in front of the alarm message Please refer to the figures below Detail Color When time or date format is selected the user can use this option to designate the display color Act...

Page 207: ...Date these two options are selected the user can designate the display color by using this option Alarm Frequency Table Table 3 13 4 Property Description of Alarm Frequency Table Element Property Desc...

Page 208: ...Time and Date these two options are selected the user can designate the display color by using this option Alarm Moving Sign Table 3 13 5 Property Description of Alarm Moving Sign Element Property De...

Page 209: ...t Date Provide MM DD YY DD MM YY and DD MM YY three kinds of display format Alarm Number If this option is selected when the alarm occurs the alarm number that is designated in Alarm Setup dialog box...

Page 210: ...t The user can click where the user wants to start the line and drag across the work place on the screen Then release the mouse to finish the line When selecting this line graphic element the user can...

Page 211: ...led also Round Radius 0 38 pixels round radius are provided for selection Circle Table 3 14 3 Property Description of Circle Graphic Element Property Description of Circle Graphic Element The user can...

Page 212: ...ace the first node and drag the mouse across work place on the screen until the next node is decided and left click the mouse again to determine the position of the next node Repeat the above action u...

Page 213: ...en release the mouse to finish the arc When selecting this arc graphic element the user can see a rectangle range and this is designed for the user to move and adjust the arc more quickly and convenie...

Page 214: ...f the multi language function is used the user can see different language tabs and edit different language font setting in Font Detail Setting dialog box Please refer to the example figure above Foreg...

Page 215: ...mat 1 BCD 2 Signed Decimal 3 Unsigned Decimal Minimum Maximum The user can set the minimum and maximum of input setting value to determine the range of input setting value Integral Digits Fractional D...

Page 216: ...on the screen Background Color It is used to set the display color of the table scale element Row Header It is used to the color of the first row of the table The user can enable or disable this optio...

Page 217: ...user can enable or disable this option by checking the check box next to Columns Header Sep Rows Evenly It is used to distribute rows of the table evenly Cell Setting Sep Col Evenly It is used to dist...

Page 218: ...If it is refined as character A the display text will be changed to A If it is changed to character the display text will be changed to and vise versa The keypad is displayed in a Group on the screen...

Page 219: ...nd edit different language font setting in Font Detail Setting dialog box Please refer to the example figure above Picture Bank Name Picture Name Please refer to Table 3 2 2 Property Description of Ge...

Page 220: ...anual Revision Apr 30th 2007 2007PDD23000002 3 83 Example for Keypad Element This example can be downloaded via the following link http 59 120 64 39 81 phpbb2 files keypad dop In this example the user...

Page 221: ...Chapter 3 Element Function ScrEdit Software User Manual 3 84 Revision Apr 30th 2007 2007PDD23000002 This page intentionally left blank...

Page 222: ...the PC before downloading to HMI The lines number for each macro is 512 lines and 128 words max for writing comments or strings in a line The sub macro number is 512 sub macros number is 1 512 See Fi...

Page 223: ...k On Macro 1 The user can have an ON Macro for each specific button Off Macro 1 The user can have an OFF Macro for each specific button Before Execute Macro 1 For all button elements and numeric chara...

Page 224: ...the action of pressing the button i e the Bit is set to be OFF and the pressed button is OFF also OFF Macro will not be executed if the Bit is set to be OFF only Before Execute Macro This macro is att...

Page 225: ...itial Macro in a program It is executed first at the beginning of a program So the user can preset some necessary initial values in this macro to omit step by step settings and also control initial se...

Page 226: ...ddresses and then execute one line of background macro in order Clock Macro There is only an initial Macro in a program or a machine Similar to Screen Cycle Macro it can be executed repeatedly for a s...

Page 227: ...to write CALL 1 in Macro whenever it is used In this case the user needs only modify this sub macro instead of modifying 10 macros if necessary The sub macro can be named by its function for easy man...

Page 228: ...ter macro command in Marco Command Window or input macro command in Edit Window directly Fig 4 2 1 Start editing Macro The user can also use the icons on the toolbars Fig 4 2 2 for Macro editing Refer...

Page 229: ...Macro command editing window will pop up Fig 4 2 5 by clicking The user can determine the command that the user needs by pressing the command button or clicking command from menu bar Then the user onl...

Page 230: ...function for the convenience of editing macro The user can open old Macro files when using any PLC brand to save Macro editing time without re input Refer to Fig 4 2 6 for Open Macro window Fig 4 2 6...

Page 231: ...macro commands In the example figure below one to five rows is chose After the desired macro commands are chose the user can right click the mouse on the cell in red color to select the Copy option Fi...

Page 232: ...00002 4 11 Fig 4 2 9 Paste one or more macro commands Fig 4 2 10 The result of copying and pasting one or more macro commands Edit The user can edit Macro via Edit option in Macro Command dialog box F...

Page 233: ...iting the user should re do again Insert Insert the editing macro between two lines of macro After inserting a new line the existing line of macro will move backward a line Delete Delete the selected...

Page 234: ...ication Fig 4 2 23 Others Keypad For the convenience of editing macro ScrEdit allows the user to edit Macro by using keypad key in manually ScrEdit will check the validity automatically If there are a...

Page 235: ...two registers used actually It means that if the user set the format of 0 as Double Word 0 and 1 will be used for storing data If Signed shows after the macro command it indicates that the command is...

Page 236: ...n Trigonometric Function Operation is the operation of signed 32 Bit data V1 can be internal memory only V2 and V3 can be internal memory or constant Table 4 3 1 Arithmetic command table FADD Addition...

Page 237: ...this calculation is stored in the internal memory address 8 8 FSUB 4 6 Signed DW FMUL Multiplication Equation V1 V2 V3 V1 FMUL V2 V3 Signed DW Perform the multiplication of V2 and V3 and store the mu...

Page 238: ...V1 The value contained within V3 cannot be equal to 0 zero Example The value contained within the internal memory address 2 divided by 5 and the remainder of the result of this calculation is stored...

Page 239: ...esses started from address 2 and the grand total is stored in the address 0 The value of the grand total is equal to 8 SIN Sine Function Operation Equation V1 SIN V2 Signed DW Perform the sine functio...

Page 240: ...Example 0 CSC 50 The result is 0 1 305 Logical Operation Six logical operations includes OR AND XOR NOT Shift left and Shift right There are three operands for each operation Each operand can be inte...

Page 241: ...eration Equation V1 V2 V3 Perform the Bit AND operation on V2 and V3 and save the result of this calculation in V1 Example 2 F000H 4 0F00H 6 2 4 Store the result of 6 in 0000H Operand Bit XOR operatio...

Page 242: ...Bit Shift right operation Equation V1 V2 V3 Shift V2 WORD DWORD data to right number of bit is V3 The result of this calculation is stored in V1 If the shift number of bit is more than the address its...

Page 243: ...hin V2 after command is executed Example The data within the internal memory address 0 is designated the constant 4 0 4 The data within the internal memory address 4 is designated the same as the data...

Page 244: ...in order The low and high bit of the converted ASCII code will be exchanged Example CHR 1 AB12 After executing CHR command 4241H will be stored in 1 and 3130H will be stored in 2 FMOV Transfer Floatin...

Page 245: ...into BCD value and stored in V1 Example The binary data in 4 is 5564 After executing BCD command the binary data in 5 is converted to 5564H 4 5564 5 BCD 4 BIN Converts BCD Data into BIN value Equatio...

Page 246: ...at the low and high byte of the converted WORD will be exchanged Example 10 AB12 H 11 34CD H 20 B2W 10 4 Read 2 WORDS i e 4 BYTES from 10 and convert 4 BYTES to 4 WORD Then store the result in 20 to 2...

Page 247: ...ng SWAP command XCHG Exchange Data Equation XCHG V1 V2 V3 DW Exchange the data of V2 V2 1 V2 2 V2 V3 and the data of V1 V1 1 V1 2 V1 V3 The data of V1 and V2 will be exchanged after executing XCHG com...

Page 248: ...cuting A2H command the data in 1 will be converted to 4368H H2A Convert a four digits integer in hexadecimal format to 4 ASCII code Equation V1 H2A V2 Convert V2 1 WORD in hexadecimal format to the AS...

Page 249: ...ption Remark V1 V2 V1 is equal to V2 V1 V2 V1 is not equal to V2 V1 V2 V1 is greater than V2 V1 V2 V1 is greater than or equal to V2 V1 V2 V1 is smaller than V2 V1 V2 V1 is smaller than or equal to V2...

Page 250: ...IF This is logical determination from multiple conditions If expression1 is true Statement1 will be executed If expression1 is false it will run expression2 If expression2 is true Stemenent2 will be e...

Page 251: ...2 and continue to execute the program unconditionally GOTO LABEL 2 LABEL 2 LABEL Label such as Label V1 Equation LABEL V1 Please note that the label cannot be repeated in a Macro CALL RET Call Sub ma...

Page 252: ...FOR V1 Statement NEXT It is for multi level loops The multi level loop can be up to 3 levels V1 can be the internal memory or constant When this command is executed the number of V1 Statement can be...

Page 253: ...ion the result is 1 11 not 1 12 as the END command has ended the macro program Bit Settings Please refer to the following table for the commands of Bit Settings Command Equation Description SETB SETB...

Page 254: ...e of 3rd Bit within the internal memory 0 and store it to the 5th Bit within the internal memory 10 0 0000000000000100B 10 0 10 5 GETB 0 3 The result is 10 0000000000010000B Communication Command Equa...

Page 255: ...COM INITCOM Initial setup COM port to start communication and set communication protocol Fig 4 3 2 INITCOM Fig 4 3 3 Variable2 settings in INITCOM communication protocol Fig 4 3 4 COM port Fig 4 3 5 C...

Page 256: ...ing cable DSR DTR It is flow control for hardware also It is used when PC and HMI is connected by cable directly XON XOFF It is flow control for software It is only used for 2400bps modem The control...

Page 257: ...rt each other and there will be no interference between different macros CLEARCOMBUFFER Clear COM port buffer Equation CLEARCOMBUFFER V1 V2 V1 is the number of communication port It represents as cons...

Page 258: ...Convert the string of commands to ASCII code and store data from 11 10 3A00H Set starting Bit Because the value of high byte and low byte will be exchanged when HMI sends command even though the start...

Page 259: ...the timeout setting is 500ms 51 GETCHARS 110 18 500 Receive the PLC response data after communication The received data is stored in 100 the data length is 18 bytes and the timeout setting is 500ms D...

Page 260: ...ength is 20 bytes and the timeout setting is 500ms 1501 GETCHARS 1121 20 500 Receive the PLC response data after communication The received data is stored in 1121 the data length is 20 bytes and the t...

Page 261: ...mand will not affect macro function The user only needs to put in front of the equation and the macro will become readable If the user wants to change the comment to be back to equation just remove th...

Page 262: ...system time as 2006 01 04 Wed 09 26 25 1 2006 2 1 3 4 4 3 5 9 6 26 7 25 SETSYSTEMTIME 1 GETHISTORY Get history data Equation V1 GETHISTORY V2 V3 V4 V5 V6 V1 is the internal memory address where store...

Page 263: ...ge is to warn the user not to use more than 3 nested FOR commands The purpose is to avoid insufficient memory The user can use GOTO or IF to replace it Code 103 Sub macro does not exist This error mes...

Page 264: ...Code 10 GOTO Error This message means that there is GOTO error in macro Code 11 Stack Overflow This message means that stack in macro is full That may be cause by using too many sub macros or execute...

Page 265: ...onnel We will tell you the next step where the point is and how to debug according the error messages you get to dispel the doubt that HMI cannot communicate with the controller For the meaning of com...

Page 266: ...essage Incorrect Command Error Message Com d Station d Command Can Not be Executed Incorrect Address Error Message Com Station Address Fault Incorrect Value Error Message Com Station Value is Incorrec...

Page 267: ...30th 2007 2007PDD23000002 Controller Station Number Error Error Message Com Station Controller Station Number Error UART Communication Error Error Message Com Station UART Communication Error Other C...

Page 268: ...tab Please choose Options Configuration to find the Standard tab in Configuration dialog box Fig 5 1 and Fig 5 2 Through the settings set in the Standard tab the controller which is connected to HMI c...

Page 269: ...In the following table we assume that the user uses a Delta PLC so the available starting addresses in control block are Dn Dn 7 D0 D7 Word Number Register Number Example 0 Register for designating S...

Page 270: ...lly It cannot be used to turn off HMI communication directly Fig 5 1 1 Communication tab Enable Disable Back Light Control HMI back light When Bit 1 is set to ON it will turn off HMI back light When B...

Page 271: ...ON Bit 0 Bit 3 is set to ON HMI will sample ONCE by reading continuous data of curve on HMI screen and convert the data to graph and show on HMI screen Since the flag is only used to trigger the grap...

Page 272: ...ng History Buffer 11 11 Control flag for Sampling History Buffer 12 12 15 Reserved Control Flag Register for Sampling History Buffer Controls sampling history buffer operation of HMI by the external c...

Page 273: ...ber One method is to use HMI internal register RCPNO directly RCPNO is the internal system register used for designating recipe number The other method is to use Recipe Control Register RECR Dn 5 When...

Page 274: ...control block and use this control flag to trigger Dn 5 Bit 3 is set to ON After setting RCPG will be changed to N automatically This flag needs be set to OFF and then ON if the user wants to trigger...

Page 275: ...t screen or print typesetting screen Either one of them can be selected The default setting is print typesetting screen usually When this flag is triggered to ON the general current screen or print ty...

Page 276: ...ll use a Delta PLC so the available starting addresses in control block are Dm Dm 7 D10 D17 Word Number Register 0 Status Register for General Control GCSR Dm D10 1 Status Register for Screen Number S...

Page 277: ...ON OFF OFF 5 ON OFF ON 6 ON ON OFF 7 ON ON ON Status Register for Screen Number SNSR Word Function 0 The last open screen number The last open screen number The register SNSR Dm 1 is used to store th...

Page 278: ...ng Status of History Buffer 4 4 Sampling Status of History Buffer 5 5 Sampling Status of History Buffer 6 6 Sampling Status of History Buffer 7 7 Sampling Status of History Buffer 8 8 Sampling Status...

Page 279: ...set to ON After HMI change the status of recipe number and update the RCPNO value the change status of recipe number flag will be OFF Recipe Read Status Flag When HMI read one recipe data from PLC th...

Page 280: ...on HMI from the multi language status value Printer Status Flag When this flag is triggered to ON it indicates that the printer is printing current display or editing screen When this flag is set to...

Page 281: ...Chapter 5 Control Block and Status Block ScrEdit Software User Manual 5 14 Revision Apr 30th 2007 2007PDD23000002 This page intentionally left blank...

Page 282: ...ple if n m m X then n X the value of m cannot exceed 65535 Receipt Number Register R W RCPNO It is 16 bit register that is used to designate the receipt group number The minimum receipt group number s...

Page 283: ...CPNO 3 data from this area RCP0 RCP L 1 can be regarded as a common area Absolute Address Access This method is used to access the data that data address is greater than RCP L 1 At this time the start...

Page 284: ...be shown on the Output section of the Screen It is assumed that a Delta display kit is being used but if not just an E Drive and HMI with a power source and communication cable will be needed To start...

Page 285: ...Chapter 7 Example Explanation ScrEdit Software User Manual 7 2 Revision Apr 30th 2007 2007PDD23000002 Fig 7 1 The Screen will look like this after the user click the OK button See Fig 7 2 Fig 7 2...

Page 286: ...2007PDD23000002 7 3 Select the Element drop down Select Button Select SET The Screen will look like this See Fig 7 3 Fig 7 3 After that the cursor will be a Left click and drag the mouse in the Scree...

Page 287: ...Chapter 7 Example Explanation ScrEdit Software User Manual 7 4 Revision Apr 30th 2007 2007PDD23000002 Fig 7 4 In the Write Address type in 10 1 See Fig 7 5 Fig 7 5...

Page 288: ...on when the button is selected The screen will look like Fig 7 6 Fig 7 6 Go to the Screen drop down and at the bottom select Screen Cycle Macro Type in 2 INVERTER 0200 3 Type in 2 INVERTER 0201 4 This...

Page 289: ...up to control the drive To do this you must set the baud rate and signaling for the HMI and the drive The computer must be set up to download the information to the HMI written in the HMI programming...

Page 290: ...Chapter 7 Example Explanation ScrEdit Software User Manual Revision Apr 30th 2007 2007PDD23000002 7 7 Fig 7 8...

Page 291: ...PDD23000002 Making a Stop Button with Macro s The next button will be made to turn the drive off Select the set button again In the Address button select 11 0 In the Edit on Macro section Type 2 INVER...

Page 292: ...for each Button then the user will see the effect when using them and know which one to select Select the Icon to download it to the HMI Select the Icon to compile the program The screen will look li...

Page 293: ...Chapter 7 Example Explanation ScrEdit Software User Manual 7 10 Revision Apr 30th 2007 2007PDD23000002 Fig 7 11...

Page 294: ...3 AE 3 AE USB for Download USB Client 1 Client Ver 1 1 USB for Data Storage Printer USB Host 3 Display Type 3 8 STN LCD 8 shades of blue 5 7 STN LCD 8 shades of blue 5 7 FSTN LCD 16 shades of gray 5 7...

Page 295: ...er supply Note 3 Backup Battery 3V lithium battery CR2032 x 1 battery life 5 years Buzzer 85dB NOTE 1 Only DOP AE94BSTD this model is not UL recognized 2 The maximum visual performance of the models w...

Page 296: ...ht about 50 thousand hours at 25 o C CCFL Back Light about 30 thousand hours at 25 o C 2CCFL Back Light about 30 thousand hours at 25 o C LCD MODULE Display Size 8 inches 162 2 x 121 7mm 8 inches 162...

Page 297: ...nized 2 The maximum visual performance of the models with 256 colors LCD module is 256 colors However in order to make the created elements to be displayed with more brilliant colors the ScrEdit softw...

Page 298: ...ion ScrEdit Software User Manual Revision Apr 30th 2007 2007PDD23000002 A 5 A 2 Dimensions and Profile DOP AS38BSTD W Units mm Number Description A COM1 COM3 RS232 B Power Input Terminal C USB Client...

Page 299: ...oftware User Manual A 6 Revision Apr 30th 2007 2007PDD23000002 DOP A E 57G B C STD W Units mm Number Description A COM2 RS2323 RS422 RS485 B COM1 RS232 C USB Client D Power Input Terminal E Extension...

Page 300: ...l Revision Apr 30th 2007 2007PDD23000002 A 7 DOP A80THTD1 DOP AE80THTD Units mm Number Description A Power Input Terminal B Battery Cover C USB Host D USB Client E COM1 RS232 F COM2 RS2323 RS422 RS485...

Page 301: ...r Manual A 8 Revision Apr 30th 2007 2007PDD23000002 DOP AE94BSTD Units mm Number Description A Power Input Terminal B Battery Cover C USB Host D USB Client E COM1 RS232 F COM2 RS2323 RS422 RS485 G Ext...

Page 302: ...al Revision Apr 30th 2007 2007PDD23000002 A 9 DOP A10TCTD DOP AE10THTD Units mm Number Description A Power Input Terminal B Battery Cover C USB Host D USB Client E COM1 RS232 F COM2 RS2323 RS422 RS485...

Page 303: ...e screw more than its torque specification to avoid damage to plastic box 2 Damage may occur if torque exceeds 0 7N M 3 8 Panel DOP AS38BSTD W DOPAS38BSTD W 5 7 Panel DOP A E 57GSTD DOP A E 57CSTD DOP...

Page 304: ...7PDD23000002 A 11 8 0 Panel DOP A80THTD1 DOP AE80THTD 9 4 10 4 Panel DOP AE94BSTD DOP A E 10TC H TD DOPA E 10TC H TD DOPAE94BSTD Top View Mounting holes Bottom View Mounting holes Fixed support Snap i...

Page 305: ...Appendix A Specifications and Installation ScrEdit Software User Manual A 12 Revision Apr 30th 2007 2007PDD23000002 This page intentionally left blank...

Page 306: ...nd No Encryption mode If Encryption mode is selected the screen data will be encrypted and copying of the screen data is an act restricted by the copy times setting of HMI Choosing Encryption can effe...

Page 307: ...e created If the user executes this function when compile operation is not completed there will be an error message display to warn the user Fig B 4 If a file created previously has been existed in th...

Page 308: ...Appendix B USB Flash Drive Function ScrEdit Software User Manual Revision Apr 30th 2007 2007PDD23000002 B 3 Fig B 4 Fig B 5 Fig B 6 Fig B 7...

Page 309: ...at the data transfer and copy only can be done via USB flash drive at this time After pressing OK button it will return the original HMI screen Then press SYS system key on HMI panel for three seconds...

Page 310: ...data from a USB flash drive to HMI Upgrade the firmware via USB flash drive Copy screen data to a USB flash drive Screen Data Encryption Upgrade the firmware via USB flash drive Clear HMI Flash ROM C...

Page 311: ...ryption It is used to enable the screen data encryption function When pressing this icon one dialog box will pop up and ask if the user wants to encrypt SYS system file or not Please refer to the figu...

Page 312: ...ser Manual Revision Apr 30th 2007 2007PDD23000002 B 7 After Copy Times is set the user needs to enter password which is set in ScrEdit software Options Configuration Standard Security After entering t...

Page 313: ...nual B 8 Revision Apr 30th 2007 2007PDD23000002 After screen data encryption is completed the user can touch to copy the data If the password is incorrect the following warning dialog box will display...

Page 314: ...r Manual Revision Apr 30th 2007 2007PDD23000002 B 9 Upgrade Firmware The user can press this icon to upgrade the HMI firmware via USB flash drive immediately and compare the firmware version through t...

Page 315: ...ion Apr 30th 2007 2007PDD23000002 Clear HMI Flash ROM Pressing this icon can clear HMI Flash ROM Entering the password is needed when using this function Copy screen data from a USB flash drive to HMI...

Page 316: ...updating check this option in Options Configuration Standard Repeat the steps from Fig B 2 to Fig B 6 and then connect USB flash drive to HMI After power in connected to HMI power on HMI and a warnin...

Page 317: ...Appendix B USB Flash Drive Function ScrEdit Software User Manual B 12 Revision Apr 30th 2007 2007PDD23000002 Fig B 11 Fig B 12...

Page 318: ...Appendix B USB Flash Drive Function ScrEdit Software User Manual Revision Apr 30th 2007 2007PDD23000002 B 13 Fig B 13...

Page 319: ...Appendix B USB Flash Drive Function ScrEdit Software User Manual B 14 Revision Apr 30th 2007 2007PDD23000002 This page intentionally left blank...

Page 320: ...on HMI panel for three seconds can enter into the main menu of HMI system Fig C 1 The user can change some settings and execute some function by touching the icons here Fig C 1 Main Menu of HMI Syste...

Page 321: ...ering into Calibrate function the user can find three front sight icons on the top left bottom right and the center of the screen Please touch these three icons by turns to calibrate the touch panel C...

Page 322: ...Port Download Upload dialog box will display and ask the user to select the desired COM port After the user selects the COM port HMI system will ask if Bypass mode is used or not Please press NO and H...

Page 323: ...onnecting to PLC if the PLC program needs to be updated during operation the user can select Bypass mode to transfer the new PLC program of PC to HMI via COM2 port of HMI and then download the new PLC...

Page 324: ...Appendix C Main Menu Operation of HMI System ScrEdit Software User Manual Revision Apr 30th 2007 2007PDD23000002 C 5...

Page 325: ...MI System ScrEdit Software User Manual C 6 Revision Apr 30th 2007 2007PDD23000002 Screen Parameter Settings Touching Backlight icon change the screen parameter settings Please refer to the following t...

Page 326: ...ime Min Set how long it waits before going into screensaver after HMI is used The unit is minute Boot Delay Times Sec Set how long it delays before enabling HMI program after the power is in connected...

Page 327: ...N button to run HMI File Manager AS Series A Series Screen Data Encryption Upgrade the firmware via USB flash drive Clear HMI Flash ROM Copy screen data from a USB flash drive to HMI Copy screen data...

Page 328: ...e description of USB Flash Drive Function please refer to Appendix B Screen Data Encryption Upgrade the firmware via USB flash drive Clear HMI Flash ROM Copy screen data from a USB flash drive to HMI...

Page 329: ...Appendix C Main Menu Operation of HMI System ScrEdit Software User Manual C 10 Revision Apr 30th 2007 2007PDD23000002 This page intentionally left blank...

Reviews: