background image


DESIGNER’S HANDBOOK 4189350049C EN 


Page 149 of 206 


See previous chapter (AX1 used for azimuth set point) for more details.    

11.9  DX1 Digital input adjust 

11.9.1 

DX1 digital RPM from pickup 

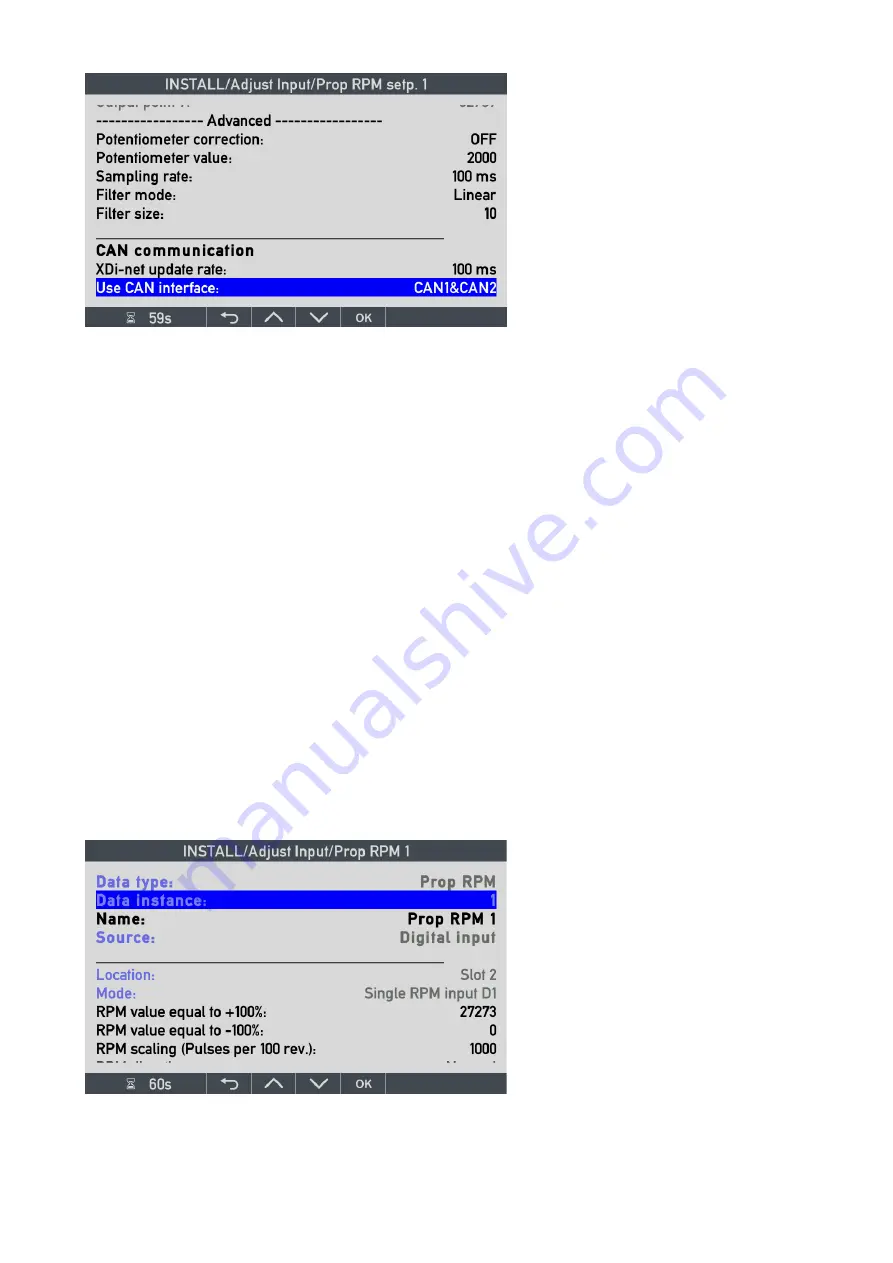
A virtual indicator can be configured to receive digital signals directly from one or two RPM pickups as previously 
described in the DX1 chapter of this document.  

The DX1 extension module can be preconfigured in the VS to support either a digital input pair (bidirectional RPM) 
or as one or two single direction RPM inputs. 

In this example, the RPM is a single direction. 


The digital RPM function calculates both the actual RPM value based on pulses per 100 revolutions, and it is also 
able to calculate %RPM value based on a positive or negative RPM scaling value. 

The digital RPM function can also calculate %Thrust as (%RPM)

2

 and %Power as (%RPM)

3

; this is a predefined 

setting in the VS, only relevant if one of those parameters are used in the virtual indicator. 

(No special setup is needed for %Thrust and %Power). 


The above RPM-based calculations are handled by one calculator function in the XDi, and therefore adjustments 
are handled by one setup menu, described below.   


Data type

 and 

Data instance

 have the 

same function as described for the 
azimuth; they define the data type and 
instance to use.  

Name

 of the data type may be changed 

via virtual keyboard. 

Source is in this case the digital input from 
the DX1 module located in slot 2 on the 
XDi. 

Mode:

 is in this case single RPM input 

D1, where D1 is short for digital input 1 on 
the DX1 module.  


Potentiometer correction:

 if a 

potentiometer is used for the analogue set 
point, this feature may be useful (see 
previous chapter for details).  


Filter mode:  i

n this case, the normal 

linear filter type is used. 


Filter size: c

an be set between 0 and 

100. Increase the filter value to reduce 
noise and fluctuations in the presentation.    

Summary of Contents for XDi 144

Page 1: ...4189350049C 1 DESIGNER S HANDBOOK XDi fleXible Display indicator 4189350049C...

Page 2: ...re 11 3 Product Introduction 12 3 1 Virtual indicator library 13 3 1 1 Product profile PP 14 3 1 2 Virtual indicator VI 14 3 1 3 VI setup profile VS 15 3 1 4 Library types 15 3 1 5 XDi type and relate...

Page 3: ...nel 31 4 2 2 Waterproof mounting 32 4 3 Mounting instructions 32 4 4 Installing a CAN bus system 33 4 4 1 XDi CAN bus ports 33 4 4 2 CAN bus system wiring 33 4 4 3 CAN backbone and Termination 33 4 4...

Page 4: ...restrictions 50 5 2 2 The CAN bus mode 51 5 2 3 CAN bus changes via menu 51 5 3 Error indication 52 5 4 XL BW BRW 2 and TRI 2 with sCAN 54 5 5 Extension modules 54 5 6 AX1 analogue extension module 55...

Page 5: ...1 1 Using Screen mode grouping in system integration 91 8 3 Quick menu only XDi N 92 8 3 1 Change unit profile 92 8 3 2 Change unit profile setup 93 8 3 3 Change unit profile in a CAN bus system 94 8...

Page 6: ...RPDO input adjust 138 11 7 1 PDO converter for azimuth rudder 138 11 7 2 CANopen Rudder transmitter for example DEIF RTC 600 140 11 7 3 PDO converter for pitch 140 11 7 4 PDO converter for RPM 141 11...

Page 7: ...Changing filter settings 173 11 14 3 The other input configuration parameters 174 11 15 CAN bus changes via menu 174 11 16 Service menu 175 11 16 1 NMEA monitor 175 11 16 2 Product information page 1...

Page 8: ...tor system with set point 195 13 3 2 Azimuth Pitch and RPM system with set point 196 13 4 Application 4 azimuth RPM pickup analogue system using XDi net 198 13 4 1 Azimuth and RPM indicator system wit...

Page 9: ...066 XDi standard libraries 4189350067 XDi quick start guide 4189350046 Rudder systems Application notes 4189350085 XDi supported NMEA sentences 4189350086 Link to XDi N wind Wind system application no...

Page 10: ...ubt about how to install or operate the XDi unit the company responsible for the installation or the operation of the set must be contacted The XDi unit is not to be opened by unauthorised personnel I...

Page 11: ...menus The menu functions are supplemented by a number of examples of how to set up and change parameters The general purpose of this document is to provide useful overall information about the functio...

Page 12: ...t data types on such indicators during normal operation After installation the front frame is mounted hiding the four buttons and the selected virtual indicator will be fixed most likely for the rest...

Page 13: ...y structure for XDi Dual or Multi It is important to be aware that all virtual indicators in an XDi library are predefined and version controlled to make sure that the requirements for relevant marine...

Page 14: ...ependent of the selection of virtual indicator and VI setup 3 1 2 Virtual indicator VI The virtual indicator VI contains drawings of scales and other indicator elements and defines the graphical layou...

Page 15: ...t conditions If the DEIF standard design does not fulfil your needs or wants the XDi concept opens for a flexible pallet of customisation opportunities from small changes like adding a logo on a stand...

Page 16: ...or NMEA input Input data from an extension module may even be shared on the CAN bus making the XDi act as a data source for other XDi indicators on the bus Utilising this function limits the number of...

Page 17: ...data can be received by an XDi 3 3 1 CANopen TPDO or RPDO 1 A TPDO Transmit Process Data Object contains up to 8 data bytes A data type is often located in byte 0 and 1 and the rest is not used but i...

Page 18: ...no CAN master in the system to start a transmitting device then the device should be set up as a self starting device Alternatively the XDi can be set up to act as a master in this case by sending a...

Page 19: ...2 RPDO 3 or RPDO 4 for this RPDO 1 may only be selected if XDi net is deactivated Please note that XDi net must be selected as source when DAM MPDO is used even if XDi net is deactivated The DAM MPDO...

Page 20: ...input mode and pre set parameters for converting the input pulses to an RPM value are predefined The scaling parameters can be adjusted via the XDi installation menu Alternatively the two digital inp...

Page 21: ...types described and with parameter pre sets stored in the respective VI setup profile VS or Product Profile PP In general a new profile should be defined for every new combination of inputs Well desig...

Page 22: ...in more detail we will look at an example from our standard navigation library 3 5 1 Example Fall back function used in the standard heading indicator library In the XDi 144 192 N Standard heading lib...

Page 23: ...DESIGNER S HANDBOOK 4189350049C EN Page 23 of 206 VI002 is only presenting heading In the input adjust menu the name of the active data type is presented GYRO 1 Press OK to open the multi source menu...

Page 24: ...ake over as source or indicates if the source at present is providing input data or not Source priority It is possible to change the priority order from this menu It is possible to give 2 fall back so...

Page 25: ...n In the standard heading indicator VI003 the ROT has 2 fall back sources the input selected should be consistent with the selected gyro It can also be set to fixed source or the same NMEA source can...

Page 26: ...92 N with the 4 push buttons available on front The 4 push buttons on XDi N are available on the front frame and are also used for daily operation such as toggling between screens dimming up down and...

Page 27: ...d from there a hidden long double push to access the installation menu This is part of the required protection against unauthorised changing of vital setup parameters The menu structure has therefore...

Page 28: ...c the system will jump one step back in the menu structure and restart the timer and in the end the XDi will resume normal operation Timeout acts like the return arrow soft key 3 8 1 Soft keys descrip...

Page 29: ...DESIGNER S HANDBOOK 4189350049C EN Page 29 of 206 Select and press OK to open the line for editing View and change setup parameters Select from a list Virtual keyboard for entering a new text line...

Page 30: ...OOK 4189350049C EN Page 30 of 206 Change a data value The detailed menu functions are in the relevant chapters To learn more about XDi functions and menu system please see the chapter 6 XDi menu syste...

Page 31: ...at there is space in the cabinet for sufficient airflow around the XDi and that the operating temperature of the unit is not exceeded Especially when mounted in top of a horizontal panel the temperatu...

Page 32: ...often not the case and therefore a water resistant sealant should be used between the XDi front flange and the panel surface to obtain the required protection Alternatively use the XDi with the IP66 o...

Page 33: ...by a short drop cable to the backbone or by daisy chaining the backbone from unit to unit see following drawing The standard terminal block with a single row of 5 screw terminals supplied as standard...

Page 34: ...rminations In a practical installation terminations should be inserted in a way so that the most cable length will be serial connected between the two terminations This cable will then be defined as t...

Page 35: ...in ISO11898 2 4 4 5 Shielding and grounding of the CAN bus cables 4 4 5 1 Cable shield Where CAN cables are connected the cable shielded must be interconnected The cable shield must not be connected...

Page 36: ...on Connector 2 6 CAN 2 connection CAN 2 GND Common should not be connected 7 CAN 2 LOW 8 CAN 2 HIGH 9 Supply Voltage 24 V DC Redundant power input 10 0 V The common wire should only be used if an extr...

Page 37: ...supplied from two independent power sources Each input is also protected by a polyfuse that will disconnect the XDi unit in case of a short circuit in the internal power supply unit A single failure i...

Page 38: ...he headline Important check that the library identification and version are correct before you start to set up the XDi 4 6 1 Rotate the display180O The XDi display has a wide viewing angle However dep...

Page 39: ...t CAN bus warnings and sound The parameters in the selected PP may later be changed via the user or installation menus In this example there is only one PP 4 7 3 Step 3 Select virtual indicator The XD...

Page 40: ...setup menus Installation menu change or fine tune the predefined setup parameters User menu change dimmer audio and visual settings Restart wizard go back to start and make or change the PP or VI In t...

Page 41: ...e used after the auto scan routine is performed Manual input configuration can be used to configure an NMEA input where no sentence is available when the input scanning is performed If the sensor and...

Page 42: ...ding HEHDT 194 2 T 21 We select auto scan by pushing the OK button and the automatic NMEA input scanning is performed After a short period of time the numbers in the right side will be stable This mea...

Page 43: ...g GREEN dot means that all data types in this group have been assigned a source We can now look through the automatic selection and check that needed data has a source assigned 4 7 8 2 DIMMER The dimm...

Page 44: ...s case Speed through water STW instance 1 and Speed over ground SOG instance 1 are received from input port 2 1 provided by talker VD and sent in sentence VBW The XDi only needs one of the speed data...

Page 45: ...receive XDi net data will present the same calculated wind data The geographic wind direction can be calculated both relative to the magnetic north pole and or to the geographic true north pole In thi...

Page 46: ...ll left to do is to press the return arrow until the wind indicator is shown on the display and presents wind data 4 7 9 Change NMEA setup If you make changes in your installation or want to change to...

Page 47: ...eIDs in the installation and the combination of virtual indicator VI VI setup VS and Product Profile PP to auto setup If needed adjustments of default parameters like selecting another headline from t...

Page 48: ...In the XDi Library a default NodeID is stored This is simply to guide the installer to the desired section of NodeIDs for indicators 5 1 3 1 Which NodeID should you select The importance of selecting...

Page 49: ...with up to two propulsion systems on the same bus Data of the same type for example azimuth angle 1 and 2 are determined by the data type instance which is then pre configured in the two VI setup pro...

Page 50: ...kbps is normally used for marine CANopen application XDi net functions ON OFF ON OFF All XDi net functions are disabled XDi net variable data on See Important XDi net restrictions NO CAN1 CAN2 CAN1 2...

Page 51: ...buses An example could be a supply vessel with four azimuth thrusters each with a separate data bus and with XDi indicators located in respectively centre bridge port and starboard bridge wing and af...

Page 52: ...arning when the data for the set point is missing The same applies for CAN bus errors from CAN bus monitoring that will not be shown if the specific port is not configured as used See chapters 10 3 2...

Page 53: ...dule not mounted in Slot 1 Warning On while error persists DX1 module not mounted in Slot 2 Warning On while error persists NMEA data on a configured NX2 module mounted in Slot 1 is not received can a...

Page 54: ...ms are designed Application notes may be available from DEIF to help you specify indicators for your combined system 5 5 Extension modules The input output capability of an XDi can be extended by addi...

Page 55: ...s in the reference voltage will be measured and automatically compensated to obtain a very high accuracy It is even possible to overwrite the reference voltage output by an external voltage between 7...

Page 56: ...ent input 2 mA 2 000 A The resistance used to measure the current excl the resistance in the poly fuse 5 6 3 Analogue scaling In the VS profile each analogue input used is pre configured to scale the...

Page 57: ...s The scaling of input value for respectively 100 portside rudder angle and 100 starboard rudder angle can now be adjusted individually during installation The XDi has a very strong multi point linear...

Page 58: ...enu when the RTA 602 is installed and set up 5 6 4 1 Pitch application and other The multi point linearisation can of course be used for several applications at present it has been used in a customise...

Page 59: ...XDi 192 only The 2 current inputs including the low voltage inputs are differential inputs but not galvanic separated so common mode rejection must be taken into consideration The 3 high voltage input...

Page 60: ...circuit will be forced out of range and the measurement will no longer be valid Therefore when more than one type of input is used it is important to carefully consider the common mode situation Analo...

Page 61: ...ommon mode voltage from HI1 to AGND will in the worst case be approximately 1 2 V and is well within the 15 V common mode limit 5 6 7 2 Example of an incorrect RAI system configured current sink and s...

Page 62: ...To fix the problem in the above example it is important rot educe the common mode voltage to below 15V so you can either reduce the supply voltage for the current loop to below 15V instead of 24V With...

Page 63: ...tage range can be between 18V and 29V this solution cannot be used 5 6 7 2 3 Alternative 3 how to solve the common mode problem The above system will work if the current loop and dimmer circuit is con...

Page 64: ...DC port 1 9 HI1 LIV1 Positive input for Low voltage low current or high current port 1 10 LIV1 HV1 Negative input for Low voltage max 2 V DC or Low current 2 mA DC port 1 11 HV1 Positive input for Hig...

Page 65: ...ltage max 30 V or High current max 20 mA Input pair Single input Port 1 or Port 2 High voltage max 30 V or High current max 20 mA or Low current max 2 mA or Low voltage max 2 V DC Low current and Low...

Page 66: ...the input circuit into saturation the selected input range should be the nearest higher range Example In the DEIF standard library for azimuth thruster indication it is possible to select a VS for sin...

Page 67: ...ween AGND and Vref However the potentiometer should be isolated from 0V and also ships ground Use of an analogue dimmer voltage from another system is not recommended in this application example unles...

Page 68: ...9 4 Double triangle input external 10V supply for potentiometer Instead of using a sin cos potentiometer it is also possible to use a double potentiometer with two tringle shaped outputs with an angl...

Page 69: ...ltage range as long as it is inside the max input range but please note that the measurements will be performed with the input centred at 5 000 V and in this application the supply voltage must be rel...

Page 70: ...y to move the active input range so that it is possible to detect when the input is lost Double potentiometers In the example below the double potentiometer configuration 2 additional resistors are us...

Page 71: ...ither 10 mA or 20 mA The internal current resolution is in A 1mA 1000 A Very often this input type will be pre configured to 4 to 20 mA 4000 to 20000 A The high current input is overcurrent protected...

Page 72: ...error caused by the input resistance loading the potentiometer output In the system below the max measuring error of 1 1 due to input load is reached when the wiper is located in the centre position...

Page 73: ...le below the 24 V supply is used as external reference voltage Since the high voltage input is pre configured as a Vref potentiometer input the input voltage will be measured relative to the external...

Page 74: ...the potentiometer is lost the input voltage will raise to 9 53V and activate the input max error detection above 9 3V Worst case calculation if 0V connection is lost V error max o 10V source 112k 112k...

Page 75: ...find product profiles for analogue dimmer connection to the dimmer input on AX1 located in slot 1 It is important that the AX1 module is located in the correct slot specified in the PP documentation h...

Page 76: ...possible to route the PWM signal through a low pass filter to obtain a DC voltage at the analogue input The high input impedance 112 k of the analogue dimmer input limits the load of the RC filter Th...

Page 77: ...made it should be considered how the dimmer must behave when for example the potentiometer wiper loses its connection or the dimmer supply fails If the dimmer input is a traditional input where 0 V eq...

Page 78: ...that has special 32 bit data formats and will be transferred via XDi net it those formats 5 6 10 2 Share data in a TPDO It is also possible to configure XDi to send variable data from the object inde...

Page 79: ...le it cannot be changed from menu The setup will be one of 4 fixed levels intended for input signals of respectively 5 V 12 V 24 V or 30 V The input voltage level must not exceed 32 V DC Please see th...

Page 80: ...elected setup profiles When the DX module is used as data input for an indicator or mode control of an indicator the input definition and its pre set parameters are defined in the VI setup profile VS...

Page 81: ...nted with a mechanical offset meaning that the pulses from the sensors are also offset in time making it possible to determine the direction of the movement 5 7 3 3 Mechanical RPM system recommendatio...

Page 82: ...the maximum cable length 5 7 3 5 Sharing RPM data from DX1 via CAN The RPM data calculated based on the pickup signal s can be shared on CANopen XDi net Therefore it is only necessary to connect the...

Page 83: ...25 mechanical offset between the sensors will make the signal from sensor no 2 arrive 25 of the period time ahead of the signal from sensor no 1 as illustrated below Positioning of the sensors The sig...

Page 84: ...1st sensor left The optimal positioning of the 2nd sensor is with an offset equal to 25 of the distance L at the drawing above In the actual layout where there can be some tolerances to take in consid...

Page 85: ...B This connection can be used in both dimmer modes Mode A Dim up down Day night colour shift can be automatic at a defined dimmer level Mode B Dim up down and make a colour shift by a simultaneous pu...

Page 86: ...ion if the event is still true This can be useful if the relay is activating a sound or light signal The timing of this function is selectable in steps of 500 msec This function can also be disabled 5...

Page 87: ...1 with internal pull up to 5 V 6 Contact input 2 C IN 2 C IN 2 Push button input 2 with internal pull up to 5 V 7 COM 1 output NMEA 0183 TX1 A TX1 A RS 422 Differential output IEC 61162 1 8 TX1 B TX1...

Page 88: ...All DEIF standard rudder indicators contains VS profiles that will support NMEA output The RSA sentence that contains actual rudder angle may be used in a CAN based rudder system to output the rudder...

Page 89: ...in Slot 1 will now work in parallel with button 1 on the front frame and toggle between the screen modes If a pushbutton is connected between C IN2 term 6 and common term 9 it will work in parallel w...

Page 90: ...on a button will perform the function stated in the soft key menu line 7 1 Dimmer level up down button 2 and 3 Use the push buttons below the symbols 2 and 3 to dimmer backlight up or down Press shor...

Page 91: ...grouping in system integration Normally the mode function is set up as local which means that only the XDi where you have pushed the button will shift screen In a CAN bus system the screen mode funct...

Page 92: ...it profiles Each unit profile contains default setup for all selectable data units that the XDi N supports Be aware that the unit shift function will only work if the selected virtual indicator is des...

Page 93: ...the following units m s knot Beaufort km h MPH To change the wind speed unit in one of the unit profiles select Unit profile in the quick menu and highlight the profile that you want to edit Press OK...

Page 94: ...ged on one XDi then all other XDi N units in Global mode and connected to the same CAN bus will follow If you edit the selection of presentation units in one of the 3 Unit profiles the change will als...

Page 95: ...push the left front button you can do it in the Mode Group setup menu If you want this XDi to toggle between screen 4 2 3 and 1 then you can change the assigned screens for each mode Highlight Mode 1...

Page 96: ...allation menu and select Edit virtual indicator Indicators where you select the data type or types that is not presented available and press OK to access the setup menu where you must set Visible to O...

Page 97: ...ou now can toggle between screen 1 and 3 without getting a data lost warning Note In this case it is only the true wind direction relative to ship that needs to be disabled The True wind speed is alwa...

Page 98: ...he active mode group for example to group 1 Press OK to select another group highlight Gr 1 and press OK You can now change the screen assigned to each Mode in Gr 1 for this XDi indicator or keep them...

Page 99: ...m used on several exhibitions 8 3 4 4 Screen mode input control options There are several ways to control the screen mode function Locale on one XDi N or for a group of XDi N indicators on a CAN bus 1...

Page 100: ...X1 setup is made in the VS profile for the virtual indicator where this function is relevant Also in this case it is only necessary to have one XDi with DX1 extension module to control a defined group...

Page 101: ...nput setup and see the actual NMEA data and time setup 8 3 5 2 Local time offset shared via NMEA If other XDi N units needs the local offset via CAN bus then Send on CAN and Send interval must be setu...

Page 102: ...the other parameters since it is not relevant they are greyed out in the menu 8 3 5 4 Local time offset manual setup If the local time offset is not available via NMEA or via XDi net it is possible to...

Page 103: ...the system is synchronized only when the offset value is changed It may be a good idea to use a fixed time interval instead However if you want to be able to change a manual offset from different XDi...

Page 104: ...selection has been accepted The table below shows the valid push button combination to use to access a menu from normal operation mode Menu Function Button 1 Button 2 Button3 Button 4 Surveyor Info Ma...

Page 105: ...ension modules if mounted 4 Library owner and library number 5 Active virtual indicator number 6 Thumbnail picture of the active virtual indicator 7 Wheel mark if the active virtual indicator is MED c...

Page 106: ...to the predefined settings it had when it left the factory The setup wizard will be started after a reboot sequence 3 Reset as a service unit in this mode the unit will be reset to factory settings an...

Page 107: ...rm 1 was located in the engine control room to set a reduced backlight level and thereby increase the lifetime of the display With the new direct dimmer function on front button 2 and 3 only available...

Page 108: ...mer setup description below In case of very aged displays it may also be necessary to adjust calibrate the display colours of a new XDi please see the chapter on Display colour adjust 10 1 2 Fixed dim...

Page 109: ...g the actual virtual indicator together with a new soft key menu for adjusting the fixed dimmer level Using the actual indicator design when adjusting the backlight level makes it easier to find the d...

Page 110: ...is activated and it is therefore possible to have two or more XDi units controlling the dimmer level in the group The shift between Day Dusk Night colour scheme is also part of the dimmer group funct...

Page 111: ...he dimmer group number each dimmer group may have a describing name The name will normally be predefined in the PP but it can also be added or changed via the Edit dimmer group name menu using the ons...

Page 112: ...obal min offset level this function offers the possibility to adjust the minimum backlight level for all XDi units in a dimmer group on the CAN bus This global minimum level is added to the local mini...

Page 113: ...nstead of XDi net Setup changes in the PDO converter may be synchronised via CAN Front buttons Yes Yes XDi can share the front button dimmer adjustment with other XDi units in the same dimmer group an...

Page 114: ...s a setting called On change This setting should be selected if more than one XDi controls the dimmer group in parallel The analogue module does not have the setting On change and therefore only one X...

Page 115: ...0 V This setting is useful to avoid the XDi to go black when dimmer input is disconnected Setting Not used indicates that the automatic scaling to reference voltage is not in use and the dimmer input...

Page 116: ...g On change and therefore only one XDi with analogue input can control a dimmer group Use CAN interface See digital dimmer setup above 10 1 4 5 XDi net dimming or DAM MPDO This source type does not ne...

Page 117: ...mode is turned off then the TPDO converter is disabled Be aware that the XDi can receive dimmer data sent in XDi net format even when it is set up to receive dimmer data in a TPDO or RPDO but since d...

Page 118: ...k text scale and pointer boundary on a white background and full backlight will provide a very clear readability Where during nighttime white text and scale orange pointer on a black background combin...

Page 119: ...10 2 1 1 1 Colour shift using XDi net or DAM MPDO This selection has no setup menu The colour pallet selection is received in sub index 0x03 of the dimmer group object index range in the table above...

Page 120: ...B located at bit 12 Data in bit 12 13 Gr 8 with LSB located at bit 14 Data in bit 14 15 Byte 2 Gr 9 with LSB located at bit 16 Data in bit 16 17 Example 2 It is also possible to combine dimmer level a...

Page 121: ...only dimmer level but also the display colour For each display colour Day Dusk Night the XDi is programmed to generate the optimal backlight range 10 2 2 1 Auto Day Night Colour shift This function i...

Page 122: ...eters For example adjust the backlight levels to best match the actual location of the indicator In the example above the indicator is in Auto Day Night mode and the shift is at 70 with a hysteresis a...

Page 123: ...g available in normal operation mode front frame is in place and it has no alarms as such It has 2 levels of warnings respectively called a warning or a caution Warnings most important are indicated b...

Page 124: ...oblem on the CAN bus and should be set OFF if CAN bus communication is not used Supply voltage monitor is mostly used in systems where redundant power supply is used In systems with only one power sup...

Page 125: ...tor Normal colour Bar graph is blue and digital readout is white black in day mode Caution colour Yellow for both bar graph and digital readout Warning colour Red for both bar graph and digital readou...

Page 126: ...e product system and selected virtual indicator The dynamic behaviour means that the menu structure will adapt to the actual selection of virtual indicator and product profile made using the Setup Wiz...

Page 127: ...make it possible to change CAN NodeID select a new Product Profile PP and or Virtual Indicator VI or maybe change the default input setup by selecting another VS for the selected VI IMPORTANT The inst...

Page 128: ...e virtual indicator and predefined in the VI setup profile VS can be changed or new text added Example Change of temperature unit from oC to F is not possible using the Change unit feature In XDi D an...

Page 129: ...hrusters on the same CAN bus we have most likely defined four VS profiles for respectively TT 1 TT 2 TT 3 TT 4 with their respective instance of CAN input data If we use a standard headline list like...

Page 130: ...first is Headline 0 Next Headline 1 and so on Select a new headline from the list and press OK Each headline in a VI has a list of up to 32 predefined headline texts to choose from It is always possi...

Page 131: ...estrictions could be due to resonances causing heavy vibrations One red sector is activated and shown on the RPM scale In the virtual indicator it is also possible to define that the bar graph will sh...

Page 132: ...XDi is defined with a resolution of 0 1 the value you have to enter is Critical high value 2760 276 0 RPM Critical low value 2380 238 0 RPM Warning colour The warning colours are defined when the vir...

Page 133: ...rom the installation menu When a DX1 digital i o module is mounted on the XDi the critical bands can also be used to control one or both relay outputs on that module but only if support for DX1 relay...

Page 134: ...d by the parameters Max visible input value and Min visible input value To make the azimuth set point pointer and readout only visible when the commanded angle is between 45o the mode inside must be s...

Page 135: ...digital and CAN indicator inputs The menu principles can be used in general also for other data types than the ones in the examples Each input source for the selected virtual indicator will be availa...

Page 136: ...enu when XDi net is used as input In this menu the only thing you can change is the name of the input source in this case Prop RPM setp 1 Note In some virtual indicators especially in XDi N we use the...

Page 137: ...rofiles where the input adjust menu is disabled in cases where it is not needed but in many of the existing libraries the source line will still be visible in the adjust input menu 11 6 CANopen MPDO a...

Page 138: ...ype and instance It makes it easier to identify the data source The name may be edited from the menu using the virtual keyboard and can be synchronised via XDi net Source is the input source type that...

Page 139: ...e CW and counter clockwise CCW In praxis the sign of the absolute angle will be shifted This is very useful if the angle transmitter is mounted upside down Either set the azimuth physically to 0 degre...

Page 140: ...udder system needs calibration this can be performed using the following procedure 1 Set Zero position rudder at 0o and either zero set the encoder acting as source or make zero set via the menu see Z...

Page 141: ...also able to calculate actual RPM and RPM but in addition it can also calculate Thrust RPM 2 and Power RPM 3 if the virtual indicator needs to be able to present those data types The selected VS profi...

Page 142: ...29785 the PRM bar graph indicator will be at 110 when the input value is 32765 the largest valid value equal to 3275 5 RPM Change RPM settings To obtain the desired RPM settings of 200RPM equal to 100...

Page 143: ...mething else in this CAN system Encoder TPDO RPDO defines the COBID of the TPDO or RPDO that the PDO converter is receiving data from all valid COBIDs for TPDOs and RPDOs is basically supported But pl...

Page 144: ...indicators 11 8 AX1 analogue input adjust 11 8 1 AX1 analogue input azimuth rudder set point 1 In this example the selected VS profile defines the input for azimuth set point to be an analogue 4 20 m...

Page 145: ...parameters active Note For an azimuth 180 180 you should only scale to 179 9 as shown in this example Direction is quite useful if the analogue input is reversed in the actual installation But be car...

Page 146: ...nalogue rudder input voltage When the analogue input is used for rudder applications 3 point linearisation of the analogue input is normally used Below is a 0 10V input signal from the rudder sensor c...

Page 147: ...es this function is by default set to CAN1 CAN2 so data is automatically shared with another XDi repeater on the same CAN bust that is setup with a XDi net input profile usually VS01 XDi net update ra...

Page 148: ...d it may be changed Source analogue input single This is fixed defined in the selected VS Data value equal to 100 is used to calculate the RPM set point value and also Thrust RPM 2 and Power RPM 3 If...

Page 149: ...RPM 3 this is a predefined setting in the VS only relevant if one of those parameters are used in the virtual indicator No special setup is needed for Thrust and Power The above RPM based calculations...

Page 150: ...ulses from the pickup that equals 100 revolutions In this case there are 10 bolts in the disk on the shaft so for each revolution of the propeller shaft 10 pulses will be generated which equals 1000 p...

Page 151: ...flag can be directly controlled using the XDi net on CAN but can also be controlled using other input devices such as analogue input digital input or CANopen TPDO or RPDO as input 11 10 1 AX1 Analogue...

Page 152: ...just The two relay outputs on the DX1 module can be configured to be controlled either by product related event pre set in the selected PP and or by an indicator specific event predefined in the VS pr...

Page 153: ...e of the warning caution functions can be set ON OFF in the user menu and this will affect the relay function accordingly Turning off sound on warnings and cautions does not affect the relay function...

Page 154: ...the event disappears false Relay in ND mode 11 11 3 2 Timer mode This is a function that runs every time the event occurs but only once so the event has to disappear before the timer function will be...

Page 155: ...several situations where the relay is driving a warning lamp or an acoustic alarm If the short event happens again after Timer min then the sequence will reappear Relay in ND mode In this example the...

Page 156: ...a given event In the above example if you desire the relay output to periodically repeat the activation for as long as the event lasts then the Toggle mode is the right choice and it will be describe...

Page 157: ...e minimum timer will act as a delay In this example with Relay timer MIN at 2000ms the relay will first activate when the rudder has stayed at or above 30 for the 2 second period and it will then stay...

Page 158: ...start and act as if it was a new event 11 11 4 Indicator related relay setup The relay can also be configured to react on event s predefined in the virtual indicator setup profile VS The VI relay func...

Page 159: ...relay active is set up to Activate inside critical band and critical band 1 is set to ON then the relay will activate when the data value is within the boundaries max min of critical band 1 The relay...

Page 160: ...pes generated by the XDi via analogue or digital input may be necessary for external systems such as Voyage Data Recorder VDR or the integrated navigation system XDi is able to share such data on NMEA...

Page 161: ...ust go into the installation menu and select NMEA setup 11 13 NX1 NX2 NMEA0183 setup menu XDi can be extended with two different types of NMEA interfaces NX1 contains a single NMEA0183 RS422 type outp...

Page 162: ...the menu lines that is relevant for this XDi configuration Please note that NMEA input 1 RX1 and output 1 TX1 is using the same UART and is therefore setup as one port that is COM1 RX2 and TX 2 is a R...

Page 163: ...ic talker ID to accept the NMEA data sentence XDi supports all the relevant talker IDs defined in the IEC 61162 1 standard Please note that XDi can send NMEA data with different talker IDs depending o...

Page 164: ...tput setup menu line cannot be selected greyed out If you press OK on the highlighted menu above It is only the data types that is relevant for the selected indicators that you can enter and activate...

Page 165: ...hanging that fast Where compass data in some cases is transmitted every 50msec 20 times per second in such cases the high speed NMEA standard IEC 61162 2 with 38400 bps is often used 11 13 3 NMEA inpu...

Page 166: ...d or a source is moved to another input port you must run the auto scan again to update the list of available data sources Please note that XDi is not allowed to make source changes automatically even...

Page 167: ...T 45 0 25 0 0 5 3275 0 200 0 1 0 250 0 T A A A 270 0 67 Mag Com 1 HEHDG 265 5 03 0 E 25 0 E 44 GYRO 1 HEHDT 293 5 T 22 ROT 1 HEROT 14 0 A 1E ROT is only sent once and the controller decides the sourc...

Page 168: ...when we now test the system by shifting between the 3 heading sources on the controller between Gyro1 Gyro2 and Mag Compass and the controller is only transmitting the relevant NMEA sentences from res...

Page 169: ...ame input source The HTD sentence received from input port 2 1 provided by talker with ID HE Mag Com 1 HEHDG 265 5 03 0 E 25 0 E 44 GYRO 1 HEHTD A 0 0 L M T 45 0 25 0 0 5 3275 0 200 0 1 0 250 0 T A A...

Page 170: ...e heading sentence HMR THS HTD VHW HDT HMRcc HDGcc HTDcc VHWcc The calculated sentences have the lowest priority so if the real data is available XDi will prefer to use that but you can always change...

Page 171: ...valid and A valid XDi has a strong service tool for NMEA where you can check if a NMEA sentence is actually received on one of the inputs or not The NMEA monitor tool is available in the Service menu...

Page 172: ...nd group is yellow because not all data in the group has a source assigned in the below picture we can see that it is the Geographic wind direction relative to the magnetic north pole that is not avai...

Page 173: ...The corrected wind angle will also be used if the XDi is set up to output relative wind on one of the NMEA outputs However if the NMEA routing function is used to distribute the relative wind data th...

Page 174: ...t is also possible to manually set up the input channel the talker ID and the sentence You should only set up or change those parameters if you know what you are doing It can however be useful in the...

Page 175: ...wo pages containing product information and setup status that may be quite important to have on hand in case DEIF is contacted in relation with service or support 11 16 1 NMEA monitor XDi has a built...

Page 176: ...case Heading speed and wind data are received correct RX and the wind data sentence MWV is also retransmitted TX to the NMEA output Slot 2 COM2 TX2 output In a fault situation the NMEA monitor can be...

Page 177: ...to swap the A and B wires around Strange looking sentences can also be caused by input data with an incorrect bit rate The default bit rate on all NMEA inputs is 4800 bps but it can be changed via the...

Page 178: ...heading data and is sending data marked invalid 3 Data on port 2 1 is shown as a string of random letters and the error counter is increasing No NMEA heading source is detected and the indicator show...

Page 179: ...library is released the revision number is locked and when the library is then opened for new additions the library version will be increased by one and the revision number is reset to 0000 If the sel...

Page 180: ...er 11 17 Trouble shooting help If you contact DEIF to get help with solving some installation and configuration problems then it is always a great help if you take a picture of the Product information...

Page 181: ...be different from type to type and also under which conditions the aging takes place The worst case scenario is installations where the display is running with a constant full backlight level and at...

Page 182: ...rary built with QTapp v 3 03 0 and CApp v 3 03 0 or higher will have this function typically all libraries made after 2020 03 25 with library version no 2000 or higher See chapter 11 16 2 Product info...

Page 183: ...ly see the change on the white background colour on the calibration screen When you have a new unit all colours are at level 252 If you want to match an old display where the white background is bluis...

Page 184: ...bration screen IMPORTANT By default the max backlight of XDi 192 is set to 225 to reduce the aging that a high backlight level tends to accelerate This small 10 reduction will reduce heat dissipation...

Page 185: ...tallation of a new library package You can however bring back the original display settings Factory settings by performing a master reset see next chapter 12 5 Master reset When you want to reset an X...

Page 186: ...backlight as you can see in the pictures below PORT RUDDER STBD RUDDER You shall select 100 backlight and the day design white background on both XDi indicators The next task is now to calibrate the c...

Page 187: ...bration menu and save your new settings Highlight Accept and press OK XDi will now calibrate the graphics it normally takes a few seconds before it returns to normal operation with the new colours 6 I...

Page 188: ...n the day designs of most virtual indicators In many situation this is a good way to make a replaced indicator fit into an existing indicator system with many years of continuous operation behind The...

Page 189: ...lution All XDi indicators in this example are using the XDi144 192 Dual or Multi DEIF XDi Standard azimuth library no 001 Default setup for the DEIF XDi standard library is to use both CAN 1 and CAN 2...

Page 190: ...er The dynamic azimuth pointer is used when the direction of the thrust shifts depending on either RPM or Pitch The symbol is only used on indicators on which the thrust direction can be reversed Thru...

Page 191: ...cted azimuth indicator CAN TX azimuth angle Control sys RPM RPM Select VS profile Actual Set point Actual Set point XDi 1 VI007 TPDO TPDO TPDO TPDO VS02 XDi 2 VI007 TPDO TPDO TPDO TPDO VS02 XDi 3 VI00...

Page 192: ...to receive data in an RPDO instead of the default TPDO In a fully TPDO or RPDO based CANopen system where XDi net functions are not used it is recommended to disable XDi net or just the functions not...

Page 193: ...tem is set up and ready Default setup for the XDi standard library is to use both CAN 1 and CAN 2 which means that you can select on which bus you want to transmit CAN data CAN settings can be changed...

Page 194: ...XDi net it will function with TPDO active All analogue data is default shared via the XDi net 13 2 2 Azimuth Pitch and RPM system with set point The same CAN analogue system is now set up to support...

Page 195: ...efault they are 4 to 20 mA All data is shared using the XDi net protocol for easy plug and play system integration Select a different NodeID for each of the 3 XDi indicators Make sure that it is not a...

Page 196: ...ys RPM RPM Select VS profile Actual Set point Actual Set point XDi 1 VI007 sin cos 4 20 mA 4 20 mA 0 to 10 V VS05 XDi 2 VI007 XDi net XDi net XDi net XDi net VS01 XDi 3 VI007 XDi net XDi net XDi net X...

Page 197: ...to get the RPM and pitch set point If the RPM and pitch set point presentation is not used then VS02 must be used for the XDi 2 13 3 2 2 SIN COS azimuth and normal analogue RPM and Pitch XDi device Se...

Page 198: ...igured for azimuth angle and RPM RPN and with all set point data presented In this example it is VI007 Pushing azimuth type with dynamic azimuth pointer and indicating RPM RPM Orange set points can be...

Page 199: ...can disable the TPDO input in VS02 to make it only listen on XDi net it will function with TPDO active 13 4 2 Azimuth Pitch and RPM system with set point The same CAN analogue system is now set up to...

Page 200: ...to Pitch for indication You can disable the TPDO input in VS02 to make it only listen on XDi net it will function with TPDO active An AX1 module is needed on the XDi 2 to get the RPM and pitch set po...

Page 201: ...le since it is mounted below deck where dimming is not needed artificial light The bridge indicators are dimmed from the analogue input on XDi 2 and shared with XDi 3 via CAN using dimmer group 1 A co...

Page 202: ...cator itself via the setup menu The alignment will automatically be shared with all other XDi rudder indicators 13 6 Application 6 XDi rudder system analogue angle transmitter and XDi net The system b...

Page 203: ...ons for electric zero set and min max adjust of the rudder angle transmitter 3 If the min max rudder angle is inaccurate it may be due to mechanical inaccuracy or gearing between rudder and transmitte...

Page 204: ...net PP01 Fixed PP06 Voltage PP05 XDi 2 XDi net PP01 Voltage PP02 TPDO PP03 XDi 3 XDi net PP01 XDi net PP01 TPDO PP03 The input is default set up to use a potentiometer connected to the Vref output on...

Page 205: ...immer input Select PP Dimmer group Send analogue dimmer value on XDi 1 THR 1 XDi net PP01 Default Gr 1 XDi 2 THR 2 AX1 voltage PP02 Default Gr 1 CAN 2 XDi 3 THR 1 AX1 voltage PP02 Gr 2 CAN 2 XDi 4 THR...

Page 206: ...face module that can be snapped on the back of the XDi indicator to add 2 analogue inputs 1 dimmer universal voltage input and a reference voltage output DX 1 Digital I O extension module Digital inte...

Reviews: