


128
Can not be used in Internet transmission
Used for multiple cast broadcast in limited space.
Except the above mentioned addresses of special meaning, you can use other addresses. For example:
Multiple cast IP: 235.8.8.36
Multiple cast PORT: 3666.
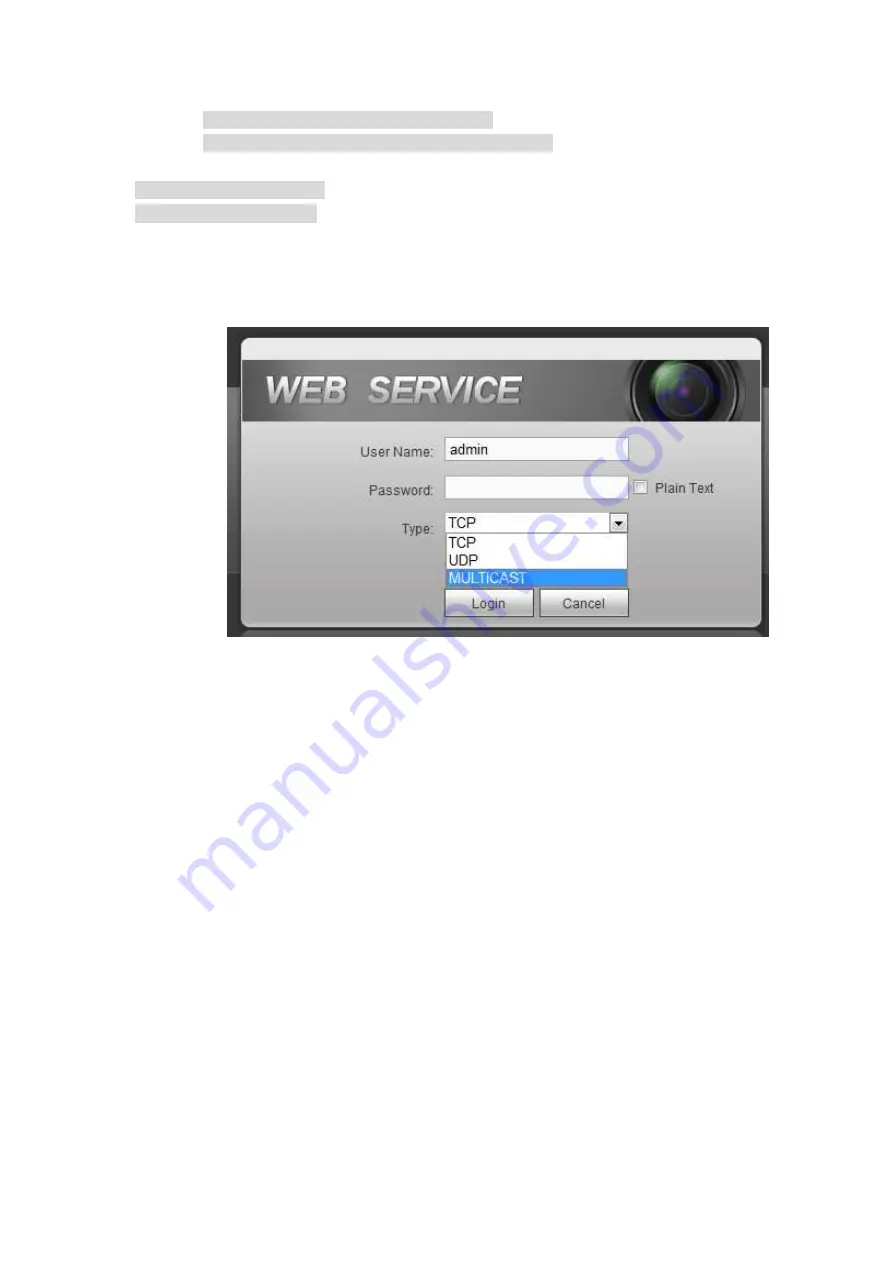
Use WEB to login, you can see the following interface. See Figure 4-118. Select login type as the
Multicast from the dropdown list. After you logged in the Web, the Web can automatically get multiple
cast address and add it to the multiple cast groups. You can enable real-time monitor function to view the
video.
Figure 4-115
4.12.13 Auto register
This function allows the device to auto register to the proxy you specified. In this way, you can use the
client-end to access the DVR and etc via the proxy. Here the proxy has a switch function. In the network
service, device supports the server address of IPv4 or domain.
Server IP address: The server IP address or server domain name you want to register.
Port: The auto registration port value of the server.
ID: The device ID allocated by the server.
Please follow the steps listed below to use this function.
Please set proxy server address, port, and sub-device name at the device-end. Please enable the auto
register function, the device can auto register to the proxy server.
1) From main menu->Setting->Network->Register, the setup interface is shown as in Figure 4-116.
Important
Do not input network default port such as TCP port number.
Summary of Contents for HCVR82**A-S3 Series
Page 1: ...Dahua HDCVI Standalone DVR User s Manual Dahua HDCVI Standalone DVR User s Manual V1 1 0 ...
Page 84: ...72 Figure 4 44 Figure 4 45 ...
Page 102: ...90 Figure 4 73 Figure 4 74 ...
Page 104: ...92 Figure 4 76 Figure 4 77 ...
Page 120: ...108 Figure 4 93 Check a file name double click file or click to play ...
Page 158: ...146 Figure 4 135 Figure 4 136 ...
Page 167: ...155 Figure 4 145 Click Draw button to draw the tripwire See Figure 4 146 Figure 4 146 ...
Page 183: ...171 Figure 4 162 Figure 4 163 ...
Page 190: ...178 Figure 4 171 Figure 4 172 ...
Page 191: ...179 Figure 4 173 Figure 4 174 ...
Page 199: ...187 4 186 and Figure 4 187 Figure 4 186 Figure 4 187 ...
Page 275: ...263 Figure 5 60 Figure 5 61 ...
Page 289: ...277 Figure 5 77 Click to draw the rule See Figure 5 78 Figure 5 78 ...
Page 349: ...337 ...
Page 358: ...346 the sound ventilation Please check and maintain the device regularly ...
Page 360: ...348 896K 393M 1024K 450M 1280K 562M 1536K 675M 1792K 787M 2048K 900M ...
Page 376: ...364 ...


