background image

101

 CAUTION / ATTENTION

Electrical Shock Hazard.  Label all wires prior to 

disconnection when servicing controls.  Wiring 

errors can cause improper and dangerous 

operation.  Verify proper operation after 

servicing.
Au moment de l´entretien des commandes, 

étiquetez tous les fils avant de les débrancher.  

Les erreurs de câblage peuvent nuire au bon 

fonctionnement et être dangereuses.

S´assurer que l´appareil fonctionne 

adéquatement une fois k´entretien terminé.

acid or alkali products is prohibited.  Do not use any 

cleaning agents or solvents.  If insulation disc has signs 

of damage, it must be replaced. 

8.  Inspect the condensate trap

 to verify it is open 

and free from debris.  Inspect condensate line integrity 

between boiler and condensate neutralizer (if used), 

condensate neutralizer and the drain.  Clean/repair if 

needed.

  If the condensate neutralizer is used, check pH before 

and after the neutralizer to determine neutralizing 

effectiveness.  Replace limestone chips and clean out 

the neutralizer if needed.

9.  Inspect the flue temperature sensor cap 

to verify 

that it is free from leakage and deterioration.  Replace 

if needed.

10.  Inspect vent connections and vent connector

 to 

heat exchanger seals to verify that they are free from 

leakage and deterioration.  Repair as needed.  Follow all 

instructions in Section IV “Venting” when reassembling 

vent system.

11.  Check  for  vent  and  air  intake  terminal 

for 

obstructions and clean as necessary.  Check rodent 

screens in vent and air intake terminations to verify 

they are  clean and free of debris.

12.  Reinstall the burner/blower/gas valve assembly


and secure with M6X1 hex flange nuts.

13.  Reconnect any wiring

 which has been disconnected.

14.  Verify 

that the system pH is between 7.5 and 9.5.

15.  Inspect the heating system

 and correct any other 

deficiencies prior to restarting the boiler.

16.  Follow Section IX 

“System Start-up” before leaving 

installation.

17. Perform the combustion test

 outlined in Section 

IX “System Start-up”.

D.  Recommended  Heating  System  Water 

Treatment Products:

1.  System Cleaning and Conditioning:

a.  The following heating system water treatment 

products are recommended for an initial existing 

heating system sludge removal, initial boiler 

cleaning from copper dust, flux residue and any 

boiler debris and for preventive treatment as 

corrosion/scale inhibitors:

i.

  Fernox™ Restorer (universal cleaner, sludge 

remover,  scale  remover,  flux  residue/debris 

remover, corrosion inhibitor)

ii.

  Fernox™ Protector (Alphi 11, CH#, Copal) 

(sludge remover, corrosion inhibitor)


Follow manufacturer application procedure 

for proper heating system/boiler cleaning and 

preventive treatment.

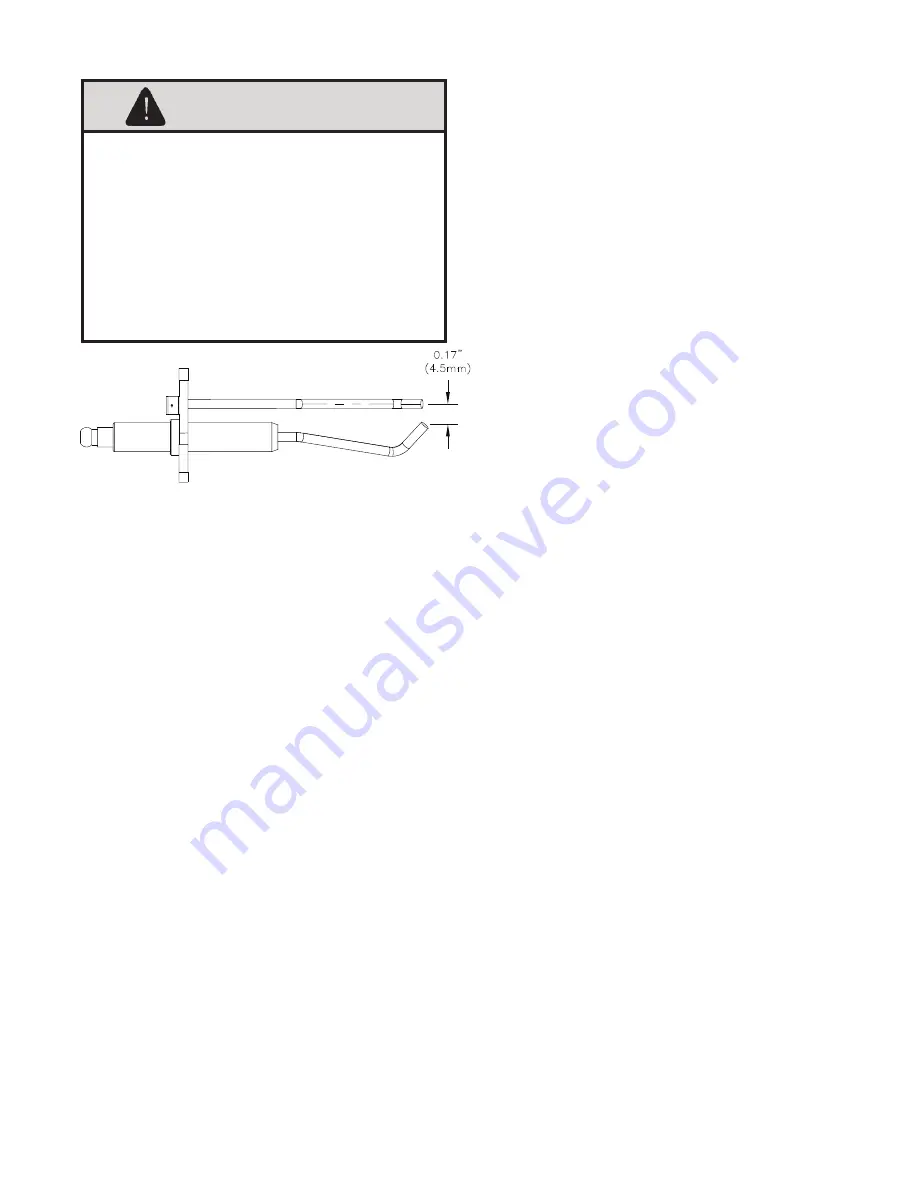
Figure 39:  Igniter Electrode Gap

3.  Remove the igniter assembly and flame sensor


and inspect them for oxide deposits.  Clean the oxide 

deposits from the igniter electrodes and flame sensor 

rod with steel wool.  Do not use sandpaper for the 

cleaning.  Inspect the ceramic insulators for cracks 

and replace the igniter assembly and/or flame sensor 

if necessary.  Check the igniter electrode spacing gap.  

Refer to Figure 39 “Igniter Electrode Gap” for details.

4.  To gain access to boiler burner and combustion 

chamber,

 first disconnect and remove gas inlet piping 

from gas valve.  Then, remove six M6X1 hex flange 

nuts and take out the burner/blower/gas valve assembly 

from the boiler. To prevent stud breakage, apply a 

generous amount of good quality penetrating oil to 

nuts and let soak in prior to attempting nut removal.

5.  Inspect the assembly

 for lint and dust presence. 

If significant lint and dust accumulations are found, 

disassemble the blower/gas valve assembly to expose 

the swirl plate and blower inlet.  For parts identification, 

refer to Section XIII “Repair Parts”.  Vacuum these 

parts as required, being careful not to damage the vanes 

on the swirl plate. 

6.  Vacuum any dust or lint 

from the burner if present.  

If the burner shows any visual deterioration or corrosion 

signs, replace it immediately.  Inspect the burner gasket 

and replace if necessary.

7.  Inspect the heat exchanger combustion 

chamber,

 clean and vacuum any debris found on 

the surfaces.  If required, brush the coils of the heat 

exchanger using a non-abrasive, non-metal bristle 

brush.  Any cleaning of the combustion chamber with 

XI. Service and Maintenance

 (continued)

Summary of Contents for Phantom-X PHNTM210

Page 1: ...ons carefully before installing Series High Efficiency Gas Fired Hot Water Direct Vent Condensing Boilers INSTALLATION AND OPERATING INSTRUCTIONS These instructions must be affixed on or adjacent to t...

Page 2: ...te http license reg state ma us pubLic pl_products pb_pre_form asp for the latest Approval Code or ask your local Sales Representative The Commonwealth of Massachusetts requires this product to be ins...

Page 3: ...l be permanently mounted to the exterior of the building at a minimum height of eight 8 feet above grade directly in line with the exhaust vent terminal for the horizontally vented gas fueled heating...

Page 4: ...Piping and Trim 36 VII Gas Piping 46 VIII Electrical 50 IX System Start up 62 X Operation 70 A Overview 70 B Supply Water Temperature Regulation 71 C Boiler Protection Features 72 D Multiple Boiler C...

Page 5: ...g in B example PHNTM285HNT1SUB Dimension Boiler Model PHNTM210 PHNTM285 A Inch mm 23 15 16 608 21 13 16 554 B Inch mm 5 13 16 147 7 5 16 185 C Inch mm 7 5 16 186 14 1 8 358 D Inch mm 17 1 8 435 18 456...

Page 6: ...ion Specifications and Dimensional Data continued F GAS VALVE INLET 3 4 FPT RELIEF DRAIN TAPPING H SUPPLY TAPPING G RETURN TAPPING J CONDENSATE TRAP DRAIN LOW VOLTAGE KNOCKOUTS 24 VOLTS LINE VOLTAGE K...

Page 7: ...7 Figure 1B Model PHNTM285 I Product Description Specifications and Dimensional Data continued...

Page 8: ...s above 7000ft 1 Net AHRI Water Ratings based on piping and pickup allowance of 1 15 The manufacturer should be consulted before selecting a boiler for installations having unusual piping and pickup r...

Page 9: ...nce Refer to Figure 2 for minimum listed clearances from combustible material Recommended III Pre Installation and Boiler Mounting service clearance is 24 in 610 mm from left side front top and rear o...

Page 10: ...pump if required Boiler Clearances to Combustible and Non Combustible Material All models are listed for closet installation with the following minimum clearances Top 1 in 25 mm Front 1 in 25 mm Left...

Page 11: ...ypropylene Vent or Flexible Polypropylene Liner for Vertical Venting only and Rigid Polypropylene or PVC Combustion Air Intake Pipe Rigid Polypropylene Vent or Flexible Polypropylene Liner for Vertica...

Page 12: ...l at the panel lower left corner and align bracket two upper holes with corresponding side panel lower dimples The remaining lower bracket hole must align with a matching bottom boiler left side panel...

Page 13: ...common gas piping is sized insure it will have adequate capacity for combined input CFH gas flow of the selected stackable boiler combination c Water Piping and Trim Follow instructions in Section VI...

Page 14: ...include vent combustion air terminals in equivalent feet calculations Use vent combustion air equivalent length worksheet provided in Table 6B b Maintain minimum clearance to combustible materials Se...

Page 15: ...6A 6B 9 12 14 10A 10B Optional Vertical Vertical through roof or chimney chase The system includes separate Flexible Polypropylene vent liner and Rigid Polypropylene vent pipe combination for venting...

Page 16: ...densate may pool Do not penetrate any part of the vent system with fasteners Les instructions d installation du syst me d vacuation doivent pr ciser que les sections horizontales doivent tre support e...

Page 17: ...4 5 ft 1 4 m 4 in 100 mm or 110 mm 13 ft 4 0 m Straight Pipe Installer Supplied 45 Elbow s Installer Supplied Nominal Diameter Quantity Length ft or m Equivalent Length ft ft or m m Subtotal Equivale...

Page 18: ...r doors f Locate bottom of vent terminal at least 3 ft 900 mm above any forced air inlet located within 10 ft 3 0 m g If window and or air inlet is within 4 ft 1 2 m of an inside corner maintain at le...

Page 19: ...s within any interior space where air cannot circulate freely including through vertical or horizontal chase ways inside a stud wall in closets and through wall penetrations The use of cellular core P...

Page 20: ...nd Sensor Cap 105133 02 1 N A 4 Vent 4 Combustion Air CPVC PVC Connector with Flue Temperature Sensor and Sensor Cap 105133 03 N A 1 3 Vent 3 Combustion Air CPVC PVC Connector Gasket 230841 N A N A 4...

Page 21: ...al run 1 N A 4 in Schedule 40 PVC Pipe x ft min horizontal run 1 2 Table 7B CPVC PVC Vent Air Intake Components Installer Provided Required for Optional Horizontal Snorkel Termination IV Venting B CPV...

Page 22: ...t to accommodate desired vent configuration provided both pieces are used in conjunction with CPVC 90 Elbow before any PVC components are used Ensure that the CPVC 90 Elbow is the first elbow used in...

Page 23: ...close PVC venting Use higher temperature rated CPVC pipe in enclosed spaces or to penetrate combustible or non combustible walls PVC vent pipe may not be used to penetrate combustible or non combustib...

Page 24: ...e See Figure 6A At top of vent pipe length install another PVC 90 elbow so that elbow leg is opposite the building s exterior surface Install rodent screen and vent terminal supplied with boiler see F...

Page 25: ...e Figure 13 for appropriate configuration Brace exterior piping if required C Polypropylene Venting WARNING Asphyxiation Hazard Follow these instructions and the installation instructions included by...

Page 26: ...olypropylene Pipe Fittings and Terminations M G DuraVent Boiler Model Centrotherm Eco Part Numbers Sizes Boiler Adapter PVC to PP Boiler Adapter Connector Rigid Pipe Flex Pipe Pipe Joint Locking Band...

Page 27: ...85 are listed for vertical venting by installing flexible vent in an UNUSED masonry chimney chase and supplying combustion air through a separate wall or roof combustion air terminal b Refer to Figure...

Page 28: ...nd these instructions the more restrictive instructions shall govern Do not mix vent components from listed manufacturers Examine all components for possible shipping damage prior to installation All...

Page 29: ...ns When pipe is cut cut end must be square and carefully de burred prior to assembly IV Venting D Stainless Steel Venting continued a Plan venting system to avoid possible contact with plumbing or ele...

Page 30: ...ow leg is opposite the building s exterior surface Install rodent screen not supplied and horizontal vent terminal Brace exterior piping if required 5 Vertical Vent Termination a Standard Two Pipe Ter...

Page 31: ...appliances remaining connected to the common venting system are not in operation 1 Seal any unused openings in the common venting system 2 Visually inspect the venting system for proper size and horiz...

Page 32: ...r Installation Venting 1 Vent Piping and Terminations a Multiple boiler vent terminations are shown in Figure 18 b Each individual boiler must have its own vent pipe and vent terminal Refer to Paragra...

Page 33: ...V Venting F Multiple Boiler Installation Venting continued Figure 17 Flexible Stainless Steel Vent in Masonry Chimney with Separate Combustion Air Intake Figure 18 Multiple Boiler Direct Vent Terminat...

Page 34: ...to the boiler to insure combustion products cannot escape from operating boiler To fill the trap inject water in the amount of 1 cup 240ml through condensate trap connection Do not overfill the trap...

Page 35: ...11C Maximum Condensate Flow Boiler Model Maximum Condensate Flow GPH PHNTM210 2 4 PHNTM285 3 2 Assumes 100 of water in fuel condenses V Condensate Disposal continued Figure 19 Condensate Trap and Dra...

Page 36: ...ront in tapping making sure tee run outlets are in vertical plane and parallel to boiler side c Mount in MPT x in FPT Pressure Relief Valve into the tee top outlet d Install Drain Valve into the tee b...

Page 37: ...late boiler from system piping via closely spaced tees to insure specified flow range through boiler any time the boiler is firing a The flow rate through the boiler loop is maintained by factory supp...

Page 38: ...Boiler VI Water Piping and Trim B Piping System To Be Employed continued Table 13 Recommended Circulators for 50 ft Equivalent ft Near Boiler Piping Approximately 20 ft Straight Pipe 4 90 Elbows and 2...

Page 39: ...port 4 3 7 0 6 6 14 0 Ball Valve full port 1 9 1 4 2 2 1 3 Swing Check Valve 4 5 5 5 6 5 9 0 Flow Check Valve typical 54 0 74 0 57 0 177 0 Butterfly Valve 2 7 2 0 2 7 4 5 Threaded Fitting and Valve E...

Page 40: ...d Installation Requirements continued CAUTION It is the installers responsibility to select pumps and boiler piping configurations that provide the proper flow rates and performance for the boiler and...

Page 41: ...m C Standard Installation Requirements continued CAUTION It is the installers responsibility to select pumps and boiler piping configurations that provide the proper flow rates and performance for the...

Page 42: ...1 Systems containing high level of dissolved oxygen Many hydronic systems contain enough dissolved oxygen to cause severe corrosion damage to Phantom boiler heat exchanger Some examples include but no...

Page 43: ...er Installation continued Figure 23A Multiple Boiler Water Piping w Domestic Hot Water Heater Page 1 of 2 NOTICE Installing a low water cutoff in the system piping of multiple boilers is strongly reco...

Page 44: ...w Domestic Hot Water Heater Page 2 of 2 VI Water Piping and Trim E Multiple Boiler Installation continued NOTICE Installing a low water cutoff in the system piping of multiple boilers is strongly reco...

Page 45: ...r refill is not recommended however if such refill is employed a water meter must be added to evaluate the makeup water volume taken after ini tial fill and eliminate any water leakage as early as pos...

Page 46: ...SI or less 0 5 Inch W C Pressure Drop Nominal Pipe Size In Inside Diameter In Length of Pipe Ft 10 20 30 40 50 60 70 80 90 100 0 622 172 118 95 81 72 65 60 56 52 50 0 824 360 247 199 170 151 137 126 1...

Page 47: ...252 215 191 173 159 148 139 131 1 1 380 937 644 517 442 392 355 327 304 285 269 1 1 610 1403 964 775 663 588 532 490 456 427 404 2 2 067 2703 1858 1492 1277 1131 1025 943 877 823 778 2 2 469 4308 2961...

Page 48: ...ce of such requirements follow National Fuel Gas Code ANSI Z223 1 NFPA 54 and or Natural Gas and Propane Installation Code CAN CSA B149 1 2 Use thread joint compounds pipe dope resistant to action of...

Page 49: ...t the smallest individual module boiler CAUTION If gas pressure in the building is above psig 3 4 kPa an additional gas pressure regulator is required Using one additional regulator for multiple boile...

Page 50: ...BTU hr or greater This boiler is equipped with a tankless coil DANGER Electrical Shock Hazard Positively assure all electrical connections are unpowered before attempting installation or service of e...

Page 51: ...ower lines and fluorescent lighting Wire the sensor to the boiler using 22 gauge or larger wire As with the sensor the sensor VIII Electrical continued wiring should be routed away from sources of ele...

Page 52: ...52 VIII Electrical continued...

Page 53: ...53 VIII Electrical continued Figure 26 Wiring Connections Diagram...

Page 54: ...54 VIII Electrical continued Figure 27 Ladder Diagram...

Page 55: ...re 28A Modified Wiring For DHW Priority When Using Low Flow Circulator Piped Off System Header Heating with Central Heating Circulators Plus Alternately Piped Indirect Water Heater VIII Electrical con...

Page 56: ...re 28B Modified Wiring For DHW Priority When Using Low Flow Circulator Piped Off System Header Heating with Central Heating Zone Valves Plus Alternately Piped Indirect Water Heater VIII Electrical con...

Page 57: ...57 Figure 28C DHW Priority Circulators with Crown PN 3501505 Zone Panel Piped Off System Header Wiring Schematic for Heating Zone Circulators CROWN PN 3501505 VIII Electrical continued...

Page 58: ...58 Figure 29A Multiple Boiler Wiring Diagram Internal R7910 Multiple Boiler Control Sequencer Three Boilers Shown Typical Connections for up to Eight Boilers VIII Electrical continued...

Page 59: ...59 Figure 29B Boiler to Boiler Communication with Crown Zone Panel PN 3501505 VIII Electrical continued...

Page 60: ...Figure 23A for installation location and Figure 30 for installation detail b Ethernet Cables Ethernet cables are used to connect the boiler network together These are standard straight through cables...

Page 61: ...Addresses Assign all boilers a unique Boiler Address using any number from 1 through 8 WARNING When two boiler s addresses are the same undesirable simultaneous operation occurs 5 Enable 1 Boiler Mas...

Page 62: ...on 1 Obtain gas heating value in Btu per cubic foot from gas supplier 2 Phantom gas valves have inlet and outlet pressure taps with built in shut off screw Turn each screw from fully closed position t...

Page 63: ...63 IX System Start up continued Figure 32 Operating Instructions Phantom Series Lighting and Operating Instructions...

Page 64: ...on analyzer Failure to use combustion analyzer could result in property damage personal injury or loss of life 1 Remove flue temperature sensor from vent connector see Figure 9 and insert combustion a...

Page 65: ...e sensor and sensor cap into two pipe vent connector port upon completion of combustion test Failure to properly secure the flue temperature sensor into the port could lead to property damage personal...

Page 66: ...performed by a qualified service agency in accordance with the manufacturer s instructions and all applicable codes and requirements of the authority having jurisdiction If the information in these i...

Page 67: ...us area on the gas valve c Apply the Boiler Conversion Label to a conspicuous surface on or adjacent to the outer boiler jacket Fill in the date of the conversion and the name and address of the compa...

Page 68: ...ss of life Under these conditions most combustion analyzers used in the field will show 0 O2 and a very high well over 1000 ppm CO Combustion readings will also appear to be unresponsive to throttle a...

Page 69: ...efer to Paragraph G Adjusting Parameters Pump Setup Menu for additional information Boiler Pump Domestic Pump 5 Contractor Setup Contractor Name Enter your contact information name address and phone n...

Page 70: ...Control The Control includes safety controls designed to ensure safe and reliable operation In addition to flame safety controls the Control includes supply water temperature differential water temper...

Page 71: ...door temperature sensor is connected to the boiler and Outdoor Reset is enabled the Central Heat and Auxiliary Heat setpoints will automatically adjusted downwards as the outdoor temperature increases...

Page 72: ...an be installed between terminals 11 and 12 on the low voltage terminal strip Be sure to remove the jumper when adding an external limit control to the system If the external limit opens the boiler wi...

Page 73: ...equenceMasterrespondstoCentralHeat Auxiliary Heat DHW and frost protection demands similar to the standaloneboiler Forexample whenselectedandDHW priorityisactive thesequencemasterusesDHWsetpoint Diff...

Page 74: ...Heat Status Running burner On circulator s On After flame is proven the sequence continues with run stabilization and low fire hold time Once the field adjustable low fire hold time is completed norm...

Page 75: ...e Fault and Rate Limit symbols provide a link to the cause of a boiler fault or firing rate limit The first boiler status screen provides an overview of boiler operation including fault status Rate Fi...

Page 76: ...protec tion logic the 6 symbol blinks and becomes a screen link Rate The rate value is equal to the actual kbtu hr input divided by the boiler rated input Priority The selected Priority is shown Avai...

Page 77: ...s can be an indication of gas supply issues Additionally supply and return tempera ture dual pen trends brings a focused look at heat exchanger and pump performance For example studying a differential...

Page 78: ...re Press the zone control button to view individual zone Zone Panel 1 typical for 2 through 4 Zone panel screens show individual zone status cycle counts and individual zone heat loss size in kbtu hr...

Page 79: ...d last to stop The lead boiler is automatically rotated after 24 hours of run time Additionally the lead is rotated if there is a lead boiler fault Firing Rate Demanded firing rate is provided The Seq...

Page 80: ...Home screen Press the Adjust button on the Adjust Mode screen or Press Service Contact for service provider contact information Press Login button to access password screen Press 5 digit display to o...

Page 81: ...surement matching the refer ence reading Not Connected Connected Not Connected Zone Control Status Connected When the Zone Control is connected adjustable settings are automatically shown under the Ad...

Page 82: ...aximum blower speeds Incorrect boiler type can cause hazardous burner conditions and improper operation that may result in PROPERTY LOSS PHYSICAL INJURY OR DEATH Table 29 Parameters Changed Using the...

Page 83: ...he expected heat rate value to set a maximum heat rate The maximum heat rate is the highest heat rate that the boiler can fire to at that moment The maximum heat rate is the summation of the expected...

Page 84: ...ted Heat Rate This parameter defines the highest modulation rate the Control will go to during the auxiliary heat call for heat If the rated input of the Auxiliary Heat Zones is less than the maximum...

Page 85: ...l for heat Central Heat off DHW demand Make sure indirect water heater and DHW circulator are sized to maintain flow through boiler within limits shown in Table 12 Pump Runs during central heat and fr...

Page 86: ...tem pump X DHW pump X Boiler Pump X X Sequencer Master Parameter Selections Sequencer Master Enabled Indirect Water Heater Boiler Piped Pump Parameter Selections System Pump Central Heat No Priority N...

Page 87: ...l It is permissible for the domestic and system pumps to run at the same time The boiler pump must run for every call for heat X Operation F Changing Adjustable Parameters continued Example Pump Param...

Page 88: ...thout Saving Clear Entire Field Backspace Save Field and Exit Save Press box to input contractor information Contractor Name i Bill Smith 1 7 6 5 4 3 2 A ES C D C B 8 CL R 7 BS 8 Enter Contractor Info...

Page 89: ...erature drops Diff Below degrees below the setpoint 3 1 to 5 Response Speed This parameter adjusts the Central Heat temperature controller Proportion Integral Derivative PID values Higher values cause...

Page 90: ...alue increases to high fire causing the temperature to exceed the Diff Above setpoint and cycle the boiler unnecessarily Lower values cause a smaller firing rate change for each degree of temperature...

Page 91: ...ange for each degree of temperature change If set too low the firing rate response will be sluggish and temperature will wander away from setpoint 10 seconds 0 to 300 seconds Low Fire Hold Time Low Fi...

Page 92: ...s typically set to the coldest outdoor temperature 70 F 21 1 C 32 F to 100 F 0 C to 37 8 C Central Heat High Outdoor Temperature The High Outdoor Temperature parameter is the outdoor temperature at wh...

Page 93: ...iary Heat Low Outdoor Temperature The Low Outdoor Temperature parameter is also called Outdoor Design Temperature This parameter is the outdoor temperature used in the heat loss calculation It is typi...

Page 94: ...entral Heat Setpoint Heating Element Type 180 F to 190 F 82 2 C to 87 8 C Fan Coil 100 F to 140 F 37 8 C to 60 C In Slab Radiant High Mass Radiant 160 F to 190 F 71 1 C to 87 8 C Convection Baseboard...

Page 95: ...ped below the setpoint minus Diff be low setpoint Longer time delay will prevent nuisance starts due to short temperature swings 195 F 90 6 C Central Heat Setpoint 195 F 90 6 C Stop All Boilers Setpoi...

Page 96: ...iption Central Heat 1 User defined Zone Control 1 Zone 1 Central Heat 2 User defined Zone Control 1 Zone 2 Central Heat 3 User defined Zone Control 1 Zone 3 Central Heat 4 User defined Zone Control 1...

Page 97: ...eters may be used to adjust the signal range Modbus Modbus is used as the temperature setpoint 130 F 54 4 C 80 F 26 7 C Central Heat Setpoint Central Heat 4 20mAdc Setup 4 mA Water Temperature Sets th...

Page 98: ...respirator 2 Long sleeved loose fitting clothing 3 Gloves 4 Eye Protection Take steps to assure adequate ventilation Wash all exposed body areas gently with soap and water after contact Wash work clo...

Page 99: ...iate safeguards and alarms should be installed on the heating system to prevent damage if the boiler is inoperative Burn Hazard This boiler contains very hot water under high pressure Do not unscrew a...

Page 100: ...e the following should be performed by a service technician once every year 1 Follow the procedure for turning the boiler off per Figure 32 Operating Instructions 2 Inspect the wiring to verify the co...

Page 101: ...Products 1 System Cleaning and Conditioning a The following heating system water treatment products are recommended for an initial existing heating system sludge removal initial boiler cleaning from c...

Page 102: ...roftheglycolsolution Allowance shouldbemadeforexpansionoftheglycolsolution WARNING Poison Hazard Use only inhibited propylene glycol solutions specifically formulated for hydronic systems Do not use e...

Page 103: ...re above j Insure that fresh silicon sealant is applied to the overflow switch threads and the switch is properly orientedrelativetothetrapbody thearrowmolded into the switch hex side end must face do...

Page 104: ...ve Control ER0011 Adjustment Mode Password Timeout The Control and Display are NOT defective The password has timed out Simply cycle power to the Display to restore operation ER0012 Control Failed Def...

Page 105: ...bled Master s Boiler has been powered down To clear fault restore communication or cycle power Boiler Size Setup Boiler Size Fault WARNING Boiler size setting may not match actual boiler size The Boil...

Page 106: ...uced to help avoid a lockout or save energy Refer to Hard Lockout section for corrective actions High Stack Temperature Limit High Supply Temperature Limit High Differential Temperature Limit The foll...

Page 107: ...nal Limit defective or jumper not installed If yellow light on LWCO is on system is low on water If neither yellow or green light is on check LWCO harness 7 Return sensor fault Shorted or open return...

Page 108: ...nlet pressure is below maximum on rating plate before replacing valve 18 Light off rate proving failed Blower is not running at Light off rate when it should or blower speed signal not being detected...

Page 109: ...109 XIII Repair Parts 1L 1K 1J 1E 1C 1D 1B 1L 1J 1A 1M 1F 1C 1D 1B 1L 1J 1A 1M 1F 1K 1G 1G 1K 1H 1G...

Page 110: ...acement Burner Kit Not Shown includes burner head burner head seal and hardware 105188 04 105188 05 1G Burner Head 101731 04 101731 05 1H Burner Head Seal 102739 01 N A Replacement Burner Door Kit Not...

Page 111: ...l Plate 2x M5 x 16 mm Phillips flat head screws Blower Adapter Plate Air Intake Adapter Blower Side Spacer Plate for size 080 through 150 only 101704 03 101704 04 2B 1 Blower Inlet Repair Kit Includes...

Page 112: ...nt Condensate Float Switch Kit 105005 01 3C Spring Clip Condensate Trap 2 per boiler 101632 01 3D Rubber Grommet Condensate Trap 101595 01 3G Air Pressure Switch 104426 01 3H Air Pressure Switch Tubin...

Page 113: ...Part Number 210 285 5A R7910 Kit 0 7000ft Altitude 106193 01 5A R7910 Kit 7000 10000ft Altitude 106193 02 106193 03 5B Programmed Display with Mounting Hardware 106217 01 5C Transformer 3502430 XIII...

Page 114: ...05181 04 105181 05 6F High Voltage Terminal Bracket 102780 01 6G Replacement Front Door Kit includes labels 105532 02 105532 01 6H Control Tray 103336 01 6J Replacement Access Panel Kit 5 in x 8 in in...

Page 115: ...4 Schedule 80 CPVC 90 Elbow 230814 N A 1 7G 3 x 3 CPVC PVC Vent System Connector Assembly with sensor cap and flue sensor 105133 01 N A 3 x 4 CPVC PVC Vent System Connector Assembly with sensor cap an...

Page 116: ...50600 8C Safety Relief Valve 30 PSI 81660363 30 PSI 95 040 N A Alternate Safety Relief Valve Not Shown 50 PSI 103837 01 8D Boiler Drain Valve 3 4 NPT 95 041 8E Boiler Stacking Brackets Two 2 pcs per a...

Page 117: ...B 10C 10D 102701 03 10A Main Low Voltage Harness 103009 03 10B High Voltage Harness 103010 02 10C Blower Power Harness 103012 01 10D Communication Harness 103011 01 10E Igniter Harness 105752 01 10F W...

Page 118: ...118...

Page 119: ...119...

Page 120: ...120 CBC PN 980132 Rev D 7 15 Manufacturer of Hydronic Heating Products P O Box 14818 3633 I Street Philadelphia PA 19134 www crownboiler com...

Reviews: