O P E R A T I N G M A N U A L
8 0 0 . 7 4 9 . 2 7 6 1
w w w . c o a c h c o m m . c o m
6 7
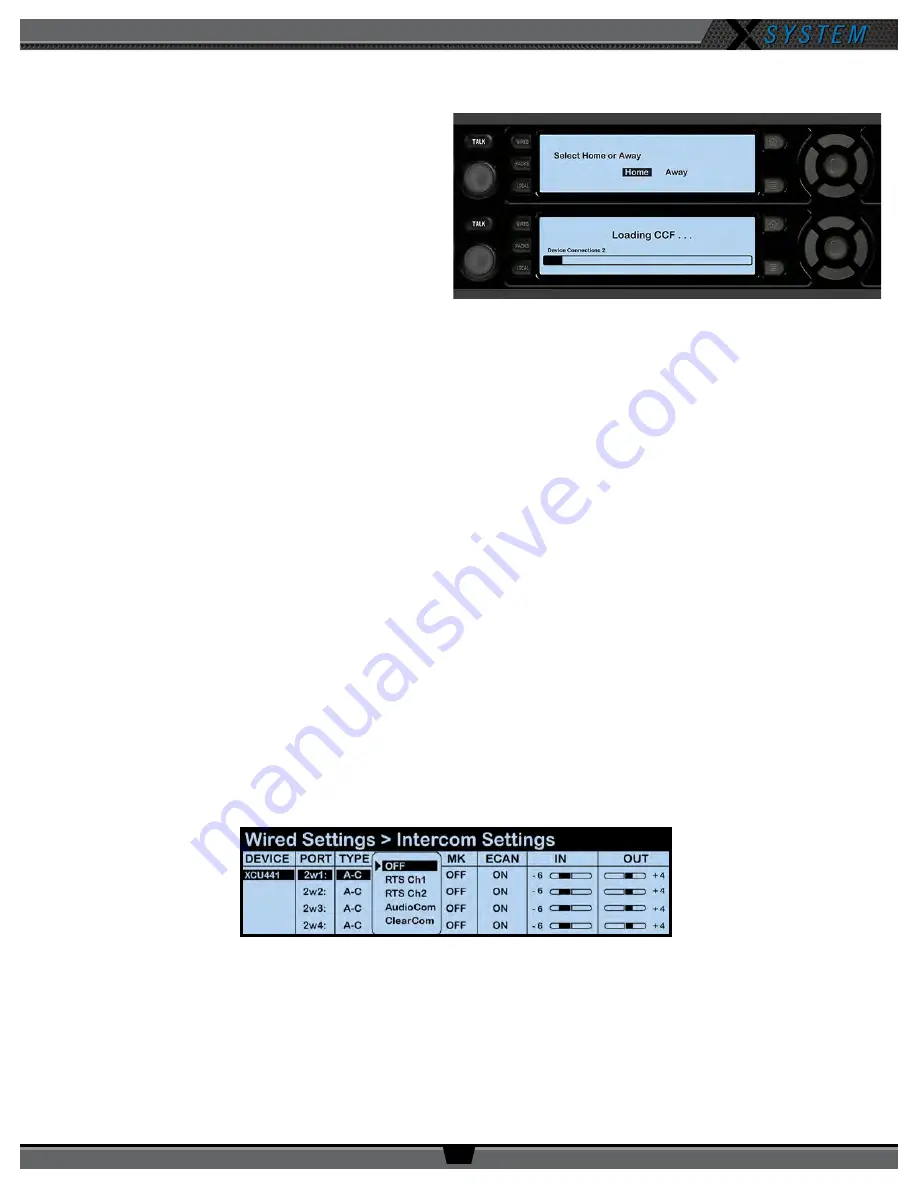
Setting Home/Away Status
When you power up the X-System Sideline Cart, a prompt
for selecting “Home” or “Away” displays on the top (master)
Control Unit LCD. Based on this setting, all of the RTs on
the system will be assigned specific hopping patterns
by the Control Unit (CU). It is very important to set this
status correctly. Hopping pattern coordination prevents
interference between X-Systems. During startup, the
configuration file (CCF) will begin loading while the Home/
Away prompt is displayed on the top CU. A progress bar
shows the load process on the bottom CU. Once the Home/
Away prompt is cleared, the CCF load progress can be seen
on both CUs. When the CCF load is complete, the home
screen will display on the front of the CU(s) and you can
proceed.
Turning On 2-Wire Ports and Adjusting Levels
Some teams elect to turn off their 2-Wire ports for each Control Unit so they can use the Sideline Cart alone for wireless
communication during practice.
Always make sure that the 2-Wire ports are turned on prior to game day. Failure to
do so will result in no communication between wireless RPs and the wired system.
To turn ports ON:
1. Navigate through the CU menu to
Wired Settings
>
Intercom Settings
.
2. Select a 2-Wire port, then press the Enter button. A menu of available types will display.
3. Scroll to select
AudioCom
, then press Enter.
4. Verify that the IN level for the port is
-6
.
5. Verify that the OUT level for the port is
+4
.
6. Repeat steps 1–5 for each 2-Wire port of all connected Control Units.
NOTE:
4-Wire ports are not used in standard X-System operation and should be turned off.
To turn ports OFF: Select
OFF
as the port type.
Figure 93: Control Unit Home/Away Status Prompt
Figure 94: Control Unit Intercom Settings Menu


