O P E R A T I N G M A N U A L
8 0 0 . 7 4 9 . 2 7 6 1
w w w . c o a c h c o m m . c o m
3 7
Radio Packs (XRP-13)
The X-System Radio Pack (RP) is to be worn by a user on the sideline. This Radio Pack communicates directly to its
corresponding RT. All wireless users are connected together through the wired system via the Control Unit and the WIM 8.
The X-System RP can be used with X-System in highly-varying applications and environments.
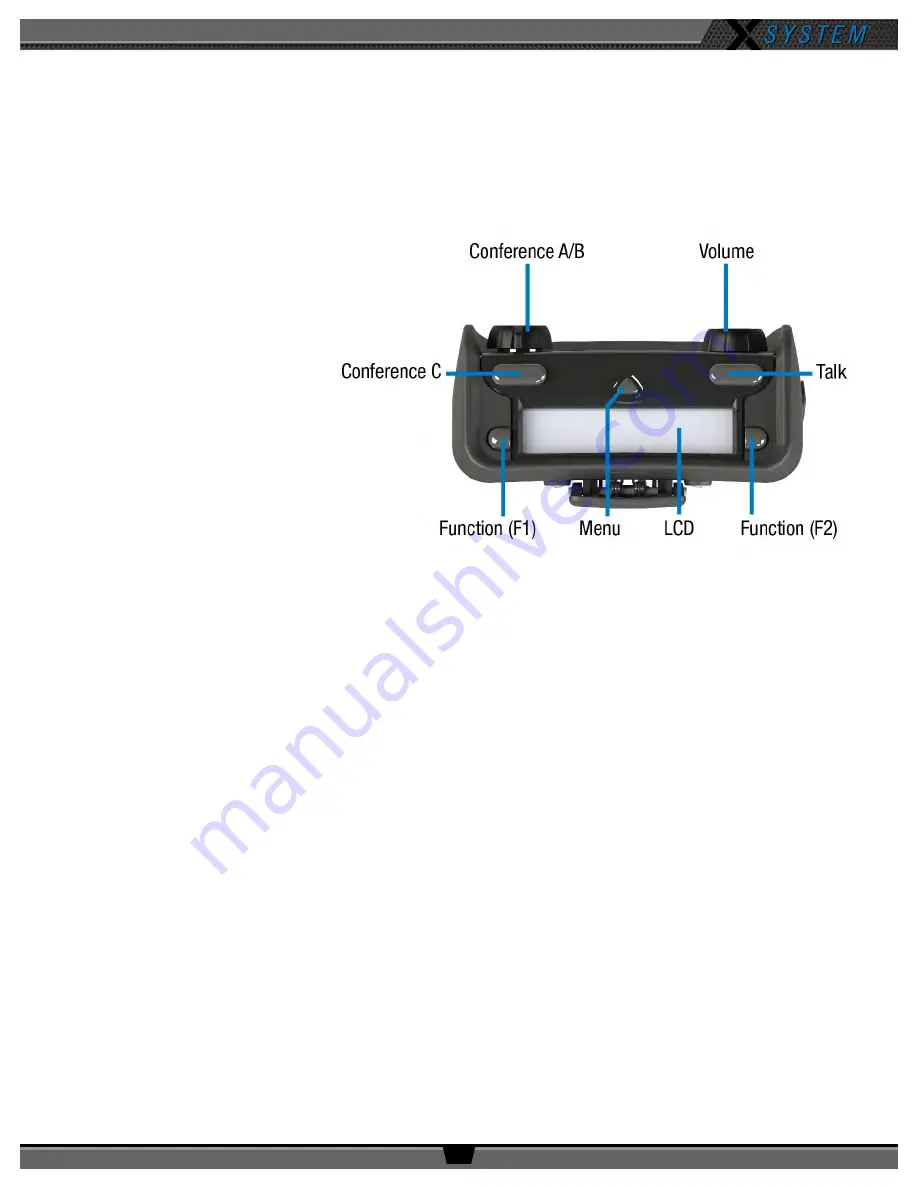
Radio Pack Top
•
Conference A/B Rocker
Knob:
The Conference A/B
knob selects whether you are
listening to your RP Profile’s
assigned Conference A or
Conference B.
•
Conference C Button
: The
Conference C button enables
or disables the audio for the RP
Profile’s assigned Conference
C.
•
Volume Knob:
The Volume
control adjusts the listening
volume of the connected
headset for the selected
conference. Turning the Volume
control clockwise increases the
audio level, while turning the control counter-clockwise decreases the level.
»
This control also serves as an Audio Overlay (AO) volume control when pressed and turned simultaneously.
(AO must be enabled on Conference C first. See page 62 for more information about setting up AO.)
•
Talk Button:
The Talk button enables or disables the microphone for the selected conference. Talk buttons can
be set to function as “Latch” press, “Momentary” press, or “Always On.” In addition, X-System uses an intelligent
latching method for Talk buttons. When set to “Latch,” one short press will latch the Talk on; however, pressing
and holding the Talk button will cause the button to act as a momentary switch.
•
Function Buttons (F1/F2):
The left (F1) and right (F2) function buttons can be programmed to assign a variety of
functions. Each Function button’s operation is set in the RP’s profile, which can be customized via X-Ware. While in
the menu, one short press of F1 returns you to the previous menu without saving any changes.
•
Menu Button:
The Menu button provides multiple functions such as access to menu options or toggling between
the home operating screen and the secondary operating screen.
»
Short Press – Cycles the RP LCD from the Home Operating screen to the Secondary Operating screen and
vice versa.
»
Long Press – Accesses the menu options of the RP to view device/system information and make setting
adjustments.
»
Escape – While in the menu, one short press returns you to the previous menu without saving any changes.
•
LCD:
Display for viewing real-time status of the RP, navigating menu options, and making subsequent setting
adjustments.
Figure 44: XRP-13 Top View


