POWERDRIVE 3 – MODEL 26560
Charger Repairs
2008-2011 Domestic Battery Charger Maintenance and Service Manual
Page 6-27
6
CHARGER REPAIRS
See General Warning, Section 1, Page 1-1. See additional WARNING on page 6-1.
ý
WARNING
• Knowledge of battery charger wiring and component terminology is required before
attempting any repair (Figure 6-9, Page 6-11 and Figure 6-10, Page 6-15).
• Prior to servicing the charger, disconnect the AC power supply cord from the wall outlet and
the DC plug from the vehicle charger receptacle.
DC CORD
DC Cord Removal
1. Disconnect AC cord from the wall outlet and DC plug from the vehicle receptacle.
2. Remove the charger cover.
3. Remove the DC cord black wire from the fuse by loosening the nut on the fuse
(Figure 6-23, Page 6-27)
.
4. Remove the DC cord red wire from the ammeter.
5. Remove the DC cord blue wire from the relay board assembly.
6. Using pliers, squeeze the strain relief bushing and remove the DC cord.
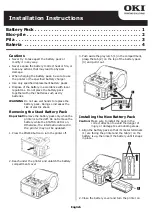
Figure 6-23 DC Cord
DC CORD BLACK
WIRE TO FUSE
DC CORD
RED WIRE
TO AMMETER
DC CORD BLUE
WIRE TO RELAY
STRAIN RELIEF
BUSHING
Summary of Contents for 2008-2011
Page 2: ......
Page 12: ...Page x 2008 2011 Domestic Battery Charger Maintenance and Service Manual ...
Page 18: ...1 ...
Page 28: ...2 ...
Page 64: ...3 ...
Page 100: ...4 ...
Page 132: ...5 ...
Page 168: ...6 ...
Page 204: ...7 ...
Page 296: ...Club Car R NOTES ...
Page 298: ......
Page 299: ......