


8.0 ADJUSTING THE IMAGE
66
R599790 - FORCE Series User Manual
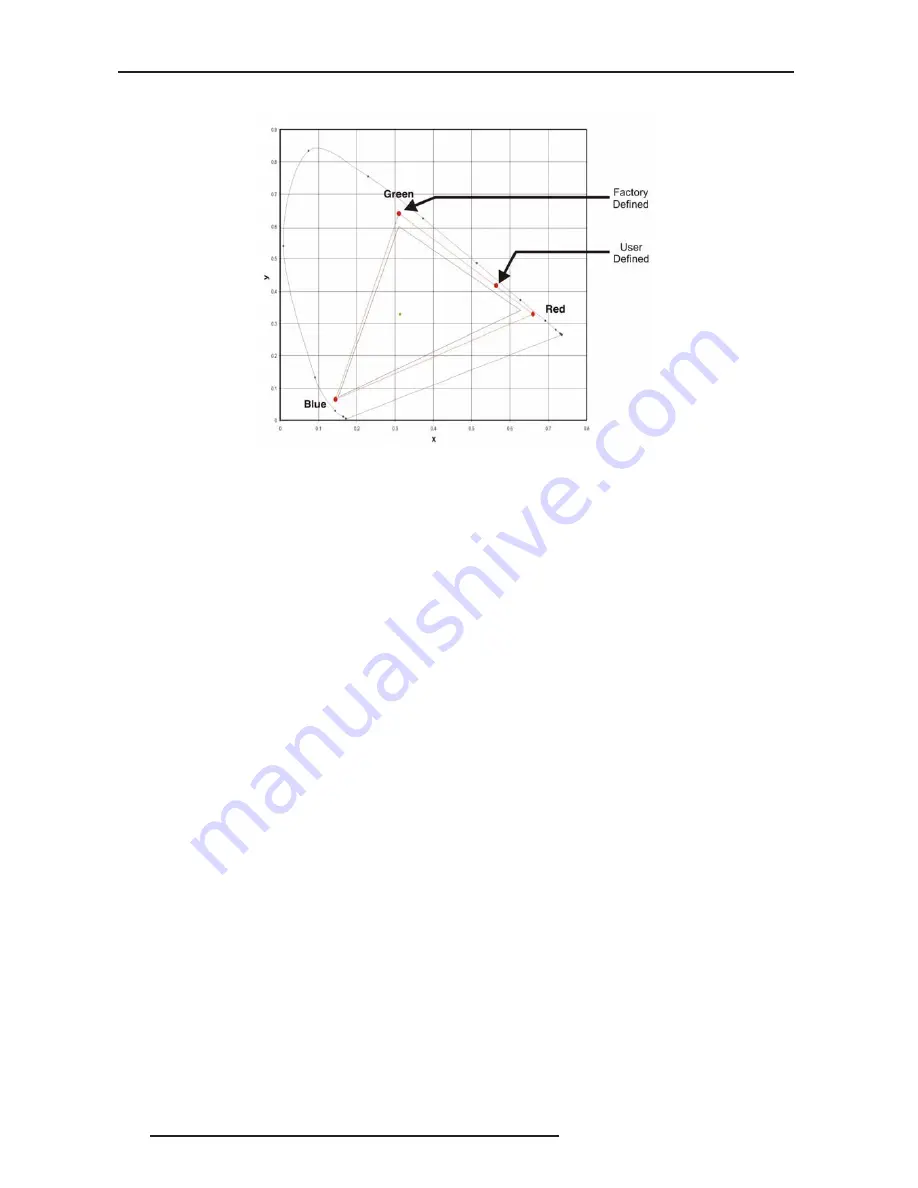
CIE 1931 Chromacity Diagram (without Yellow Notch Filter)
NOTE: Keep new x,y coordinates within the original color gamut triangle shown here.
Color Saturation - Submenu
Adjust color slide bars and judge image color by eye or meter. A user-defined color “adjustment” can be applied by
selecting it in the Advanced Image Settings menu (select ‘Color Adjustment’). Use this submenu if you do not have
specific color coordinates in mind and will judge color performance by eye or meter. Like the Color Adjustment by
X,Y submenu, each color control actually defines new x/y coordinates for that color and changes its hue. Adjust the
hue of each primary color (red, green, blue, and white) by using more or less of it in relation to the other colors.
NOTE: A Color Saturation adjustment defines the corresponding x/y coordinates shown in the Color Adjustment by
X,Y submenu. These x/y coordinates will remain stable for this User gamut until they are changed again via either
menu. Values displayed in the Color Saturation menu, will fluctuate as you use the projector, and will be different
when you return to this menu in the future. These floating changes do not affect the x/y coordinates or gamut.
•
Set Select Color Adjustment to “Max Drives”
•
Display a full white test pattern
•
Adjust lamp power and Optical Aperture to the desired Light output (measured with lightmeter)
Display the Color Adjustments by X,Y menu. This menu shows the x/y coordinates defining the “Max Drives” color
gamut for this projector.
If necessary, you may want to use the “User” color adjustment to enable Color Adjustments by X,Y changes. Then
enter the desired x/y values into each menu.
•
To match reds, decrease “Red X” until full field red screens match.
•
To match greens, decrease “Green Y” until full field green screens match.
•
To match blues, increase both “Blue X” and “Blue Y” until full field blue screens match.
NOTE: For speed, enable the “Auto Color Enable” check box. Each color coordinate you select will then
automatically trigger a full field display of the corresponding color.
Alternatively, use the Color Saturation menu for these adjustments or to fine tune. These coordinate adjustments
move the three color points closer together (see below) to establish a perfect match to the desired gamut.
Adjust only as necessary to ensure that the resulting color palette is as large as possible. When done, you may
need to adjust lamp power slightly.
Apply this new “User” gamut to a source at any time by selecting it in the “Select Color Adjustment” list accessed in
the Advanced Image Settings menu.
Using the Color Saturation Menu for Color Matching
To use the Color Saturation menu to match colors. In the three Color Adjustment submenus (Red, Green, Blue, and
White), set all main values to 1000 and the secondary values to 0, if applicable. Then judge by eye and adjust the
slide bars as needed.
NOTE: Adjustments here define new x/y coordinates in the Color Adjustments by X,Y menu. For best results, use
Summary of Contents for Force one
Page 1: ......
Page 99: ...16 0 APPENDIX DIMENSIONS R599790 FORCE Series User Manual 99...
Page 100: ......


