


Installation & Setup
2-32
Roadster & Mirage S+/HD User Manual
020-100002-04 Rev. 1 (12-2008)
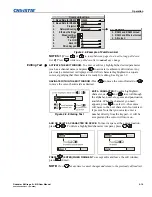
TO CHANGE FROM INFRARED TO WIRED:
1.
Remove battery compartment cover from back of keypad.
2.
Remove batteries.
3.
Wait 1-2 minutes. Meanwhile, notch the battery cover to create an exit hole for
the cable. Ensure the hole is smooth and will accommodate the cable without
pinching.
4.
Plug the keypad cable (supplied) into the empty battery compartment—ensure
the connector is oriented correctly (red wire nearest to the edge).
5.
Set keypad protocol to “wired” jumper setting (refer back to Figure 2.44). Ensure
jumper #4 is set between pins 2 and 3 as shown in the last example (shaded).
6.
Replace battery compartment cover, keeping the strain relief tie just inside the
battery compartment at the exit notch.
7.
Plug into the port labeled
REMOTE
on the projector’s input panel.
TO CHANGE FROM WIRED TO INFRARED:
1.
Unplug the keypad from the projector.
2.
Open the keypad back and unplug the keypad cable.
3.
Wait 1-2 minutes.
4.
Install batteries (see
Section 4
)
5.
Set jumpers according to the desired IR protocol (refer back to Figure 2.44).
Ensure jumper #4 is set between pins 1 and 2 as shown for all remote IR
protocols.
6.
Replace battery compartment cover.


