8–13
62-11640
To Start the Rack Position Sensor Calibration Proce-
dure:
1. Put the system into Technician Mode, refer to
2. Select the Component Calibration Mode Soft
key.
3. Press “=” to start the Rack Position Sensor cali-
bration.
During the calibration process, the display will show the
Engine Load %, RPMs, current calibration offset (the
offset in the Engine ECU), and calibration status.
The Rack Position Sensor is calibrated at an engine
speed of 1700
−
1780 RPM. In order to reach the
required engine speed, the system will incrementally
increase engine load in the following order:
Low Speed
−
Compressor Start
−
High Speed
−
Heater
1 On – Heater 2 On – (3 minutes) – Economized Mode.
If, after placing the system in Economized Mode for
180 seconds, engine speed is not high enough to cali-
brate the sensor (1700 – 1780 RPM), the system will
indicate that the load is too low for calibration. In this
case you will have to manually increase the system
load by blocking the condenser coil. Once the load is
increased enough for the engine to reach calibration
RPM, the calibration should complete successfully.
After the calibration process is finished, the system will
indicate that the calibration was successful, and the
engine will shut down.
8.5.14
Cooling System
a. Cleaning and Flushing:
Air flows through the condenser and then the radiator.
The cooling surfaces must be clean and the interior of
the radiator must be clean for adequate cooling.
NOTICE
Use only ethylene glycol anti-freeze (with
inhibitors) in system as glycol by itself
will damage the cooling system. Always
add pre-mixed 50/50 anti-freeze and water
to radiator/ engine. Never exceed more
than a 60% concentration of anti-freeze.
Use Texaco Havoline extended life cool-
ant or any other extended life coolant
which is Dexcool approved and has 5/150
(5 years/150,000 miles) on the label.
1. Ensure the unit will not start automatically by
disabling any two way communication and plac-
ing the STOP/RUN-OFF switch in the OFF posi-
tion. Disconnect the high voltage source and
lockout/tagout the receptacle.
2. Remove all foreign material from the condenser
& radiator by reversing the normal air flow. (Air
is pulled in through the front and discharges
over the engine.) Compressed air or water may
be used as a cleaning agent.
WARNING
!
Do not remove the cap from a hot coolant
system; if the cap must be removed, do
so very slowly in order to release the
pressure without spray.
NOTE
Draining the coolant from the engine petcock
will leave approximately 1 quart (.9 liters) of
coolant in the block.
3. Drain coolant into suitable container by remov-
ing coolant bottle cap and the engine drain plug.
NOTICE
NEVER POUR COLD WATER INTO A HOT
ENGINE, however hot water can always
be added to a cold engine.
4. Install hose or drain plug and fill system with
clean, untreated water.
NOTE
Only clean water should be used to flush the
cooling system. Do not use any radiator
flush or detergents to clean the radiator.
5. Start the engine and drain system while warm.
Rinse system three times after it has cooled
down. Refill system with water.
6. Run engine to operating temperature. Drain sys-
tem again and fill with 50/50 water/anti-freeze
mixture. (refer to the Caution Note at the begin-
ning of this section.)
7. Start unit and check for leaks.
b. Radiator Replacement:
1. Ensure the unit will not start automatically by
disabling any two way communication and plac-
ing the STOP/RUN-OFF switch in the OFF posi-
tion. Disconnect the high voltage source and
lockout/tagout the receptacle.
2. Drain coolant into a suitable container by remov-
ing coolant bottle cap and the engine drain plug.
3. Remove condenser fans, refer to
. When removing the road side fan
assembly, remove the condenser to subcooler
line support bracket completely, to allow clear-
ance for coil removal.
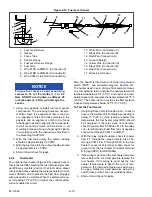
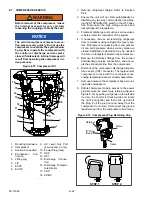
4. Remove the radiator frame assembly mounting
bolts (see
frame assembly.
5. Remove top radiator mounting brackets and
remove the radiator through the top of the unit.
6. Re-assemble in reverse order of removal.
7. Flush and fill radiator with coolant. (Refer to
Summary of Contents for Vector 8500
Page 23: ...62 11640 1 6 1 3 SAFETY DECALS ...
Page 24: ...1 7 62 11640 62 03958 ...
Page 25: ...62 11640 1 8 ...
Page 26: ...1 9 62 11640 ...
Page 27: ...62 11640 1 10 ...
Page 125: ...62 11640 SECTION 6 MESSAGECENTER PARAGRAPH NUMBER Page 6 1 MESSAGECENTER MESSAGES 6 1 ...
Page 321: ......
Page 322: ......

