1
Introduction
to
the
Copy
Functions
1-26
Paper Selection
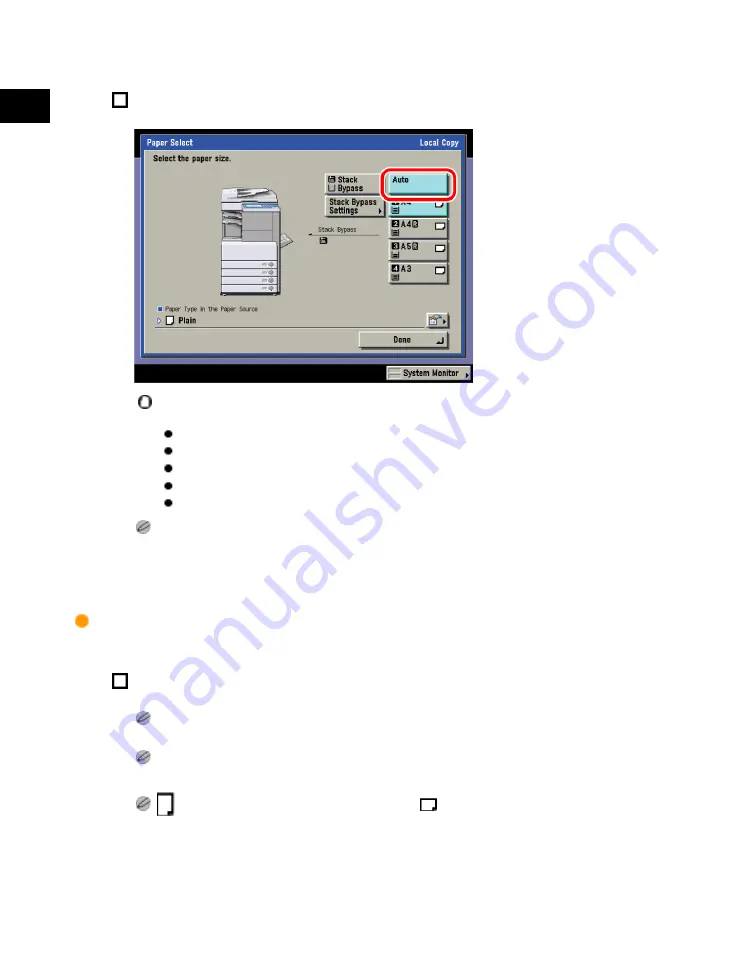
Press [Auto].
You cannot use the Automatic Paper Selection mode when copying the following types of originals. Copy
these originals using the Manual Paper Selection mode.
Nonstandard size originals
Highly transparent originals, such as transparencies
Originals with an extremely dark background
A6R or smaller originals
A5 or A5R originals that are placed on the platen glass
If Drawer Eligibility For APS/ADS in Common Settings (from the Additional Functions screen) is set to 'Off'
for a particular paper source, you cannot make copies on paper loaded in that paper source in the
Automatic Paper Selection mode. (See the Reference Guide.)
To manually select the copy paper size and type:
Select the desired paper size.
The paper sizes/types are indicated by icons on the touch panel display, in the order in which they are
loaded in the paper drawers.
Icons indicating the type of paper loaded in each paper drawer can be displayed on paper selection
screens, if you store that information into the machine beforehand. (See the Reference Guide.)
indicates that the paper is loaded vertically, and
indicates that the paper is loaded horizontally.
The suffix <R> (such as in A4R) used in paper size designations indicates that the paper is loaded in a
paper drawer or the stack bypass horizontally.
Acesst 1.0 6251194
Summary of Contents for iR3245
Page 2: ......
Page 13: ...chapter 1 Introduction to the Copy Functions ...
Page 43: ...1 Introduction to the Copy Functions Cancelling a Copy Job 1 31 Cancelling a Copy Job ...
Page 67: ...chapter 2 Introduction to the Mail Box Functions ...
Page 70: ...2 Introduction to the Mail Box Functions 2 4 Various Mail Box Functions ...
Page 104: ...2 Introduction to the Mail Box Functions 2 38 While Scanning While Scanning ...
Page 107: ...2 Introduction to the Mail Box Functions While Printing 2 41 While Printing ...
Page 135: ...2 Introduction to the Mail Box Functions Erasing a Document 2 69 3 Press Done ...
Page 150: ...2 Introduction to the Mail Box Functions 2 84 Erasing Part of a Document ...
Page 151: ...chapter 3 Basic Copying and Mail Box Features ...
Page 166: ...3 Basic Copying and Mail Box Features 3 16 Entire Image 2 Press Entire Image Done 3 Press ...
Page 255: ...chapter 4 Special Copying and Mail Box Features ...
Page 307: ...4 Special Copying and Mail Box Features Image Repeat 4 53 6 Press OK ...
Page 428: ...4 Special Copying and Mail Box Features 4 174 Date Printing ...
Page 429: ...chapter 5 Memory Features ...
Page 439: ...5 Memory Features Storing Scan Print Settings 5 11 Storing Scan Print Settings ...
Page 444: ...5 Memory Features 5 16 Naming a Memory Key Naming a Memory Key ...
Page 447: ...5 Memory Features Recalling Scan Print Settings 5 19 Recalling Scan Print Settings ...
Page 450: ...5 Memory Features 5 22 Erasing Scan Print Settings Erasing Scan Print Settings ...
Page 453: ...chapter 6 Sending and Receiving Documents Using the Inboxes ...
Page 469: ...chapter 7 Using the Express Copy Basic Features Screen ...
Page 581: ...chapter 8 Customizing Settings ...
Page 585: ...8 Customizing Settings Customizing Copy Settings 8 5 Customizing Copy Settings ...
Page 609: ...8 Customizing Settings Customizing Mail Box Settings 8 29 Customizing Mail Box Settings ...
Page 621: ...chapter 9 Appendix ...
Page 633: ......


