Chapter 2
2-21
A full turn of the screwdriver will change the left
margin by 1.0 mm.
6) Tighten the 2 screws you loosened in step 3).
7) Attach the left face cover you removed in step 2)
back to the machine.
8) Close the left deck.
- If the gap between the front cover/cassette 3 front
cover and the left front cover is appreciable, perform
the following:
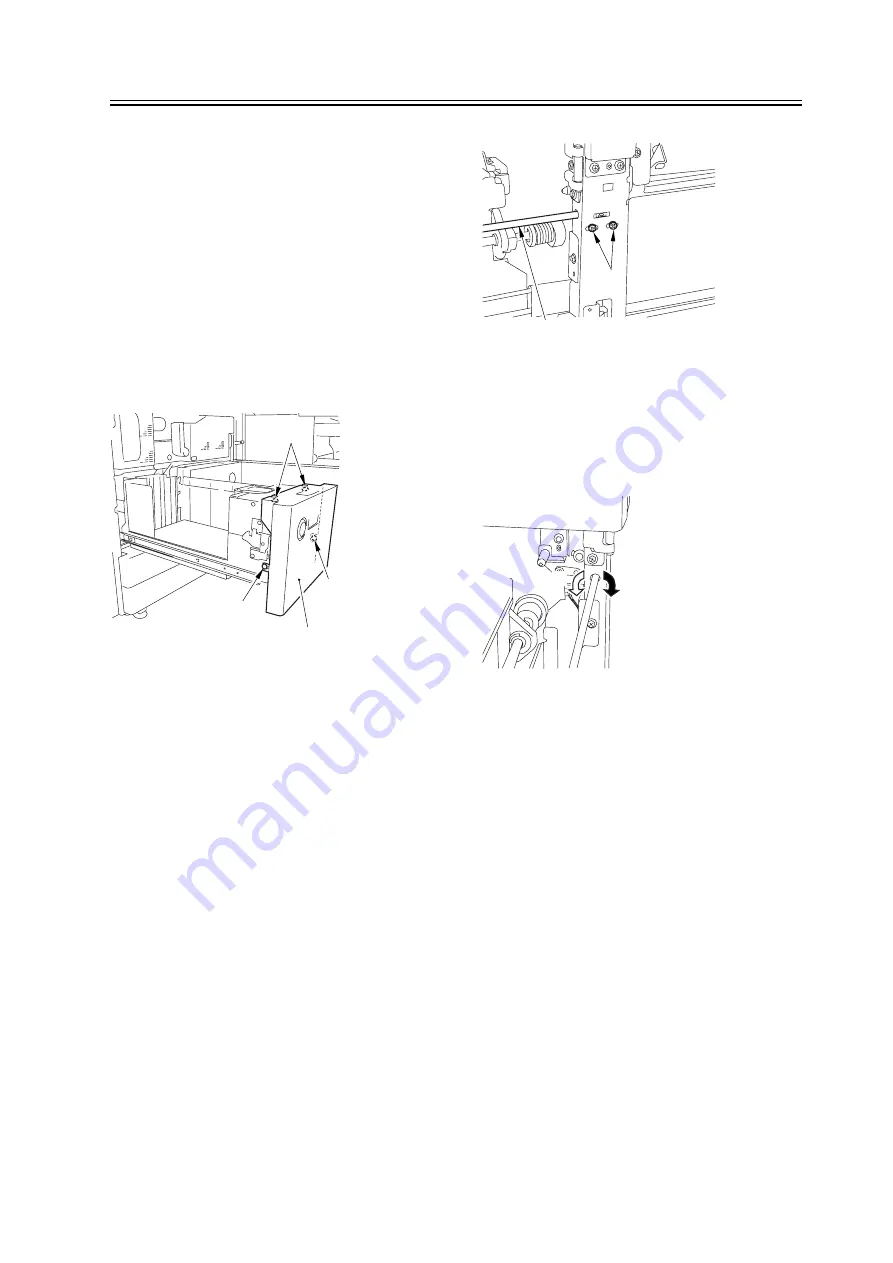
9) Slide out the left deck, and loosen the 4 screws [1];
then, shift the front left cover [2].
F-2-20
10) Close the left deck; when the gap is gone, slide out
the left deck once again, and tighten the 4 screws you
loosened in step 9).
- If there still is a gap, go back to step 9).
11) Close the left deck.
2. Right Deck Left/Right Margin Adjustment
1) Push the release button, and slide out the right deck.
2) Open the upper right color and the lower right cover
3) Loosen the 2 screws [1]; then, insert a screwdriver
[2] through the opening in the front right stay, and turn
the adjusting screw to adjust the left/right margin.
F-2-21
4) Check to make sure that the left/right margin of
printouts made on paper from the right deck is as
indicated.
5) As necessary, perform the following:
F-2-22
- turn the screwdriver counterclockwise to decrease
the left margin [1].
- turn the screwdriver clockwise to increase the left
margin [1].
A full turn of the screwdriver changes the left margin
by 1.0 mm.
6) Tighten the 2 screws you loosened in step 3).
7) Close the upper right cover and the lower right
cover
8) Close the right deck.
- If the gap between the front cover/cassette 3 front
cover and the front right cover is appreciable, perform
the following:
9) Slide out the right deck, and loosen the 4 screws,
and shift the front right cover [2].
[1]
[1]
[1]
[2]
[1]
[2]
[1]
[2]
Summary of Contents for iR C6800 Series
Page 1: ...Jan 20 2005 Portable Manual iR C6800 Series ...
Page 2: ......
Page 6: ......
Page 12: ......
Page 13: ...Chapter 1 Maintenance and Inspection ...
Page 14: ......
Page 16: ......
Page 20: ...Chapter 1 1 4 Under high humidity and high temperature condition 85 000 images ...
Page 51: ...Chapter 2 Standards and Adjustments ...
Page 52: ......
Page 79: ...F 2 27 1 ...
Page 99: ...F 2 88 F 2 89 1 OK NG NG ...
Page 110: ......
Page 111: ...Chapter 3 Error Code ...
Page 112: ......
Page 114: ......
Page 172: ......
Page 173: ...Chapter 4 User Mode Items ...
Page 174: ......
Page 176: ......
Page 188: ...LIPS emulation 12 items utility printer initialize yes no Item Description ...
Page 190: ......
Page 191: ...Chapter 5 Service Mode ...
Page 192: ......
Page 380: ......
Page 381: ...Chapter 6 Outline of Components ...
Page 382: ......
Page 384: ......
Page 387: ...F 6 1 SL7 CL3 CL2 SL6 SL8 SL9 SL2 SL1 SL4 SL3 SL5 CL1 SL10 SL11 SL12 ...
Page 397: ...F 6 5 FM2 FM10 FM11 FM12 FM6 FM3 FM4 FM8 FM9 FM5 FM7 FM1 ...
Page 407: ...F 6 9 PS65 PS38 PS39 PS46 PS44 PS45 PS52 PS53 PS58 PS59 PS37 ...
Page 417: ...F 6 13 13 2 5 3 14 15 16 9 6 12 7 1 11 4 25 24 21 23 19 20 31 29 28 27 26 22 18 17 32 30 10 8 ...
Page 418: ......
Page 419: ...Chapter 7 System Construction ...
Page 420: ......
Page 422: ......
Page 443: ...Chapter 8 Upgrading ...
Page 444: ......
Page 446: ......
Page 455: ...Jan 20 2005 ...
Page 456: ......


