Canon iPF510 - imagePROGRAF Color Inkjet Printer User Manual Download Page 156

Handling rolls

Removing the Roll Feed Unit
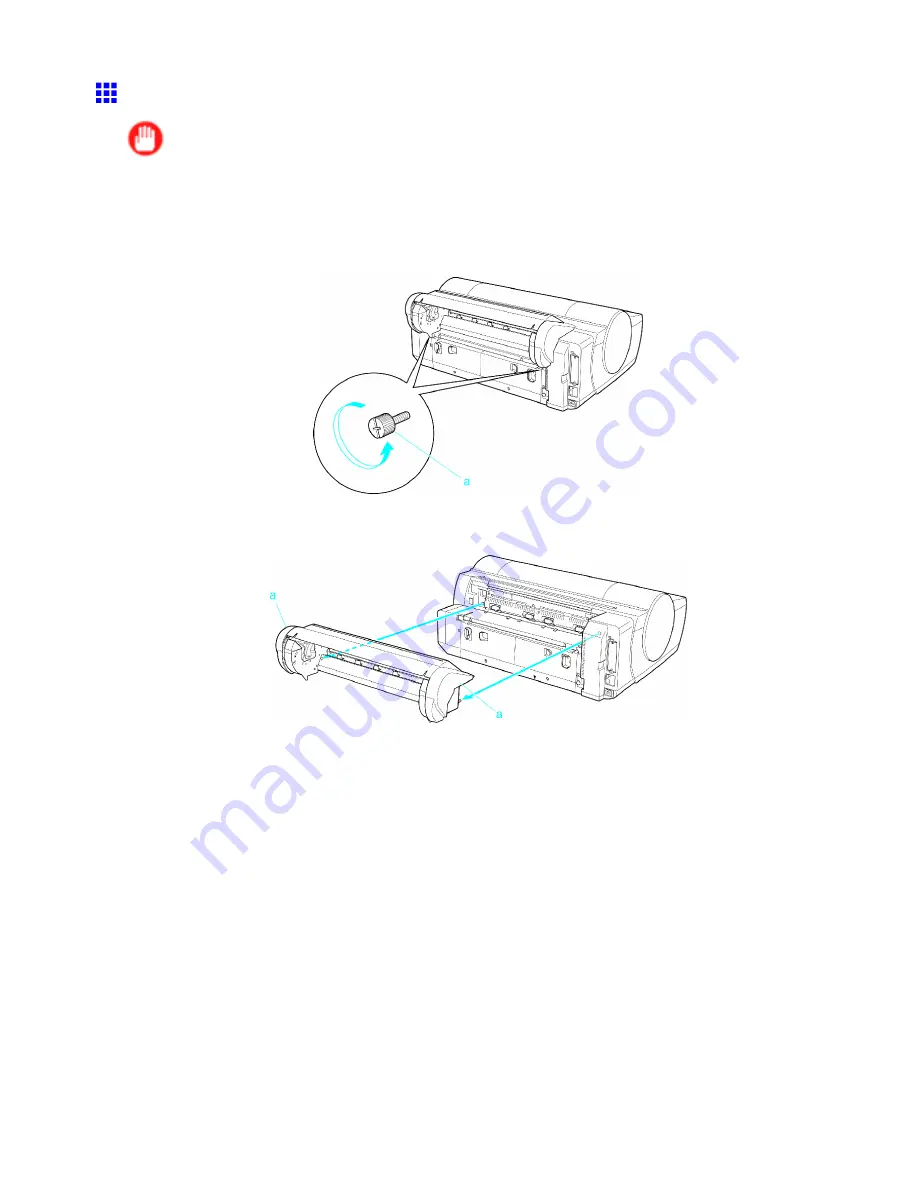
Important

Always make sure the printer is off before removing the Roll Feed Unit.

1.

Remove any rolls in the Roll Feed Unit. (→P.120)

2.

Use a coin to loosen the screws on both sides of the back of the Roll Feed Unit (a) and remove

the unit from the printer.

3.

Hold the Roll Feed Unit by the Carrying Handles (a) as you remove the Roll Feed Unit from

the printer.

142 Handling Paper

Summary of Contents for iPF510 - imagePROGRAF Color Inkjet Printer

Page 1: ...User Manual ENG Large Format Printer ...

Page 2: ......

Page 3: ...ssette 20 Vents 20 Control Panel 21 Control Panel 23 Control Panel 23 Turning the Printer On and Off 25 Printer Modes 27 Switching Modes 31 Printer Menu Operations 33 Main Menu Operations 34 Menu Structure 36 Main Menu Settings 51 Main Menu Settings During Printing 61 Submenu Display 62 Status Print 64 Optional accessories 70 Stand 70 Roll Feed Unit 70 Roll Holder Set 71 Desktop Stacker 72 IEEE 13...

Page 4: ...g the Paper Length Roll 113 Loading Rolls on the Roll Holder 114 Loading Rolls in the Roll Feed Unit 116 Loading the Roll in the Printer 117 Removing the Roll from the Printer 119 Removing Rolls from the Roll Feed Unit 120 Removing Rolls From the Roll Holder 121 Clearing Jammed Roll Paper 122 Clearing Jammed Paper Paper Feed Slot 125 Feeding Roll Paper Manually 126 Detection of the Remaining Roll ...

Page 5: ...ting Photos and Images Mac OS 9 189 Printing CAD Drawings 192 Printing CAD Drawings 192 Printing Line Drawings and Text Windows Mac OS X 193 Printing Line Drawings and Text Mac OS 9 194 Printing Line Drawings and Text Windows 195 Printing Line Drawings and Text Mac OS X 197 Printing Line Drawings and Text Mac OS 9 199 HP GL 2 Printing 201 Printing Office Documents 202 Printing Office Documents 202...

Page 6: ...Entering a Scaling Value 265 Resizing Originals by Entering a Scaling Value Windows 266 Resizing Originals by Entering a Scaling Value Mac OS X 268 Resizing Originals by Entering a Scaling Value Mac OS 9 271 Printing Enlargements of Scanned Originals from a Color imageRUNNER 275 Printing Enlargements of Scanned Originals from a Color imageRUNNER Windows 275 Printing Enlargements of Scanned Origina...

Page 7: ... 9 365 Printing Multiple Pages Per Sheet 367 Printing Multiple Pages Per Sheet Windows 368 Printing Multiple Pages Per Sheet Mac OS X 370 Printing Multiple Pages Per Sheet Mac OS 9 373 Printing Posters in Sections 375 Printing Large Posters Windows 376 Printing Large Posters Mac OS 9 378 Centering originals 380 Printing Originals Centered on Rolls 380 Printing Originals Centered on Rolls Windows 3...

Page 8: ...ng Roll Paper After Printing Mac OS X 439 Cutting Roll Paper After Printing Mac OS 9 441 Windows Software 443 Printer Driver 443 Printer Driver Settings Windows 443 Specifying Paper in the Printer Driver Windows 445 Confirming Print Settings Windows 447 Checking the Layout in a Preview Before Printing Windows 449 Using Favorites Windows 451 Accessing the Printer Driver Dialog Box from Applications...

Page 9: ...alog Box from Applications Mac OS X 495 Main Pane Mac OS X 496 Paper Information on Printer Dialog Box Mac OS X 499 Media Detailed Settings Dialog Box Mac OS X 500 View Settings Dialog Box for the Printing Application Mac OS X 501 Color Settings Pane Color Mac OS X 502 Color Settings Pane Monochrome Mac OS X 504 Page Setup Pane Mac OS X 505 Utility Pane Mac OS X 507 Additional Settings Pane Mac OS...

Page 10: ...nually 551 Email Notification When Printing is Finished or Errors Occur 553 Initializing the Network Settings 554 Network Setting Windows 555 Configuring the Printer Driver Destination Windows 555 Sharing the Printer in Windows 556 Configuring the Printer s NetWare Network Settings 558 Specifying the Printer s Frame Type 560 Specifying NetWare Print Services 563 Specifying NetWare Protocols 566 Co...

Page 11: ...idge 618 Maintenance Cartridge 618 Replacing the Maintenance Cartridge 618 Checking the Maintenance Cartridge Capacity 624 When to Replace the Maintenance Cartridge 625 Cleaning the Printer 626 Cleaning the Printer Exterior 626 Cleaning Inside the Top Cover 627 Cleaning the Paper Retainer 630 Cleaning the Pick Up Roller 631 Cleaning the Printhead 632 Other Maintenance 633 Preparing to Transfer the...

Page 12: ...9 Printed colors are inaccurate 660 Banding in different colors occurs 661 Colors in printed images are uneven 662 Image Edges are Blurred or White Banding Occurs 663 The contrast becomes uneven during printing 663 The length of printed images is inaccurate 663 Documents are printed crooked 663 Documents are printed in monochrome 663 Line thickness is not uniform Windows 664 Lines are misaligned 6...

Page 13: ... 678 PaprTyp Mismatch Prnt PressOnline 679 Media Check Please Cancel 679 PaprSiz Mismatch 679 PaprSiz Mismatch Prnt PressOnline 680 Paper Too Small Please Check 680 Paper Too Large Please Check 680 Papr Size Undetected 680 Need A4 Letter Vert or Larger 680 Need 10 in or Larger Roll 680 Roll Paper Please Replace 681 Paper Size Please Check 682 Roll Selected Load Roll 682 Sheets Loaded Press To Ejec...

Page 14: ...3 Online Key and recalibrate 693 Messages regarding printheads 694 Online Key and recalibrate 694 Printhead Check Nozzles 694 Check Printout 694 Printhead Please Replace 694 Messages regarding the maintenance cartridge 695 Maint Cartridge Load Cartridge 695 MTCart Full Soon 695 Maint Cartridge Replace Cart 695 Messages regarding HP GL 2 696 GL2 Unsup papr 696 No data 696 GL2 Wxxxx xxxx is 0501 090...

Page 15: ...es and user interface elements Key and button names on the control panel and user interface elements in software such as menus and buttons are indicated as follows in this User Manual Control panel buttons Example Press the OK button Control panel messages Example Head Cleaning is displayed Software interface items Menus and Buttons Example Click OK Keyboard keys Example Press the Tab key Part nam...

Page 16: ...non Inc Microsoft and Windows are registered trademarks of Microsoft Corporation in the United States and other countries Macintosh is a registered trademark of Apple Inc in the United States and other countries Other company and product names are trademarks or registered trademarks of their respective owners Copyright 2008 Canon Inc Unauthorized reproduction of this User Manual in whole or part i...

Page 17: ...can nd information in topics of this User Manual by searching for relevant terms 1 Enter a term and click the Search button Note To search for multiple terms at once enter a space between each term Search results are listed at left Introduction 3 ...

Page 18: ...s manual 2 Click a topic you want to read The terms you searched for will be highlighted in the topic To review multiple topics at once select the check box of desired topics and click the Apply button 4 Introduction ...

Page 19: ...edure describes how to do this using the information in Basic Printing Work ow as an example Printing a group of topics in the manual When you access printable HTML versions of the content from section titles in the table of contents you can specify a group of topics to print 1 Click a section title in the table of contents Here Basic Printing Work ow is used as an example Introduction 5 ...

Page 20: ...How to use this manual 2 Click Access to the HTML for printing in the title area The topics in Basic Printing Work ow are displayed together in HTML format ready for printing 6 Introduction ...

Page 21: ...n Printing a group of individual topics in the manual When you access printable HTML versions from subtitles in the table of contents you can specify a group of topics to print 1 Click a section title in the table of contents Here Basic Printing Work ow is used as an example Introduction 7 ...

Page 22: ...How to use this manual 2 Under Basic Printing Work ow click Printing Procedure 3 Click Access to the HTML for printing in the title area 8 Introduction ...

Page 23: ...How to use this manual The topics in Printing Procedure are displayed together in HTML format ready for printing 4 Clear the topics you will not print and click the Apply button Introduction 9 ...

Page 24: ...as follows 1 Access the printing dialog box as follows depending on your computer s operating system Windows In Windows right click anywhere in the explanation area except on a gure or a link In the shortcut menu click Print to display the Print dialog box 10 Introduction ...

Page 25: ...k anywhere in the explanation area except on a gure or a link while holding the Ctrl key In the shortcut menu click Print Frame to display the Print dialog box 2 Specify conditions as needed and then click Print Windows or Print Macintosh Windows Introduction 11 ...

Page 26: ...How to use this manual Macintosh Note To print only individual topics that are displayed use this method 12 Introduction ...

Page 27: ...print on rolls replace this unit with the optional Roll Feed Unit c Paper Tray Cover Open this cover to load paper in the Tray P 17 d Roll Feed Unit Optional To print on rolls replace the Paper Tray Unit with this unit You can also load sheets in this unit manually e Roll Feed Unit Cover Open this cover to load rolls P 18 f Control Panel Use this panel to operate the printer and check the printer ...

Page 28: ... extension to match the paper size before printing on sheets k Paper Alignment Line When loading heavyweight paper ensure the paper edge is parallel to this line l Cutter Unit A round bladed cutter for automatic roll cutting This cutter is retracted inside when not cutting m Cassette Load sheets in this tray n Maintenance Cartridge Absorbs excess ink o Ink Tank Cover Open this cover to replace Ink...

Page 29: ...ible with USB 2 0 High Speed mode c Ethernet Port Connect an Ethernet cable to this port d Power Supply Connector Connect the power cord to this connector e Back Cover Open this cover to remove any jammed paper when printing from the Cassette as needed f Carrying Handles Four Positions When carrying the printer hold it by these handles under both sides Printer Parts 15 ...

Page 30: ...laten during printing The Vacuum holes on the platen holds paper in place e Borderless Printing Ink Grooves For catching ink outside the edges of paper during borderless printing f Cleaning Brush When cleaning inside the printer under the Top Cover use this brush to sweep away paper dust on the Platen g Linear Scale The linear scale serves a key role in detecting the Carriage position Be careful n...

Page 31: ...idth Guide When loading paper move the guide to match the paper size c Top Paper Feed Slot When loading sheets insert them here d Front Paper Feed Slot Output Tray When loading heavyweight paper insert it here All printed documents are ejected from this slot Printer Parts 17 ...

Page 32: ...he Roll Holder into this guide slot Carriage a Printhead Fixer Cover Holds the Printhead in place Do not open this part except during Printhead replacement b Printhead The printhead is equipped with ink nozzles It serves a key role in printing c Printhead Fixer Lever Locks the Printhead Fixer Cover Do not open this part except during Printhead replacement 18 Printer Parts ...

Page 33: ...k Cover is opened On The Ink Tank is installed correctly Off No Ink Tank is installed or the ink level detection function is disabled Flashing Slowly Not much ink is left Flashing Rapidly There is no more ink a Ink Color Label Load an Ink Tank corresponding to the color and name on these labels b Ink Set An Ink Tank that can be used in the printer is labeled with a white letter A in a black circle...

Page 34: ...e these levers to slide the guides d Maximum Capacity Line A guide line indicating how many sheets can be loaded Do not load paper over this line Vents The vents are on top 1 on the right 2 and on the bottom on the right 3 and 4 Caution Do not block these vents when the printer is on Avoid setting paper or other light objects near the vents 20 Printer Parts ...

Page 35: ...he Feeder Selection button the lamp for your chosen paper source is lit 1 Auto Feed lamp Green Cassette or Rolls On Shows whether a Cassette or roll is selected as the paper source Off Shows whether the Tray or Front Paper Feed Slot is selected as the paper source 2 Paper Tray lamp Green On Shows whether the Tray or Front Paper Feed Slot is selected as the paper source Off Shows whether a Cassette...

Page 36: ...is button for three seconds to clean the Printhead Head Cleaning A j Button Menu mode Press this button to display the previous menu item or setting value k Button Of ine mode Press this button to rewind rolls manually P 126 Menu mode Press this button to display the menu one level higher l Button Menu mode Press this button to display the next menu item or setting value m Button Of ine mode Press...

Page 37: ...press the Feeder Selection button the lamp for your chosen paper source is lit 1 Auto Feed lamp Green Cassette or Rolls On Shows whether a Cassette or roll is selected as the paper source Off Shows whether the Tray or Front Paper Feed Slot is selected as the paper source 2 Paper Tray lamp Green On Shows whether the Tray or Front Paper Feed Slot is selected as the paper source Off Shows whether a C...

Page 38: ...is button for three seconds to clean the Printhead Head Cleaning A j Button Menu mode Press this button to display the previous menu item or setting value k Button Of ine mode Press this button to rewind rolls manually P 126 Menu mode Press this button to display the menu one level higher l Button Menu mode Press this button to display the next menu item or setting value m Button Of ine mode Press...

Page 39: ...ose the Ink Tank Cover The Printhead is not installed Please see Replacing the Printhead P 611 Ink Tank is not installed Please see Replacing Ink Tanks P 600 If ERROR is shown on the Display Screen Turn off the printer and contact your Canon dealer The Online lamp and Message lamp are not lit even once and nothing appears on the Display Screen Make sure the printer is plugged in correctly Check th...

Page 40: ... If the Message lamp is ashing check the message on the Display Screen and take action as necessary P 676 If the Data lamp is ashing the printer is receiving a print job Turn off the printer only after printing is nished 2 Hold down the Power button for more than a second After Shut Down is shown on the Display Screen the printer shuts off Shut Down Please Wait 26 Printer Parts ...

Page 41: ...such as if errors occur Menu mode Menus are displayed on the printer and you can select set or execute menu items Any jobs sent from the computer are held without being printed Submenu mode Submenus are displayed regarding ink and paper information Jobs can be received and printing is possible while submenus are displayed and the printer is online In other modes any jobs sent from the computer are...

Page 42: ... pressed while all covers are closed Online and state of the Control Panel Online A2 Top Line of the Display Screen The printer status is displayed at left At right the size of paper loaded in the Cassette is displayed P 149 Bottom Line of the Display Screen The remaining ink level is displayed at left and the Maintenance Cartridge capacity at right However any warning messages are displayed here ...

Page 43: ... Take the appropriate action P 676 Data lamp Flashes when print jobs are being received Message lamp Flashes when error messages are displayed Error Messages If Action Cannot be Taken ERROR Exxx xxxx Call For Service Display Screen Error noti cation ERROR is displayed with the error code and a message Turn off the printer and wait at least three seconds before restoring the power If the message is...

Page 44: ... items and lower levels are both available and are displayed alternately P 34 Menu items and settings Chk Remain Roll On Top Line of the Display Screen Menu items are displayed here Bottom Line of the Display Screen Menu items or settings are displayed here An equals sign displayed at left indicates that this is the current value P 34 Submenu mode and state of the Control Panel When submenus are d...

Page 45: ...e and printing is paused Of ine Switches to online and the Online lamp is lit If a Maintenance Cartridge error message is displayed the error is temporarily cleared the printer switches to online and the Online lamp is lit If the following error messages are displayed the printer goes online and printing is resumed Check Supported Paper P 689 Roll Paper Please Replace P 681 Of ine when an error me...

Page 46: ...ches to Menu mode Of ine printing Menus available during printing are displayed Of ine when an error message is displayed You cannot access Menu mode until the problem is solved Press the Information button to display the submenus Press Information to display information about ink paper and so on Press Information repeatedly to change the information displayed P 62 After you display a submenu the ...

Page 47: ...Print Settings Adjust or clean the Printhead or adjust the paper feed amount Printer Settings Con gure the network settings set the sleep timer and specify the unit of measurement on the display Note By default main menu settings apply to all print jobs However for settings that are also available in the printer driver the values speci ed in the printer driver take priority Access the submenu by p...

Page 48: ...gs P 51 1 Press the Menu button to display MAIN MENU 2 Press or to select System Setup and then press MAIN MENU System Setup 3 Press or to select Sleep Timer and then press System Setup Sleep Timer 4 Press or to select 10 min and then press the OK button The setting is updated and an equals sign is displayed at left Sleep Timer 10 min 5 Press the Online button to bring the printer online 34 Printe...

Page 49: ...r to increase or decrease the value continuously 5 Press the Online button to bring the printer online If any of the settings is changed a message for con rmation is displayed In this case press the OK button Selecting Submenu Items Press the Information button to display the submenus Ink Press the Information button to display information about ink paper and so on When you press the Information b...

Page 50: ...nu Settings P 51 First Level Second Level Third Level Fourth Level Fifth Level Sixth Level Paper Cut 1 No Yes Head Cleaning 5 Head Cleaning A Head Cleaning B Paper Settings Cas Paper Type Plain Paper 6 Plain Paper HQ 6 Plain Paper HG 6 PlainP_Cons MBK 6 High Resolution 6 Coated Paper 6 HW Coated 6 Premium MatteP 6 Matte Photo 6 Glossy Photo 6 Semi Gl Photo 6 HW GlossyPhoto2 6 HW SemiGlPhoto2 6 Sat...

Page 51: ...oo ng Paper 6 CAD Trace Paper 6 Special Here the number is 1 5 6 Cas Paper Size ISO A2 ISO A3 ISO A3 ISO A4 JIS B3 JIS B4 ANSI C ANSI B ANSI B Super ANSI Letter ANSI Legal ARCH B 14 x17 12 x16 10 x12 10 x15 8 x10 16 x20 13 x22 Manual Pap Type 10 Plain Paper 6 Plain Paper HQ 6 Plain Paper HG 6 PlainP_Cons MBK 6 Printer Parts 37 ...

Page 52: ...Premium MatteP 6 Matte Photo 6 Glossy Photo 6 Semi Gl Photo 6 HW GlossyPhoto2 6 HW SemiGlPhoto2 6 SatinPhoto 190 6 Glossy Paper 6 Photo Paper Pro 6 Photo PaperPlus 6 PhotoPlus SemiGl 6 Proo ng Paper 6 CAD Trace Paper 6 CAD Matte Film 6 POP Board 6 Special Here the number is 1 5 6 Manual Pap Size ISO A2 ISO A2 ISO A3 38 Printer Parts ...

Page 53: ...B3 ISO B4 JIS B3 JIS B4 ANSI C ANSI B ANSI B Super ANSI Letter ANSI Legal ARCH B ARCH A DIN C3 DIN C4 14 x17 12 x16 10 x12 10 x15 16 x20 13 x22 Roll Media Type 1 2 Plain Paper HG 6 PlainP_Cons MBK 6 Coated Paper 6 HW Coated 6 Premium MatteP 6 Glossy Photo 6 Semi Gl Photo 6 HW GlossyPhoto2 6 Printer Parts 39 ...

Page 54: ...per 6 Special Here the number is 1 5 6 Chk Remain Roll 2 On Off Roll Length Set 2 3 m feet Med Detail Set The paper type is displayed here 6 Roll DryingTime Off 30 sec 1 min 3 min 5 min 10 min 30 min 60 min Scan Wait Time Off 1 sec 3 sec 5 sec 7 sec 9 sec Feed Priority Automatic Band Joint Print Length Adjust Length From 0 70 to 0 70 40 Printer Parts ...

Page 55: ...west Skew Check Lv Standard Off Loose High Accuracy VacuumStrngth Automatic Strongest Strong Standard Weak Weakest NearEnd RllMrgn 2 3mm 20mm Cut Speed 2 Fast Standard Slow Trim Edge First 2 Automatic On Off Cutting Mode 2 Automatic Eject Manual Bordless Margin 2 Automatic Fixed CutDustReduct 2 Off On Nr End Sht Mrgn 3mm Printer Parts 41 ...

Page 56: ...L2 Replot No Yes GL2 BufferClear No Yes Color Mode Color Monochrome Print Quality Draft Standard High Input Reso 600dpi 300dpi Media Source Automatic Roll Paper Cassette Manual Conserve Paper Off On End Point Shape Software Rounded Smoothing Software Smooth Line Width 1 dot 2 dots 3 dots 4 dots 5 dots 6 dots 7 dots ThicknFine Lines Off 42 Printer Parts ...

Page 57: ...o Yes Advanced Adj No Yes Auto Print Off On Manual Head Adj No Yes Auto Band Adj Standard Adj No Yes Advanced Adj No Yes Manual Band Adj Adjust Band No Yes Adj Far Ed Feed No Yes Adjust Length No Yes Interface Setup EOP Timer 10 sec 30 sec 1 min 2 min 5 min 10 min 30 min 60 min TCP IP IP Mode Automatic Manual Protocol 4 DHCP On Off BOOTP On Printer Parts 43 ...

Page 58: ...55 255 255 255 NetWare NetWare On Off Frame Type 8 Auto Detect Ethernet 2 Ethernet 802 2 Ethernet 802 3 Ethernet SNAP Print Service 8 BinderyPServer RPrinter NDSPServer NPrinter AppleTalk On Off Ethernet Driver Auto Detect On Off Comm Mode 7 Half Duplex Full Duplex Ethernet Type 7 10 Base T 100 Base TX Spanning Tree Not Use Use MAC Address Init Settings No Yes Maintenance Replace P head No 44 Prin...

Page 59: ...m Setup Warning Buzzer Off On Detect Mismatch Pause Warning None Keep Media Size Off On PaperSize Basis Sht Selection ISO A3 ANSI B Super Roll Selection1 2 ISO A3 297mm 300mm Roll Roll Selection2 2 10in 254mm JIS B4 257mm TrimEdge Reload Automatic Off On Nozzle Check Off 5 pages 10 pages Automatic Sleep Timer 5 min 10 min 15 min 20 min 30 min Printer Parts 45 ...

Page 60: ...n GMT 1 Paris Rome 2 Athens Cairo 3 Moscow 4 Eerevan Baku 5 Islamabad 6 Dacca 7 Bangkok 8 Hong Kong 9 Tokyo Seoul 10 Canberra 11New Caledonia 12 Wellington 12 Eniwetok 11 Midway is 10Hawaii AHST 9 Alaska AKST 8 Oregon PST 7 Arizona MST 6 Texas CST 5 NewYork EST 4 Santiago 3 Buenos Aires 2 1 Cape Verde Date Format yyyy mm dd dd mm yyyy mm dd yyyy 46 Printer Parts ...

Page 61: ... Date yyyy mm dd 9 Time hh mm Language Reset MediaType No Yes Test Print Status Print No Yes Media Details No Yes Print Job Log No Yes Menu Map No Yes Nozzle Check No Yes Information 5 Version Firm Boot MIT RAM Ext Interface No IEEE1394 MAC Address 000085 Error Log 1 xxxxx 2 xxxxx Printer Parts 47 ...

Page 62: ...Only these menus are displayed during printing 6 For information on the types of paper the printer supports refer to the Paper Reference Guide P 103 The paper type setting in the printer driver and related software as well as on the Control Panel is updated when you install the Media Con guration Tool from the User Software CD ROM or if you change paper information by using the Media Con guration ...

Page 63: ...mation about ink paper and so on Each time you press the Information button on the Control Panel different submenus are displayed in the following order 1 Displayed if sheets are loaded 2 Displayed if a roll is loaded For details on submenu screens see Submenu Display P 62 Printer Parts 49 ...

Page 64: ...Fifth Level Sixth Level MAIN MENU Head Cleaning Head Cleaning A Head Cleaning B Fine Band Adj From 5 to 5 Information Version Firm Boot MIT RAM Ext Interface No IEEE1394 MAC Address 000085 Error Log 1 xxxxx 2 xxxxx Job Log Choose from information about the latest three print jobs Document Name User Name Page Count Job Status OK CANCELED Print Start Time yyyy mm dd hh mm Print End Time yyyy mm dd h...

Page 65: ...rying time and borderless printing options P 53 GL2 Settings Specify settings for HP GL 2 printing P 55 Adjust Printer Adjust the Printhead alignment or amount of feed by printing a test pattern P 56 Interface Setup Con gure the network settings P 57 Maintenance Replace the Printhead prepare to transfer the printer and clean the Pick Up Roller P 58 System Setup Specify the printer system settings ...

Page 66: ...se Off if you prefer not to print the barcode Roll Length Set Displayed if Chk Remain Roll is On If a barcode is not printed on rolls specify the roll length The roll length is displayed in meters 1 0 91 0 m or feet 1 300 ft depending on the setting in Length Unit 1 For information on the types of paper the printer supports refer to the Paper Reference Guide P 103 The media type setting in the pri...

Page 67: ...an irregular width choose Loose for a higher skew detection threshold or choose Off to disable skew detection However if paper is loaded askew when detection is Off note that paper jams or Platen soiling may occur If strict skew detection is required choose High Accuracy VacuumStrngth Specify the level of suction that holds paper against the Platen P 598 NearEnd RllMrgn Specify a margin at the lea...

Page 68: ...r the printing quality at the leading edge and affect feeding accuracy The printed surface may be scratched and ink may adhere to the leading edge If you have selected 20mm the test print sheet may not be printed completely Tray Source Choose how the paper is supplied Top for printing from the Tray or Front for printing from the Front Paper Feed Slot The paper type is displayed here 1 Return Defau...

Page 69: ...he application If nothing is speci ed by the application the result is as shown in the gure If you choose Rounded Smoothing Choose whether to print arcs as smooth curved lines or as multiple connected line segments If you choose Software Operation is determined by the application If nothing is speci ed by the application the result is as shown in the gure Note By default this is a 72 sided gure If...

Page 70: ...ave the printer print and read a test pattern for band adjustment based on which the printer automatically adjusts the feed amount P 587 Auto Band Adj Advanced Adj Choose this option when using paper other than genuine Canon paper or paper for purposes other than checking output Choose Yes to have the printer print and read a test pattern for band adjustment based on which the printer automaticall...

Page 71: ...fy the NetWare protocol To apply your changes choose Store Setting Frame Type Specify the frame type to use NetWare Print Service Choose the print service AppleTalk Specify whether to use the AppleTalk protocol To apply your changes choose Store Setting Auto Detect Specify the communication method To apply your changes choose Store Setting Choose On for automatic con guration of the LAN communicat...

Page 72: ...he Online button Keep Media Size Choose On to use the paper size setting as the basis for printing instead of other settings The margin setting of the printer menu will be used instead of the margin setting of the printer driver if the latter is smaller which may prevent text or images in the margin from being printed Choose Off to use the printer driver settings instead Even if the margin setting...

Page 73: ...f measurement when roll length is displayed You can switch the unit displayed for Roll Length Set and the remaining paper amount displayed in the submenu Time Zone Specify the time zone Time zone options indicate a main city in this time zone and the difference from Greenwich Mean Time Date Format Specify the date format Date Set the current date Date Time Time Set the current time Language Specif...

Page 74: ... number of pages in the print job Job Status Displays the results of the print job processed Print Start Time Displays the time when the print job was started Print End Time Displays the time when the print job was nished Print Time Displays the time required to print the job Print Size Displays the paper size in the print job Media Type Displays the paper type in the print job Interface Displays ...

Page 75: ...and rmware RAM Displays the printer memory capacity Ext Interface Identi es boards in the expansion slot MAC Address 000085 Displays the MAC address Error Log Displays the most recent error messages up to two Document Name Displays the document name in the last print job User Name Displays the name of the user who sent the print job Page Count Displays the number of pages in the print job Job Stat...

Page 76: ...el below the Display Screen Remaining ink is indicated in seven levels Note When Ink Tank are not installed the level is not displayed If error messages about Ink Tank are displayed the level is indicated with one dot If you disable ink level detection a question mark is displayed When no more ink is left the level indicator changes to a blank square and ashes The remaining capacity of the Mainten...

Page 77: ...played only when paper is loaded in the tray Manual Pap Size ISO A4 Roll width and remaining length Displays the width and remaining length of roll loaded in the Roll Feed Unit This information is displayed only when a roll is loaded and Chk Remain Roll is On Roll 17 inch m Left Roll width and type Displays the width and type of roll loaded in the Roll Feed Unit This information is displayed only ...

Page 78: ... need at least four sheets 2 Press the Menu button to display MAIN MENU 3 Press or to select Test Print and then press MAIN MENU Test Print 4 Press or to select Status Print and then press OK The setting is updated and an equals sign is displayed at left Test Print Status Print Checking the information in the Status Print report The following information is included in the Status Print report Cano...

Page 79: ...value Execution Log The calibration log Date Media Indicates the date calibration was performed and the type of paper used Use Effect Value This value indicates whether the results of color calibration are used or not Interface Setup Current network settings EOP Timer Sets the elapsed time between receiving last data and canceling printing TCP IP IP Mode Protocol DHCP BOOTP RARP Settings related t...

Page 80: ... Setup Warning Buzzer Detect Mismatch Current warning and error settings Keep Media Size Sheet Selection Roll Selection 1 Roll Selection 2 Current paper related settings Nozzle Check Nozzle check settings Sleep Timer Length Unit Time Zone Date Format Language Contrast Adj General printer settings Information RAM Ext Interface Error Log System information and an error log 66 Printer Parts ...

Page 81: ...ode Bi direction FTP Printing Primary DNS Server Address Secondary DNS Server Address DNS Host Name DNS Domain Name Multicast DNS Service Name Current network settings used by RemoteUI Blank if the status has been saved by using Status Monitor NetWare Frame Type IPX External Network Number Node Number Print Service Current NetWare settings Depending on the NetWare print service settings informatio...

Page 82: ...Server Password Polling Interval Values set when NetWare Print Service NDS PServer is selected NPrinter Print Server Name Printer Number Values set when NetWare Print Service NPrinter is selected Blank if the status has been saved by using Status Monitor AppleTalk Phase Type Name Network Number Zone Current AppleTalk settings Blank if the status has been saved by using Status Monitor HEAD LOT NUMB...

Page 83: ...ntrol Panel COUNTER CUTTER MEDIA MEDIA1 7 NAME TTL ROLL CUTSHEET CASSETTE AFTER INSTALLATION Utilization status of the cutter media and other items indicating how much they have been used Printer Parts 69 ...

Page 84: ...nd Optional Printer Stand ST 11 Note For details on assembling the Stand refer to the instructions provided with the Stand Roll Feed Unit A unit for using rolls Optional Roll Feed Unit RU 01 For instructions on installing the Roll Feed Unit see Installing the Roll Feed Unit P 143 70 Printer Parts ...

Page 85: ...Inch Paper Core Attachment on the Roll Holder and attach the Holder Stopper for 3 inch paper cores If you use an A2 420 mm 16 5 in roll for borderless printing insert the Spacer for Borderless Printing on the Roll Holder Roll Holder Set RH2 11 Roll Holder Holder Stopper for 2 and 3 inch paper cores a and b 3 Inch Paper Core Attachment Spacer for Borderless Printing For instructions on installing t...

Page 86: ...lation instructions refer to the instructions provided with the Desktop Stacker IEEE 1394 Expansion Board An interface board to add an IEEE 1394 also called FireWire port IEEE1394 Expansion Board EB 05 For instructions on installing the IEEE 1394 expansion board refer to the documentation provided with the optional IEEE 1394 expansion board 72 Printer Parts ...

Page 87: ...inter only 39 kg 86 lb Weight not including the Printhead and Ink Tank Printer and Roll Feed Unit not including rolls 43 kg 94 8 lb Printer only 1 119 1 833 617 mm 44 1 72 2 24 3 in Space required for installation 2 Printer and Roll Feed Unit not including rolls 1 119 1 910 644 mm 44 1 75 2 25 4 in Applicable standards International Energy Star Program Law on Promoting Green Purchasing GPN RoHS IT...

Page 88: ...erial Transfer speed 100 200 400 Mbps IEEE 1394 2 Connector Conforms to IEEE 1394 1995 6 pin no power supply 1 Use in USB 2 0 High Speed mode requires the following environment Computer USB 2 0 High Speed compatible Operating system Windows Vista Windows Server 2003 Windows XP Windows 2000 or Mac OS X ver 10 3 3 or later USB 2 0 driver Microsoft USB 2 0 driver available from Windows Update or the ...

Page 89: ...3 x19 Super B Letter 8 5 x11 Legal 8 5 x14 12 x18 ARCH B 14 x17 12 x16 10 x12 10 x15 8 x10 US Photo 13 x22 Tray top Width 203 432 mm 8 17 in Length 279 1 600 mm 11 63 in Sheets Tray front Width 203 432 mm 8 17 in Length 520 914 mm 20 5 36 0 in Paper size Rolls 8 inches 203 mm 10 inches 254 mm JIS B4 257 mm ISO A3 A4 297 mm Banner 300 mm A3 329 mm 14 inches 356 mm 16 inches 407 mm ISO A2 A3 420 mm ...

Page 90: ...cer for Borderless Printing Paper capacity Cassette Paper Size Paper Type A4 Letter 13 22 in A3 17 22 in A2 Plain Paper 250 sheets 100 sheets 50 sheets Coated Paper 200 sheets 100 sheets 50 sheets Photo Paper Plus 20 sheets 20 sheets Premium Matte Paper 30 sheets 20 sheets Glossy Paper 100 sheets 50 sheets The preceding information is a guideline for the maximum capacity Load the paper making sure...

Page 91: ... kg 94 8 lb Dimensions W D H Printer only 819 733 317 mm 32 2 28 9 12 5 in Printer and Roll Feed Unit 819 810 344 mm 32 2 31 9 13 5 in Resource ef ciency Recycling Recyclable plastic used for printer body Structural components No prohibited brominated ame retardants used PBB or PBDE Toxic substances Body plastic No heavy metals Pb Hg Cr Vl or Cd or halogenated ame retardants used Product safety Op...

Page 92: ... Feed Slot a margin of 3 mm 0 12 in on top 23 mm 0 91 in on bottom and 3 mm 0 12 in on left and right sides is required Recommended print area A margin of 20 mm 0 79 in on top 27 mm 1 06 in on bottom and 5 mm 0 20 in on left and right sides is required Note Printable area The area that can be printed Guaranteed Print Area We recommend printing within this area To print so that your original matche...

Page 93: ...mpatible with borderless printing see the Paper Reference Guide P 103 Recommended print area A margin of 20 mm 0 79 in on top and 5 mm 0 20 in on the bottom and left and right sides is required Note Printable area The area that can be printed Guaranteed Print Area We recommend printing within this area To print so that your original matches the print area exactly use an oversized paper size that i...

Page 94: ...l Holder which are in turn loaded in the printer Rolls can be used to print large photos or create posters or banners that cannot be printed on regular sheets Large format printing Easily print vertical or horizontal banners from familiar applications such as Microsoft Of ce applications P 332 Borderless printing Print without a margin border around posters or photos P 299 P 310 P 288 Banner print...

Page 95: ...Paper Retainer Enlarged reduced printing You can freely adjust the size of originals by enlarging or reducing originals before printing P 248 P 256 P 265 Free Layout function Print multiple documents from multiple applications such as word processing programs spreadsheet programs and so on next to each other P 354 Basic Printing Work ow 81 ...

Page 96: ...e printer properties and then click Acquire Status This will enable roll printing P 480 If a sheet is loaded in the Tray remove it before this procedure P 141 Before printing banners or other large format documents spread a clean cloth or paper over the oor Long sheets that touch the oor after printing may become dirty If you will wait for the ink to dry after printing and simply eject the documen...

Page 97: ...nting procedure 3 Load a roll on the Roll Holder P 114 Note When switching rolls rst remove the current roll from the Roll Holder P 121 4 Load the roll in the Roll Feed Unit P 116 Basic Printing Work ow 83 ...

Page 98: ...Printing procedure 5 Load the roll in the printer P 117 6 Select the paper type P 112 7 Specify the paper length P 113 84 Basic Printing Work ow ...

Page 99: ...he Printer Driver Mac OS X P 244 Specifying Paper in the Printer Driver Mac OS 9 P 246 Important Always specify the same type and size of paper in the printer menu and printer driver If the type and size do not match an error message may be displayed and printing may not be possible PaprTyp Mismatch P 678 PaprSiz Mismatch P 679 Paper Mismatch P 678 Basic Printing Work ow 85 ...

Page 100: ...printing on it may leave a depression on the leading edge When printing quality is most important we recommend setting TrimEdge Reload to On so that the paper edge is automatically cut before printing For details on supported sizes and types of the roll that can be loaded see Paper Sizes or the Paper Reference Guide P 109 P 103 Clean the platen after you have used up a roll P 627 When a roll has b...

Page 101: ... below to load and print on sheets in the cassette 1 Turn the printer on P 25 2 Load paper in the Cassette P 152 3 Complete settings in the printer driver for the type of paper and other details Specifying Paper in the Printer Driver Windows P 242 Specifying Paper in the Printer Driver Mac OS X P 244 Specifying Paper in the Printer Driver Mac OS 9 P 246 Basic Printing Work ow 87 ...

Page 102: ... Printing from Windows P 91 Printing from Mac OS X P 92 Printing from Mac OS 9 P 94 Start printing Note For details on supported paper sizes for the Cassette see Paper Sizes or the Paper Reference Guide P 109 P 103 88 Basic Printing Work ow ...

Page 103: ...rint on sheets in the paper feed slot Note If a roll is loaded rewind the roll before this procedure P 141 1 Turn the printer on P 25 2 Complete settings in the printer driver for the type and size of paper and other details Specifying Paper in the Printer Driver Windows P 242 Specifying Paper in the Printer Driver Mac OS X P 244 Specifying Paper in the Printer Driver Mac OS 9 P 246 Basic Printing...

Page 104: ... will load a sheet before sending a print job you must select the type and size of paper in advance on the printer Display Screen Follow these steps Selecting the Paper Type Tray P 147 Selecting the Paper Size Tray P 150 Start printing Note For details on supported sizes and types of the paper that can be loaded in the tray see Paper Sizes or the Paper Reference Guide P 109 P 103 90 Basic Printing...

Page 105: ...ected in the dialog box click Print or OK to start printing Note The appearance of the dialog box varies depending on the application software In most cases the dialog box includes basic printing options and enables you to choose the printer specify the range of pages number of copies and so on Example Print dialog box displayed by the application software Note If another printer is selected selec...

Page 106: ... Macintosh P 570 Important During this setup process the printer will not be listed among available printers if it is off or disconnected By factory default the AppleTalk protocol is disabled on the printer You must enable the AppleTalk protocol before using the printer in an AppleTalk network For instructions on activating AppleTalk protocol see Con guring the Destination for AppleTalk Network Ma...

Page 107: ...ing options and enables you to choose the printer specify the range of pages number of copies and so on 2 Select the printer in the Printer list 3 Click Print to start printing As shown in the following illustration you can switch to other panes in this dialog box to complete settings for various methods of printing including enlarged and reduced printing borderless printing and so on Basic Printi...

Page 108: ...r if it is off or disconnected By factory default the AppleTalk protocol is disabled on the printer You must enable the AppleTalk protocol before using the printer in AppleTalk network For instructions on activating AppleTalk protocol see Con guring the Destination for AppleTalk Network Macintosh P 572 Note In Chooser choose GARO Printer Driver In Destination choose USB if the printer is connected...

Page 109: ...x for printing conditions Note This dialog box includes basic printing options for the range of pages number of copies and so on You can also specify enlargement or reduction borderless printing and a variety of other print settings 2 Make sure the printer is selected in the Printer list 3 Click Print to start printing Basic Printing Work ow 95 ...

Page 110: ... the Stop Eject button before printing starts Holding down for a second or more the Stop Eject button before printing cancels the print job and brings the printer online If you are using a roll the paper is fed before the printer goes online If you press the Stop Eject button during printing Holding down for a second or more the Stop Eject button during printing stops printing immediately If you p...

Page 111: ...rt menu 2 Right click the job to cancel and select Cancel Note The print job is displayed on the printer screen during the transmission of print data from the computer When the transmission is nished the job is not displayed even during printing To cancel print jobs from the Control Panel follow these steps 1 If the Display Screen of the Control Panel still indicates that the job is in progress an...

Page 112: ...no print jobs are shown in the printer window because they have already been sent to the printer 1 Double click the taskbar icon to access the imagePROGRAF Status Monitor 2 On the Printer Status sheet click Cancel Job 98 Basic Printing Work ow ...

Page 113: ...s to stop printing In this window you can cancel jobs sent to the printer Note The print job is displayed on the printer s screen during the transmission of print data from the computer When the transmission is completed the job is not displayed even during printing Alternatively you can cancel print jobs as follows 1 Click Utility to display imagePROGRAF Printmonitor Basic Printing Work ow 99 ...

Page 114: ...inter even if the computer has started the process of the data 3 Exit imagePROGRAF Printmonitor In the printer window click Start Jobs Important Always follow these steps if you cancel print jobs If you do not restart job processing the next job cannot be printed To cancel print jobs from the Control Panel follow these steps 1 If the Display Screen of the Control Panel still indicates that the job...

Page 115: ...cessing The job status changes from Sending to Send 4 Select the print job to cancel and click the Cancel Job button to remove the print job 5 Choose Resume Printing in the File menu Important Always follow these steps if you cancel print jobs If you do not restart the print queue the next job cannot be printed To cancel print jobs from the Control Panel follow these steps 1 If the Display Screen ...

Page 116: ...ed hold down the Command key and press the period key to cancel print jobs 2 If the Display Screen of the Control Panel still indicates that the job is in progress and the Data lamp continues ashing hold down the Stop Eject button for a second or more to stop printing 102 Basic Printing Work ow ...

Page 117: ...s of paper as well as information on printer driver settings and tips on handling paper You can update paper information in the Paper Reference Guide on the printer Control Panel and in the printer driver by downloading the latest version of the Media Con guration Tool from the imagePROGRAF website Note The media types with marked in the product name are those speci ed as genuine Canon media For o...

Page 118: ...ows Follow the steps for your particular operating system Windows 1 Double click the iPFxxxx Support icon on the desktop Here iPFxxxx represents the printer model The online support window is displayed 2 Select Paper Reference Guide The Paper Reference Guide is displayed 104 Handling Paper ...

Page 119: ...Paper Mac OS X 1 Click the iPF Support icon in the Dock The online support window is displayed 2 Select Paper Reference Guide The Paper Reference Guide is displayed Handling Paper 105 ...

Page 120: ...Paper Mac OS 9 1 Double click the iPFxxxx Paper Reference Guide icon on the desktop Here iPFxxxx represents the printer model The Paper Reference Guide is displayed 106 Handling Paper ...

Page 121: ...ration Tool Guide Macintosh Follow these steps to access the imagePROGRAF website Important When you update paper information by using the Media Con guration Tool the paper type setting on the Control Panel in the printer driver and in related software is updated Windows 1 Double click the iPFxxxx Support icon on the desktop Here iPFxxxx represents the printer model The online support window is di...

Page 122: ...ms iPFxxxx Media Con guration Tool here iPFxxxx represents the printer model iPFxxxx Media Con guration Tool to start the Media Con guration Tool and clicking Extra Information On a Macintosh computer you can also access the imagePROGRAF website from the Finder by selecting Applications in Mac OS X or OS 9 Canon Utilities iPFxxxx Media Con guration Tool here iPFxxxx represents the printer model MC...

Page 123: ...03 2mm No Custom Paper Size 203 2 mm 8 00 in 431 8 mm 17 00 in 1 For information on types of paper compatible with borderless printing see the Paper Reference Guide P 103 2 Requires the Spacer for Borderless Printing Sheets Sheets of the following sizes are supported Paper Size Dimensions Feeding from Cassette ISO A2 420 0 594 0 mm 16 54 23 39 in Yes ISO A2 431 8 609 6 mm 17 00 24 00 in No ISO A3 ...

Page 124: ...x10 is only supported when printing from the Cassette This size is not supported when printing from the Top Paper Feed Slot or Front Paper Feed Slot Note In the printer driver paper sizes are categorized into groups based on the size system such as ISO A or ANSI In Windows and Mac OS 9 some size systems are not available by default Follow the steps below to make them available Windows 1 Display th...

Page 125: ...ia or Remove CutSheet when you press the Feeder Selection button To remove the paper press the OK button P 141 You cannot switch the paper source in the following situations If the Message lamp is ashing Check the message on the Display Screen and take action as necessary P 674 If the Data lamp is ashing Select the paper source after printing If a printer menu operation is in progress Select the p...

Page 126: ...he remaining roll paper P 113 1 Press the Menu button to display MAIN MENU 2 Press or to select Paper Settings and then press MAIN MENU Paper Settings 3 Press or to select Roll Media Type and then press Paper Settings Roll Media Type 4 Press or to select the paper type and then press the OK button The setting is updated and an equals sign is displayed at left Roll Media Type Plain Paper Note For d...

Page 127: ...lay Screen if no barcode has been printed on the roll and you have activated automatic detection of the remaining roll paper In this case follow step 4 The printer will automatically go online 1 Press the Menu button to display MAIN MENU 2 Press or to select Paper Settings and then press MAIN MENU Paper Settings 3 Press or to select Roll Length Set and then press Paper Settings Roll Length Set 4 P...

Page 128: ... roll with scissors before loading the roll in the printer and then cut the edge of the paper manually using the Paper Cutting operation of the printer P 131 To load a roll with a 3 inch paper core insert the 3 Inch Paper Core Attachment on the roll holder and attach the 3 Inch Paper Core Holder Stopper P 139 Caution Set the roll on a table or other at surface so that it does not roll or fall Roll...

Page 129: ...y until it touches the ange a of the Roll Holder Important Always put the Roll Holder sideways when loading rolls If you accidentally load a roll when the Roll Holder is upright it may damage the Roll Holder 3 Insert the Holder Stopper from the left in the Roll Holder as shown pushing it rmly in until the ange a of the Holder Stopper touches the roll Handling Paper 115 ...

Page 130: ...l Holder shaft into the guide grooves a of the Roll Holder Slot on both sides Make sure that the colors of the Roll Holder shaft ends b and the guide grooves match Caution Be careful not to pinch your ngers between the guide grooves a and the Roll Holder shaft b when loading rolls Note If it is dif cult to load rolls from the front load them from behind the printer At this point to advance the rol...

Page 131: ... not be used Rolls P 119 Sheets P 167 If the Platen is dirty clean inside the Top Cover P 627 If the Output Tray Extension is extended push it in 1 Insert your ngers under the Vertical Paper Guides on the Output Tray at the positions shown a and lift the guides 2 Open the Roll Feed Unit Cover with one hand as shown Handling Paper 117 ...

Page 132: ... paper as you insert it in the slot This may affect the printing quality We recommend wearing clean cloth gloves when handling rolls to protect the printing surface If the paper is wrinkled or warped straighten it out before loading it Load paper straight so it is not fed askew The printer now starts advancing the paper 4 Close the Roll Feed Unit Cover with one hand as shown 118 Handling Paper ...

Page 133: ...aper A menu for selection of the paper type and length is automatically shown on the Display Screen P 112 P 113 Printed Off Not printed You must specify the type of paper P 112 If the edge of the roll is bent or soiled cut the edge of the paper P 131 Removing the Roll from the Printer Remove rolls from the printer as follows 1 Hold down the Stop Eject button for a second or more to rewind the roll...

Page 134: ...ll Feed Unit as follows Note If the Output Tray Extension is extended push it in 1 Open the Roll Feed Unit Cover with one hand as shown 2 Using both hands rotate the Roll Holder toward the back to rewind the roll 3 Remove the Roll Holder from the Roll Holder Slot 120 Handling Paper ...

Page 135: ...nt After removal store the roll in the original bag or box away from high temperature humidity and direct sunlight If paper is not stored properly the printing surface may become scratched which may affect the printing quality when you use it again Note How to remove the 3 Inch Paper Core Attachment P 139 How to remove the Spacer for Borderless Printing P 139 Handling Paper 121 ...

Page 136: ...Jammed Paper Paper Feed Slot P 125 1 Open the Roll Feed Unit Cover Use a store bought cutter or the like to cut the paper of the loaded roll Caution When cutting paper be careful to avoid injury and damaging the printer 2 Press button 3 Remove the jammed paper If paper is jammed inside the Top Cover 1 Open the Top Cover and move the Carriage to the side 2 Clear any jammed paper from inside the Top...

Page 137: ...is jammed by the Paper Feed Slot 1 Open the Roll Feed Unit Cover 2 Remove the jammed paper from the Paper Feed Slot After removing the paper make sure there are no other scraps of paper in the printer If paper is jammed deep in the Paper Feed Slot P 124 remove the Roll Feed Unit and clear the paper jam Handling Paper 123 ...

Page 138: ... If paper is jammed deep in the Paper Feed Slot remove the Roll Feed Unit and clear the paper jam as follows 1 Turn off the printer and remove the Roll Feed Unit from the printer P 142 2 Remove the jammed paper from the Paper Feed Slot After removing the paper make sure there are no other scraps of paper in the printer 3 Install the Roll Feed Unit on the printer again P 143 124 Handling Paper ...

Page 139: ... an equals sign is displayed at left Manual Pap Size ISO A2 A con rmation message is displayed notifying you that the printer is changing the media source Please Wait 4 After the following message is displayed press the OK button Chk Back Space Press OK 5 After the following message is displayed open the Top Cover Open UpperCover 6 Fold an A4 sheet lengthwise four times and insert it through the g...

Page 140: ... by pressing or Press to retract the roll paper manually Press to feed the roll paper manually If you hold down or for less than a second the roll paper will move about 1 mm 0 04 in If you hold down or for more than a second the paper will move until you release the button Release the button if Feed Limit is shown on the Display Screen 126 Handling Paper ...

Page 141: ...xt message is printed This is also the case when printing on 8 inch rolls or clear lm Important If the barcode on the roll is not detected enter the type and length of paper on the Control Panel Follow these steps to activate detection of the remaining roll paper 1 Press the Menu button to display MAIN MENU 2 Press or to select Paper Settings and then press the button MAIN MENU Paper Settings 3 Pr...

Page 142: ... transferred onto the paper surface during ejection soiling it You can prevent problems by adjusting the drying time after printing before the paper is cut Windows 1 Display the printer driver dialog box P 455 2 Select the Main sheet and click C Advanced Settings in A Media Type 3 In the Paper Detailed Settings dialog box displayed next select C Between Pages and D Between Scans in B Drying Time a...

Page 143: ... the application menu 2 Select the Main pane and click C Settings in A Media Type 3 In the Paper Detailed Settings dialog box displayed next select C Between Pages and D Between Scans in B Drying Time and then click OK P 500 Handling Paper 129 ...

Page 144: ...tings dialog box displayed next select C Between Pages and D Between Scans in B Drying Time and then click OK P 533 Note By factory default Drying Time is deactivated Off for all paper types To have the printer wait for ink to dry immediately after printing without releasing paper set Cutting Mode to Eject in the printer menu P 131 130 Handling Paper ...

Page 145: ...e from the roll using scissors For continuous printing if you will cut each page later in Auto Cut select Yes or select Print Cut Guideline P 437 Cutting Mode Manual NoYesPrint Cut Guideline Paper Cutting P 134 Choose this option if you want to cut pages by pressing Cutter Unit buttons for manual cutting after printing when the printer driver is con gured to Auto Cut No or Print Cut Guideline Othe...

Page 146: ...rinter menu and then press OK The setting is updated and an equals sign is displayed at left Cutting Mode Eject 2 Starts printing Roll paper is fed to the speci ed cut position and then automatically stopped 3 To cut the roll paper hold down the Stop Eject button for a second or more 132 Handling Paper ...

Page 147: ...ng is updated and an equals sign is displayed at left Cutting Mode Manual 2 Starts printing Complete the print settings 3 Press the Online button Roll paper is fed to the speci ed cut position and then automatically stopped 4 Use scissors to cut the roll paper along the cut line 5 Press the Online button After the roll is rewound it stops automatically Handling Paper 133 ...

Page 148: ...dPaper 2 Press or to feed the roll paper to the position for cutting 3 Select Yes as the Paper Cut in the printer menu and then press OK The setting is updated and an equals sign is displayed at left Paper Cut Yes After the roll paper is cut it is rewound automatically Caution If paper would be short when cut at a particular position the roll may automatically be advanced in some cases before cutt...

Page 149: ...aps are not removed This setting is Off for most types of paper by default For more information see the Paper Reference Guide P 103 On The leading edge is cut off when you load a roll and scraps are removed The amount of paper cut off from the leading edge varies depending on the paper type For more information see the Paper Reference Guide P 103 Note If you print on paper that has an irregular wi...

Page 150: ... Plain Paper Trim Edge First 5 Press or to select the desired setting option and then press the OK button Trim Edge First On The setting is updated and an equals sign is displayed at left Trim Edge First On 6 Press the Online button to bring the printer online 136 Handling Paper ...

Page 151: ... wrinkles easily such as Plain Paper or lightweight paper This may impair cutting and cause paper jams Borderless printing is not available when this function is activated Deactivate this function before borderless printing 1 Press the Menu button to display MAIN MENU 2 Press or to select Med Detail Set and then press MAIN MENU Med Detail Set 3 Press or to select the type of paper and then press M...

Page 152: ... Paper Core Attachment on the Roll Holder and attach the Holder Stopper for 3 inch paper cores If you use an A2 420 mm 16 5 in roll for borderless printing insert the Spacer for Borderless Printing on the Roll Holder Roll Holder Set RH2 11 Roll Holder Holder Stopper for 2 and 3 inch paper cores a and b 3 Inch Paper Core Attachment Spacer for Borderless Printing For instructions on installing these...

Page 153: ...the 3 Inch Paper Core Attachment a with the triangular groove c of the Roll Holder as shown and insert the 3 Inch Paper Core Attachment into the Roll Holder Use the Holder Stopper for 3 inch paper cores Removing the 3 Inch Paper Core Attachment Spread the tips b of the 3 Inch Paper Core Attachment that protrude by the triangular label a of the Roll Holder as shown and remove the 3 Inch Paper Core ...

Page 154: ...otrusions b of the Spacer for Borderless Printing a into the holes c of the Roll Holder as shown Removing the Spacer for Borderless Printing Pull out the Spacer for Borderless Printing from the Roll Holder as shown Roll Feed Unit A unit for using rolls Optional Roll Feed Unit RU 01 For instructions on installing the Roll Feed Unit see Installing the Roll Feed Unit P 143 140 Handling Paper ...

Page 155: ...e paper source 1 Select the tray as the paper source P 111 2 After Remove RllMedia is displayed press the OK button The roll is rewound automatically Similarly if a sheet is in the Top Paper Feed Slot or Front Paper Feed Slot when you wish to print on a roll you will need to remove the sheet from the slot and reinsert the roll paper which has been rewound in the Paper Feed Slot 1 Select the roll a...

Page 156: ...the Roll Feed Unit 1 Remove any rolls in the Roll Feed Unit P 120 2 Use a coin to loosen the screws on both sides of the back of the Roll Feed Unit a and remove the unit from the printer 3 Hold the Roll Feed Unit by the Carrying Handles a as you remove the Roll Feed Unit from the printer 142 Handling Paper ...

Page 157: ...er is off before attaching the Roll Feed Unit 1 If the Paper Tray Unit is installed remove the Paper Tray Unit P 177 2 Holding the Roll Feed Unit by the Carrying Handles a insert the two pins of the Roll Feed Unit b into the each hole on the back of the printer c Handling Paper 143 ...

Page 158: ...to the printer Important After installing the Roll Feed Unit you may not be able to select rolls in the printer driver unless you complete the Roll Feed Unit device settings In the printer properties select Roll Feed Unit on the Device Settings sheet and then click Acquire Status P 480 144 Handling Paper ...

Page 159: ...dia or Remove CutSheet when you press the Feeder Selection button To remove the paper press the OK button P 141 You cannot switch the paper source in the following situations If the Message lamp is ashing Check the message on the Display Screen and take action as necessary P 674 If the Data lamp is ashing Select the paper source after printing If a printer menu operation is in progress Select the ...

Page 160: ...s Paper Type and then press Paper Settings Cas Paper Type 4 Press or to select the paper type and then press the OK button The setting is updated and an equals sign is displayed at left Cas Paper Type Plain Paper Note For details on paper types see the Paper Reference Guide P 103 By factory default Plain Paper is selected 5 Press the Online button to bring the printer online 146 Handling Paper ...

Page 161: ...ENU 2 Press or to select Paper Settings and then press MAIN MENU Paper Settings 3 Press or to select Manual Pap Type and then press Paper Settings Manual Pap Type Note Manual Pap Type is not displayed unless paper is loaded in the Tray 4 Check the paper type To use this type of paper without changing it press the OK button To change the paper type press or to select another type and then press the...

Page 162: ...Handling sheets 5 Press the Online button to bring the printer online 148 Handling Paper ...

Page 163: ...s the OK button The setting is updated and an equals sign is displayed at left Cas Paper Size ISO A4 Important When printing originals centered on the paper specify the correct size of the paper actually loaded in the printer menu and printer driver If the size setting does not match the size of paper actually loaded the original will not be printed correctly in the center Note For details on pape...

Page 164: ...U 2 Press or to select Paper Settings and then press MAIN MENU Paper Settings 3 Press or to select Manual Pap Size and then press Paper Settings Manual Pap Size Note Manual Pap Size is not displayed unless paper is loaded in the Tray 4 Check the paper size To use the paper size without changing it press the OK button To change the paper size press or to select another size and then press the OK bu...

Page 165: ...Handling sheets Note For details on paper sizes see Paper Sizes P 109 5 Press the Online button to bring the printer online Handling Paper 151 ...

Page 166: ...r warped may jam If necessary straighten the paper and reload it Load the paper straight Loading paper skewed will cause an error 1 Push in the Output Tray Extension 2 Grasp the handle a on the front of the Cassette and pull it forward a little Holding the Cassette on both sides with both hands remove the cassette Caution When removing the Cassette do not drag it on the table This may damage the t...

Page 167: ... slide it back until it touches the edge of the paper lightly Important Do not set the Width Guide and Length Guide away from the paper or too tight against it This may cause feeding problems 6 Holding the Cassette in the middle on both sides with both hands insert it rmly into the printer Caution When removing the Cassette do not drag it on the table This may damage the table Handling Paper 153 ...

Page 168: ...lecting the Paper Type Cassette P 146 Selecting the Paper Size Cassette P 149 When printing from the Cassette always make sure the Vertical Paper Guides are stored out of the way If the Vertical Paper Guides are up and a printed document is left in the Output Tray the Front Tray Guides may become caught inside the Front Paper Feed Slot P 653 154 Handling Paper ...

Page 169: ...er The sheet may jam if it curls before feeding or printing and the trailing edge drops toward the front If a roll is loaded rewind the roll before this procedure P 141 If the standard Paper Tray Unit is installed 1 If you send a print job specifying a paper other than POP Board from a computer beforehand the type and size of paper are shown on the Display Screen Note If you will load paper before...

Page 170: ...rt the paper until its edge touches the far end of the tray lightly Feeding may not be possible and feeding errors may occur if the edge of the paper does not touch the tray Caution If you load A2 or larger in the printer the paper goes down on the back of the printer under its own weight Therefore place your hands on the paper till the paper is fed 156 Handling Paper ...

Page 171: ...K button to start feeding the paper Load Top Tray Press OK If you hear a warning tone and the message Push in Paper Slightly is displayed on the Control Panel push in the paper a little until it is pulled automatically After the paper is advanced and the printer goes online printing starts automatically If no print job was received beforehand the printer enters Standby mode Handling Paper 157 ...

Page 172: ... the Top Paper Feed Slot always make sure the Vertical Paper Guides are stored out of the way If the Vertical Paper Guides are up and a printed document is left in the Output Tray the Front Tray Guides may become caught inside the Front Paper Feed Slot P 653 158 Handling Paper ...

Page 173: ...isplay Screen Press or to select the size of paper and then press the OK button For details on paper types see the Paper Reference Guide P 103 By factory default Plain Paper is selected If this setting does not match the loaded paper it may cause feed errors and affect the printing quality 2 Open the Paper Tray Cover 3 Slide the Width Guide a to align it with the mark for the size of paper you wil...

Page 174: ...vanced and the printer goes online printing starts automatically If no print job was received beforehand the printer enters Standby mode 7 Pull out the Output Tray Extension Note When printing from the Top Paper Feed Slot always make sure the Vertical Paper Guides are stored out of the way If the Vertical Paper Guides are up and a printed document is left in the Output Tray the Front Tray Guides m...

Page 175: ...er beforehand the type and size of paper are shown on the Display Screen Note If you will load paper before sending a print job press the Feeder Selection button to illuminate the Paper Tray lamp A screen is shown on the Display Screen for selection of the paper type Press or to select POP Board and then press the OK button Next a menu for selection of the paper size is shown on the Display Screen...

Page 176: ...Handling sheets 3 Push the handles of the Vertical Paper Guides a back to raise the Vertical Paper Guides 4 After the following message is displayed open the Top Cover Open UpperCover 162 Handling Paper ...

Page 177: ...des Keeping the sheet against the Front Paper Feed Slot and keep it at as you insert it into the Vertical Paper Guides Load Front Tray Load Paper Caution When loading paper in the Front Paper Feed Slot keep it at as you insert it into the slot If you do not the printing surface may be damaged Handling Paper 163 ...

Page 178: ...n the Platen Insert the leading edge of the paper between the Platen and Paper Retainer b keeping it parallel to the Paper Retainer b and align the paper with the Paper Alignment Line c of the Output Tray Important Never touch the Linear Scale a or Carriage Shaft b This may stain your hands and damage the printer 164 Handling Paper ...

Page 179: ...ceived beforehand the printer enters Standby mode 9 Pull out the Output Tray Extension 10 After printing the printer will temporarily stop advancing the paper while the trailing edge is still in the rollers to prevent the sheet from dropping Press the button to release the sheet After pulling it straight out press the button P 168 Note Remove the printed document on the Output Tray after printing ...

Page 180: ...ay Extension 2 Grasp the handle a on the front of the Cassette and pull it forward a little Holding the Cassette on both sides with both hands remove the cassette Caution When removing the Cassette do not drag it on the table This may damage the table 3 Squeeze the Guide Lever of the paper Width Guide a and slide it to the left Similarly squeeze the Guide Lever of the paper Length Guide b and slid...

Page 181: ... the Stop Eject button to eject the sheet Note Before ejecting paper during print jobs or while ink is still drying press the Stop Eject button to cancel printing print job processing or ink drying The paper is ejected from the front of the printer Handling Paper 167 ...

Page 182: ...ter will eject the paper and stop advancing it momentarily while the trailing edge is still in the rollers to prevent the sheet from dropping Press the button again when you are ready to remove the paper 2 Remove the sheet by pulling it forward keeping it at Caution If you do not remove POP Board by pulling it straight forward and keeping it at the printed surface may become scratched 3 Press the ...

Page 183: ... t DetectPapr Remove Paper is displayed If paper is jammed in the paper feed slot of the cassette 1 Grasp the handle a on the front of the Cassette and pull it forward a little Holding the Cassette on both sides with both hands remove the cassette 2 Clear any jammed paper from the paper feed slot of the Cassette After removing the paper make sure there are no other scraps of paper in the printer 3...

Page 184: ...move the Back Cover from the printer 2 Remove the jammed paper from the back After removing the paper make sure there are no other scraps of paper in the printer Caution Do not touch the areas in the printer indicated by a If the grease that coats these parts is accidentally wiped away it may cause feeding problems 170 Handling Paper ...

Page 185: ...arks on the Back Cover If Paper Jam Press Key is displayed 1 Press 2 Remove the jammed paper If paper is jammed inside the Top Cover 1 Open the Top Cover and move the Carriage to the side 2 Clear any jammed paper from inside the Top Cover After removing the paper make sure there are no other scraps of paper in the printer Handling Paper 171 ...

Page 186: ...hands and damage the printer If paper is jammed in the back of the printer 1 While squeezing the two levers a at two positions on the Back Cover remove the cover from the printer 2 Remove the jammed paper from the back After removing the paper make sure there are no other scraps of paper in the printer 172 Handling Paper ...

Page 187: ...s at two positions so that the levers are aligned with the marks on the Back Cover If the paper is jammed by the Output Tray 1 Remove the jammed paper from the Output Tray After removing the paper make sure there are no other scraps of paper in the printer 3 Press Handling Paper 173 ...

Page 188: ...Control Panel Remove the jammed paper as follows 1 Press 2 Remove the jammed paper If paper is jammed inside the Top Cover 1 Open the Top Cover and move the Carriage to the side 2 Clear any jammed paper from inside the Top Cover After removing the paper make sure there are no other scraps of paper in the printer 3 Close the Top Cover 174 Handling Paper ...

Page 189: ...emoving the paper make sure there are no other scraps of paper in the printer If paper is jammed deep in the Paper Feed Slot P 176 remove the Roll Feed Unit or Paper Tray Unit and clear the paper jam If the paper is jammed by the Output Tray Remove the jammed paper from the Output Tray After removing the paper make sure there are no other scraps of paper in the printer Handling Paper 175 ...

Page 190: ...er Feed Slot remove the Roll Feed Unit or Paper Tray Unit and clear the paper jam as follows 1 Turn off the printer and remove the Roll Feed Unit or Paper Tray Unit from the printer P 142 P 177 2 Remove the jammed paper from the Paper Feed Slot After removing the paper make sure there are no other scraps of paper in the printer 3 Install the Roll Feed Unit or Paper Tray Unit on the printer again P...

Page 191: ...ang it on the printer using the two hooks Removing the Paper Tray Unit 1 Remove any paper from the Tray 2 Close the Paper Tray Cover 3 The Paper Tray Unit is attached to the printer by hooks at two positions Lift the Paper Tray Unit with your hand at the position indicated by a to remove it Handling Paper 177 ...

Page 192: ...sktop Stacker The printer can be used with the following Desktop Stacker Optional Desktop Stacker BU 02 Note For Desktop Stacker installation instructions refer to the instructions provided with the Desktop Stacker 178 Handling Paper ...

Page 193: ...Basket Wire 2 a and pull them toward the front b Peel off the Velcro Tape c of the Basket Band and fasten it in the middle of Basket Rod 2 d to put the stacker in the extended position This position enables printed documents to be removed more easily For information on the position for easy removal refer to the Paper Reference Guide P 103 Important The Output Stacker can hold one sheet When printi...

Page 194: ...ting optimized for printing at the highest level of quality Photo Setting optimized for printing photographic images from digital cameras Poster Photos Settings optimized for printing posters mainly composed of photos Poster Text Illustrations Setting optimized for printing vivid eye catching store posters combining images and text Scanned Image Setting optimized for printing scanned images with a...

Page 195: ...ttings For details on Advanced Settings see Giving Priority to Particular Graphic Elements and Colors for Printing P 225 For instructions on printing photos and images refer to the following topics as appropriate for your computer and operating system Printing Photos and Images Windows P 184 Printing Photos and Images Mac OS X P 186 Working With Various Print Jobs 181 ...

Page 196: ...ghest level of quality Photo from digital camera Setting optimized for printing photographic images from digital cameras Poster Graphic Image Settings optimized for printing posters mainly composed of photos POP Ad Setting optimized for printing vivid eye catching store posters combining images and text Scanned Image Setting optimized for printing scanned images with accurate color reproduction to...

Page 197: ...as needed Advanced Settings For details on Advanced Settings see Giving Priority to Particular Graphic Elements and Colors for Printing P 225 For instructions on printing photos and images refer to the following topics as appropriate for your computer and operating system Printing Photos and Images Mac OS 9 P 189 Working With Various Print Jobs 183 ...

Page 198: ...y Photo Paper In the A Media Type choose the type of paper used for printing such as Glossy Paper Coated Paper and so on Make sure the paper you select is loaded in the printer Note The paper type setting in the printer driver and related software as well as on the Control Panel is updated when you install the Media Con guration Tool from the User Software CD ROM or if you change paper information...

Page 199: ...ce list 9 Select the width of the loaded roll in the M Roll Paper Width list In this case click 10 in Roll 254 0mm and then click OK 10 Specify additional printing conditions For details on available printing conditions see Printer Driver Settings Windows P 443 11 Con rm the print settings and print as desired Note For instructions on con rming print settings see Con rming Print Settings Windows P...

Page 200: ...ginal In this case click 10 x12 4 Click F OK to close the dialog box 5 Choose Print in the application menu 6 Access the Main pane 7 In the A Media Type list select the type of paper that is loaded In this case click Glossy Photo Paper Make sure the paper you select is loaded in the printer Note The paper type setting in the printer driver and related software as well as on the Control Panel is up...

Page 201: ... the settings values selected in the E Print Target list by clicking F View set 9 Access the Page Setup pane 10 Click Roll Paper in the A Media Source list 11 Make sure the width of the loaded roll is displayed in the B Roll Paper Width list in this case 10 in 254 0mm Note If the width of the loaded roll is not displayed in B Roll Paper Width click L Printer Information on the Main pane and update...

Page 202: ...dialog box in this case 10 x12 13 Specify additional printing conditions For details on available printing conditions see Printer Driver Settings Mac OS X P 489 14 Con rm the print settings and then click M Print to start printing Note For tips on con rming print settings see Con rming Print Settings Mac OS X P 492 188 Working With Various Print Jobs ...

Page 203: ... Roll Paper type Glossy Photo Paper Roll paper width 10 inches 254 0mm 1 Select the printer in Chooser 2 Choose Page Setup from the application menu to display the Page Attribute dialog box 3 In the A Page Size list click the size of the original In this case click 10 x12 4 Click I OK to close the dialog box 5 Choose Print in the application menu 6 Make sure the Main pane is displayed Working With...

Page 204: ... the Control Panel is updated when you install the Media Con guration Tool from the User Software CD ROM or if you change paper information by using the Media Con guration Tool See the Media Con guration Tool Guide Windows or Media Con guration Tool Guide Macintosh 8 After con rming that E Easy Settings is selected click Photo from digital camera in the F Print Target list Note You can check the s...

Page 205: ...l Paper Width click L Printer on the Main pane and update the printer information 12 Specify additional printing conditions For details on available printing conditions see Printer Driver Settings Mac OS 9 P 511 13 Con rm the print settings and then click N Print to start printing Note For tips on con rming print settings see Con rming Print Settings Mac OS 9 P 514 Working With Various Print Jobs ...

Page 206: ...ighly precise drawings using the provided imagePROGRAF HDI Driver for AutoCAD AutoCAD LT For details on the HDI driver see the HDI Driver Guide For instructions on CAD printing refer to the following topics as appropriate for your computer and operating system Printing Line Drawings and Text Windows P 195 Printing Line Drawings and Text Mac OS X P 197 Printing Line Drawings and Text Mac OS 9 P 199...

Page 207: ...rinting of highly precise documents such as CAD drawings with smooth lines and small text Poster Notice Announcement Settings optimized for printing announcements such as wall newspapers and other notices with a large amount of text 3D CAD GIS Settings optimized for printing 3D CAD drawings perspective drawings and maps including GIS maps Note You can check the settings values for each print targe...

Page 208: ...cy Settings optimized for attractive printing of highly precise documents such as CAD drawings with smooth lines and small text Poster Notice Announcement Settings optimized for printing announcements such as wall newspapers and other notices with a large amount of text 3D GIS Map Settings optimized for printing 3D CAD drawings perspective drawings and maps including GIS maps Note You can check th...

Page 209: ...printer in the dialog box and then open the printer driver dialog box P 453 3 Make sure the Main sheet is displayed 4 In the A Media Type list select the type of paper that is loaded In this case click Plain Paper 5 After con rming that D Easy Settings is selected click CAD Line Drawing or CAD Monochrome Line Drawing in the E Print Target list Note You can check the settings values selected in the...

Page 210: ...Click Cassette in the L Paper Source list 9 Specify additional printing conditions For details on available printing conditions see Printer Driver Settings Windows P 443 10 Con rm the print settings and print as desired Note For tips on con rming print settings see Con rming Print Settings Windows P 447 196 Working With Various Print Jobs ...

Page 211: ...t the printer in the B Format for list 3 In the C Paper Size list click the size of the original In this case click ISO A3 4 Click F OK to close the dialog box 5 Choose Print in the application menu 6 Access the Main pane 7 In the A Media Type list select the type of paper that is loaded In this case click Plain Paper 8 After con rming that D Easy Settings is selected click CAD Line Drawing or CAD...

Page 212: ...Paper Size in the Page Attributes dialog box in this case ISO A3 12 Specify additional printing conditions For details on available printing conditions see Printer Driver Settings Mac OS X P 489 13 Con rm the print settings and then click M Print to start printing Note For tips on con rming print settings see Con rming Print Settings Mac OS X P 492 198 Working With Various Print Jobs ...

Page 213: ...tribute dialog box 3 In the A Page Size list click the size of the original In this case click ISO A4 4 Click I OK to close the dialog box 5 Choose Print in the application menu 6 Make sure the Main pane is displayed 7 In the C Media Type list select the type of paper that is loaded In this case click Plain Paper 8 After con rming that E Easy Settings is selected click CAD Line Drawing or CAD Mono...

Page 214: ...additional printing conditions For details on available printing conditions see Printer Driver Settings Mac OS 9 P 511 12 Con rm the print settings and then click N Print to start printing Note For tips on con rming print settings see Con rming Print Settings Mac OS 9 P 514 200 Working With Various Print Jobs ...

Page 215: ...responding processing depending on whether a GARO HP GL 2 or HP RTL job is received Con gure the optional settings for HP GL 2 emulation on the printer control panel P 51 This printer can emulate the following printers using HP GL 2 emulation Emulated Printers Canon W3000 and W3050 3 Hewlett Packard Designjet 450c Designjet 750c Plus and Designjet 750c 1 HP GL 2 Hewlett Packard Graphics Language 2...

Page 216: ...ed for clear printing of of ce documents such as handouts Note You can check the settings values for each print target by clicking View Settings You can also ne tune these values as needed Advanced Settings For details on Advanced Settings see Giving Priority to Particular Graphic Elements and Colors for Printing P 225 For instructions on printing of ce documents refer to the following topics as a...

Page 217: ...n 1 Choose Print in the application menu 2 Select the printer in the dialog box and then display the printer driver dialog box P 453 3 Make sure the Main sheet is displayed 4 In the A Media Type list select the type of paper that is loaded In this case click Plain Paper 5 After con rming that D Easy Settings is selected click Of ce Document in the E Print Target list Note You can check the setting...

Page 218: ...st 9 Specify additional printing conditions For details on available printing conditions see Printer Driver Settings Windows P 443 10 Con rm the print settings and print as desired Caution Depending on the Media Type setting some Print Target options may not be available Note For instructions on con rming print settings see Con rming Print Settings Windows P 447 204 Working With Various Print Jobs...

Page 219: ...ation menu to display the Page Attributes dialog box 2 Select the printer in the B Format for list 3 In the C Paper Size list click the size of the original In this case click ISO A4 4 Click F OK to close the dialog box 5 Choose Print in the application menu 6 Access the Main pane 7 In the A Media Type list select the type of paper that is loaded In this case click Plain Paper 8 After con rming th...

Page 220: ... in the Page Attributes dialog box in this case ISO A4 12 Specify additional printing conditions For details on available printing conditions see Printer Driver Settings Mac OS X P 489 13 Con rm the print settings and then click M Print to start printing Note For tips on con rming print settings see Con rming Print Settings Mac OS X P 492 206 Working With Various Print Jobs ...

Page 221: ...ge Setup in the application menu to display the Page Attribute dialog box 3 In the A Page Size list click the size of the original In this case click ISO A4 4 Click I OK to close the dialog box 5 Choose Print in the application menu 6 Make sure the Main pane is displayed 7 In the C Media Type list select the type of paper that is loaded In this case click Plain Paper 8 After con rming that E Easy ...

Page 222: ...additional printing conditions For details on available printing conditions see Printer Driver Settings Mac OS 9 P 511 12 Con rm the print settings and then click N Print to start printing Note For tips on con rming print settings see Con rming Print Settings Mac OS 9 P 514 208 Working With Various Print Jobs ...

Page 223: ...nce is called the Color imageRUNNER Enlargement Copy function To use Color imageRUNNER Enlargement Copy rst complete these settings in the following order 1 Register a hot folder on your computer Register a hot folder on your computer for storing scanned originals from the Color imageRUNNER and complete the settings for enlargement copy 2 Complete the scanning settings on the Color imageRUNNER Con...

Page 224: ...al displayed by clicking Color imageRUNNER Enlargement Copy Setup Manual button of Color imageRUNNER Enlargement Copy utility or refer to the Color imageRUNNER manual Scanning the original and print an enlargement Follow the steps below to scan an original on the Color imageRUNNER for enlarged printing on the printer For detailed instructions refer to the Color imageRUNNER manual 1 Load the origin...

Page 225: ...ned originals to the hot folder After these settings are complete you can print enlarged copies of scanned originals from the Color imageRUNNER Registering a hot folder on your computer Folders used for Color imageRUNNER Enlargement Copy iR enlargement copy are called hot folders Register a hot folder on your computer for storing scanned originals from the Color imageRUNNER You can specify printin...

Page 226: ...e Color imageRUNNER for enlarged printing on the printer For detailed instructions refer to the Color imageRUNNER manual 1 Load the original on the platen glass or document feeder of the Color imageRUNNER 2 Press Send to display the screen for transmission 3 Press Favorites and then press the Favorites button assigned to the hot folder 4 Press Start on the control panel If you scan originals on th...

Page 227: ...atching method Monochrome Print in grayscale You can adjust the color balance Color CAD A color mode optimized for line drawings 2D CAD Lines in red yellow and other colors are printed especially clearly You can adjust the color balance Color CAD Light Another color mode optimized for line drawings 2D CAD Black lines are printed especially clearly when ink of many colors is used as for colored bac...

Page 228: ...ed colors match the colors of on screen images more closely Matching Mode Description Notes Driver Matching Mode Color adjustment based on the original color pro le of the printer driver This is the default color matching method Normally use Driver Matching Mode ICC Matching Mode Color adjustment based on ICC color pro les an international standard using the printer driver You can select the print...

Page 229: ...uration Color matching optimized for graphics This option emphasizes color saturation The available options and their display order vary depending on your selection in Color Matching Mode as well as the operating system Note Be sure to calibrate your monitor colors correctly if you adjust the colors for printing If monitor colors are not calibrated correctly you may not obtain the desired printing...

Page 230: ...r tone of photos before printing 1 Choose Print in the application menu 2 Select the printer in the dialog box and then display the printer driver dialog box P 453 3 Make sure the Main sheet is displayed 4 In the A Media Type list select the type of paper that is loaded 5 Click D Advanced Settings to switch the print mode 6 Click Color in the G Color Mode list 216 Enhanced Printing Options ...

Page 231: ...e cool black tinged with blue pure black neutral warm black tinged with red and so on Select the color tone in the color region or from the list H Brightness Adjust the brightness of printed images while keeping the darkest and lightest portions intact I Contrast Adjust the contrast of the darkest and lightest portions relative to each other For soft gradation decrease the contrast For hard gradat...

Page 232: ...play the Page Setup sheet 11 Con rm the settings of A Page Size L Paper Source and so on 12 Con rm the print settings and print as desired Note For tips on con rming print settings see Con rming Print Settings Windows P 447 218 Enhanced Printing Options ...

Page 233: ... photos before printing 1 Choose Page Setup in the application menu to display the Page Attributes dialog box 2 Select the printer in the B Format for list 3 Choose the original size in the C Paper Size list 4 Click F OK to close the dialog box 5 Choose Print in the application menu 6 Access the Main pane 7 In the A Media Type list select the type of paper that is loaded Enhanced Printing Options ...

Page 234: ...Adjusting Images 8 Click D Advanced Settings to switch the print mode 9 Click Color in the H Color Mode list 10 Click I Set to display the Color Settings dialog box 220 Enhanced Printing Options ...

Page 235: ...ust the brightness of printed images while keeping the darkest and lightest portions intact I Contrast Adjust the contrast of the darkest and lightest portions relative to each other For soft gradation decrease the contrast For hard gradation increase the contrast J Saturation Adjust the level of color saturation in a range from subdued to vivid 12 Click OK to close the Color Settings dialog box 1...

Page 236: ...photos before printing 1 Select the printer in Chooser 2 Choose Page Setup from the application menu to display the Page Attribute dialog box 3 Choose the original size in the A Page Size list 4 Click I OK to close the dialog box 5 Choose Print in the application menu 6 Make sure the Main pane is displayed 7 In the C Media Type list select the type of paper that is loaded 222 Enhanced Printing Opt...

Page 237: ...Adjusting Images 8 Click E Advanced Settings to switch the print mode 9 Click Color in the H Color Mode list 10 Click I Set to display the Color Settingsdialog box Enhanced Printing Options 223 ...

Page 238: ...ontrast For hard gradation increase the contrast H Saturation Adjust the level of color saturation in a range from subdued to vivid I Gray Tone Adjust the gray tone to suit the images of monochrome photos Choose cool black tinged with blue pure black neutral warm black tinged with red and so on Select the color tone in the color region or from the list 12 Click OK to close the Color Settings dialo...

Page 239: ...rinting Of ce Documents P 202 Print Priority Choose the graphic elements that you want to emphasize for printing Print Priority 1 Description Image A setting for posters or other documents made up mainly of photos or images or for emphasizing photos or images in printed documents Line Drawing Text Choose this setting for CAD drawings made up mainly of intricate lines or wall newspapers and other n...

Page 240: ...y are listed under Print Quality Color settings Setting Item Options Description Color Mode 1 Color Monochrome Color CAD Color CAD Light Monochrome BK ink Monochrome Bitmap Choose whether to print in color or monochrome P 213 Color Adjustment Cyan Magenta Yellow Gray Tone Brightness Contrast Saturation You can adjust the levels of cyan magenta and yellow as well as the brightness contrast saturati...

Page 241: ...ing but the quality is diminished Select this mode if you want to conserve ink when checking drawings for example Depending on the Media Type and Print Quality settings this mode may not be available 1 Displayed in Windows and Mac OS X 10 5 2 Displayed in Mac OS X Note To print at a higher level of quality in the printer driver choose High or Highest in Print Quality and choose Unidirectional Prin...

Page 242: ...Select the printer in the dialog box and then display the printer driver dialog box P 453 3 Make sure the Main sheet is displayed 4 In the A Media Type list select the type of paper that is loaded 5 Click D Advanced Settings to switch the print mode 6 Click Line Drawing Text in the E Print Priority list 7 Click High 1200dpi in the F Print Quality list Note Options displayed in the F Print Quality ...

Page 243: ...r Driver P 213 10 Select the K Sharpen Text check box 11 Click the Page Setup tab to display the Page Setup sheet 12 Con rm the settings of A Page Size L Paper Source and so on 13 Con rm the print settings and print as desired Note For tips on con rming print settings see Con rming Print Settings Windows P 447 Enhanced Printing Options 229 ...

Page 244: ...learly as possible with sharp lines and text 1 Choose Page Setup from the application menu to display the Page Attributes dialog box 2 Select the printer in the B Format for list 3 Choose the original size in the C Paper Size list 4 Click F OK to close the dialog box 5 Choose Print in the application menu 6 Access the Main pane 7 In the A Media Type list select the type of paper that is loaded 230...

Page 245: ...in the F Print Quality list Note Options displayed in the F Print Quality list vary depending on the paper type 11 Click Color CAD in the H Color Mode list 12 To adjust the color click I Set Note For instructions on adjusting color see Adjusting the Color in the Printer Driver P 213 13 Access the Page Setup pane Enhanced Printing Options 231 ...

Page 246: ...e settings of A Media Source and C Page Size 15 Con rm the print settings and then click M Print to start printing Note For tips on con rming print settings see Con rming Print Settings Mac OS X P 492 232 Enhanced Printing Options ...

Page 247: ...learly as possible with sharp lines and text 1 Select the printer in Chooser 2 Choose Page Setup from the application menu to display the Page Attribute dialog box 3 Choose the original size in the A Page Size list 4 Click I OK to close the dialog box 5 Choose Print in the application menu 6 Make sure the Main pane is displayed 7 In the C Media Type list select the type of paper that is loaded Enh...

Page 248: ...ity list Note Options displayed in the G Print Quality list vary depending on the paper type 11 Click Color CAD in the H Color Mode list 12 To adjust the color click I Set Note For instructions on adjusting color see Adjusting the Color in the Printer Driver P 213 13 Select the O Sharpen Text check box 14 Access the Finishing pane 234 Enhanced Printing Options ...

Page 249: ...on rm the selection in A Media Source 16 Con rm the print settings and then click N Print to start printing Note For tips on con rming print settings see Con rming Print Settings Mac OS 9 P 514 Enhanced Printing Options 235 ...

Page 250: ... about the Media Con guration Tool see the Media Con guration Tool Guide Windows or Media Con guration Tool Guide Macintosh An error message is displayed on the printer Control Panel if the paper type as speci ed in the printer driver does not match the type speci ed on the printer Although you can print under these conditions the printing results may not be suitable If the paper type is not liste...

Page 251: ...the remaining roll paper P 113 1 Press the Menu button to display MAIN MENU 2 Press or to select Paper Settings and then press MAIN MENU Paper Settings 3 Press or to select Roll Media Type and then press Paper Settings Roll Media Type 4 Press or to select the paper type and then press the OK button The setting is updated and an equals sign is displayed at left Roll Media Type Plain Paper Note For ...

Page 252: ...ENU 2 Press or to select Paper Settings and then press MAIN MENU Paper Settings 3 Press or to select Manual Pap Type and then press Paper Settings Manual Pap Type Note Manual Pap Type is not displayed unless paper is loaded in the Tray 4 Check the paper type To use this type of paper without changing it press the OK button To change the paper type press or to select another type and then press the...

Page 253: ...Choosing Paper for Printing 5 Press the Online button to bring the printer online Enhanced Printing Options 239 ...

Page 254: ...s Paper Type and then press Paper Settings Cas Paper Type 4 Press or to select the paper type and then press the OK button The setting is updated and an equals sign is displayed at left Cas Paper Type Plain Paper Note For details on paper types see the Paper Reference Guide P 103 By factory default Plain Paper is selected 5 Press the Online button to bring the printer online 240 Enhanced Printing ...

Page 255: ...nd size For instructions on con guring paper settings in the printer driver refer to the following topics as appropriate for your computer and operating system Specifying Paper in the Printer Driver Windows P 242 Specifying Paper in the Printer Driver Mac OS X P 244 Specifying Paper in the Printer Driver Mac OS 9 P 246 Enhanced Printing Options 241 ...

Page 256: ...ill be displayed and printing is not possible 1 Choose Print in the application menu 2 Select the printer in the dialog box and then display the printer driver dialog box P 453 3 Make sure the Main sheet is displayed 4 In the A Media Type list select the type of paper that is loaded 5 Click the Page Setup tab to display the Page Setup sheet 6 In the A Page Size list select the size of the original...

Page 257: ...e select the width of the loaded roll in M Roll Paper Width Note A variety of settings are available in the printer driver to suit different printing applications For details on available printing conditions see Printer Driver Settings Windows P 443 Enhanced Printing Options 243 ...

Page 258: ...ose Page Setup from the application menu to display the Page Attributes dialog box 2 Select the printer in the B Format for list 3 Choose the original size in the C Paper Size list 4 Click F OK to close the dialog box 5 Choose Print in the application menu 6 Access the Main pane 7 In the A Media Type list select the type of paper that is loaded 244 Enhanced Printing Options ...

Page 259: ...er in A Media Source make sure the width of the loaded roll is displayed in B Roll Paper Width Note If the width of the roll loaded in the printer is not shown in B Roll Paper Width click L Printer Information on the Main pane to update the printer information Note A variety of settings are available in the printer driver to suit different printing applications For details on available printing co...

Page 260: ...ect the printer in Chooser 2 Choose Page Setup from the application menu to display the Page Attribute dialog box 3 Choose the original size in the A Page Size list 4 Click I OK to close the dialog box 5 Choose Print in the application menu 6 Make sure the Main pane is displayed 7 In the C Media Type list select the type of paper that is loaded 246 Enhanced Printing Options ...

Page 261: ...layed in B Roll Paper Width Note If the width of the roll loaded in the printer is not shown in B Roll Paper Width click L Printer Information on the Main pane to update the printer information Note A variety of settings are available in the printer driver to suit different printing applications For details on available printing conditions see Printer Driver Settings Mac OS 9 P 511 Enhanced Printi...

Page 262: ... For instructions on resizing originals to match the paper size refer to the following topics as appropriate for your computer and operating system Resizing Originals to Match the Paper Size Windows P 249 Resizing Originals to Match the Paper Size Mac OS X P 251 Resizing Originals to Match the Paper Size Mac OS 9 P 253 Note For better printing results when enlarging photos from a digital camera in...

Page 263: ...er Paper size A3 297 0 420 0 mm 11 7 16 5 in 1 Choose Print in the application menu 2 Select the printer in the dialog box and then display the printer driver dialog box P 453 3 Make sure the Main sheet is displayed 4 In the A Media Type list select the type of paper that is loaded In this case click Plain Paper 5 Select the printing application in the E Print Target list 6 Click the Page Setup ta...

Page 264: ...ion In this case click JIS B4 9 Select the C Enlarged Reduced Printing check box 10 Click D Fit Paper Size 11 Click ISO A3 in the G Paper Size list 12 Con rm the print settings and print as desired Note For tips on con rming print settings see Con rming Print Settings Windows P 447 250 Enhanced Printing Options ...

Page 265: ...e A3 297 0 420 0 mm 11 7 16 5 in 1 Choose Page Setup in the application menu to display the Page Attributes dialog box 2 Select the printer in the B Format for list 3 In C Paper Size click the size of the original In this case click JIS B4 4 Click F OK to close the dialog box 5 Choose Print in the application menu 6 Access the Main pane 7 In the A Media Type list select the type of paper that is l...

Page 266: ... C Paper Size in the Page Attributes dialog box in this case JIS B4 12 Select the D Enlarged Reduced Printing check box 13 Make sure E Fit Media Size is selected 14 Click ISO A3 in the I Media Size list 15 Con rm the print settings and then click M Print to start printing Note For tips on con rming print settings see Con rming Print Settings Mac OS X P 492 252 Enhanced Printing Options ...

Page 267: ... A3 297 0 420 0 mm 11 7 16 5 in 1 Select the printer in Chooser 2 Choose Page Setup from the application menu to display the Page Attribute dialog box 3 In A Page Size click the size of the original In this case click JIS B4 4 Click I OK to close the dialog box 5 Choose Print in the application menu 6 Make sure the Main pane is displayed 7 In the C Media Type list select the type of paper that is ...

Page 268: ...e list 11 Access the Page Setup pane 12 Make sure the B Page Size setting matches the original size as selected in A Page Size in the Page Attribute dialog box in this case JIS B4 13 Select the C Enlarged Reduced Printing check box 14 Make sure D Fit Media Size is selected 254 Enhanced Printing Options ...

Page 269: ...uctions 15 Click ISO A4 in the H Media Size list 16 Con rm the print settings and click N Print to start printing Note For tips on con rming print settings see Con rming Print Settings Mac OS 9 P 514 Enhanced Printing Options 255 ...

Page 270: ...tions on resizing originals to match the roll paper width refer to the following topics as appropriate for your computer and operating system Resizing Originals to Fit the Roll Width Windows P 257 Resizing Originals to Fit the Roll Width Mac OS X P 259 Resizing Originals to Fit the Roll Width Mac OS 9 P 262 Note For better printing results when enlarging photos from a digital camera in TIFF or JPE...

Page 271: ...tion menu 2 Select the printer in the dialog box and then display the printer driver dialog box P 453 3 Make sure the Main sheet is displayed 4 In the A Media Type list select the type of paper that is loaded In this case click Plain Paper 5 Select the printing application in the E Print Target list 6 Click the Page Setup tab to display the Page Setup sheet 7 Click Roll Paper in the L Paper Source...

Page 272: ...E Fit Roll Paper Width Note After you click E Fit Roll Paper Width the Information dialog box is displayed Select the width of the loaded roll in the Roll Paper Width list and click OK Make sure the roll paper width you specify matches the width of the loaded roll 11 Con rm the print settings and print as desired Note For tips on con rming print settings see Con rming Print Settings Windows P 447 ...

Page 273: ... width 16 inches 406 4 mm 1 Choose Page Setup from the application menu to display the Page Attributes dialog box 2 Select the printer in the B Format for list 3 In C Paper Size click the size of the original In this case click ISO A4 4 Click F OK to close the dialog box 5 Choose Print in the application menu 6 Access the Main pane 7 In the A Media Type list select the type of paper that is loaded...

Page 274: ...ce list 11 Make sure the width of the loaded roll is displayed in the B Roll Paper Width list in this case 16 in 406 4mm Note If the width of the loaded roll is not displayed in B Roll Paper Width click L Printer Information on the Main pane and update the printer information 260 Enhanced Printing Options ...

Page 275: ...ze in the Page Attributes dialog box in this case ISO A4 13 Select the D Enlarged Reduced Printing check box 14 Click F Fit Roll Paper Width 15 Con rm the print settings and then click M Print to start printing Note For tips on con rming print settings see Con rming Print Settings Mac OS X P 492 Enhanced Printing Options 261 ...

Page 276: ...per width 16 inches 406 4 mm 1 Select the printer in Chooser 2 Choose Page Setup from the application menu to display the Page Attribute dialog box 3 In A Page Size click the size of the original In this case click ISO A4 4 Click I OK to close the dialog box 5 Choose Print in the application menu 6 Make sure the Main pane is displayed 7 In the C Media Type list select the type of paper that is loa...

Page 277: ... Source list 11 Make sure the width of the loaded roll is displayed in the B Roll Paper Width list in this case 16 in 406 4mm Note If the width of the loaded roll is not displayed in B Roll Paper Width click L Printer on the Main pane and update the printer information Enhanced Printing Options 263 ...

Page 278: ...cted in A Page Size in the Page Attribute dialog box in this case ISO A4 14 Select the C Enlarged Reduced Printing check box 15 Click E Fit Roll Paper Width 16 Con rm the print settings and click N Print to start printing Note For tips on con rming print settings see Con rming Print Settings Mac OS 9 P 514 264 Enhanced Printing Options ...

Page 279: ...caling value to resize originals refer to the following topics as appropriate for your computer and operating system Resizing Originals by Entering a Scaling Value Windows P 266 Resizing Originals by Entering a Scaling Value Mac OS X P 268 Resizing Originals by Entering a Scaling Value Mac OS 9 P 271 Note For better printing results when enlarging photos from a digital camera in TIFF or JPEG forma...

Page 280: ...h A2 A3 roll 420 0 mm 16 5 in Important In borderless printing you cannot resize originals by entering a scaling value 1 Choose Print in the application menu 2 Select the printer in the dialog box and then display the printer driver dialog box P 453 3 Make sure the Main sheet is displayed 4 In the A Media Type list select the type of paper that is loaded In this case click Plain Paper 5 Select the...

Page 281: ...O A4 in the G Paper Size list 12 Click F Scaling and enter 120 Note You can specify enlargement that exceeds the paper size but in this case the portion off the edge of the paper will not be printed If the original size after enlargement or reduction is smaller than the paper size the original is printed in the upper left corner In this case you can center originals by selecting G Print Centered o...

Page 282: ...t In borderless printing you cannot resize originals by entering a scaling value 1 Choose Page Setup in the application menu to display the Page Attributes dialog box 2 Select the printer in the B Format for list 3 In C Paper Size click the size of the original In this case click ISO A4 4 Click F OK to close the dialog box 5 Choose Print in the application menu 6 Access the Main pane 7 In the A Me...

Page 283: ... list 11 Make sure the width of the loaded roll is displayed in the B Roll Paper Width list in this case ISO A2 A3 420 0mm Note If the width of the loaded roll is not displayed in B Roll Paper Width click L Printer Information on the Main pane and update the printer information Enhanced Printing Options 269 ...

Page 284: ...hat exceeds the paper size but in this case the portion off the edge of the paper will not be printed If the original size after enlargement or reduction is smaller than the paper size the original is printed in the upper left corner In this case you can center originals by selecting the J Print Centered check box 15 Con rm the print settings and then click M Print to start printing Note For tips ...

Page 285: ... In borderless printing you cannot resize originals by entering a scaling value 1 Select the printer in Chooser 2 Choose Page Setup from the application menu to display the Page Attribute dialog box 3 In A Page Size click the size of the original In this case click ISO A4 4 Click I OK to close the dialog box 5 Choose Print in the application menu 6 Make sure the Main pane is displayed 7 In the C M...

Page 286: ...ia Source list 11 Make sure the width of the loaded roll is displayed in the B Roll Paper Width list here ISO A2 A3 420 0mm Note If the width of the loaded roll is not displayed in B Roll Paper Width click L Printer on the Main pane and update the printer information 272 Enhanced Printing Options ...

Page 287: ...s the Page Setup pane 13 Make sure the B Page Size setting matches the original size as selected in A Page Size in the Page Attribute dialog box in this case ISO A4 14 Select the C Enlarged Reduced Printing check box Enhanced Printing Options 273 ...

Page 288: ...d If the original size after enlargement or reduction is smaller than the paper size the original is printed in the upper left corner In this case you can center originals by selecting F Print Centered on the Finishing pane 16 Con rm the print settings and click N Print to start printing Note For tips on con rming print settings see Con rming Print Settings Mac OS 9 P 514 274 Enhanced Printing Opt...

Page 289: ...opy function To use Color imageRUNNER Enlargement Copy rst complete these settings in the following order 1 Register a hot folder on your computer Register a hot folder on your computer for storing scanned originals from the Color imageRUNNER and complete the settings for enlargement copy 2 Complete the scanning settings on the Color imageRUNNER Con gure the Color imageRUNNER to send scanned origi...

Page 290: ...lor imageRUNNER Enlargement Copy Setup Manual button of Color imageRUNNER Enlargement Copy utility or refer to the Color imageRUNNER manual Scanning the original and print an enlargement Follow the steps below to scan an original on the Color imageRUNNER for enlarged printing on the printer For detailed instructions refer to the Color imageRUNNER manual 1 Load the original on the platen glass or d...

Page 291: ...ed originals to the hot folder After these settings are complete you can print enlarged copies of scanned originals from the Color imageRUNNER Registering a hot folder on your computer Folders used for Color imageRUNNER Enlargement Copy iR enlargement copy are called hot folders Register a hot folder on your computer for storing scanned originals from the Color imageRUNNER You can specify printing...

Page 292: ...e Color imageRUNNER for enlarged printing on the printer For detailed instructions refer to the Color imageRUNNER manual 1 Load the original on the platen glass or document feeder of the Color imageRUNNER 2 Press Send to display the screen for transmission 3 Press Favorites and then press the Favorites button assigned to the hot folder 4 Press Start on the control panel If you scan originals on th...

Page 293: ...e printed Oversize The margin required by the printer is added around the outside of a regular paper size For example when printing a A4 sized original 210 297 mm you have the following options a Regular paper size Gray area not printed b Page Size c Oversized paper size Print area matches the page size b Important When printing on oversize paper load paper larger than the page size a size that in...

Page 294: ...ndard page size and print on it To specify a non standard paper size in oversized printing register the paper size as a Custom Paper Size Oversized printing is not available with Custom Size P 344 For instructions on oversized printing refer to the following topics as appropriate for your computer and operating system Printing at Full Size Windows P 281 Printing at Full Size Mac OS X P 283 Printin...

Page 295: ...in the dialog box and then display the printer driver dialog box P 453 3 Make sure the Main sheet is displayed 4 In the A Media Type list select the type of paper that is loaded In this case click Plain Paper 5 Click the Page Setup tab to display the Page Setup sheet 6 Click O Size Options to display the Paper Size Options dialog box 7 In the Paper Size Options dialog box select the Oversize check...

Page 296: ...Con rm the print settings and print as desired Note For tips on con rming print settings see Con rming Print Settings Windows P 447 Note You can select Oversize in Display Series to make all oversized versions of paper in the selected Display Series available for printing These sizes are displayed in the Page Size list in the format Oversize xxxxxx 282 Enhanced Printing Options ...

Page 297: ...ay the Page Attributes dialog box 2 Select the printer in the B Format for list 3 In C Paper Size click the size of the original In this case click ISO A4 Oversize Note For oversized printing choose paper identi ed by the regular paper name followed by Oversize 4 Click F OK to close the dialog box 5 Choose Print in the application menu 6 Access the Main pane 7 In the A Media Type list select the t...

Page 298: ...1 Make sure the width of the loaded roll is displayed in the B Roll Paper Width list in this case ISO A2 A3 420 0mm Note If the width of the loaded roll is not displayed in B Roll Paper Width click L Printer Information on the Main pane and update the printer information 284 Enhanced Printing Options ...

Page 299: ... speci ed in C Paper Size in the Page Attributes dialog box in this case ISO A4 Oversize 13 Con rm the print settings and then click M Print to start printing Note For tips on con rming print settings see Con rming Print Settings Mac OS X P 492 Enhanced Printing Options 285 ...

Page 300: ... Choose Page Setup from the application menu to display the Page Attribute dialog box 3 In D Print Area Setting click G For printing oversizes 4 In the A Page Size list click the size of the original In this case click ISO A4 5 Click I OK to close the dialog box 6 Choose Print in the application menu 7 Make sure the Main pane is displayed 8 In the C Media Type list select the type of paper that is...

Page 301: ...r Width list in this case ISO A2 A3 420 0mm Note If the width of the loaded roll is not displayed in B Roll Paper Width click L Printer on the Main pane and update the printer information 13 Con rm the print settings and then click N Print to start printing Note For tips on con rming print settings see Con rming Print Settings Mac OS 9 P 514 Enhanced Printing Options 287 ...

Page 302: ...ion with borderless printing special page layouts centering originals and printing cut lines on rolls You cannot have pages rotated 90 degrees to conserve paper if you have set up borderless printing at actual size or in combination with resizing originals to match the paper size When borderless printing is used the edge of the paper is cut during printing Thus ink density may be uneven at the edg...

Page 303: ... combination with resizing originals to match the paper size This may affect image quality When image quality is most important make the original 3 mm longer on each side than the paper size so that the image can be printed at actual size in borderless printing For instructions on borderless printing of photos and images at actual size refer to the following topics as appropriate for your computer...

Page 304: ...rce application 3 mm 0 12 in larger on each side than 254 0 304 8 mm 10 12 in that is 260 0 310 8 mm 10 2 12 2 in Note If you can specify the margin as in Microsoft Word set the margin at 0 mm For instructions on specifying the margin refer to the software documentation The extra 3 mm 0 12 in on each side will not be printed Create the original so that it ts inside the paper area to be printed on ...

Page 305: ...e B Borderless Printing check box to display the Information dialog box 11 Select the width of the loaded roll in the Roll Paper Width list in this case click 10 in Roll 254 0mm 12 Click OK to close the Information dialog box 13 In C Borderless Printing Method click F Print Image with Actual Size 14 Con rm the print settings and print as desired Note For tips on con rming print settings see Con rm...

Page 306: ...ss Paper Roll Paper type Heavyweight Coated Paper Roll paper width 10 inches 254 0 mm 1 Choose Page Setup from the application menu to display the Page Attributes dialog box 2 Select the printer in the B Format for list 3 In the C Paper Size list choose a paper size supported for borderless printing Here click 10 x12 Borderless Note Paper sizes supported for borderless printing are indicated by Bo...

Page 307: ...up pane 11 Click Roll Paper in the A Media Source list 12 Con rm that the roll paper width matches the paper size Make sure the width of the loaded roll is displayed in the B Roll Paper Width list in this case 10 in 254 0mm Note If the width of the loaded roll is not displayed in B Roll Paper Width click L Printer Information on the Main pane and update the printer information Enhanced Printing Op...

Page 308: ...ize as selected in C Paper Size in the Page Attributes dialog box in this case 10 x12 Borderless 14 Con rm the print settings and then click M Print to start printing Note For tips on con rming print settings see Con rming Print Settings Mac OS X P 492 294 Enhanced Printing Options ...

Page 309: ...m Borderless Paper Roll Paper type Heavyweight Coated Paper Roll width 10 inches 254 0 mm 1 Select the printer in Chooser 2 Choose Page Setup from the application menu to display the Page Attribute dialog box 3 In D Print Area Setting click H For Broderless Printing 4 In the A Page Size list choose a paper size supported for borderless printing Here click 10 x12 Borderless Note Paper sizes support...

Page 310: ... the C Media Type list select the type of paper that is loaded In this case click Heavyweight Coated Paper 10 Select the print target in the F Print Target list 11 Access the Finishing pane 12 Click Roll Paper in the A Media Source list 296 Enhanced Printing Options ...

Page 311: ...idth of the loaded roll is displayed in the B Roll Paper Width list in this case 10 in 254 0mm Note If the width of the loaded roll is not displayed in B Roll Paper Width click L Printer on the Main pane and update the printer information 14 Access the Page Setup pane Enhanced Printing Options 297 ...

Page 312: ...riginal size as selected in A Page Size in the Page Attribute dialog box in this case 10 x12 16 Con rm the print settings and click N Print to start printing Note For tips on con rming print settings see Con rming Print Settings Mac OS 9 P 514 298 Enhanced Printing Options ...

Page 313: ...used in combination with borderless printing special page layouts centering originals and printing cut lines on rolls You cannot have pages rotated 90 degrees to conserve paper if you have set up borderless printing at actual size or in combination with resizing originals to match the paper size When borderless printing is used the edge of the paper is cut during printing Thus ink density may be u...

Page 314: ...e is not printed For instructions on borderless printing of photos images and other documents to match the paper size refer to the following topics as appropriate for your computer and operating system Borderless Printing by Resizing Originals to Match the Paper Size Windows P 301 Borderless Printing by Resizing Originals to Match the Paper Size Mac OS X P 303 Borderless Printing by Resizing Origi...

Page 315: ... 304 8 mm Paper Roll Paper type Heavyweight Coated Paper Roll paper width 10 inches 254 0 mm 1 In the application create an original that takes up the entire space of the paper size Note If you can specify the margin as in Microsoft Word set the margin at 0 mm For instructions on specifying the margin refer to the software documentation 2 Choose Print in the application menu 3 Select the printer i...

Page 316: ... check box to display the Information dialog box 11 Select the width of the loaded roll in the Roll Paper Width list in this case click 10 in Roll 254 0mm 12 Click OK to close the Information dialog box 13 In C Borderless Printing Method click D Fit Paper Size 14 Click Match Page Size in the G Paper Size list 15 Con rm the print settings and print as desired Note For tips on con rming print settin...

Page 317: ...ing Document Any type Page size 10 12 inches 254 0 304 8 mm Paper Roll Paper type Heavyweight Coated Paper Roll paper width 10 inches 254 0 mm 1 Choose Page Setup from the application menu to display the Page Attributes dialog box 2 Select the printer in the B Format for list 3 In the C Paper Size list click the size of the original In this case click 10 x12 Note All sizes are available in borderl...

Page 318: ...dia Type list select the type of paper that is loaded In this case click Heavyweight Coated Paper 9 Select the print target in the E Print Target list 10 Access the Page Setup pane 11 Click Roll Paper in the A Media Source list 304 Enhanced Printing Options ...

Page 319: ...matches the original size as selected in C Paper Size in the Page Attributes dialog box in this case 10 x12 14 Select the D Enlarged Reduced Printing check box 15 Select the H Borderless Printing check box 16 Click E Fit Media Size under D Enlarged Reduced Printing 17 In I Media Size click the paper size In this case click 10 x12 Borderless 18 Con rm the print settings and then click M Print to st...

Page 320: ...rless printing Document Any type Page size 10 12 inches 254 0 304 8 mm Paper Roll Paper type Heavyweight Coated Paper Roll width 10 inches 254 0 mm 1 Select the printer in Chooser 2 Choose Page Setup from the application menu to display the Page Attribute dialog box 3 In the A Page Size list click the size of the original In this case click 10 x12 Note All sizes are available in borderless printin...

Page 321: ... the C Media Type list select the type of paper that is loaded In this case click Heavyweight Coated Paper 9 Select the print target in the F Print Target list 10 Access the Finishing pane 11 Click Roll Paper in the A Media Source list Enhanced Printing Options 307 ...

Page 322: ...splayed in the B Roll Paper Width list in this case 10 in 254 0mm Note If the width of the loaded roll is not displayed in B Roll Paper Width click L Printer on the Main pane and update the printer information 13 Access the Page Setup pane 308 Enhanced Printing Options ...

Page 323: ...Reduced Printing check box 16 Select the G Borderless Printing check box 17 Click D Fit Media Size under C Enlarged Reduced Printing 18 In H Media Size click the paper size In this case click 10 x12 Borderless 19 Con rm the print settings and click N Print to start printing Note For tips on con rming print settings see Con rming Print Settings Mac OS 9 P 514 Enhanced Printing Options 309 ...

Page 324: ...ed in combination with borderless printing special page layouts centering originals and printing cut lines on rolls You cannot have pages rotated 90 degrees to conserve paper if you have set up borderless printing at actual size or in combination with resizing originals to match the paper size When borderless printing is used the edge of the paper is cut during printing Thus ink density may be une...

Page 325: ... width in borderless printing For instructions on borderless printing of photos images and other documents to match the roll paper width refer to the following topics as appropriate for your computer and operating system Borderless Printing by Resizing Originals to Fit the Roll Width Windows P 312 Borderless Printing by Resizing Originals to Fit the Roll Width Mac OS X P 314 Borderless Printing by...

Page 326: ... 8 3 11 7 in Paper Roll Paper type Heavyweight Coated Paper Roll paper width 10 inches 254 0 mm 1 In the application create an original that takes up the entire space of the paper size Note If you can specify the margin as in Microsoft Word set the margin at 0 mm For instructions on specifying the margin refer to the software documentation 2 Choose Print in the application menu 3 Select the printe...

Page 327: ... Borderless Printing check box to display the Information dialog box 11 Select the width of the loaded roll in the Roll Paper Width list in this case click 10 in Roll 254 0mm 12 Click OK to close the Information dialog box 13 In C Borderless Printing Method make sure E Scale to t Roll Paper Width is selected 14 Con rm the print settings and print as desired Note For tips on con rming print setting...

Page 328: ... type Page size A4 210 0 297 0 mm Letter 8 3 11 7 in Paper Roll Paper type Heavyweight Coated Paper Roll paper width 10 inches 254 0 mm 1 Choose Page Setup from the application menu to display the Page Attributes dialog box 2 Select the printer in the B Format for list 3 In C Paper Size click the size of the original In this case click ISO A4 Note All sizes are available in borderless printing if ...

Page 329: ...get list 10 Access the Page Setup pane 11 Click Roll Paper in the A Media Source list 12 Make sure the width of the loaded roll is displayed in the B Roll Paper Width list here 10 in 254 0mm Note If the width of the loaded roll is not displayed in B Roll Paper Width click L Printer Information on the Main pane and update the printer information Enhanced Printing Options 315 ...

Page 330: ...ct the D Enlarged Reduced Printing check box 15 Select the H Borderless Printing check box This ensures that F Fit Roll Paper Width is automatically selected in D Enlarged Reduced Printing 16 Con rm the print settings and then click M Print to start printing Note For tips on con rming print settings see Con rming Print Settings Mac OS X P 492 316 Enhanced Printing Options ...

Page 331: ... printing Document Any type Page size A4 210 0 297 0 mm Letter 8 3 11 7 in Paper Roll Paper type Heavyweight Coated Paper Roll width 10 inches 254 0 mm 1 Select the printer in Chooser 2 Choose Page Setup from the application menu to display the Page Attribute dialog box 3 In A Page Size click the size of the original In this case click ISO A4 Note All sizes are available in borderless printing if ...

Page 332: ... the C Media Type list select the type of paper that is loaded In this case click Heavyweight Coated Paper 9 Select the print target in the F Print Target list 10 Access the Finishing pane 11 Click Roll Paper in the A Media Source list 318 Enhanced Printing Options ...

Page 333: ...splayed in the B Roll Paper Width list in this case 10 in 254 0mm Note If the width of the loaded roll is not displayed in B Roll Paper Width click L Printer on the Main pane and update the printer information 13 Access the Page Setup pane Enhanced Printing Options 319 ...

Page 334: ...ect the C Enlarged Reduced Printing check box 16 Select the G Borderless Printing check box This ensures that E Fit Roll Paper Width is automatically selected in C Enlarged Reduced Printing 17 Con rm the print settings and click N Print to start printing Note For tips on con rming print settings see Con rming Print Settings Mac OS 9 P 514 320 Enhanced Printing Options ...

Page 335: ...on with borderless printing special page layouts centering originals and printing cut lines on rolls You cannot have pages rotated 90 degrees to conserve paper if you have set up borderless printing at actual size or in combination with resizing originals to match the paper size When borderless printing is used the edge of the paper is cut during printing Thus ink density may be uneven at the edge...

Page 336: ...combination with resizing originals to match the paper size This may affect image quality When image quality is most important make the original 3 mm longer on each side than the paper size so that the image can be printed at actual size in borderless printing For instructions on borderless printing of photos and images at actual size refer to the following topics as appropriate for your computer ...

Page 337: ...ce application 3 mm 0 12 in larger on each side than 254 0 304 8 mm 10 12 in that is 260 0 310 8 mm 10 2 12 2 in Note If you can specify the margin as in Microsoft Word set the margin at 0 mm For instructions on specifying the margin refer to the software documentation The extra 3 mm 0 12 in on each side will not be printed Create the original so that it ts inside the paper area to be printed on 2...

Page 338: ... B Borderless Printing check box to display the Information dialog box 11 Select the width of the loaded roll in the Roll Paper Width list in this case click 10 in Roll 254 0mm 12 Click OK to close the Information dialog box 13 In C Borderless Printing Method click F Print Image with Actual Size 14 Con rm the print settings and print as desired Note For tips on con rming print settings see Con rmi...

Page 339: ...s Paper Roll Paper type Heavyweight Coated Paper Roll paper width 10 inches 254 0 mm 1 Choose Page Setup from the application menu to display the Page Attributes dialog box 2 Select the printer in the B Format for list 3 In the C Paper Size list choose a paper size supported for borderless printing Here click 10 x12 Borderless Note Paper sizes supported for borderless printing are indicated by Bor...

Page 340: ...p pane 11 Click Roll Paper in the A Media Source list 12 Con rm that the roll paper width matches the paper size Make sure the width of the loaded roll is displayed in the B Roll Paper Width list in this case 10 in 254 0mm Note If the width of the loaded roll is not displayed in B Roll Paper Width click L Printer Information on the Main pane and update the printer information 326 Enhanced Printing...

Page 341: ...ze as selected in C Paper Size in the Page Attributes dialog box in this case 10 x12 Borderless 14 Con rm the print settings and then click M Print to start printing Note For tips on con rming print settings see Con rming Print Settings Mac OS X P 492 Enhanced Printing Options 327 ...

Page 342: ... Borderless Paper Roll Paper type Heavyweight Coated Paper Roll width 10 inches 254 0 mm 1 Select the printer in Chooser 2 Choose Page Setup from the application menu to display the Page Attribute dialog box 3 In D Print Area Setting click H For Broderless Printing 4 In the A Page Size list choose a paper size supported for borderless printing Here click 10 x12 Borderless Note Paper sizes supporte...

Page 343: ...the C Media Type list select the type of paper that is loaded In this case click Heavyweight Coated Paper 10 Select the print target in the F Print Target list 11 Access the Finishing pane 12 Click Roll Paper in the A Media Source list Enhanced Printing Options 329 ...

Page 344: ...dth of the loaded roll is displayed in the B Roll Paper Width list in this case 10 in 254 0mm Note If the width of the loaded roll is not displayed in B Roll Paper Width click L Printer on the Main pane and update the printer information 14 Access the Page Setup pane 330 Enhanced Printing Options ...

Page 345: ...iginal size as selected in A Page Size in the Page Attribute dialog box in this case 10 x12 16 Con rm the print settings and click N Print to start printing Note For tips on con rming print settings see Con rming Print Settings Mac OS 9 P 514 Enhanced Printing Options 331 ...

Page 346: ...printing in Mac OS X For instructions on printing vertical or horizontal banners refer to the following topics as appropriate for your computer and operating system Printing Vertical or Horizontal Banners Large Format Printing Windows P 333 Printing Vertical or Horizontal Banners Large Format Printing Mac OS X P 337 Printing Vertical or Horizontal Banners Large Format Printing Mac OS 9 P 340 Impor...

Page 347: ... the application create an original in the size you registered 3 Print the banner using the settings that correspond to banners Registering a Custom Paper Size This example describes how to register a paper size that is horizontally elongated and suitable for banners in either horizontal or vertical format 1 Display the printer driver dialog box P 455 2 Click the Page Setup tab to display the Page...

Page 348: ...t If My Horizontal Banner is not listed make sure this printer is selected as the printer to use In applications such as Microsoft PowerPoint that do not enable you to choose registered paper sizes use the custom paper size setting in Custom and specify 100 500 mm 3 9 19 7 in 4 Set the printing orientation to horizontal 5 Create the banner Printing the banner Follow the steps below to print the ba...

Page 349: ...g check box Note If the Enlarged Reduced Printing check box is not displayed on the Page Setup sheet clear the B Borderless Printing check box 9 Click Roll Paper in the L Paper Source list 10 After you click E Fit Roll Paper Width the Information dialog box is displayed 11 Select the width of the loaded roll in the Roll Paper Width list In this case click 16 in Roll 406 4mm and then click OK Enhan...

Page 350: ...on rming print settings see Con rming Print Settings Windows P 447 Note If printing is unsuccessful you may be able to print after completing the following setting 1 On the Layout sheet click M Special Settings to display the Special Settings dialog box 2 In the FineZoom Settings list click Yes 336 Enhanced Printing Options ...

Page 351: ... on Mac OS X 10 4 The method of setting up non standard paper sizes varies depending on the version of Mac OS X Register a Custom Page Size This example describes how to register and print using a page size that is horizontally elongated and suitable for banners in either horizontal or vertical format 1 Create the document in the application 2 Choose Page Setup from the application menu to display...

Page 352: ...ialog box Print the banner Follow the steps below to print the banner using the corresponding banner settings 1 Choose Print in the application menu 2 Access the Main pane 3 In the A Media Type list select the type of paper that is loaded In this case click Plain Paper 4 After con rming that D Easy Settings is selected click POP in the E Print Target list 5 Access the Page Setup pane 6 Click Roll ...

Page 353: ...er Width click L Printer Information on the Main pane and update the printer information 8 In C Page Size make sure 100 500 is displayed as registered in Page Setup 9 Select the D Enlarged Reduced Printing check box 10 Click F Fit Roll Paper Width 11 Con rm the print settings and click M Print to start printing Note For tips on con rming print settings see Con rming Print Settings Mac OS X P 492 E...

Page 354: ...tend to be in non standard sizes so register a Custom Paper Size In this example 100 500 mm 3 9 19 7 in is registered 3 Print the banner using the settings that correspond to banners Register a Custom Paper Size This example describes how to register and print using a page size that is horizontally elongated and suitable for banners in either horizontal or vertical format 1 Create the document in ...

Page 355: ... document in landscape orientation 12 Click I OK to close the dialog box Print the banner Follow these steps to print the banner using the corresponding banner settings 1 Choose Print in the application menu 2 Make sure the Main pane is displayed 3 In the C Media Type list select the type of paper that is loaded In this case click Plain Paper 4 After con rming that E Easy Settings is selected clic...

Page 356: ... Media Source list 7 Make sure the width of the loaded roll is displayed in the B Roll Paper Width list in this case 10 in 254 0mm Note If the width of the loaded roll is not displayed in B Roll Paper Width click L Printer on the Main pane and update the printer information 342 Enhanced Printing Options ...

Page 357: ...Banner is displayed as registered in Media Design 10 Select the C Enlarged Reduced Printing check box 11 Click E Fit Roll Paper Width 12 Con rm the print settings and then click N Print to start printing Note For tips on con rming print settings see Con rming Print Settings Mac OS 9 P 514 Enhanced Printing Options 343 ...

Page 358: ...source is set to Cassette Specifying custom media sizes for temporary use Because these are sizes you specify temporarily in the printer driver the sizes will not be available after you exit the application If you want to set up a non standard paper size so that it will always be available we recommend registering the paper size in the printer driver Note These temporary paper sizes you register o...

Page 359: ...d dimensions 430 430 mm 16 9 16 9 in Paper Sheets Manual Paper type Plain Paper Paper size A square sheet 430 430 mm 16 9 16 9 in 1 Load the square paper 430 430 mm 16 9 16 9 in in the Top Paper Feed Slot 2 Choose Print in the source application menu 3 Select the printer in the dialog box and then display the printer driver dialog box P 453 4 Make sure the Main sheet is displayed 5 In the A Media ...

Page 360: ... instructions on con rming print settings see Con rming Print Settings Windows P 447 Printing by using Custom Paper Size This section describes how to print using Custom Paper Size based on the following example First register a non standard paper size called 430 mm Square as a Custom Paper Size Document Scanned image Page size A square sheet 430 430 mm 16 9 16 9 in Paper Sheets Manual Paper type ...

Page 361: ... Size Options dialog box 9 Complete the following settings in the Paper Size Options dialog box 1 Enter a desired paper name in Custom Paper Size Name 430 mm Square is used in this example 2 Select mm or inch in Units 3 Enter 430 16 9 in in both Width and Height Note If you select the Fix the Ratio of the Width to Height check box after you enter a value in either Width or Height the other value w...

Page 362: ...in the L Paper Source list 13 In the A Page Size list click the size you added 430 mm Square 14 Con rm the print settings and print as desired Note For instructions on con rming print settings see Con rming Print Settings Windows P 447 348 Enhanced Printing Options ...

Page 363: ...n the Top Paper Feed Slot 3 Choose Page Setup from the application menu to display the Page Attributes dialog box 4 Select the printer in the B Format for list 5 Click Manage Custom Sizes in the C Paper Size list to display the Custom Page Sizes dialog box 6 In Page Size enter the height and width of the original Here enter 43 00 cm in Height and Width 7 In Printer Margins enter 0 3 for the top an...

Page 364: ...ttings is selected click Scanned Image in the E Print Target list 16 Access the Page Setup pane 17 Click Manual in the A Media Source list 18 In D Easy Settings make sure 430 430 is displayed as registered in Page Setup 19 Con rm the print settings and then click M Print to start printing Note For tips on con rming print settings see Con rming Print Settings Mac OS X P 492 350 Enhanced Printing Op...

Page 365: ...sheet 430 430 mm 16 9 16 9 in 1 Create the document in the application 2 Load the square paper 430 430 mm 16 9 16 9 in in the Top Paper Feed Slot 3 Select the printer in Chooser 4 Choose Page Setup in the application menu to display the Page Attribute dialog box 5 Click Media Design in the Page Attribute list to display the Media Design pane 6 Enter a paper name of your choice in B Custom Name 430...

Page 366: ...1 In D Print Area Setting click F For Manual printing 12 Click I OK to close the dialog box 13 Choose Print in the application menu 14 Make sure the Main pane is displayed 15 In the C Media Type list select the type of paper that is loaded In this case click Plain Paper 16 After con rming that E Easy Settings is selected click Scanned Image in the F Print Target list 352 Enhanced Printing Options ...

Page 367: ...ccess the Finishing pane 18 Click Manual in the A Media Source list 19 Con rm the print settings and then click N Print to start printing Note For tips on con rming print settings see Con rming Print Settings Mac OS 9 P 514 Enhanced Printing Options 353 ...

Page 368: ...owser screen shots next to each other on single sheets you can create highly expressive presentation materials easy to understand meeting materials and a variety of other printed documents Free Layout Windows Besides combining multiple pages in a single page layout you can combine originals from multiple les even multiple source applications in a single page layout 354 Enhanced Printing Options ...

Page 369: ...e source applications in a single page layout Important The driver must be installed from the User Software CD ROM to use this function For instructions on arranging originals from multiple applications refer to the following topics Printing Multiple Originals Next to Each Other Windows P 356 Printing Multiple Originals Next to Each Other Mac OS X P 358 Enhanced Printing Options 355 ...

Page 370: ...he Free Layout function 1 Choose Print in the application menu 2 Select the printer in the dialog box and then open the printer driver dialog box P 453 3 Make sure the Main sheet is displayed 4 Click the Layout tab to display the Layout sheet 5 Select the A Page Layout check box 6 Click Free Layout in the B Page Layout list 356 Enhanced Printing Options ...

Page 371: ...yout window as desired Important Without closing the imagePROGRAF Free Layout window repeat steps 1 7 to arrange originals from multiple applications on the same page Note For instructions on editing and rearranging images refer to the imagePROGRAF Free Layout help topic 9 Print from the imagePROGRAF Free Layout menu Note For details on imagePROGRAF Free Layout functions refer to Free Layout Enhan...

Page 372: ...elect Canon imagePROGRAF Free Layout 3 The Canon imagePROGRAF Free Layout window is displayed 4 Edit and rearrange the image in the Canon imagePROGRAF Free Layout window as desired Important Without closing the Canon imagePROGRAF Free Layout window repeat steps 1 7 to arrange originals from multiple applications on the same page Note For instructions on editing and rearranging images refer to the ...

Page 373: ...Tiling and multiple pages per sheet 5 Print from the Canon imagePROGRAF Free Layout menu Note For details on Canon imagePROGRAF Free Layout functions refer to Free Layout Enhanced Printing Options 359 ...

Page 374: ...nting settings for conserving paper number of copies borderless printing enlargement or reduction and other layout related settings are disregarded For instructions on borderless printing of photos and images at actual size refer to the following topics as appropriate for your computer and operating system Printing Multiple Pages Continuously Windows P 361 Printing Multiple Pages Continuously Mac ...

Page 375: ...tings for conserving paper number of copies borderless printing enlargement or reduction and other layout related settings are disregarded 1 Choose Print in the application menu 2 Select the printer in the dialog box and then display the printer driver dialog box P 453 3 Make sure the Main sheet is displayed 4 In the A Media Type list click the type of paper that is loaded 5 Click the Page Setup t...

Page 376: ...ns to display the Roll Paper Options dialog box 8 Select the B Banner Printing check box 9 Click OK 10 Con rm the print settings and print as desired Note For tips on con rming print settings see Con rming Print Settings Windows P 447 362 Enhanced Printing Options ...

Page 377: ...ber of copies borderless printing enlargement or reduction and other layout related settings are disregarded 1 Choose Page Setup in the application menu to display the Page Attributes dialog box 2 Select the printer in the B Format for list 3 Click the original size in the C Paper Size list 4 Click F OK to close the dialog box 5 In the source application menu choose Print 6 Access the Main pane 7 ...

Page 378: ...ge Setup pane 10 Click Roll Paper Banner in the A Media Source list 11 Con rm the print settings and then click M Print to start printing Note For tips on con rming print settings see Con rming Print Settings Mac OS X P 492 364 Enhanced Printing Options ...

Page 379: ...er of copies borderless printing enlargement or reduction and other layout related settings are disregarded 1 Select the printer in Chooser 2 Choose Page Setup from the application menu to display the Page Attribute dialog box 3 Click the original size in the A Page Size list 4 Click I OK to close the dialog box 5 In the source application menu choose Print 6 Make sure the Main pane is displayed 7...

Page 380: ...nishing pane 10 Click Roll Paper Banner in the A Media Source list 11 Con rm the print settings and then click N Print to start printing Note For tips on con rming print settings see Con rming Print Settings Mac OS 9 P 514 366 Enhanced Printing Options ...

Page 381: ... on a single sheet You can also change the page layout order and print page boundary lines as desired Important This function cannot be combined with the following options Borderless Printing Resizing to Fit the Roll Width Windows Scaling Originals Windows Banner Printing Windows For instructions on printing multiple pages per sheet refer to the following topics as appropriate for your computer an...

Page 382: ... in the application menu 2 Select the printer in the dialog box and then display the printer driver dialog box P 453 3 Make sure the Main sheet is displayed 4 In the A Media Type list select the type of paper that is loaded In this case click Plain Paper 5 Select the type of document in the E Print Target list 6 Click the Page Setup tab to display the Page Setup sheet 7 In A Page Size click the si...

Page 383: ...t in the B Page Layout list Note You can select the layout order for placing four pages on a sheet and a frame border in the Page Layout Printing dialog box by clicking C Set 12 Con rm the print settings and print as desired Note For instructions on con rming print settings see Con rming Print Settings Windows P 447 Enhanced Printing Options 369 ...

Page 384: ...oose Page Setup in the application menu to display the Page Attributes dialog box 2 Select the printer in the B Format for list 3 In the C Paper Size list click the size of the original In this case click ISO A4 4 Click F OK to close the dialog box 5 Choose Print in the application menu 6 Access the Layout pane 7 Click 4 0 in the A Pages per Sheet list Note You can choose the layout order and spec...

Page 385: ...In this case click Plain Paper 10 Select the printing application in the E Print Target list 11 Access the Page Setup pane 12 Click Cassette in the A Media Source list 13 Make sure C Page Size shows the original size as speci ed in C Paper Size in the Page Attributes dialog box in this case ISO A4 Enhanced Printing Options 371 ...

Page 386: ... multiple pages per sheet 14 Con rm the print settings and then click M Print to start printing Note For tips on con rming print settings see Con rming Print Settings Mac OS X P 492 372 Enhanced Printing Options ...

Page 387: ...mm Letter 8 3 11 7 in 1 Select the printer in Chooser 2 Choose Page Setup in the application menu to display the Page Attribute dialog box 3 In the A Page Size list click the size of the original In this case click ISO A4 4 Click I OK to close the dialog box 5 Choose Print in the application menu 6 Make sure the Main pane is displayed 7 In the C Media Type list select the type of paper that is loa...

Page 388: ...oose the layout order and specify a boundary line for the four pages in J Layout Direction and K Page Border 12 Access the Finishing pane 13 Click Cassette in the A Media Source list 14 Con rm the print settings and then click N Print to start printing Note For tips on con rming print settings see Con rming Print Settings Mac OS 9 P 514 374 Enhanced Printing Options ...

Page 389: ...ger than the maximum supported paper size of the printer Page Layout Choose poster printing For instructions on printing large posters refer to the following topics as appropriate for your computer and operating system Printing Large Posters Windows P 376 Printing Large Posters Mac OS 9 P 378 Note This method of poster printing is supported in Windows and Mac OS 9 Enhanced Printing Options 375 ...

Page 390: ... Document Poster Page size A2 420 0 594 0 mm 16 5 23 4 in Paper Sheets Manual Paper Type Glossy Paper Paper size A2 420 0 594 0 mm 16 5 23 4 in 1 Choose Print in the application menu 2 Select the printer in the dialog box and then display the printer driver dialog box P 453 3 Make sure the Main sheet is displayed 4 In the A Media Type list select the type of paper that is loaded In this case click...

Page 391: ...B Page Layout list Note Follow the steps below to print only a portion of the poster as divided for printing 1 Click C Set under B Page Layout to display the Pages to Print dialog box 2 On the Pages to Print dialog box clear the check boxes of the portion you do not want to print 3 Click OK to close the Pages to Print dialog box 12 Con rm the print settings and print as desired Note For instructio...

Page 392: ...e Glossy Paper Paper size A2 420 0 594 0 mm 16 5 23 4 in 1 Select the printer in Chooser 2 Choose Page Setup from the application menu to display the Page Attribute dialog box 3 In the A Page Size list click the size of the original In this case click ISO A2 4 In D Print Area Setting click F For Manual printing 5 Click I OK to close the dialog box 6 Choose Print in the application menu 7 Make sure...

Page 393: ... the Pages to Print dialog box clear the check boxes of any portion you do not want to print 14 Access the Finishing pane 15 Click Paper Tray Feed in the A Media Source list 16 Con rm the print settings and then click N Print to start printing Note For tips on con rming print settings see Con rming Print Settings Mac OS 9 P 514 Enhanced Printing Options 379 ...

Page 394: ...l paper width you can center them relative to the width when printing Print Centered Aligns the center of the original with the center of the roll relative to the width For instructions on centering originals when printing on rolls refer to the following topics as appropriate for your computer and operating system Printing Originals Centered on Rolls Windows P 381 Printing Originals Centered on Ro...

Page 395: ...the application menu 2 Select the printer in the dialog box and then display the printer driver dialog box P 453 3 Make sure the Main sheet is displayed 4 In the A Media Type list select the type of paper that is loaded In this case click Plain Paper 5 Select the print target in the E Print Target list 6 Click the Page Setup tab to display the Page Setup sheet 7 In the A Page Size list click the s...

Page 396: ...Roll Paper Width list in this case ISO A3 A4 Roll 297 0mm 10 Click the Layout tab to display the Layout sheet 11 Select the G Print Centered check box 12 Con rm the print settings and print as desired Note For tips on con rming print settings see Con rming Print Settings Windows P 447 382 Enhanced Printing Options ...

Page 397: ...m 11 7 in 1 Choose Page Setup from the application menu to display the Page Attributes dialog box 2 Select the print target in the B Format for list 3 In C Paper Size click the size of the original In this case click ISO A4 4 Click F OK to close the dialog box 5 Choose Print in the application menu 6 Access the Main pane 7 In the A Media Type list select the type of paper that is loaded In this ca...

Page 398: ... 11 Make sure the width of the loaded roll is displayed in the B Roll Paper Width list in this case 10 in Roll Note If the width of the loaded roll is not displayed in B Roll Paper Width click L Printer Information on the Main pane and update the printer information 384 Enhanced Printing Options ...

Page 399: ...ed in C Paper Size in the Page Attributes dialog box in this case ISO A4 13 Select the J Print Centered check box 14 Con rm the print settings and click M Print to start printing Note For tips on con rming print settings see Con rming Print Settings Mac OS X P 492 Enhanced Printing Options 385 ...

Page 400: ... mm 11 7 in 1 Select the printer in Chooser 2 Choose Page Setup from the application menu to display the Page Attribute dialog box 3 In A Page Size click the size of the original In this case click ISO A4 4 Click I OK to close the dialog box 5 Choose Print in the application menu 6 Make sure the Main pane is displayed 7 In the C Media Type list select the type of paper that is loaded In this case ...

Page 401: ...cess the Page Setup pane 10 Make sure the B Page Size setting matches the original size as selected in A Page Size in the Page Attribute dialog box in this case ISO A4 11 Access the Finishing pane Enhanced Printing Options 387 ...

Page 402: ...7 0mm Note If the width of the loaded roll is not displayed in B Roll Paper Width click L Printer on the Main pane and update the printer information 14 Select the F Print Centered check box 15 Con rm the print settings and click N Print to start printing Note For tips on con rming print settings see Con rming Print Settings Mac OS 9 P 514 388 Enhanced Printing Options ...

Page 403: ... be aligned in the upper left corner of the paper In this case you can center originals on sheets when printing Print Centered Aligns the center of the original with the center of the sheet For instructions on centering originals when printing on sheets refer to the following topics as appropriate for your computer and operating system Printing Originals Centered on Sheets Windows P 390 Printing O...

Page 404: ...elect the printer in the dialog box and then display the printer driver dialog box P 453 3 Make sure the Main sheet is displayed 4 In the A Media Type list select the type of paper that is loaded In this case click Plain Paper 5 Select the type of document in the E Print Target list 6 Click the Page Setup tab to display the Page Setup sheet 7 In A Page Size click the size of the original as speci ...

Page 405: ...nd print as desired Note For instructions on con rming print settings see Con rming Print Settings Windows P 447 Important If you have selected Cut Sheet as the media source follow the instructions on the printer control panel to enter the paper size If you have selected Manual as the media source but have not loaded the paper yet follow the instructions on the printer control panel to complete th...

Page 406: ... Choose Page Setup from the application menu to display the Page Attributes dialog box 2 In the C Paper Size list click the size of the original In this case click ISO A4 3 Click F OK to close the dialog box 4 In the application software menu choose Print 5 Access the Main pane 6 In the A Media Type list select the type of paper that is loaded In this case click Plain Paper 7 Select the printing a...

Page 407: ...ings and then click M Print to start printing Note For tips on con rming print settings see Con rming Print Settings Mac OS X P 492 Important If you have selected Cut Sheet as the media source follow the instructions on the printer control panel to enter the paper size If you have selected Manual as the media source but have not loaded the paper yet follow the instructions on the printer control p...

Page 408: ...e Page Setup from the source application menu to display the Page Attribute dialog box 2 In the A Page Size list click the size of the original In this case click ISO A4 3 Click I OK to close the dialog box 4 In the source application menu choose Print 5 Make sure the Main pane is displayed 6 In the C Media Type list select the type of paper that is loaded In this case click Plain Paper 7 Select t...

Page 409: ...als 8 Access the Page Setup pane 9 Make sure B Page Size shows the original size as speci ed in Page Setup in the Page Attribute dialog box in this case ISO A4 10 Access the Finishing pane Enhanced Printing Options 395 ...

Page 410: ...settings see Con rming Print Settings Mac OS 9 P 514 Important If you have selected Cut Sheet as the media source follow the instructions on the printer control panel to enter the paper size If you have selected Manual as the media source but have not loaded the paper yet follow the instructions on the printer control panel to complete the size setting before loading the paper 396 Enhanced Printin...

Page 411: ...he roll width This enables you to conserve paper Important If the page would exceed the roll paper width after rotation use this function with Scale to t Roll Paper Width to print rotated pages For tips on conserving roll paper refer to the following topics as appropriate for your computer and operating system Conserving Roll Paper by Rotating Originals 90 Degrees Windows P 398 Conserving Roll Pap...

Page 412: ...ple illustrates how to rotate an A4 210 0 297 0 mm Letter 8 3 11 7 in original in portrait orientation 90 degrees to t within the width of A3 A4 roll paper 297 0 mm 11 7 in which enables you to conserve paper 1 Choose Print in the application menu 2 Select the printer in the dialog box and then open the printer driver dialog box P 453 3 Make sure the Main sheet is displayed 4 In the A Media Type l...

Page 413: ...l Paper in the L Paper Source list 8 Select the width of the loaded roll in the M Roll Paper Width list in this case ISO A3 A4 Roll 297 0mm 9 Select the K Rotate Page 90 degrees Conserve Paper check box 10 Con rm the print settings and print as desired Note For tips on con rming print settings see Con rming Print Settings Windows P 447 Enhanced Printing Options 399 ...

Page 414: ...0 0 297 0 mm Letter 8 3 11 7 in original in portrait orientation 90 degrees to t within the width of A3 A4 roll 297 0 mm 11 7 in which enables you to conserve paper 1 Choose Page Setup in the application menu to display the Page Attributes dialog box 2 Select the printer in the B Format for list 3 In the C Paper Size list click the size of the original In this case click ISO A4 4 Click F OK to clo...

Page 415: ...st 10 Make sure the width of the loaded roll is displayed in B Roll Paper Width in this case ISO A3 A4 297 0mm Note If the width of the loaded roll is not displayed in B Roll Paper Width click L Printer Information on the Main pane and update the printer information Enhanced Printing Options 401 ...

Page 416: ...C Paper Size in the Page Attributes dialog box in this case ISO A4 12 Select the L Rotate Page 90 degrees check box 13 Con rm the print settings and then click M Print to start printing Note For tips on con rming print settings see Con rming Print Settings Mac OS X P 492 402 Enhanced Printing Options ...

Page 417: ...297 0 mm Letter 8 3 11 7 in original in portrait orientation 90 degrees to t within the width of A3 A4 roll 297 0 mm 11 7 in which enables you to conserve paper 1 Select the printer in Chooser 2 Choose Page Setup from the application menu to display the Page Attribute dialog box 3 In the A Page Size list click the size of the original In this case click ISO A4 4 Click I OK to close the dialog box ...

Page 418: ...ISO A3 A4 297 0mm Note If the width of the loaded roll is not displayed in B Roll Paper Width click L Printer on the Main pane and update the printer information 11 Select the I Rotate Page 90 degrees check box 12 Con rm the print settings and then click N Print to start printing Note For tips on con rming print settings see Con rming Print Settings Mac OS 9 P 514 404 Enhanced Printing Options ...

Page 419: ...printing If you have chosen poster as the type of page layout Note Even during borderless printing you can print without the top and bottom margins Printing without the top and bottom margins may cause inconsistency in the size of printed documents depending on the layout of images or text in your originals For tips on conserving roll paper refer to the following topics as appropriate for your com...

Page 420: ...per Roll paper width A3 A4 roll 297 0 mm 11 7 in 1 Choose Print in the application menu 2 Select the printer in the dialog box and then display the printer driver dialog box P 453 3 Make sure the Main sheet is displayed 4 In the A Media Type list select the type of paper that is loaded In this case click Plain Paper 5 Click the Page Setup tab to display the Page Setup sheet 6 In the A Page Size li...

Page 421: ...idth list in this case ISO A3 A4 Roll 297 0mm 9 Click the Layout tab to display the Layout sheet 10 Select the I No Spaces at Top or Bottom Conserve Paper check box 11 Con rm the print settings and print as desired Note For tips on con rming print settings see Con rming Print Settings Windows P 447 Enhanced Printing Options 407 ...

Page 422: ... Roll Paper type Plain Paper Roll paper width A3 A4 roll 297 0 mm 11 7 in 1 Choose Page Setup from the application menu to display the Page Attributes dialog box 2 Select the print target in the B Format for list 3 In C Paper Size click the size of the original In this case click ISO A4 4 Click F OK to close the dialog box 5 Choose Print in the application menu 6 Access the Main pane 7 In the A Me...

Page 423: ...st 10 Make sure the width of the loaded roll is displayed in B Roll Paper Width in this case ISO A3 A4 297 0mm Note If the width of the loaded roll is not displayed in B Roll Paper Width click L Printer Information on the Main pane and update the printer information Enhanced Printing Options 409 ...

Page 424: ... C Paper Size in the Page Attributes dialog box in this case ISO A4 12 Select the K No Spaces at Top or Bottom check box 13 Con rm the print settings and click M Print to start printing Note For tips on con rming print settings see Con rming Print Settings Mac OS X P 492 410 Enhanced Printing Options ...

Page 425: ...per Roll Paper type Plain Paper Roll paper width A3 A4 roll 297 0 mm 11 7 in 1 Select the printer in Chooser 2 Choose Page Setup from the application menu to display the Page Attribute dialog box 3 In A Page Size click the size of the original In this case click ISO A4 4 Click I OK to close the dialog box 5 Choose Print in the application menu 6 Make sure the Main pane is displayed 7 In the C Medi...

Page 426: ...A3 A4 297 0mm Note If the width of the loaded roll is not displayed in B Roll Paper Width click L Printer on the Main pane and update the printer information 11 Select the H No Spaces at Top or Bottom check box 12 Con rm the print settings and click N Print to start printing Note For tips on con rming print settings see Con rming Print Settings Mac OS 9 P 514 412 Enhanced Printing Options ...

Page 427: ...print layout on the preview screen Open Preview When Print Job Starts Windows While viewing the preview screen you can also adjust orientation or other settings and your changes will be instantly applied on the preview screen Note Under some settings and in some environments PageComposer may be started Enhanced Printing Options 413 ...

Page 428: ...ntly applied on the preview screen Important The driver must be installed from the User Software CD ROM to use this function For instructions on how to check the layout before printing refer to the following topics Checking the Layout in a Preview Before Printing Windows P 415 Checking the Layout Before Printing Mac OS X P 417 414 Enhanced Printing Options ...

Page 429: ... printer in the dialog box and then display the printer driver dialog box P 453 3 Make sure the Main sheet is displayed 4 Select the L Open Preview When Print Job Starts check box 5 After you click OK when you print a job the imagePROGRAF Preview window will be displayed Note If PageComposer is running access the Special Settings dialog box from the Layout sheet and clear Enable Preview Switching ...

Page 430: ...rinting 6 On the main window you can check the layout and change settings as needed 7 To print click Start Printing in the File menu Note For details on imagePROGRAF Preview functions see Preview 416 Enhanced Printing Options ...

Page 431: ...se Print in the application menu 2 Click PDF and select Canon imagePROGRAF Preview 3 The Canon imagePROGRAF Preview window is displayed 4 Check the layout and adjust settings in the Canon imagePROGRAF Preview window as desired 5 Print from the Canon imagePROGRAF Preview menu Note For details on imagePROGRAF Preview functions refer to Preview Enhanced Printing Options 417 ...

Page 432: ...printing them 1 In the application menu choose Print 2 Click Preview to open the preview window 3 Check the layout and other aspects of the printing image and then click Print this page to start printing Note Preview is provided as a standard feature of the operating system For details refer to the Mac OS documentation 418 Enhanced Printing Options ...

Page 433: ...ermark Watermark string Specify the font size color and so on Surround the watermark with a frame if desired Watermark position Specify the position on the page the angle and so on Watermark printing method Specify whether to print the watermark superimposed or under the document image You can also print the watermark only on the rst page if desired Note Watermarks are supported in Windows and Mac...

Page 434: ...Type Plain Paper Paper size A4 210 0 297 0 mm Letter 8 3 11 7 in 1 Choose Print in the application menu 2 Select the printer in the dialog box and then display the printer driver dialog box P 453 3 Make sure the Main sheet is displayed 4 In the A Media Type list select the type of paper that is loaded In this case click Plain Paper 5 After con rming that D Easy Settings is selected click Of ce Doc...

Page 435: ...k the Layout tab to display the Layout sheet 10 Select the D Watermark check box 11 Click FILE COPY in the E Watermarks list Note To create your own original watermark click F Edit Watermark Refer to the printer driver help for instructions on modifying watermarks to create your own 12 Con rm the print settings and print as desired Note For instructions on con rming print settings see Con rming Pr...

Page 436: ...r Sheets Cassette Paper type Plain Paper Paper size A4 210 0 297 0 mm Letter 8 3 11 7 in 1 Select the printer in Chooser 2 Choose Page Setup in the application menu to display the Page Attribute dialog box 3 In the A Page Size list click the size of the original In this case click ISO A4 4 Click I OK to close the dialog box 5 Choose Print in the application menu 6 Make sure the Main pane is displa...

Page 437: ...k box 12 Click FILE COPY in the D Watermarks list Note To create your own original watermark click E Edit Watermark Refer to the printer driver help for instructions on modifying watermarks to create your own 13 Specify additional printing conditions For details on available printing conditions see Printer Driver Settings Mac OS 9 P 511 14 Con rm the print settings and then click N Print to start ...

Page 438: ...inted in landscape orientation Rotate 180 degrees The original is rotated 180 degrees to print it upside down Mirror A mirror image of the original is printed For instructions on specifying the original orientation before printing refer to the following topics as appropriate for your computer and operating system Making the Original Orientation Match the Paper Orientation Windows P 425 Making the ...

Page 439: ...3 11 7 in Paper Sheets Cassette Paper type Plain Paper Paper size A4 210 0 297 0 mm Letter 8 3 11 7 in 1 Choose Print in the application menu 2 Select the printer in the dialog box and then open the printer driver dialog box P 453 3 Make sure the Main sheet is displayed 4 In the A Media Type list select the type of paper that is loaded In this case click Plain Paper 5 Select the type of document i...

Page 440: ...pplication In this case click ISO A4 or Letter 8 5 x11 8 In H Orientation click J Landscape 9 Click Cassette in the L Paper Source list 10 Con rm the print settings and print as desired Note For tips on con rming print settings see Con rming Print Settings Windows P 447 426 Enhanced Printing Options ...

Page 441: ... Letter 8 3 11 7 in 1 Choose Page Setup in the application menu to display the Page Attributes dialog box 2 Select the printer in the B Format for list 3 In the C Paper Size list click the size of the original In this case click ISO A4 4 In D Orientation click the icon of the document in landscape orientation 5 Click F OK to close the dialog box 6 Choose Print in the application menu 7 Access the ...

Page 442: ...ure C Page Size shows the original size as speci ed in C Paper Size in the Page Attributes dialog box in this case ISO A4 13 Con rm the print settings and then click M Print to start printing Note For tips on con rming print settings see Con rming Print Settings Mac OS X P 492 428 Enhanced Printing Options ...

Page 443: ...Letter 8 3 11 7 in 1 Select the printer in Chooser 2 Choose Page Setup from the application menu to display the Page Attribute dialog box 3 In the A Page Size list click the size of the original In this case click ISO A4 4 In B Orientation click the icon of the document in landscape orientation 5 Click I OK to close the dialog box 6 Choose Print in the application menu 7 Make sure the Main pane is...

Page 444: ...shing pane 11 Click Cassette in the A Media Source list 12 Con rm the print settings and then click N Print to start printing Note For tips on con rming print settings see Con rming Print Settings Mac OS 9 P 514 430 Enhanced Printing Options ...

Page 445: ...ave registered from a list before printing and you can check the settings details Note You can also save the favorite settings as les Using these les is a convenient way to print under the same conditions on another computer In Windows and Mac OS 9 For instructions on using favorites to print refer to the following topics as appropriate for your computer and operating system Using Favorites Window...

Page 446: ...ttings 4 Click the Favorites tab to display the Favorites sheet 5 Click H Add to display the Add dialog box 6 Complete the following settings in the Add dialog box Enter a desired name in Name such as Photos for Presentations or Monthly Report Choose a tting icon for these print settings in the Icon list In Comment enter a description of the favorite to be added as desired 7 Click OK to close the ...

Page 447: ... 453 3 Click the Favorites tab to display the Favorites sheet 4 In the A Favorites choose the favorite you registered Note To import a favorite click I Import and specify the favorite le 5 Click D Apply Favorite to replace the favorite settings with the current print settings 6 Con rm the print settings and print as desired Note For instructions on con rming print settings see Con rming Print Sett...

Page 448: ...nction in Mac OS X for favorite based printing Note In the printing dialog box click Save As in the Presets list to save the current print settings This is a standard feature of the operating system For details refer to the Mac OS documentation 434 Enhanced Printing Options ...

Page 449: ...ay the Add Favorite dialog box 5 Complete the following settings in the Add Favorite dialog box Enter a desired name in Name such as Photos for Presentations or Monthly Report In Comment enter a description of the favorite to be added 6 Click OK to close the Add Favorite dialog box The favorite you have added is now displayed in Favorites Note To edit the name of an existing favorite or comment cl...

Page 450: ...g box 5 In the application menu choose Print 6 In the Favorites list choose the favorite you registered Note To import a favorite click Import and specify the favorite le If you select a favorite and edit it an icon is displayed at left of the name to indicate that the settings have been changed For details refer to the printer driver help 7 Con rm the print settings and then click Print to start ...

Page 451: ...ce Guide P 103 Automatic Cutting Roll paper is cut automatically after printing If you prefer you can print continuously without cutting the roll or you can print a cut line For instructions on cutting roll paper after printing refer to the following topics as appropriate for your computer and operating system Cutting Roll Paper After Printing Windows P 438 Cutting Roll Paper After Printing Mac OS...

Page 452: ...nu 2 Select the printer in the dialog box and then display the printer driver dialog box P 453 3 Click the Page Setup tab to display the Page Setup sheet 4 Click Roll Paper in the L Paper Source list 5 Click N Roll Paper Options to display the Roll Paper Options dialog box 6 To enable automatic cutting click Yes in the A Automatic Cutting list If you prefer to cut the paper later yourself click Pr...

Page 453: ...printer driver is installed Follow the steps below to reactivate the function once disabled or select the setting for printing a cut guideline instead 1 Choose Page Setup in the application menu to display the Page Attributes dialog box 2 Select the printer in the B Format for list 3 Choose the original size in the C Paper Size list 4 Click F OK to close the dialog box 5 Choose Print in the applic...

Page 454: ...ing list If you prefer to cut the paper later yourself click Print Cut Guideline Important If the automatic cut function has been deactivated on the printer change the auto cut setting on the printer Control Panel 12 Click OK to close the Media Detailed Settings dialog box 13 Con rm the print settings and click M Print to start printing Note For tips on con rming print settings see Con rming Print...

Page 455: ...the printer driver is installed Follow the steps below to reactivate the function once disabled or select the setting for printing a cut guideline instead 1 Select the printer in Chooser 2 Choose Page Setup from the application menu to display the Page Attribute dialog box 3 Choose the original size in the A Page Size list 4 Click I OK to close the dialog box 5 Choose Print in the application menu...

Page 456: ... list If you prefer to cut the paper later yourself click Print Cut Guideline Important If the automatic cut function has been deactivated on the printer change the auto cut setting on the printer Control Panel 12 Click OK to close the Media Detailed Settings dialog box 13 Con rm the print settings and then click N Print to start printing Note For tips on con rming print settings see Con rming Pri...

Page 457: ... printing application or Advanced Settings to complete more detailed settings as desired Media Detailed Settings Dialog Box Windows P 461 View Settings Dialog Box for the Printing Application Windows P 462 Color Adjustment Sheet Color Windows P 463 Matching Sheet Windows P 465 Color Adjustment Sheet Monochrome Windows P 467 Page Setup Sheet Windows P 469 You can specify the page size of the origin...

Page 458: ...Windows P 479 You can view support information and the user manual Device Settings Sheet Windows P 480 You can display settings for optional equipment installed on the printer and see the printer driver version imagePROGRAF Free Layout is a feature for freely arranging originals from various source applications on a single page as desired before printing For details see Free Layout Color imageRUNN...

Page 459: ...l be displayed and printing is not possible 1 Choose Print in the application menu 2 Select the printer in the dialog box and then display the printer driver dialog box P 453 3 Make sure the Main sheet is displayed 4 In the A Media Type list select the type of paper that is loaded 5 Click the Page Setup tab to display the Page Setup sheet 6 In the A Page Size list select the size of the original a...

Page 460: ...select the width of the loaded roll in M Roll Paper Width Note A variety of settings are available in the printer driver to suit different printing applications For details on available printing conditions see Printer Driver Settings Windows P 443 446 Windows Software ...

Page 461: ...ientation paper source layout and so on Display Area Information Displayed P Top illustrations Illustrations indicate the orientation page layout borderless printing selection color mode and other settings information Q Middle bordered area The page size paper size and method and percentage of enlargement or reduction are indicated R Bottom illustrations Illustrations indicate the feed source orie...

Page 462: ... be printed When you activate this feature imagePROGRAF Preview or PageComposer is started before printing Con rming how documents will be printed this way helps prevent printing errors For details on print previews see Checking the Layout in a Preview Before Printing P 413 448 Windows Software ...

Page 463: ...nter in the dialog box and then display the printer driver dialog box P 453 3 Make sure the Main sheet is displayed 4 Select the L Open Preview When Print Job Starts check box 5 After you click OK when you print a job the imagePROGRAF Preview window will be displayed Note If PageComposer is running access the Special Settings dialog box from the Layout sheet and clear Enable Preview Switching Wind...

Page 464: ...ver 6 On the main window you can check the layout and change settings as needed 7 To print click Start Printing in the File menu Note For details on imagePROGRAF Preview functions see Preview 450 Windows Software ...

Page 465: ...ettings 4 Click the Favorites tab to display the Favorites sheet 5 Click H Add to display the Add dialog box 6 Complete the following settings in the Add dialog box Enter a desired name in Name such as Photos for Presentations or Monthly Report Choose a tting icon for these print settings in the Icon list In Comment enter a description of the favorite to be added as desired 7 Click OK to close the...

Page 466: ...P 453 3 Click the Favorites tab to display the Favorites sheet 4 In the A Favorites choose the favorite you registered Note To import a favorite click I Import and specify the favorite le 5 Click D Apply Favorite to replace the favorite settings with the current print settings 6 Con rm the print settings and print as desired Note For instructions on con rming print settings see Con rming Print Set...

Page 467: ... on the source application In some cases when you select the printer a sheet for con guring the printer driver is added to the dialog box In the following case click Preferences Example Print dialog box displayed by the application software Six sheets of print settings are displayed by the printer driver Main Page Setup Layout Favorites Utility and Support Note The titles of dialog boxes may vary ...

Page 468: ...porarily to that application Because these are sizes you specify temporarily in the printer driver the sizes will not be available after you exit the application You can also access the printer driver dialog box from the Windows system menu see Accessing the Printer Driver Dialog Box from the Operating System Menu Windows P 455 454 Windows Software ...

Page 469: ...nters and Faxes or Printers 2 Select the printer and then display the printer properties dialog box 3 Click Printing Preferences to display the Printing Preferences dialog box titled with the name of this printer Note The Device Settings sheet is also an extension of the printer driver P 480 Windows Software 455 ...

Page 470: ...Important If you access the printer driver dialog box from the operating system menu changes you make to the settings will apply to all applications you use for printing You can also access the printer driver dialog box from applications see Accessing the Printer Driver Dialog Box from Applications Windows P 453 456 Windows Software ...

Page 471: ...ur selection is applied to the printer driver settings for the feed source type of paper and roll width C Advanced Settings Click to display the Paper Detailed Settings dialog box for ink drying time and other detailed settings based on the type of paper E Print Target Choose presets that match the type of document to be printed Printing Photos and Images Windows Mac OS X P 180 Printing Line Drawi...

Page 472: ...r speci ed on the printer for each feed source When you select a feed source your selection is applied to the printer driver settings for the feed source type of paper and roll width C Advanced Settings Click to display the Paper Detailed Settings dialog box for ink drying time and other detailed settings based on the type of paper E Print Priority Choose the graphic elements that you want to emph...

Page 473: ...example Depending on the Media Type and Print Quality settings this mode may not be available L Open Preview When Print Job Starts Activate this option to check on screen previews of documents before printing Checking the Layout in a Preview Before Printing P 413 M Status Monitor Click to start imagePROGRAF Status Monitor which enables you to con rm the status of the printer and print jobs You can...

Page 474: ...urce and media type Note To display the Paper Information on Printer dialog box on the Main sheet click Get Information by Media Type P 457 Setting Item Description A Paper Source Shows the Paper Source supported by the printer as well as information about the loaded paper To update the Paper Source and media type settings in the printer driver select the desired Paper Source option and click OK 4...

Page 475: ... the time the printer waits after printing a page until ejecting the paper as needed D Between Scans Specify the time the printer waits after printing a line on the page until printing the next line as needed E Roll Paper Margin for Safety You can specify the length of a margin on the leading edge of paper to ensure that paper susceptible to curling is held rmly against the Platen F Near End Margi...

Page 476: ...ettings dialog box on the Main sheet click View Settings by Print Target P 457 Setting Item Description A Print Target Shows all Print Target options settings items for the printing application B Name Identi es the item selected in Print Target by its name and an icon C Details Here you can con rm detailed settings values for each listed item for the selected Print Target 462 Windows Software ...

Page 477: ...e color tones by adjusting the levels of each color G Gray Tone Adjust the color tone of grays as desired Choose Cool Black tinged with blue or Warm Black tinged with red H Brightness Adjust the overall image brightness as desired You can adjust the brightness if the printed document is lighter or darker than the original image that is the original photo that was scanned or the original graphic as...

Page 478: ...ct Adjustment dialog box you can specify what type of print jobs to apply color adjustment to If an original comprises images graphics and text you can specify which portion to apply color adjustment to Note To display the Object Adjustment dialog box click Object Adjustment on the Color Adjustment sheet Setting Item Description A Image Select this option to apply color adjustment to image areas s...

Page 479: ...et P 457 Setting Item Description A Matching Mode Select the color matching mode to use as desired Normally select Driver Matching Mode For color matching based on ICC pro les select ICC Matching Mode Driver ICM Mode or Host ICM Mode depending on your color matching system If you prefer not to use the printer driver for color matching select No B Matching Method Select the color matching method th...

Page 480: ...iption A Matching Mode Select the color matching mode to use as desired B Input Pro le Settings You can select Image Graphics or Text You can choose Matching Method and Input Pro le Various options are available depending on your selected Matching Mode To apply the same input pro le automatically for Graphics and Text select Use the Same Pro le for All Objects To apply separate input pro les to Gr...

Page 481: ...n E Magenta F Yellow Not available G Gray Tone Not available H Brightness Adjust the overall image brightness as desired You can adjust the brightness if the printed document is lighter or darker than the original image that is the original photo that was scanned or the original graphic as it appears on the computer screen I Contrast Adjust the contrast of the darkest and lightest portions relativ...

Page 482: ...ges graphics and text you can specify which portion to apply color adjustment to Note To display the Object Adjustment dialog box click Object Adjustment on the Color Adjustment sheet Setting Item Description A Image Select this option to apply color adjustment to image areas such as photos B Graphics Select this option to apply color adjustment to graphics such as lines and circles C Text Select ...

Page 483: ...Paper Size Scales the document image to match the paper size E Scale to t Roll Paper Width Scales the document image to match the roll width F Print Image with Actual Size Prints documents at their actual size This function is available when you have selected the size same as the width of Roll Paper for either length or width of the document from the A Page Size list G Paper Size Available when Fi...

Page 484: ...er by Rotating Originals 90 Degrees P 397 L Paper Source Choose how paper is supplied Options displayed in the list vary depending on the selection in Media Type in the Main sheet M Roll Paper Width Choose the roll width For details on available roll widths see Paper Sizes P 109 N Roll Paper Options Complete optional roll paper settings Click to display the Roll Paper Options dialog box Under A Au...

Page 485: ...standard paper size of the printer driver is selected If an oversized paper size is selected If a paper size in a red box is selected C Custom Paper Size Name You can name Custom Paper Size as desired D Units Specify the desired unit of measure for the Custom Paper Size height and width E Paper Size Specify the desired Width and Height You can make your selection from sizes that are compatible wit...

Page 486: ...inting With Watermarks P 419 E Watermarks Lists the provided watermarks Choose the watermark to print F Edit Watermark Click to display the Edit Watermark dialog box for creating your own original watermark G Print Centered Activate this setting to print document images in the center of the paper Printing Originals Centered on Rolls P 380 Printing Originals Centered on Sheets P 389 H Rotate 180 de...

Page 487: ... you to complete settings for printing the user name date or page number in the header or footer M Special Settings If the printing results are not as you expected click this option to change how printing is processed S Defaults Click to restore all settings on the sheet to the default values Windows Software 473 ...

Page 488: ...r Name Select where the user name is printed as desired D Print Page Number Select where the page number is printed as desired E Format Settings Click to display the Format Settings dialog box which enables you to complete format related settings Note If you specify the same position for multiple items the items are printed from left to right in this order date user name and page number When you p...

Page 489: ...g Priority You can give applications priority in color management C Enable Preview Switching Selecting this option will start PageComposer if you print when Open Preview When Print Job Starts is selected on the Main sheet D Fast Graphic Process If image colors are inconsistent in printed documents or if lines are printed in varying thicknesses clearing this option may help produce the expected res...

Page 490: ...ting to use settings values speci ed in the source application in preference to favorite settings selected in the A Favorites when clicking D Apply Favorite For details on the settings items used in preference refer to the printer driver help F Delete Click to delete the selected favorite from the A Favorites list G Edit Click to display the Edit dialog box which enables you to change the name and...

Page 491: ...Printer Driver Setting Item Description K Up Click to move the selected favorite up in the A Favorites list L Down Click to move the selected favorite down in the A Favorites list Windows Software 477 ...

Page 492: ...ozzle ink ejecting outlet check Nozzle ink ejecting outlet cleaning Head alignment adjustment Feed amount adjustment B Color imageRUNNER Enlargement Copy Click to launch Color imageRUNNER Enlargement Copy 1 iR enlargement copy which enables you to create hot folders used for Color imageRUNNER Enlargement Copy and assign print settings to hot folders Printing Enlargements of Scanned Originals from ...

Page 493: ...the latest information on the printer and consumables check for printer driver updates and browse other information B User Manual Click to view the printer user s manual This function requires the user s manual to be installed on your computer C Settings Summaries Click to display the View Settings dialog box which enables you to con rm the settings for the Main Page Setup Layout and Favorites she...

Page 494: ...ter driver The following settings are available on the Device Settingssheet Setting Item Description A Roll Feed Unit Select this check box if the printer is equipped with a Roll Feed Unit B Acquire Status Click to acquire device information from the printer Acquire information from the printer as to whether the Roll Feed Unit is installed or not C About You can display version information for the...

Page 495: ...es you to con rm the settings for the Main Page Setup Layout and Favorites sheets Button Corresponding Utility A Copy Click to copy the settings information to the clipboard You can paste the settings information into a le created with a text editor or similar application Windows Software 481 ...

Page 496: ...ed in real time on a computer monitor If a printer error occurs you can investigate the corrective action immediately Images of Ink Tanks are shown with different images for various types of ink An icon and warning message will notify you when ink levels are low The type of paper loaded in each media source is identi ed You can also check to see if paper has run out This way the utility enables yo...

Page 497: ...also print from Digital Photo Front Access In short Digital Photo Front Access can help you manage images in many ways from editing to printing as an effective way to work with other applications Digital Photo Front Access also enables image retouching For automatic retouching select an image for retouching and click Image Adjustment Because this application automates the work ow from retouching t...

Page 498: ...mportant PosterArtist sold separately must be installed to use this function Edit Using PosterArtist PosterArtist offers a wide range of features including features to insert source documents in posters and compose an original with them Important This function is only supported in Windows For detailed instructions on editing with PosterArtist refer to the following topic Using PosterArtist to Comp...

Page 499: ...cation menu 2 Select the printer in the dialog box and then open the printer driver dialog box P 453 3 Make sure the Main sheet is displayed 4 Click the Layout tab to display the Layout sheet 5 Select the A Page Layout check box 6 Click in the Edit Using PosterArtist in the B Page Layout list 7 When you attempt to print PosterArtist starts up and the PageCapture window is displayed At this point t...

Page 500: ...ed Important Without closing the PosterArtist window repeat steps 1 8 to arrange originals from multiple applications on the same page Note For instructions on editing and rearranging images refer to the PosterArtist Manual 10 Print from the PosterArtist menu 486 Windows Software ...

Page 501: ...s are online in the network by checking the printer list Communication between your computer and these printers is possible Note We recommend that your network or printer administrator complete the setup work using imagePROGRAF Device Setup Utility For details refer to the imagePROGRAF Device Setup Utility help Installing imagePROGRAF Device Setup Utility Install imagePROGRAF Device Setup Utility ...

Page 502: ... instructions on installing imagePROGRAF Device Setup Utility see Installing imagePROGRAF Device Setup Utility P 487 1 Start imagePROGRAF Device Setup Utility from the start menu 2 In the Product Name list displayed select the printer to con gure 3 Choose Protocol Settings from the Printer menu 4 In the Setting IP Address list choose Manual 5 Enter the IP address assigned to the printer and click ...

Page 503: ...n specify the page size of the original borderless printing enlargement or reduction the orientation the paper size and source and automatic cutting Utility Pane Mac OS X P 507 You can specify settings related to maintenance for the Printhead and feed amount as well as settings for Color imageRUNNER Enlargement Copy Additional Settings Pane Mac OS X P 508 You can specify settings for how print job...

Page 504: ...e Page Setup from the application menu to display the Page Attributes dialog box 2 Select the printer in the B Format for list 3 Choose the original size in the C Paper Size list 4 Click F OK to close the dialog box 5 Choose Print in the application menu 6 Access the Main pane 7 In the A Media Type list select the type of paper that is loaded 490 Mac OS X Software ...

Page 505: ...in A Media Source make sure the width of the loaded roll is displayed in B Roll Paper Width Note If the width of the roll loaded in the printer is not shown in B Roll Paper Width click L Printer Information on the Main pane to update the printer information Note A variety of settings are available in the printer driver to suit different printing applications For details on available printing condi...

Page 506: ...size orientation paper source and so on Display Area Information Displayed Pane displayed when the H Images tab is clicked On top illustrations indicate the page size of the original the paper size orientation layout borderless printing selection color mode and other settings information Under this the page size paper size and method and percentage of enlargement or reduction is displayed Pane dis...

Page 507: ...isplay the View settings dialog box Checking a print preview You can check an image of the original just as it will be printed Con rming the image of print jobs beforehand helps prevent printing errors For details on print previews see Checking the Layout in a Preview Before Printing P 413 Mac OS X Software 493 ...

Page 508: ...int in the application menu 2 Click PDF and select Canon imagePROGRAF Preview 3 The Canon imagePROGRAF Preview window is displayed 4 Check the layout and adjust settings in the Canon imagePROGRAF Preview window as desired 5 Print from the Canon imagePROGRAF Preview menu Note For details on imagePROGRAF Preview functions refer to Preview 494 Mac OS X Software ...

Page 509: ...Mac OS X 1 In the application software select Print from the File menu to display the dialog box for printing conditions Note This dialog box includes basic printing options and enables you to choose the printer specify the range of pages number of copies and so on 2 Select the printer in the Printer list 3 Click Print to start printing As shown in the following illustration you can switch to othe...

Page 510: ... each media source When you select a media source your selection is applied to the printer driver settings for the media source and media type C Set Click to display the Media Detailed Settings dialog box for ink drying time and other detailed settings based on the paper type E Print Target Choose presets that match the type of document to be printed Printing Photos and Images Windows Mac OS X P 1...

Page 511: ...s that you want to emphasize for printing Giving Priority to Particular Graphic Elements and Colors for Printing P 225 F Print Quality Choose the level of print quality Giving Priority to Particular Graphic Elements and Colors for Printing P 225 H Color Mode Choose the color mode Giving Priority to Particular Graphic Elements and Colors for Printing P 225 I Set Click to display the Color Settings ...

Page 512: ...he quality is diminished Select this mode if you want to conserve ink when checking drawings for example Depending on the Media Type and Print Quality settings this mode may not be available L Printer Click to display the Printer dialog box which indicates the ink levels and gives other information about the printer 498 Mac OS X Software ...

Page 513: ...er media type setting Note To display the Paper Information on Printer dialog box on the Main pane click Get Information by Media Type P 496 Setting Item Description A Paper Source Shows the Paper Source supported by the printer as well as the type of paper loaded To update the media type setting in the printer driver select the desired Paper Source option and click OK Mac OS X Software 499 ...

Page 514: ...eeded D Between Scans Specify the time the printer waits after printing a line on the page until printing the next line as needed E Roll Paper Margin for Safety You can specify the length of a margin on the leading edge of paper to ensure that paper susceptible to curling is held rmly against the Platen F Near End Margin Specify the length of the Near End Margin the leading edge margin of the roll...

Page 515: ... Settings dialog box on the Main pane click View Settings by Print Target P 496 Setting Item Description A Print Target Shows all Print Target options settings items for the printing application B Name Identi es the item selected in Print Target by its name and an icon C Details Here you can con rm detailed settings values for each item selected in the Print Target list Mac OS X Software 501 ...

Page 516: ...riginal state before adjustment You can compare it to the Preview image C Cyan D Magenta E Yellow Correct color tones by adjusting the levels of each color F Brightness Adjust the overall image brightness as desired You can adjust the brightness if the printed document is lighter or darker than the original image that is the original photo that was scanned or the original graphic as it appears on ...

Page 517: ...pane on the Main pane click Color Settings by Color Mode in Advanced Settings and then click Matching P 496 Setting Item Description A Matching Mode Select the color matching mode to use as desired B Matching Method Select the matching method that suits the document to be printed Various Matching Method options are available depending on your selection in Matching Note For details on settings item...

Page 518: ...nal The image at right shows the original state before adjustment You can compare it to the Preview image C Cyan D Magenta E Yellow Not available F Brightness Adjust the overall image brightness as desired You can adjust the brightness if the printed document is lighter or darker than the original image that is the original photo that was scanned or the original graphic as it appears on the comput...

Page 519: ...Originals to Match the Paper Size P 248 Resizing Originals to Fit the Roll Width P 256 Resizing Originals by Entering a Scaling Value P 265 E Fit Media Size Resizes the document image to match the paper size F Fit Roll Paper Width Resizes the document image to match the roll width G Scaling Resizes the document image based on a speci ed scaling value Enter a value in a range of 5 600 H Borderless ...

Page 520: ...s at Top or Bottom Activate this setting to print the next image skipping blank areas above and below printable data in documents which enables you to conserve the paper Conserving Roll Paper by Printing Originals Without Top and Bottom Margins P 405 L Rotate Page 90 degrees Activate this setting to rotate the original 90 degrees before printing Conserving Roll Paper by Rotating Originals 90 Degre...

Page 521: ...wing maintenance for the printer Nozzle ink ejecting outlet cleaning Head alignment adjustment Feed amount adjustment B View Click to start imagePROGRAF Printmonitor which enables you to view the status of print jobs C Set Click to complete the settings for Color imageRUNNER Enlargement Copy iR enlargement copy 1 For details see Color imageRUNNER Enlargement Copy Mac OS X Software 507 ...

Page 522: ...lowing settings are available on the Additional Settingspane Setting Item Description A Data Send Method Choose how printing data is sent to the printer B Send Print Data Immediately to Printer C Send All Print Data as Batch to Printer 508 Mac OS X Software ...

Page 523: ...n on the printer and consumables check for printer driver updates and browse other information B User Manual Click to view the printer user s manual This function requires the user s manual to be installed on your computer C Settings The settings can be saved as a le Click to display the Export dialog box which enables you to specify where to save the le D About You can display version information...

Page 524: ...he desired printer is not shown in imagePROGRAF Printmonitor select the printer again as follows 1 Make sure the printer is on and connected to the network or to a local port 2 In the Printer menu select the name of the desired printer After the printer is detected the printer status is shown 3 If information about the printer is not shown in step 2 choose Search Printer in the Printer menu 4 Sele...

Page 525: ...more detailed settings as desired Media Detailed Settings Dialog Box Mac OS 9 P 533 View Settings Dialog Box for the Printing Application Mac OS 9 P 534 Color Settings Pane Color Mac OS 9 P 528 Color Settings Pane Monochrome Mac OS 9 P 531 Page Setup Pane Mac OS 9 P 523 You can specify the amount of enlargement or reduction borderless printing media size and page layout Finishing Pane Mac OS 9 P 5...

Page 526: ...t the printer in Chooser 2 Choose Page Setup from the application menu to display the Page Attribute dialog box 3 Choose the original size in the A Page Size list 4 Click I OK to close the dialog box 5 Choose Print in the application menu 6 Make sure the Main pane is displayed 7 In the C Media Type list select the type of paper that is loaded 512 Mac OS 9 Software ...

Page 527: ...yed in B Roll Paper Width Note If the width of the roll loaded in the printer is not shown in B Roll Paper Width click L Printer Information on the Main pane to update the printer information Note A variety of settings are available in the printer driver to suit different printing applications For details on available printing conditions see Printer Driver Settings Mac OS 9 P 511 Mac OS 9 Software...

Page 528: ...page size orientation media source and so on Display Area Information Displayed Pane displayed when the H Images tab is clicked On top illustrations indicate the page size of the original the paper size orientation layout borderless printing selection color mode and other settings information Under this the page size paper size and method and percentage of enlargement or reduction is displayed Pan...

Page 529: ...e to display the View set dialog box Checking a print preview You can check an image of the original just as it will be printed Con rming the image of print jobs beforehand helps prevent printing errors For details on print previews see Previewing Images Before Printing Mac OS 9 P 418 Mac OS 9 Software 515 ...

Page 530: ...ing them 1 In the application menu choose Print 2 Click Preview to open the preview window 3 Check the layout and other aspects of the printing image and then click Print this page to start printing Note Preview is provided as a standard feature of the operating system For details refer to the Mac OS documentation 516 Mac OS 9 Software ...

Page 531: ...lay the Add Favorite dialog box 5 Complete the following settings in the Add Favorite dialog box Enter a desired name in Name such as Photos for Presentations or Monthly Report In Comment enter a description of the favorite to be added 6 Click OK to close the Add Favorite dialog box The favorite you have added is now displayed in Favorites Note To edit the name of an existing favorite or comment c...

Page 532: ...g box 5 In the application menu choose Print 6 In the Favorites list choose the favorite you registered Note To import a favorite click Import and specify the favorite le If you select a favorite and edit it an icon is displayed at left of the name to indicate that the settings have been changed For details refer to the printer driver help 7 Con rm the print settings and then click Print to start ...

Page 533: ...es basic printing options and enables you to choose the printer specify the range of pages number of copies and so on 2 Select the printer in the Printer list 3 Click Print to start printing As shown in the following illustration you can switch to other panes in this dialog box to complete settings for various methods of printing including enlarged and reduced printing borderless printing and so o...

Page 534: ...n reverse order C Media Type Select the paper type For information on the types of paper the printer supports refer to the Paper Reference Guide P 103 D Set Click to display the Media Detailed Settings dialog box for ink drying time and other detailed settings based on the paper type F Print Target Choose the settings that match the document you will print Printing Photos and Images Mac OS 9 P 182...

Page 535: ...rint results Giving Priority to Particular Graphic Elements and Colors for Printing P 225 G Print Quality You can choose the print quality Giving Priority to Particular Graphic Elements and Colors for Printing P 225 H Color Mode You can choose the color mode Giving Priority to Particular Graphic Elements and Colors for Printing P 225 I Set Click to display the Color Settings dialog box for more ad...

Page 536: ...aper in C Media Type and Of ce Document in F Print Priority Activate this option to automatically switch between one pass and two pass printings which reduces color shading Deactivate this option for one pass printing only L Printer Click to display the Printer Information dialog box which indicates the ink levels and gives other information about the printer 522 Mac OS 9 Software ...

Page 537: ...to match the paper size E Fit Roll Paper Width Scales the document image to match the roll width F Scaling Resizes the document image based on a speci ed scaling value Enter a value in a range of 5 600 G Borderless Printing Borderless printing is available if Roll Paper is selected from the A Media Source list in the Page Setup Pane Mac OS 9 Activate this setting for borderless printing to match t...

Page 538: ... multiple pages to be printed on a single sheet K Page Border This setting is available when I Page Layout is selected Here you can specify the type of boundary line around each page of multiple pages printed on a single sheet 1 Selecting poster layout from the I Page Layout list displays a check box for specifying the pages to print 524 Mac OS 9 Software ...

Page 539: ...he watermark to print E Edit Watermark Click to display the Edit Watermark dialog box for creating your own original watermark F Print Centered Choose this option to print the document images in the center of the paper Printing Originals Centered on Rolls P 380 Printing Originals Centered on Sheets P 389 G Rotate 180 degrees Activate this setting to rotate the document image by 180 degrees before ...

Page 540: ...ble on the Device Settings pane Setting Item Description A Utility Click to display the Printer Information dialog box which offers the following maintenance for the printer Nozzle ink ejecting outlet cleaning Head alignment adjustment Feed amount adjustment 526 Mac OS 9 Software ...

Page 541: ...ing data is sent to the printer E Send Print Data Immediately to Printer F Send All Print Data as Batch to Printer G Printing Finished Alert Method Choose how to notify when printing is nished Specify how to be noti ed when printing is nished by a tone or a message H Make a Sound Activate this setting to be noti ed by a tone when printing is nished You can also choose a different tone J Display a ...

Page 542: ... the results of adjustment B Original The image at right shows the original state before adjustment You can compare it to the Preview image C Cyan D Magenta E Yellow Correct color tones by adjusting the levels of each color F Brightness Adjust the overall image brightness as desired You can adjust the brightness if the printed document is lighter or darker than the original image that is the origi...

Page 543: ...justment dialog box In the Object Adjustment dialog box you can specify what type of print jobs to apply color adjustment to If an original comprises images graphics and text you can specify which portion to apply color adjustment to Note To display the Object Adjustment dialog box click Object Adjustment on the Color Adjustment pane Setting Item Description A Image Select this option to apply col...

Page 544: ...by Color Mode in Advanced Settings and then click Matching P 520 Setting Item Description A Matching Mode Select the color matching mode to use as desired B Matching Method Select the matching method that suits the document to be printed Various Matching Method options are available depending on your selection in Matching Note For details on settings items see Adjusting the Color in the Printer Dr...

Page 545: ...e bottom shows the original state before adjustment You can compare it to the Preview image C Cyan D Magenta E Yellow Not available F Brightness Adjust the overall image brightness as desired You can adjust the brightness if the printed document is lighter or darker than the original image that is the original photo that was scanned or the original graphic as it appears on the monitor G Contrast A...

Page 546: ...ges graphics and text you can specify which portion to apply color adjustment to Note To display the Object Adjustment dialog box on the Color Adjustment pane click Object Adjustment Setting Item Description A Image Select this option to apply color adjustment to image areas such as photos B Graphics Select this option to apply color adjustment to graphics such as lines and circles C Text Select t...

Page 547: ...ded D Between Scans Specify the time the printer waits after printing a line on the page until printing the next line as needed E Roll Paper Margin for Safety You can specify the length of a margin on the leading edge of paper to ensure that paper susceptible to curling is held rmly against the Platen F Near End Margin Specify the length of the Near End Margin the leading edge margin of the roll a...

Page 548: ... Settings dialog box on the Main pane click View Settings by Print Target P 520 Setting Item Description A Print Target Shows all Print Target options settings items for the printing application B Name Identi es the item selected in Print Target by its name and an icon C Details Here you can con rm detailed settings values for each item selected in the Print Target list 534 Mac OS 9 Software ...

Page 549: ...Settings dialog box Note To display the Special Settings dialog box on the Additional Settings pane click Special Settings P 527 Setting Item Description A Fast Graphic Process If image colors are inconsistent in printed documents or if lines are printed in varying thicknesses clearing this option may help produce the expected results Mac OS 9 Software 535 ...

Page 550: ...he desired printer is not shown in imagePROGRAF Printmonitor select the printer again as follows 1 Make sure the printer is on and connected to the network or to a local port 2 In the Printer menu select the name of the desired printer After the printer is detected the printer status is shown 3 If information about the printer is not shown in step 2 choose Search Printer in the Printer menu 4 Sele...

Page 551: ...computer A computer that runs one of the above operating systems Printing over an AppleTalk network Compatible operating systems Mac OS 9 1 or later Mac OS X 10 2 8 or later Compatible computer A computer that runs one of the above operating systems Note The printer cannot be used over a LocalTalk network Compatible with EtherTalk Phase 2 Printing over a NetWare network Compatible servers Novell N...

Page 552: ...etworks print over TCP IP Note NetBIOS is not supported Example of a Macintosh network In Macintosh networks print over AppleTalk EtherTalk or TCP IP using Bonjour Zeroconf functions Example of a NetWare network Note Even if there is a NetWare server in your network environment you can use both TCP IP and AppleTalk In this case complete the settings for each protocol you will use 538 Network Setti...

Page 553: ...ss Using ARP and PING Commands P 543 Important If you use a DHCP server for automatic assignment of the printer s IP address printing may no longer be possible after the printer is turned off and on This is because an IP address different from before has been assigned Thus when using DHCP server functions consult your network administrator and con gure the settings in one of the following ways Con...

Page 554: ...nstructions on installing imagePROGRAF Device Setup Utility see Installing imagePROGRAF Device Setup Utility P 487 1 Start imagePROGRAF Device Setup Utility from the start menu 2 In the Product Name list displayed select the printer to con gure 3 Choose Protocol Settings from the Printer menu 4 In the Setting IP Address list choose Manual 5 Enter the IP address assigned to the printer and click th...

Page 555: ...s and then press IP Setting IP Address 6 Press or to move the cursor _ to each eld for entering IP address numbers IP Address 0 0 0 0 7 Press the OK button to prepare to enter the number 8 Press or to select the number and then press the OK button IP Address xxx 0 0 0 Note Pressing the button decreases the number by 1 The minimum value is 0 after which 255 is displayed Pressing the button increase...

Page 556: ...the OK button Important Be sure to complete step 10 This will activate the values you have entered You can also specify the subnet mask and default gateway on the Control Panel Note If an error message is displayed check the settings and correct any invalid values To cancel the setup process hold down the Stop Eject button for a second or more 542 Network Setting ...

Page 557: ... entries to the ARP table for managing IP addresses and corresponding MAC addresses arp s IP address the printer s MAC address you have veri ed Example arp s xxx xxx xxx xxx 00 00 85 xx xx xx Note In Mac OS X when using Terminal enter the arp command in the format arp s xxx xxx xxx xxx 00 00 85 xx xx xx For details refer to the help le for the command line 4 Execute the following command to send t...

Page 558: ... also offers many other features You can display the ink levels check error messages and other status information and cancel print jobs By factory default the English screen is displayed To change the display language select the desired language under Language before logging on in administrator mode Important Use Netscape Navigator 6 0 or later Internet Explorer 5 01 or later or Firefox 1 5 or lat...

Page 559: ...DHCP for con guring the IP address Off Use BOOTP Activate this setting to use BOOTP for con guring the IP address Off Use RARP Activate this setting to use RARP for con guring the IP address Off Enable DNS Dynamic Update Activate this setting to perform DNS server registration automatically Off Use Zeroconf Function Activate this setting to use Bonjour On IP Address Specify the printer s IP addres...

Page 560: ...haracter or or for the last character blank Multicast DNS Service Name Specify the printer s Multicast DNS service name 1 63 characters This name will be displayed when Bonjour functions are used Canon iPFxxxx xxxxxx 7 Click OK to display the Network page Note If you specify to con gure the IP address using DHCP BOOTP or RARP there must be a server that supports such protocol running in the networ...

Page 561: ...name used by AppleTalk in up to 31 single byte or 15 double byte characters However do not use the following single byte characters Canon NB 17FB xxxxxx Zone 2 Specify the printer zone name up to 31 single byte characters However do not use the following single byte characters Also avoid using which represents the default zone in the middle of a string 1 The object name you have speci ed in Name i...

Page 562: ...s Item Details Default Setting Frame Type Specify the type of frame to use in NetWare Disabled NCP Burst Mode Activate this setting to use NCP Burst Mode This mode supports fast data transfer when printing in queue server mode Normally leave the setting On On Print Application Choose the print service Bindery PServer RPrinter NDS PServer NPrinter NDS PServer Packet Signature Select If Requested by...

Page 563: ...NetWare print server 0 255 characters Print Server Name Specify the name of a NetWare print server 0 64 characters Print Server Password Set a password for the print server 0 20 characters Polling Interval Specify the interval to con rm jobs 1 255 seconds 5 NPrinter Print Server Name Specify the name of a NetWare print server 0 47 characters Printer Number Specify the number of the printer connect...

Page 564: ...complete these settings Device Information Settings Item Details Default Setting Device Name Enter a device name 0 32 characters blank Location Enter the location where the device is installed 0 32 characters blank Administrator Enter the administrator s name 0 32 characters blank Phone Enter the administrator s contact information 0 32 characters blank Comments E mail Enter any comments regarding...

Page 565: ...OK The setting is updated and an equals sign is displayed at left Auto Detect Off Return to the Ethernet Driver menu 6 Press or to select Comm Mode and then press Ethernet Driver Comm Mode 7 Press or to select the communication mode and then press the OK button The setting is updated and an equals sign is displayed at left Comm Mode Half Duplex Return to the Ethernet Driver menu 8 Press or to sele...

Page 566: ...ed and an equals sign is displayed at left Spanning Tree Use Return to the Ethernet Driver menu 12 Press the Online button After the con rmation message is displayed press OK The printer will now restart Note If an error message is displayed check the settings and correct any invalid values To cancel the setup process hold down the Stop Eject button for a second or more 552 Network Setting ...

Page 567: ...mputer Use the imagePROGRAF Status Monitor Windows function to set up email recipients and message timing Besides being informed of nished print jobs or errors you can also complete settings for email noti cation when service is needed or it s time to replace consumables For detailed instructions see Specifying Printer Related Information P 550 Note For details on email noti cation using imagePROG...

Page 568: ...Start the web browser and enter the following URL in the Location or Address box to display the RemoteUI page http printer IP address or name Example http xxx xxx xxx xxx 2 Select Administrator Mode and click Logon 3 If a password has been set on the printer enter the password 4 Click Network in the Device Manager menu at left to display the Network page 5 Click Reset to Default settings in the lo...

Page 569: ...539 1 Open the Printers and Faxes or Printers window 2 Right click the icon of this printer and choose Properties to open the printer properties window 3 Click the Port tab to display the Port sheet 4 Click Add Port to display the Printer Ports dialog box 5 In the Available Port list select Standard TCP IP Port 6 Click New Port After the wizard starts a window is displayed for the Welcome to the A...

Page 570: ...receive print jobs sent from other computers clients connected to it for printing This topic describes how to share the printer in Windows Important We recommend that your network administrator con gure your network for printer sharing 1 Open the Printers and Faxes or Printers window 2 Right click the icon of this printer and choose Sharing to open the printer properties window 556 Network Setting...

Page 571: ...esponding version If you are prompted to choose the location of the printer driver le insert the provided User Software CD ROM in the CD ROM drive and specify the folder where the printer driver is located 5 Click OK Important When installing the printer driver on client computers select Network Printer on the connection type screen in the printer wizard and then select the printer shared from the...

Page 572: ...Items Item Details Default Setting Frame Type Specify the type of frame to use in NetWare Disabled NCP Burst Mode Activate this setting to use NCP Burst Mode This mode supports fast data transfer when printing in queue server mode Normally leave the setting On On Print Application Choose the print service Bindery PServer RPrinter NDS PServer NPrinter NDS PServer Packet Signature Select If Requeste...

Page 573: ...s a NetWare print server 0 255 characters Print Server Name Specify the name of a NetWare print server 0 64 characters Print Server Password Set a password for the print server 0 20 characters Polling Interval Specify the interval to con rm jobs 1 255 seconds 5 NPrinter Print Server Name Specify the name of a NetWare print server 0 47 characters Printer Number Specify the number of the printer con...

Page 574: ...ity see Installing imagePROGRAF Device Setup Utility P 487 Specifying the Frame Type Using imagePROGRAF Device Setup Utility 1 Start imagePROGRAF Device Setup Utility 2 In the list of printers select the printer to con gure 3 Choose Protocol Settings from the Printer menu 4 In the NetWare Frame Type list select the frame type 5 Click ETHERNET II under Frame Type in TCP IP 6 In IP Address enter the...

Page 575: ...is updated and an equals sign is displayed at left NetWare On Return to the NetWare menu 6 Press or to select Frame Type and then press NetWare Frame Type 7 Press or to select your frame type and then press OK The setting is updated and an equals sign is displayed at left Frame Type Ethernet 802 3 Return to the NetWare menu 8 Press or to select Print Service and then press NetWare Print Service 9 ...

Page 576: ...on rmation is displayed In this case press the OK button Important Be sure to complete step 10 This will activate the values you have entered Note If an error message is displayed check the settings and correct any invalid values To cancel the setup process hold down the Stop Eject button for a second or more 562 Network Setting ...

Page 577: ... NDPS use the Novell printer gateway included with NetWare For details on con guring NDPS refer to the NetWare documentation NDS Novell Directory Service and bindery NDS and bindery are both supported Use the mode that is compatible with your network environment Queue server mode and remote printer mode Queue server mode and remote printer mode are both supported Queue server mode When using queue...

Page 578: ...representing the physical volume on the network where the print queue will be created Click the button at right to choose from a list 7 Complete other settings as needed and click OK Note The print server name will be required when con guring the printer s protocol settings Write down the print server name for future reference When running Quick Setup the printer is assigned printer number 0 When ...

Page 579: ...ture reference 4 Specify the printer type 1 To use the printer in queue server mode choose Other Unknown in Type To use remote printer mode set Printer Type to Parallel and Position to Manual Load 2 Press the Esc key 3 After the con rmation message is displayed choose Yes and press the Enter key 5 Set a password 1 In Available Options select Print Servers and press the Enter key 2 Select the print...

Page 580: ...ly choose On 8 In Print Application click the print service to be used Note Only one print service selected here will be enabled Multiple print services are not available at the same time 9 For packet signature click If Requested by Server in Packet Signature 10 Complete the following settings based on the selected service If you have selected Bindery PServer Queue Server Mode Using a Bindery Prin...

Page 581: ...ng a NDS Print Server 1 In Print Server Name enter the advertising name of the print server created in Specifying NetWare Print Services P 563 Usually the advertising name is the same as the name of the print server 2 In Printer Number enter the same printer number speci ed in Specifying NetWare Print Services P 563 11 Click OK to display the Network page 12 Click Reset to activate the settings Fo...

Page 582: ... 4 Connect to the NetWare network Install NetWare client software on each computer to be used for printing over the network and log in to the NetWare server or tree For instructions on connection refer to the NetWare and operating system documentation 5 Install the printer driver Follow the instructions of your network administrator to install the printer driver on each computer to be used for pri...

Page 583: ...describes how to con gure the IP address using imagePROGRAF Device Setup Utility Important To con gure network settings you must be logged in with administrative rights such as Administrator account We recommend that your network administrator con gure the network settings For instructions on installing imagePROGRAF Device Setup Utility see Installing imagePROGRAF Device Setup Utility P 487 1 Star...

Page 584: ...nection instead of via USB connection If you switch to printing in an AppleTalk network see Con guring the Destination for AppleTalk Network Macintosh P 572 If you switch to printing in a TCP IP network or if the printer s IP address is changed see Con guring the Destination for TCP IP Network Macintosh P 576 If you switch to printing in a Bonjour network see Con guring the Destination for Bonjour...

Page 585: ...ject name used by AppleTalk in up to 31 single byte or 15 double byte characters However do not use the following single byte characters Canon NB 17FB xxxxxx Zone 2 Specify the printer zone name up to 31 single byte characters However do not use the following single byte characters Also avoid using which represents the default zone in the middle of a string 1 The object name you have speci ed in N...

Page 586: ...ce Setup 3 Press or to select AppleTalk and then press Interface Setup AppleTalk 4 Press or to select On and then press OK The setting is updated and an equals sign is displayed at left AppleTalk On 5 Press the Online button to bring the printer online If any of the settings is changed a message for con rmation is displayed In this case press the OK button Important Be sure to complete step 5 This...

Page 587: ...ferences click Network to display the Network window 2 In Show choose Built in Ethernet Next click AppleTalk select Make AppleTalk Active and click Apply now 3 Close the Network window and save the settings 4 Choose Utilities or Applications in the Go menu of Finder 5 Click Printer Setup Utility or Print Center in the Utilities folder 6 If the printer name is not displayed in Printer List click Ad...

Page 588: ... the Chooser window 2 In AppleTalk click Active 3 Close the Chooser window 4 Click AppleTalk under Control Panels to display the AppleTalk window 5 In Connect via choose Built in Ethernet 6 Close the AppleTalk window and save the settings 7 Choose Chooser from the Apple menu to display the Chooser window 8 In the list at left click GARO Printer Driver 574 Network Setting ...

Page 589: ...ng Macintosh 9 In the Destination list at right select AppleTalk and then select the printer in the list below 10 Close the Chooser window and click OK after the con rmation message is displayed Network Setting 575 ...

Page 590: ...Printer Control Panel P 541 Con guring the Destination Mac OS X Note The following procedures are based on Mac OS X 10 4 The method of con guring the destination varies depending on the version of Mac OS X If you use other versions refer to the help for the Printer Setup Utility or the Print Center 1 Choose Utilities or Applications in the Go menu of Finder 2 Click Printer Setup Utility or Print C...

Page 591: ...osh 5 In the list of connection methods click Canon IP iPF 6 Enter the printer s IP address in Printer s Address and click Add 7 Make sure the printer has been added and then close the Printer List window Network Setting 577 ...

Page 592: ...he Chooser window 2 In the list at left click GARO Printer Driver 3 Click Registering IP Address in the Destination list to display the IP Address Register Edit dialog box 4 Enter the printer s IP address in IP Address and click Add 5 Click OK to close the IP Address Register Edit dialog box 578 Network Setting ...

Page 593: ...Network Setting Macintosh 6 In the Destination list click the address you registered 7 Close the Chooser window and click OK after the con rmation message is displayed Network Setting 579 ...

Page 594: ...t require a router for connection Make sure the computer and printer are on the same network For information about network settings ask your network administrator By default Bonjour is activated on the printer The printer name as displayed in Chooser in Mac OS 9 or Printer Setup Utility or Print Center in Mac OS X is prede ned as the Multicast DNS Service Name You can activate or deactivate the Bo...

Page 595: ...g and reading a test pattern There are two modes for automatic adjustment Standard Adj and Advanced Adj Standard Adj will x most slight image distortion or color misalignment but if not try Advanced Adj If using special media or printing does not improve even after performing automatic adjustment using advanced adjustment try manual adjustment For instructions on manual adjustment see Adjusting th...

Page 596: ... type of media or adjust the Printhead alignment manually P 583 2 Press the Menu button to display MAIN MENU 3 Press or to select Adjust Printer and then press MAIN MENU Adjust Printer 4 Press the or button to select Auto Head Adj and then press Adjust Printer Auto Head Adj 5 Press or to select Advanced Adj and then press Auto Head Adj Advanced Adj 6 Press or to select Yes and then press OK The se...

Page 597: ...s not displayed in the menu choose Advanced Adj in Auto Head Adj Manual Head Adj is displayed after you try Auto Head Adj once 1 When using sheets have an unused sheet A4 Letter sized or larger ready When using a roll load a roll 10 inches 254 mm or wider Loading Sheets Manually P 155 Loading Rolls on the Roll Holder P 114 Loading Rolls in the Roll Feed Unit P 116 Loading the Roll in the Printer P...

Page 598: ... Unit is not installed select the type and size of paper loaded in the Cassette Media Source Roll 6 After Adj Setting is displayed press Adj Setting D 7 Press D D 1 8 Examine test pattern D 1 for printhead adjustment After you determine the pattern with straight lines press or to choose the pattern number and then press the OK button D 1 10 Note If you cannot determine the pattern with straight li...

Page 599: ... Printhead 12 Press or to select Yes and then press the OK button The setting is updated and an equals sign is displayed at left Save Settings Yes The printer now goes online Adjustments for Better Print Quality 585 ...

Page 600: ...ess MAIN MENU Med Detail Set 3 Press or to select the type of paper and then press Med Detail Set Plain Paper 4 Press or to select Head Height and then press Plain Paper Head Height 5 Press or to select Printhead and then press the OK button The setting is updated and an equals sign is displayed at left Head Height Automatic Important If you switch to another type of paper after printing reset the...

Page 601: ...e type and size for adjustment as you will use for printing To apply the results of adjusting the feed amount in printing you must rst set Feed Priority to Band Joint Note that if you select Automatic the results of adjustment will only be applied in printing if you set Print Priority in the printer driver to Image or Of ce Document P 225 Follow these steps to change the Feed Priority setting 1 Pr...

Page 602: ...n equals sign is displayed at left Standard Adj Yes Note The following screen is displayed if automatic feeding is selected when an optional Roll Feed Unit is installed but no roll is loaded In this case select the paper source and press the OK button If Cassette is selected on the following screen or if automatic feeding is selected when an optional Roll Feed Unit is not installed select the type...

Page 603: ...ess the Menu button to display MAIN MENU 3 Press or to select Fine Band Adj and then press the OK button MAIN MENU Fine Band Adj 4 Press or to change the value and then press the OK button The setting is updated and an equals sign is displayed at left Fine Band Adj 2 Note The supported range is 5 to 5 5 Press the Online button to resume printing Note The Fine Band Adj value set during printing is ...

Page 604: ... required when Adjust Band is selected and one sheet is required when Adj Far Ed Feed is selected Loading Rolls on the Roll Holder P 114 Loading Rolls in the Roll Feed Unit P 116 Loading the Roll in the Printer P 117 Loading Sheets in the Cassette P 152 Loading Sheets Manually P 155 Note Always select the paper type when loading paper Using paper that you have not selected on the printer may cause...

Page 605: ... and then press the OK button The setting is updated and an equals sign is displayed at left Manual Band Adj Yes Test pattern A is printed for band adjustment Note The following screen is displayed if automatic feeding is selected when an optional Roll Feed Unit is installed but no roll is loaded In this case select the paper source and press the OK button If Cassette is selected on the following ...

Page 606: ...iate value For example choose 11 if you cannot decide whether pattern 10 or 12 is better 6 Examine test pattern B for band adjustment After you determine the pattern in which streaks are least noticeable press or to choose the pattern number and then press the OK button Adj Setting 8 The feed amount is adjusted and the printer goes online If printed documents are still affected by uneven contrast ...

Page 607: ...1 Press the Online button to pause printing 2 Press the Menu button to display MAIN MENU 3 Press or to select Fine Band Adj and then press the OK button MAIN MENU Fine Band Adj 4 Press or to change the value and then press the OK button The setting is updated and an equals sign is displayed at left Fine Band Adj 2 Note The supported range is 5 to 5 5 Press the Online button to resume printing Note...

Page 608: ...e Drawing Text P 225 Follow these steps to change the Feed Priority setting 1 Press the Menu button to display MAIN MENU 2 Press or to select Med Detail Set and then press the button 3 Press or to select the type of paper and then press the button 4 Press or to select Feed Priority and then press the button 5 Press or to select Print Length and then press the OK button Follow these steps to adjust...

Page 609: ...tte is selected on the following screen or if automatic feeding is selected when an optional Roll Feed Unit is not installed select the type and size of paper loaded in the Cassette Media Source Roll 6 Measure the length of the adjustment pattern Calculate the difference between the measured length and actual length Enter it as a percentage and press the OK button You can adjust the value in 0 02 ...

Page 610: ... edge of 3 mm 0 12 in 1 Load a sheet of unused paper A4 Letter sized or larger Note Always make sure the loaded paper matches the media type setting on the printer Adjustment cannot be completed correctly unless the setting value matches the loaded paper We recommend using the type of paper you use most often for adjustment 2 Press the Menu button to display MAIN MENU 3 Press or to select Adjust P...

Page 611: ...s the or to choose the pattern number and then press the OK button The printer now goes back online Note If streaks seem least noticeable in two patterns but you cannot decide which one is better choose an intermediate value For example choose 17 if you cannot decide whether pattern 16 or 18 is better Adjustments for Better Print Quality 597 ...

Page 612: ... Menu button to display MAIN MENU 2 Press or to select Med Detail Set and then press MAIN MENU Med Detail Set 3 Press or to select the type of paper and then press Med Detail Set Plain Paper 4 Press or to select VacuumStrngth and then press Plain Paper VacuumStrngth 5 Press or to select the level of suction against paper on the Platen and then press the OK button The setting is updated and an equa...

Page 613: ...e on the side When purchasing Ink Tank make sure an A is printed on the label along with the following Ink Tank part numbers BK Ink Tank PFI 102BK MBK Ink Tank PFI 102MBK C Ink Tank PFI 102C M Ink Tank PFI 102M Y Ink Tank PFI 102Y 130 ml per color Note For instructions on replacing Ink Tank see Replacing Ink Tanks P 600 Maintenance 599 ...

Page 614: ...e printer Ink may leak out Avoid dropping the Ink Tank after removing it from the pouch Otherwise ink may leak and cause stains There may be ink around the ink holes of Ink Tank you remove Handle an Ink Tank carefully during replacement The ink may stain clothing We recommend using up an Ink Tank in the course of printing within six months after breaking the seal Using an old Ink Tank may affect t...

Page 615: ...ven during print jobs if No Ink Left is shown on the Display Screen but it is not possible to replace Ink Tank in other cases If you pause printing to replace an Ink Tank it may cause the printed images to be blurry 2 Open the Ink Tank Cover and check the Ink Lamp The Ink Lamp ashes quickly if there is no ink left Note Ink levels are shown on the Display Screen of the control panel and the level i...

Page 616: ...k Lock Lever to open it 4 Hold the empty Ink Tank by the grip and remove it Note If there is still some ink left in the Ink Tank you removed store the ink tank with the ink holes a facing up Otherwise ink may leak and cause stains Dispose of used Ink Tanks according to local regulations 602 Maintenance ...

Page 617: ...nk and affect printing quality Avoid dropping the Ink Tank after removing it from the pouch Otherwise ink may leak and cause stains Do not remove an Ink Tank to shake it once installed in the printer Ink may leak out 7 Insert the Ink Tank into the holder facing as shown in the gure with the ink holes down Important Ink Tank cannot be loaded in the holder if the color or orientation is wrong If the...

Page 618: ...ere is little ink left 10 Close the Ink Tank Cover The printer returns to the mode before replacement of Ink Tank If the printer was in Menu mode or an error message was shown on the Display Screen the printer goes online If a print job was in progress when the Ink Tank was replaced printing is automatically resumed 604 Maintenance ...

Page 619: ... Display Screen bottom line These levels shown on the Display Screen correspond to the inks identi ed by the Color Label below the Display Screen The remaining ink level is indicated as shown below When Not Enough Ink or No Ink Left appears on the Display Screen a symbol is shown above the Ink Tank without much ink left Check the ink levels and replace an Ink Tank as needed if Ink Lvl Chk xx here ...

Page 620: ...ce that consume a lot of ink If little ink is left there may not be enough for large format printing head cleaning and maintenance which require a lot of ink In this case replace or prepare to replace the Ink Tank before maintenance The display corresponds to the color labels on the bottom of the Display Screen Not Enough Ink If a message for ink replacement is shown on the Display Screen When ink...

Page 621: ...zles are clear by printing a test pattern to check the nozzles For instructions see Checking for Nozzle Clogging P 608 Improving the Print Quality If printing is faint or streaked in different colors make sure the Printhead nozzles are clear by printing a test pattern to check the nozzles Clean the Printhead if the printed test pattern was faint For instructions on cleaning the Printhead see Clean...

Page 622: ...in the Printer P 117 Loading Sheets in the Cassette P 152 Loading Sheets Manually P 155 2 Press the Menu button to display MAIN MENU 3 Press or to select Test Print and then press MAIN MENU Test Print 4 Press or to select Nozzle Check and then press the OK button The printer goes online and prints a test pattern 5 Check the printing results The Printhead L prints the test pattern for nozzle checki...

Page 623: ...he steps below and check again for nozzle clogging 1 Clean the Printhead P 610 2 Print a test pattern to check the nozzles Note If you repeat these steps several times but the horizontal lines are still faint or incomplete contact your Canon dealer Maintenance 609 ...

Page 624: ...press the OK button Head Cleaning A Use Head Cleaning A if printing is faint or contains foreign substances This method of cleaning consumes the least amount of ink It takes about four minutes to complete Head Cleaning B Use Head Cleaning A if no ink comes out of the printhead or if Head Cleaning B does not solve the problem It takes about six minutes to complete The setting is updated and an equa...

Page 625: ...d becomes extremely hot and there is a risk of burns Important Avoid dropping or shaking the Printhead Otherwise ink may leak and cause stains There may be ink around the nozzles of the Printhead you remove Handle the Printhead carefully during replacement The ink may stain clothing Do not open the Printhead pouch until immediately before installation After removing the Printhead from the pouch in...

Page 626: ...51 1 If the roll is not ejected because of the cutting method selected cut it manually and remove it P 437 2 Clean inside the Top Cover P 627 3 Press the Menu button to display MAIN MENU 4 Press or to select Maintenance and then press MAIN MENU Maintenance 5 Press or to select Replace P head and then press Maintenance Replace P head 6 Press or to select Yes and then press OK The setting is updated...

Page 627: ... Replace P head Rep P head OK 8 If the Carriage is dirty use a damp cloth that you have wrung out completely to wipe it clean Important Do not touch the Linear Scale a or Carriage Shaft b Never touch the metal contacts of the Carriage This may damage the printer Maintenance 613 ...

Page 628: ... it completely 11 Remove the used Printhead Caution When replacing the Printhead immediately after printing wait a few minutes before replacing it The metal parts of the Printhead become hot during printing and there is a risk of burns from touching these parts Note Dispose of the used Printhead in accordance with local regulations 614 Maintenance ...

Page 629: ...ful not to touch areas other than the grips Never touch the ink supply section d This may cause printing problems The inside surface of Safety Cap 2 b is coated with ink to protect the nozzles Handle it carefully to avoid touching the nozzles or spilling ink Spilled ink may cause stains The Printhead contains ink to protect the nozzles If this ink is accidentally spilled it may stain the printer o...

Page 630: ...Carriage Carefully push the printhead rmly into the Carriage ensuring that the nozzles or metal contacts do not touch the carriage 15 Pull the Printhead Fixer Cover down toward the front to lock the Printhead in place 16 Push the Printhead Fixer Lever toward the back of the printer until it clicks 616 Maintenance ...

Page 631: ...t will be automatically adjusted and the printer will go online Important Never touch the Ink Tank nozzles or the metal contacts This may cause printing problems If Auto Print is Off in the printer menu the Printhead alignment will not be adjusted In this case adjust the alignment after Printhead replacement by accessing Advanced Adj in Auto Head Adj P 581 Maintenance 617 ...

Page 632: ...he following precautions when handling the Maintenance Cartridge Caution For safety keep the Maintenance Cartridge out of the reach of children If ink is accidentally ingested contact a physician immediately Important Do not remove the Maintenance Cartridge except to replace it To prevent ink from leaking from a used Maintenance Cartridge avoid dropping the cartridge or storing it at an angle Othe...

Page 633: ... Maint Cartridge Replace Cart Maint Cartridge Replace Cart Do not replace the Maintenance Cartridge during initialization immediately after turning on the printer or during Printhead cleaning Initializing If you pause printing to replace the Maintenance Cartridge it may cause the printed images to be blurry 2 Holding the Output Tray on both sides by the far end press the button to release the lock...

Page 634: ...n both sides rmly and keep the cartridge level during removal and storage If you drop a used Maintenance Cartridge or store it at an angle ink may leak and cause stains The remaining Maintenance Cartridge capacity is recorded on each printer Do not install a used Maintenance Cartridge in another printer 4 Open the plastic bag of the new Maintenance Cartridge and remove the packaging material Holdi...

Page 635: ...al contacts a This may damage the Maintenance Cartridge 5 Keeping the used Maintenance Cartridge level put it in the plastic bag that was in the box as shown 6 Expel air in the plastic bag and seal the zipper Fold the plastic bag in half Maintenance 621 ...

Page 636: ...store the box on a at surface Otherwise ink may leak and cause stains In accordance with its active and ongoing policy to protect the environment Canon collects used Maintenance Cartridge Follow the instructions provided with the new Maintenance Cartridge that describe how to process the used Maintenance Cartridge 8 Holding the handles on both sides of the new Maintenance Cartridge a insert it com...

Page 637: ...dge is installed correctly If the printer was in Menu mode or an error message was shown on the Display Screen the printer goes online If a print job was in progress when the Maintenance Cartridge was replaced printing is resumed Important Do not remove the Maintenance Cartridge during about the rst ve seconds after the printer goes back online This may damage the Maintenance Cartridge If you repl...

Page 638: ...nline except during print jobs or error messages During print jobs or error messages press the Information button to display the Maintenance Cartridge capacity at right on the Display Screen bottom line The remaining capacity level of the Maintenance Cartridge is indicated as shown below If Maint Cartridge Replace Cart is shown on the Display Screen replace the Maintenance Cartridge If MTCart Full...

Page 639: ...pacity is depleted Printhead cleaning Printhead replacement and preparations to transfer the printer deplete much of the Maintenance Cartridge capacity In particular preparing to move the printer depletes a lot of the capacity Check the Maintenance Cartridge capacity and if necessary perform maintenance after replacing the Ink Tank OnlineISO A2 MTCart Full Soon If a message for the Maintenance Car...

Page 640: ... power cord before cleaning or maintenance Accidentally leaving the printer on poses a risk of injury if you touch moving parts inside the printer 3 Using a damp cloth that you have wrung out completely wipe the exterior surfaces of the printer Dry the surfaces with a dry cloth Caution Never use ammable solvents such as alcohol benzene or thinner If these substances come into contact with electric...

Page 641: ...utting debris If you have replaced the roll Important If the Platen inside the Top Cover becomes dirty it may soil the underside of paper We recommend always cleaning the Platen after borderless printing or printing on small paper 1 Press the Menu button to display MAIN MENU 2 Press or to select Maintenance and then press MAIN MENU Maintenance 3 Press the or button to select Clean Platen and then ...

Page 642: ...e the Cleaning Brush provided with the printer to wipe it away Note If the Cleaning Brush is dirty rinse it in water 7 Using a damp cloth that you have wrung out completely wipe inside the Top Cover to clean it Wipe away any ink residue on the Platen as a whole the Paper Retainer and the Borderless Printing Ink Grooves 628 Maintenance ...

Page 643: ...ay attract dust and affect the printing quality Never use ammable solvents such as alcohol benzene or thinner If these substances come into contact with electrical components inside the printer there is a risk of re or electrical shock Never touch the Linear Scale a or Carriage Shaft b 8 Close the Top Cover Maintenance 629 ...

Page 644: ...if you use lm or other media that are more likely to generate debris when cut or that have a surface nish that may come off 1 Turn the printer off P 25 2 Unplug the power cord from the outlet Caution Always turn off the printer and unplug the power cord before cleaning and maintenance Accidentally leaving the printer on poses a risk of injury if you touch moving parts inside the printer 3 Remove t...

Page 645: ...d Plain Paper In Cassette is displayed for two seconds after which the display reverts to the upper level menu 1 Load a sheet of Letter size plain paper in the Cassette P 87 2 Press the Menu button to display MAIN MENU 3 Press or to select Maintenance and then press MAIN MENU Maintenance 4 Press or to select Clean Roller and then press Maintenance Clean Roller 5 Press or to select Yes and then pre...

Page 646: ...then press the OK button Head Cleaning A Use Head Cleaning A if printing is faint or contains foreign substances This method of cleaning consumes the least amount of ink It takes about four minutes to complete Head Cleaning B Use Head Cleaning A if no ink comes out of the printhead or if Head Cleaning B does not solve the problem It takes about six minutes to complete The setting is updated and an...

Page 647: ...e transfer preparations P 618 Do not tilt the printer in transit Ink inside the printer may leak and cause stains If it is necessary to stand the printer up or tilt it contact your Canon dealer 1 Remove the paper Cassette P 166 Rolls P 119 P 120 P 121 Sheet P 168 2 Press the Menu button to display MAIN MENU 3 Press or to select Maintenance and then press MAIN MENU Maintenance 4 Press or to select ...

Page 648: ...ank Cover Remove Ink Tank is shown on the Display Screen Move Printer Remove Ink Tank 7 Open the Ink Tank Lock Lever and remove every Ink Tank Put the Ink Tank in a plastic bag and seal it Note Store the Ink Tank you removed with the ink holes a facing up Otherwise ink may leak and cause stains 634 Maintenance ...

Page 649: ...Turn Power Off Important Turn off the printer before you unplug it It may damage the printer if you unplug it before it is off and transfer it in that state If you accidentally unplug the printer plug it in again reinstall the Ink Tanks wait until the printer comes online and follow this procedure again 10 Disconnect the power cord and interface cable 11 Open the Top Cover 12 Grasp the Belt insert...

Page 650: ...oved and stored after initial installation 13 Close the Top Cover 14 Tape down printer covers to secure them in the reverse order of tape removal during installation 15 Grasp the handle a on the front of the Cassette and pull it forward a little Holding the Cassette on both sides with both hands remove the cassette 636 Maintenance ...

Page 651: ...e Update the printer rmware to take advantage of new and improved printer functions Con rming the rmware version 1 Press the Menu button to display MAIN MENU 2 Select Information Version The rmware version is displayed Updating the rmware To obtain the latest rmware visit the Canon website If the rmware available online is newer than the installed rmware update the printer rmware For details on do...

Page 652: ...r Selection button ÞSelecting the Paper Source P 111 How do I change the paper type or size Specify the type and size of paper both on the Control Panel and in the printer driver Specifying it in the Printer Driver ÞSpecifying Paper in the Printer Driver P 241 Specifying it on the Control Panel Selecting the paper type ÞSelecting the Paper Type Roll P 112 ÞSelecting the Paper Type Tray P 147 ÞSele...

Page 653: ... Format Printing P 332 How do I print on a custom paper size You can specify custom sizes temporarily in the printer driver ÞPrinting on Non Standard Paper Sizes P 344 How do I register custom paper sizes You can add desired sizes Custom Media Sizes in the Size Options dialog box of the printer driver ÞPrinting on Non Standard Paper Sizes P 344 How do I print lines thicker By specifying Thicken Fi...

Page 654: ...ng is updated and an equals sign is displayed at left Manual Pap Size ISO A2 A con rmation message is displayed notifying you that the printer is changing the media source Please Wait 4 After the following message is displayed press the OK button Chk Back Space Press OK 5 After the following message is displayed open the Top Cover Open UpperCover 6 Fold an A4 sheet lengthwise four times and insert...

Page 655: ...ring Jammed Paper Paper Feed Slot P 125 1 Open the Roll Feed Unit Cover Use a store bought cutter or the like to cut the paper of the loaded roll Caution When cutting paper be careful to avoid injury and damaging the printer 2 Press button 3 Remove the jammed paper If paper is jammed inside the Top Cover 1 Open the Top Cover and move the Carriage to the side 2 Clear any jammed paper from inside th...

Page 656: ...oll is jammed by the Paper Feed Slot 1 Open the Roll Feed Unit Cover 2 Remove the jammed paper from the Paper Feed Slot After removing the paper make sure there are no other scraps of paper in the printer If paper is jammed deep in the Paper Feed Slot P 643 remove the Roll Feed Unit and clear the paper jam 642 Troubleshooting ...

Page 657: ...Press If paper is jammed deep in the Paper Feed Slot remove the Roll Feed Unit and clear the paper jam as follows 1 Turn off the printer and remove the Roll Feed Unit from the printer P 142 2 Remove the jammed paper from the Paper Feed Slot After removing the paper make sure there are no other scraps of paper in the printer 3 Install the Roll Feed Unit on the printer again P 143 Troubleshooting 64...

Page 658: ... Can t DetectPapr Remove Paper is displayed If paper is jammed in the paper feed slot of the cassette 1 Grasp the handle a on the front of the Cassette and pull it forward a little Holding the Cassette on both sides with both hands remove the cassette 2 Clear any jammed paper from the paper feed slot of the Cassette After removing the paper make sure there are no other scraps of paper in the print...

Page 659: ...r remove the Back Cover from the printer 2 Remove the jammed paper from the back After removing the paper make sure there are no other scraps of paper in the printer Caution Do not touch the areas in the printer indicated by a If the grease that coats these parts is accidentally wiped away it may cause feeding problems Troubleshooting 645 ...

Page 660: ...he marks on the Back Cover If Paper Jam Press Key is displayed 1 Press 2 Remove the jammed paper If paper is jammed inside the Top Cover 1 Open the Top Cover and move the Carriage to the side 2 Clear any jammed paper from inside the Top Cover After removing the paper make sure there are no other scraps of paper in the printer 646 Troubleshooting ...

Page 661: ...our hands and damage the printer If paper is jammed in the back of the printer 1 While squeezing the two levers a at two positions on the Back Cover remove the cover from the printer 2 Remove the jammed paper from the back After removing the paper make sure there are no other scraps of paper in the printer Troubleshooting 647 ...

Page 662: ...evers at two positions so that the levers are aligned with the marks on the Back Cover If the paper is jammed by the Output Tray 1 Remove the jammed paper from the Output Tray After removing the paper make sure there are no other scraps of paper in the printer 3 Press 648 Troubleshooting ...

Page 663: ...the Control Panel Remove the jammed paper as follows 1 Press 2 Remove the jammed paper If paper is jammed inside the Top Cover 1 Open the Top Cover and move the Carriage to the side 2 Clear any jammed paper from inside the Top Cover After removing the paper make sure there are no other scraps of paper in the printer 3 Close the Top Cover Troubleshooting 649 ...

Page 664: ...er removing the paper make sure there are no other scraps of paper in the printer If paper is jammed deep in the Paper Feed Slot P 651 remove the Roll Feed Unit or Paper Tray Unit and clear the paper jam If the paper is jammed by the Output Tray Remove the jammed paper from the Output Tray After removing the paper make sure there are no other scraps of paper in the printer 650 Troubleshooting ...

Page 665: ... Paper Feed Slot remove the Roll Feed Unit or Paper Tray Unit and clear the paper jam as follows 1 Turn off the printer and remove the Roll Feed Unit or Paper Tray Unit from the printer P 142 P 177 2 Remove the jammed paper from the Paper Feed Slot After removing the paper make sure there are no other scraps of paper in the printer 3 Install the Roll Feed Unit or Paper Tray Unit on the printer aga...

Page 666: ... Tray which lifted the document The Cutter passed under the paper Remove the foreign object by the Output Tray to enable the printer to eject the printed document keeping it level In the printer driver No or Print Cut Guideline is speci ed in Auto Cut Specify Yes in Auto Cut in the printer driver In MAIN MENU Eject or Manual is speci ed in Cutting Mode Specify Automatic in Cutting Mode in MAIN MEN...

Page 667: ...be ejected because the roll was advanced when the Front Tray Guides were in the Front Paper Feed Slot On the Control Panel momentarily select POP Board on the screen for selection of the media type The Front Paper Feed Slot will rise so lift the Vertical Paper Guides and store them toward the front Troubleshooting 653 ...

Page 668: ...es or Printers window 2 Clear Pause Printing in the File menu to restart the print job In Mac OS X restart the print job as follows 1 Open the Printer Setup Utility or the Print Center 2 Select the printer and then Start Jobs in the Printers menu to restart the print job The print job is paused The printer is in Sleep mode In Mac OS 9 restart the print job as follows 1 Open imagePROGRAF Printmonit...

Page 669: ...en Trim Edge First is Automatic and the leading edge is slanted The printer is ready to print after this initial preparation When Off is selected under Trim Edge First the edge is not cut and scraps are not removed The Printhead nozzles are clogged Print a test pattern to check the nozzles and make sure the Printhead is in good condition for printing P 608 Clean the Printhead if the nozzles are cl...

Page 670: ...f paper inside the Top Cover 1 Press the Online button to bring the printer of ine 2 Open the Top Cover and make sure the Carriage is not over the Platen 3 Remove any scraps of paper inside the Top Cover 4 Close the Top Cover For tips on clearing paper jams refer to the following topics Clearing Jammed Paper from the Cassette P 169 Clearing Jammed Roll Paper P 122 Clearing Jammed Paper from the Tr...

Page 671: ...d media choose a VacuumStrngth setting of Strong or Strongest If the paper is still scratched try setting the Printhead level in Head Height to High P 598 P 586 When printing on CAD Tracing Paper or lm based media choose a VacuumStrngth setting of Standard Strong or Strongest If the paper is still scratched try setting the Printhead level in Head Height to High P 598 P 586 When printing on paper 0...

Page 672: ...t line is printed because the function to reduce cutting dust has been activated If this function is not needed deactivate CutDustReduct through the printer menu P 51 The Printhead is set too low In Head Height choose Automatic P 586 When printing on Heavyweight Coated Paper or other paper based media choose a VacuumStrngth setting of Strong or Strongest If the paper is still scratched try setting...

Page 673: ... Roller marks are left across the trailing edge of paper Cause Corrective Action Following the instructions press the button remove the paper and then press the button A document was removed after printing from the Front Paper Feed Slot without pressing the button Wipe away any soiling on the rollers P 627 P 630 Fine Scratches Appear on Glossy Paper from the Cassette Cause Corrective Action When g...

Page 674: ...he nozzles and see if they are clogged P 608 In the printer driver Application Color Matching Priority is not selected Click Special Settings on the Layout sheet of the printer driver and select Application Color Matching Priority in the dialog box Printhead characteristics gradually change through repeated use and colors may change Adjust the Printhead alignment P 581 P 583 Color may change sligh...

Page 675: ...rint jobs are interrupted during transmission Exit other applications and cancel other print jobs In the printer menu Print Length is speci ed in Feed Priority To adjust the feed amount specify Band Joint in Feed Priority in the printer menu P 587 The Printhead is out of alignment Adjust the Printhead alignment P 581 Streaks may occur if you set the Print Quality too low Choose a higher level of P...

Page 676: ...ity too low Choose a higher level of Print Quality in the Advanced Settings of the printer driver P 225 Color may be uneven between dark and light image areas Select Unidirectional Printing in the Advanced Settings of the printer driver Specify No in Auto Cut in the printer driver before printing In this case the paper can be printed without borders on the left and right sides only Cut the printed...

Page 677: ...th in Feed Priority in the printer menu and enter the amount for adjustment in Adjust Length You can adjust the feed amount in 0 02 0ncrements P 51 Documents are printed crooked Cause Corrective Action Skew Skew Check Lv has been set to Loose or Off Choose Standard in Skew Check Lv If strict skew detection is required choose High Accuracy in Skew Check Lv Documents are printed in monochrome Cause ...

Page 678: ...Settings button in the Layout sheet to open the Special Settings dialog box and remove the check from Fast Graphic Process Lines are misaligned Cause Corrective Action The Printhead alignment is not adjusted Adjust the Printhead alignment P 581 P 583 Thin lines are not printed after switching to Economy Printing mode Cause Corrective Action You have selected Economy Printing in the printer driver ...

Page 679: ...ks in place Make sure there is no problem with the Ethernet cable If there is any problem replace the Ethernet cable Check the communication mode with the hub Although the printer normally detects the hub communication mode and transmission rate automatically in auto negotiation mode sometimes the hub settings cannot be detected In this case con gure the connection method manually specifying the c...

Page 680: ...t the print service is con gured correctly and the print queue is available 4 If data transmission to a printer on another subnet fails deactivate NCP burst mode in that printer s network protocol settings 5 If the printer is used in queue server mode specify Other Unknown as the printer type The printer was turned off and on when not disconnected from the server Leave the printer off for at least...

Page 681: ...vices icon and choose Properties 4 On the Driver sheet click Update Driver to start the Hardware Update Wizard or the Upgrade Device Driver Wizard 5 Follow the instructions on the screen 6 When the window is displayed to choose the source for driver installation select the CD ROM drive Insert the User Software CD ROM provided with the printer and follow the instructions on the screen The device in...

Page 682: ...nstaller included in the User Software CD ROM For Mac OS X open OS X and double click iPF Driver Installer X For Mac OS 9 open OS 9 and double click iPF Driver Installer 9 3 In the upper left menu choose Uninstall and click Uninstall 4 Follow the instructions on the screen to remove the printer driver or imagePROGRAF Printmonitor Removing imagePROGRAF Status Monitor Windows Remove imagePROGRAF Sta...

Page 683: ...int setting ThicknFineLines to On in the main menu will print the lines more distinctly P 51 HP GL 2 jobs are printed in monochrome or color Cause Corrective Action The color mode is incorrect On the printer Control Panel check the color mode setting P 51 For optimal printhead performance the printer consumes trace amounts of color ink even in monochrome mode Printed Colors in Line Drawings are In...

Page 684: ...gain The memory buffer was cleared from the Control Panel The printer was turned off The printer has received a new HP GL 2 print job Printing has been canceled The printer stops when printing a HP GL 2 job the carriage stops moving Cause Corrective Action The printer is analyzing the print job Either wait a while for printing to resume or on the printer Control Panel set Input Reso to 300dpi P 51...

Page 685: ...t cleared Cause Corrective Action Remove the new Maintenance Cartridge you have just installed and insert it again rmly The printer has not detected the new Maintenance Cartridge that was used to replace the old one Restart the printer The printer consumes a lot of ink Cause Corrective Action Many full page color images are printed In print jobs such as photos images are lled with color This consu...

Page 686: ...loaded Ink Tank To use ink level detection again replace the Ink Tank with a new ink tank speci ed for use with the printer Repeatedly removing and inserting an Ink Tank may damage the connection between the Ink Tank and the printer which may cause ink leakage from the Ink Tank and damage the printer Disabling ink level detection 1 On the Display Screen a message indicates that the ink level canno...

Page 687: ... in ink tank Canon is not liable for damages due to lled tank Agree 6 Press or to select Yes and then press the OK button Agree Yes 7 A con rmation message is shown on the Display Screen As you check the message press the button repeatedly until the screen of step 8 is displayed Release inklevel detection Perform after use of ink tank was memorized Agree 8 Press or to select Yes and then press the...

Page 688: ... Display Screen if the printer operation stops until you take some action The pages are displayed alternately Check the message and take the appropriate action P 676 Maint Cartridge Replace Cart Error messages if no action can be taken Error noti cation ERROR is displayed with the error code on the top line of the Display Screen and a message is displayed on the bottom line of the Display Screen E...

Page 689: ...rinter operation Check the information on the Display Screen and take action as necessary Messages requiring special attention are as follows Note Messages are also displayed in imagePROGRAF Status Monitor Windows or imagePROGRAF Printmonitor Macintosh Error Message 675 ...

Page 690: ...78 Error messages if action can be taken Check the message and take the appropriate action GL2 Unsup papr P 696 Need 10 in or Larger Roll P 680 Need A4 Letter Vert or Larger P 680 No Ink Left P 690 Ink Tank Check xx xx represents an ink color P 691 Ink Tank Replace xx xx represents an ink color P 692 Close UpperCover P 697 Online Key and recalibrate P 693 Load Papr in Cas Press Online P 684 Casset...

Page 691: ...smatch Prnt PressOnline P 679 Paper Please Reload P 687 Remove paper P 685 Paper Askew Please Reload P 687 Roll Selected Load Roll P 682 Roll Paper Please Replace P 681 Roll Paper Chk Check Width Spcr P 683 Roll P Unit Please Check P 683 Error messages if no action can be taken ERROR Exxx xxxx x represents a letter or number P 697 No data P 696 Other Messages These messages do not prevent printer ...

Page 692: ...s Cause Corrective Action When using multiple sheets to print test patterns for printer adjustment you are using sheets of different sizes or types of paper Press the button to eject the sheet and load a sheet of the same size and type as the rst sheet PaprTyp Mismatch Cause Corrective Action Make sure the same type of paper is speci ed on the printer as in the printer driver P 82 P 89 P 87 Follow...

Page 693: ... Roll Paper Width in the printer driver settings and Warning in Detect Mismatch in the printer menu Printing resumes after the warning message is displayed However note that this error may cause paper jams and affect the printing quality Try printing again after adjusting the paper size as speci ed in the printer driver and the size speci ed on the printer so that they match Follow the steps below...

Page 694: ...orted by the printer Press the Online button to clear the error message For details on supported paper sizes see Paper Sizes P 109 Paper Too Large Please Check Cause Corrective Action The loaded paper exceeds the maximum size supported by the printer Press the Online button to clear the error message For details on supported paper sizes see Paper Sizes P 109 Papr Size Undetected Cause Corrective A...

Page 695: ... longer than the amount of roll paper left Press the Online button to continue with printing However the roll paper may run out during the print job and you may not be able to print all of the document Paper Not Loaded Press Key Cause Corrective Action The roll is empty Follow the steps below to replace the used roll with a new roll of the same type and size 1 If the last paper on the roll has not...

Page 696: ...een loaded Load paper of the correct size P 109 Roll Selected Load Roll Cause Corrective Action Follow these steps to load the roll 1 Load the roll P 114 P 116 P 117 2 If no barcode was printed on the roll specify the paper type P 112 3 Specify the paper length unless a barcode has been printed on the roll and you have deactivated the automatic detection function of the remaining roll paper P 113 ...

Page 697: ...y become narrower or wider than the supported width for borderless printing Use each type of paper only where the recommended environmental conditions are met For details on environmental conditions for various paper see the Paper Reference Guide P 103 Roll P Unit Please Check Cause Corrective Action Change the paper source in the printer driver to a source other than roll and then try printing ag...

Page 698: ...e P 87 Change the printer driver settings to match the paper feed slot speci ed for the sheet already loaded and then try printing again A print job for the Cassette was sent when no sheets are loaded there Hold down the Stop Eject button for a second or more to cancel printing Cassette Selectd Press Key Cause Corrective Action After printing on a roll the printer has received a print job that spe...

Page 699: ...not inserted correctly Insert the Cassette rmly all the way into the printer P 152 Unsupported paper is loaded in the Cassette Load paper that can be used in the Cassette Refer to the Paper Reference Guide for details on supported paper P 103 Too much paper is loaded in the Cassette The paper height exceeds the maximum capacity Load the paper making sure not to exceed the Maximum Capacity Line of ...

Page 700: ...s been loaded in the tray askew Follow the steps below to reload the paper 1 After pressing the button to clear the error message remove any jammed paper from the tray P 174 2 Load sheets manually P 155 Note To disable this message if it is displayed repeatedly despite reloading paper for example choose Off or Loose in the Skew Check Lv setting of the printer menu However this may cause jams as pa...

Page 701: ...eet 3 Press the button 4 Load a sheet manually P 155 Note To disable this message if it is displayed repeatedly despite reloading paper for example choose Off or Loose in the Skew Check Lv setting of the printer menu However this may cause jams if paper is crooked when printed Also the platen may become soiled which may soil the back of the next document when it is printed Paper Please Reload Caus...

Page 702: ...reign object You are not using the printer under the recommended environmental conditions for the paper Use the printer only where the recommended environmental conditions for the paper are met Note that various environmental conditions are recommended for various types of paper For details on the recommended environmental conditions for paper see Types of Paper P 103 You are using paper that is n...

Page 703: ...dicated printer driver for your printer is selected and try printing again For information on types of paper compatible with borderless printing refer to the Paper Reference Guide P 103 P 299 P 310 P 288 The print job received speci es a type or width of paper that is not compatible with borderless printing Press the Online button to continue with printing However note that this error may cause pa...

Page 704: ... situation will occur depending on the position of the leading edge when it passes through the printer 1 No Ink Left is displayed and printing stops Press the Stop Eject button to cancel printing or open the Ink Tank Cover replace the ink tank that is low with a new one and continue printing However note that because printing is paused colors may be slightly different P 600 2 No Ink Left Canceling...

Page 705: ...ause Corrective Action The Ink Tank Cover is open Close the Ink Tank Cover Ink Lvl Chk xx xx represents an ink color Cause Corrective Action Not much ink is left Prepare a new Ink Tank We recommend replacing the Ink Tank with a new Ink Tank at this point if you plan to print large format or high quantity jobs Ink Tank Check xx xx represents an ink color Cause Corrective Action There is no Ink Tank...

Page 706: ... The printer cannot process any more ink mist There is a possibility that printing may stop in the middle of large format or borderless printing jobs Contact the Canon dealer for such types of printing You can continue printing The Display Screen indicates the system is lling with ink Cause Corrective Action When the printer was turned off previously some cleaning operation was terminated Wait unt...

Page 707: ...e Band Adj Error Please Readjust Cause Corrective Action The feed amount cannot be adjusted highly transparent lm is loaded Adjust the feed amount manually P 590 Printhd Adj Err Please Readjust Cause Corrective Action The Printhead nozzles are clogged Follow the steps below to check the nozzles 1 Print a test pattern to check the nozzles P 608 2 Clean the Printhead if the nozzles are clogged P 610...

Page 708: ...zles Cause Corrective Action If printing is faint clean the Printhead P 610 The printhead nozzles may be clogged Press the Online button to continue with printing However note that this error may affect the printing quality To cancel printing press the Stop Eject button Check Printout Cause Corrective Action The Printhead nozzles are becoming clogged If printing is faint clean the Printhead P 610 ...

Page 709: ...ridge Replace Cart Maint Cart Error Replace Cart Cause Corrective Action An incompatible or used Maintenance Cartridge has been installed Install a Maintenance Cartridge speci ed for use with the printer P 618 Maint Cart Full Replace Cart Cause Corrective Action The Maintenance Cartridge is full After con rming that the printer has stopped operating replace the Maintenance Cartridge P 618 Maint Ca...

Page 710: ... replotting Data for replotting is lost after the following operations In this case send the print job again The memory buffer was cleared from the Control Panel The printer was turned off The printer received a new print job GL2 Wxxxx xxxx is 0501 0903 or 0904 Cause Corrective Action The printer memory is full Because the entire print job could not be received the printer may not be able to print...

Page 711: ...e printer and contact your Canon dealer for assistance Error noti cation ERROR is displayed with the error code on the top line of the Display Screen and a message on the bottom of the Display Screen ERROR Exxx xxxx Call For Service Close UpperCover Cause Corrective Action The Top Cover is open Close the Top Cover Consumables Low Cause Corrective Action It is almost time to replace consumables for...

Page 712: ...ree seconds or more before restoring the power There is a problem with the printer If the message is still displayed after this write down the error code and message turn off the printer and contact the Canon dealer for assistance Power On Again Multi sensor Err Cause Corrective Action Direct sunlight or strong lighting may be shining on the printer and causing the sensor to malfunction Take steps...

Page 713: ...39 Removing the Spacer for Borderless Printing 140 B Back 15 Banding in different colors occurs 661 Basic Environmental Performance 77 Packaging materials 77 Printer 77 Basic Printing Workflow 80 Borderless Printing 299 Borderless Printing at Actual Size 288 321 Borderless Printing 288 321 Borderless Printing Method 288 321 Print Image with Actual Size 289 322 Borderless Printing at Actual Size Ma...

Page 714: ...169 644 If Paper Jam Press Key is displayed 171 646 Clearing Jammed Paper from the Tray 174 649 Clearing Jammed Roll Paper 122 641 Close UpperCover 697 Color Adjustment Sheet Color Windows 463 Object Adjustment dialog box 464 Color Adjustment Sheet Monochrome Windows 467 Object Adjustment dialog box 468 Color Settings Pane Color Mac OS 9 528 Color Adjustment pane color 528 Matching pane 530 Object...

Page 715: ...ac OS 9 441 Cutting Roll Paper After Printing Mac OS X 439 Cutting Roll Paper After Printing Windows 438 Cutting the Leading Edge of Roll Paper Automatically 135 D Depression on the leading edge is left 652 Desktop Stacker 72 178 Detection of the Remaining Roll Paper 127 Device Settings Pane Mac OS 9 526 Device Settings Sheet Windows 480 Device Setup Utility 487 Digital Photo Front Access 483 Docu...

Page 716: ...ss is not uniform Windows 664 Lines are misaligned 664 Lines Are Printed Too Thick or Thin During HP GL 2 Printing 669 Lines or images are missing in the HP GL 2 data that was printed 669 Load Papr in Cas Press Online 684 Loading and Printing on Rolls 82 Loading and Printing on Sheets in the Cassette 87 Loading and Printing on Sheets in the Paper Feed Slot 89 Loading Rolls in the Roll Feed Unit 11...

Page 717: ...on 692 MTCart Full Soon 695 N Need 10 in or Larger Roll 680 Need A4 Letter Vert or Larger 680 Network Environment 537 Network environment 538 System requirements 537 Network Setting 537 Network Setting Macintosh 570 Network Setting Windows 555 No data 696 No Ink Left 690 Not Enough Ink 690 O Online Key and recalibrate 693 694 Band Adj Error Please Readjust 693 694 Printhd Adj Err Please Readjust 6...

Page 718: ...tering a hot folder on your computer 211 277 Scanning the original and print an enlargement 212 278 Printing Enlargements of Scanned Originals from a Color imageRUNNER Windows 209 275 Completing the scanning settings on the Color imageRUNNER 210 276 Registering a hot folder on your computer 209 275 Scanning the original and print an enlargement 210 276 Printing enlargements or reductions 248 Print...

Page 719: ... Printing Photos and Images Windows 184 Printing Photos and Images Windows Mac OS X 180 Easy Settings 180 Print Target 180 Print targets for photos and images 180 Printing Posters in Sections 375 Page Layout 375 Printing procedure 80 Printing Vertical or Horizontal Banners Large Format Printing 332 Fit Roll Paper Width 332 Printing Vertical or Horizontal Banners Large Format Printing Mac OS 9 340 ...

Page 720: ...ing Originals to Match the Paper Size Windows 249 Responding to Messages 674 Error messages if action can be taken 674 Error messages if no action can be taken 674 Other Messages 675 Warning messages 674 Roll Feed Unit 70 140 Roll Feed Unit Cover Inside 18 Roll Holder Set 71 138 Roll P Unit Please Check 683 Roll Paper Please Replace 681 Paper Level Low Replace Paper 681 Paper Not Loaded Press Key ...

Page 721: ...t Paper Feed Slot 653 The IEEE 1394 Driver Cannot Be Installed Correctly 667 The length of printed images is inaccurate 663 The printer consumes a lot of ink 671 The printer does not go on 671 The Printer Does Not Respond Even if Print Jobs are Sent 654 The printer ejects blank unprinted paper 655 The printer stops during a print job 655 The printer stops when printing a HP GL 2 job the carriage s...

Page 722: ...6 If a message for checking the ink is shown on the Display Screen 606 If a message for ink replacement is shown on the Display Screen 606 When to Replace the Maintenance Cartridge 625 If a message for checking the Maintenance Cartridge is shown on the Display Screen 625 If a message for the Maintenance Cartridge replacement is shown on the Display Screen 625 When much of the Maintenance Cartridge...

Page 723: ......

Page 724: ... CANON INC 2008 ...

Reviews: