Chapter 19
19-92
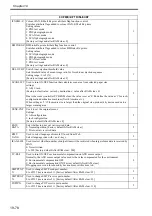
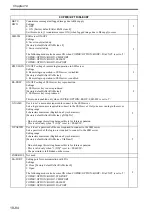
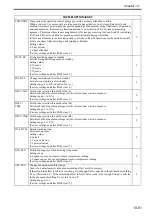
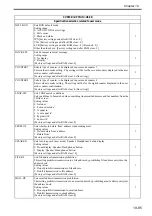
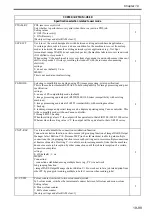
REGM-SEL Change fine line density correction range
Used when adjustments to fine line density for lines and characters in 1200 dpi printing are felt
necessary.
If lines and characters are felt to be too faint, even though '+2' is set in the fine line density UI, increase
the plus setting of this item. If lines and characters are felt to be too dark, even though '-2' is set in the
fine line density UI, increase the minus setting of this item.
Setting range: 0 to 4
[Factory settings and after RAM clear: 2]
2
SLV-UP-H
Increase developing cylinder rotation speed
Whenever possible, avoid using this setting during normal operation.
Setting range: 0 to 3
[Factory settings and after RAM clear: 1]
2
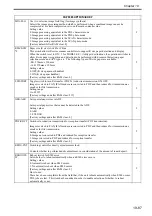
DWNSQ-
FU
Decrease throughput (for FU, normal speed, duplex, colour jobs)
This setting changes the throughput for FU, normal speed, duplex and colour jobs.
Setting values
0: Ordinary productivity
1: 32 cpm
2: 12 cpm
[Factory settings and after RAM clear: 1]
2
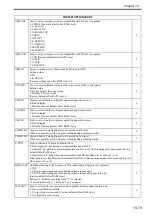
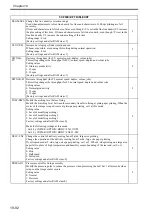
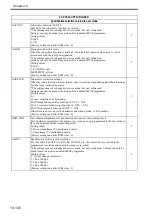
DWNSQ-FJ Decrease throughput (for FJ, normal speed, duplex, colour jobs)
This setting changes the throughput for FJ, normal speed, duplex and colour jobs.
Setting values
0: Normal productivity
1: 32 cpm
2: 12 cpm
[Factory settings and after RAM clear: 1]
2
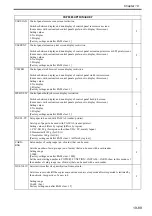
FXLP-DWN Modify the arching level before fixing
Modify the S-arching level between the secondary transfer to fixing at plain-paper printing. When the
center of the image scraped occurs at plain-paper printing, set 1 at this mode.
Setting value
0: Level of modifying arching 1
1: Level of modifying arching 2
2: Level of modifying arching 3
Factory settings and after RAM clear: 0]
Make the following settings at this mode.
- Set 4 by COPIER>OPTION>BODY>FX-LOOP1.
- Set 1 by COPIER>OPTION>BODY>FXLP1-SW.
2
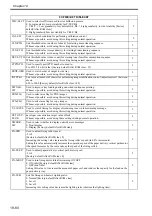
DELV-FN2
Change the control of delivery cooling fan at 2-side, large size printing
Change the operation of the delivery cooling fan at 2-side, large size paper printing
If curl is produced at 2-side, large-size paper printing, set 1 or 2. When 2-side printing on a large-size
paper left in place of high temperature and humidity causes bounding of the rear end, set 0 or 1.
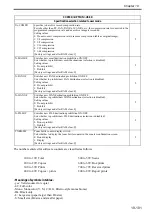
Setting value
0: Stop
1: Half speed
2: Full speed
Factory settings and after RAM clear: 0]
2
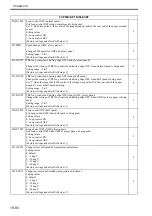
PRES-ADJ
Pressure control for fixing assembly
Modify the pressure pulse to reduce the pressure when pressuring the belt. Set 1 at this mode when
scrape on the image center occurs.
Setting value
0: Normal
1: Decrease
Factory settings and after RAM clear:0]
2
COPIER>OPTION>BODY
Summary of Contents for Color imageRUNNER C5180 Series
Page 22: ...Chapter 1 INTRODUCTION...
Page 64: ...Chapter 2 INSTALLATION...
Page 110: ...Chapter 3 BASIC OPERATION...
Page 119: ...Chapter 4 BASIC OPERATIONS AS A PRINTER...
Page 129: ...Chapter 5 MAIN CONTROLLER...
Page 138: ...Chapter 5 5 8 F 5 8 CPU HDD ROM access to the program at time of execution...
Page 165: ...Chapter 6 ORIGINAL EXPOSURE SYSTEM...
Page 209: ...Chapter 7 IMAGE PROCESSING SYSTEM...
Page 212: ...Chapter LASER EXPOSURE 8...
Page 239: ...Chapter 9 IMAGE FORMATION...
Page 324: ...Chapter 10 PICKUP FEEDING SYSTEM...
Page 435: ...Chapter 11 FIXING SYSTEM...
Page 460: ...Chapter 11 11 23 F 11 13 SEN3 SEN2 SEN1 SEN2 SEN3 SEN1 SEN2 SEN3 SEN1...
Page 491: ...Chapter 12 EXTERNALS CONTROLS...
Page 498: ...Chapter 12 12 5 F 12 2 FM1 FM7 FM9 FM2 FM13 FM14 FM12 FM11 FM10 FM5 FM3 FM4 FM8 FM6...
Page 512: ...Chapter 12 12 19 2 Remove the check mark from SNMP Status Enabled F 12 10...
Page 553: ...Chapter 13 MEAP...
Page 557: ...Chapter 14 RDS...
Page 569: ...Chapter 15 MAINTENANCE INSPECTION...
Page 578: ...Chapter 16 STANDARDS ADJUSTMENTS...
Page 597: ...Chapter 17 CORRECTING FAULTY IMAGES...
Page 612: ...Chapter 17 17 14 F 17 7 PLG1 ELCB1 SP1 H4 H3 H2 H1 H1 H2 LA1...
Page 617: ...Chapter 18 SELF DIAGNOSIS...
Page 644: ...Chapter 19 SERVICE MODE...
Page 778: ...Chapter 20 UPGRADING...
Page 823: ...Chapter 21 SERVICE TOOLS...
Page 828: ...APPENDIX...
Page 851: ......

