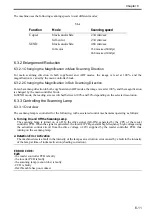
Chapter 6
6-12
F-6-15
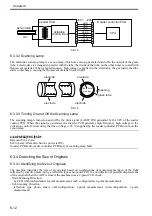
6.3.3.2 Scanning Lamp
The machine's scanning lamp is a xenon lamp, which uses xenon gas sealed inside. On the outside of the glass
tube, 2 electrodes are arranged in parallel with the tube; the inside of the tube, on the other hand, is coated with
fluorescent material. When a high-frequency high voltage is applied to the electrodes, the gas inside the tube
starts to discharge, causing the fluorescent material to emit light.
F-6-16
6.3.3.3 Turning On and Off the Scanning Lamp
The scanning lamp is turned on and off by the drive signal (LAMP_ON) generated by the CPU of the reader
control PCB. When the signal is generated, the inverter PCB generates high-frequency high voltage in the
activation control circuit using the drive voltage (+24 V) supplied by the reader controller PCB to turn on the
xenon lamp.
ä÷òAÉGÉâÅ[ÉRÅ[ÉhÅF
Relevant Error Code:
E220 (Lamp ON fault when the power is ON.)
Inverter PCB fault, reader controller PCB fault, or scanning lamp fault.
6.3.4 Detecting the Size of Originals
6.3.4.1 Identifying the Size of Originals
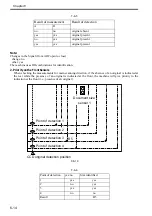
The machine identifies the size of an original based on combinations of measurements taken of the light
reflected by specific points (using a reflection type sensor and CCD). In consideration of possible displacement
of the original when the ADF is closed, the machine uses a 2-point CCD check.
- Main Scanning Direction:
by CCD (AB-configuration; 8-point measurement; inch-configuration, 6-point measurement)
- Sub Scanning Direction:
reflection type photo sensor (AB-configuration: 1-point measurement; inch-configuration: 1-point
measurement)
Inverter PCB
Xenon lamp
Activation
control circuit
J601 J206
Reader controller PCB
LA1
CPU
GND
GND
GND
GND
XE-ON
24V
24V
XSYNC
24V
1
2
3
4
5
6
7
8
9
1
2
3
4
5
6
7
8
9
fluorescent
medium
electode
opening
electode
electode
electode
glass tube
Summary of Contents for Color imageRUNNER C5180 Series
Page 22: ...Chapter 1 INTRODUCTION...
Page 64: ...Chapter 2 INSTALLATION...
Page 110: ...Chapter 3 BASIC OPERATION...
Page 119: ...Chapter 4 BASIC OPERATIONS AS A PRINTER...
Page 129: ...Chapter 5 MAIN CONTROLLER...
Page 138: ...Chapter 5 5 8 F 5 8 CPU HDD ROM access to the program at time of execution...
Page 165: ...Chapter 6 ORIGINAL EXPOSURE SYSTEM...
Page 209: ...Chapter 7 IMAGE PROCESSING SYSTEM...
Page 212: ...Chapter LASER EXPOSURE 8...
Page 239: ...Chapter 9 IMAGE FORMATION...
Page 324: ...Chapter 10 PICKUP FEEDING SYSTEM...
Page 435: ...Chapter 11 FIXING SYSTEM...
Page 460: ...Chapter 11 11 23 F 11 13 SEN3 SEN2 SEN1 SEN2 SEN3 SEN1 SEN2 SEN3 SEN1...
Page 491: ...Chapter 12 EXTERNALS CONTROLS...
Page 498: ...Chapter 12 12 5 F 12 2 FM1 FM7 FM9 FM2 FM13 FM14 FM12 FM11 FM10 FM5 FM3 FM4 FM8 FM6...
Page 512: ...Chapter 12 12 19 2 Remove the check mark from SNMP Status Enabled F 12 10...
Page 553: ...Chapter 13 MEAP...
Page 557: ...Chapter 14 RDS...
Page 569: ...Chapter 15 MAINTENANCE INSPECTION...
Page 578: ...Chapter 16 STANDARDS ADJUSTMENTS...
Page 597: ...Chapter 17 CORRECTING FAULTY IMAGES...
Page 612: ...Chapter 17 17 14 F 17 7 PLG1 ELCB1 SP1 H4 H3 H2 H1 H1 H2 LA1...
Page 617: ...Chapter 18 SELF DIAGNOSIS...
Page 644: ...Chapter 19 SERVICE MODE...
Page 778: ...Chapter 20 UPGRADING...
Page 823: ...Chapter 21 SERVICE TOOLS...
Page 828: ...APPENDIX...
Page 851: ......


