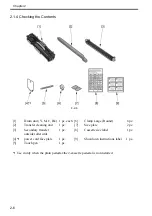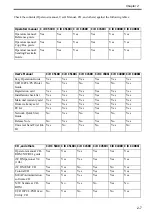
Contents
Contents
2.1
........................................................................................... 2-1
2.1.1
............................................................................................................. 2-1
2.1.2
................................................................................................ 2-3
2.1.3
Order of Installing Accessories
................................................................................ 2-5
2.1.4
............................................................................................. 2-6
2.2
.............................................................................. 2-8
2.2.1
Points to Note About Relocating the machine
....................................................... 2-8
2.2.2
Mounting the Reader Unit (Color Image Reader E1/F1)
..................................... 2-8
2.2.3
Mounting the Transfer Cleaning Unit
.................................................................... 2-13
2.2.4
Fitting the Toner Container in Place
..................................................................... 2-15
2.2.5
Fitting the Drum Unit in Place
................................................................................ 2-16
2.2.6
Fitting the Secondary Transfer Outside Roller Unit in Place
............................ 2-18
2.2.7
........................................................................................................ 2-20
2.2.8
............................................................................................................... 2-21
2.2.9
............................................................................. 2-22
................................................................................ 2-24
........................................................................... 2-24
................................................................................ 2-24
Adjustment of Left Margin of Image
................................................................... 2-24
Adjustment of the Margin along Leading Edge of Image
................................ 2-27
Adjustment of the Image Area (non-image width)
............................................ 2-27
Setting the Auto Gradation Adjustment
............................................................. 2-27
2.3
Checking the Connection to the Network
.................................................... 2-28
2.3.1
................................................................................................................... 2-28
2.3.2
Checking the Network Connection
....................................................................... 2-28
2.3.3
......................................................................................................... 2-28
2.4
........................................................................ 2-28
2.4.1
................................................................................................................... 2-28
2.4.2
Checking the Connection of Network Cable
....................................................... 2-28
2.4.3
Making a Check Using a Loopback Address
....................................................... 2-28
2.4.4
Making a Check Using a Local Host Address
.................................................... 2-28
2.5
................................................................................. 2-29
2.5.1
Checking the Attachments (Copy Tray-N1)
......................................................... 2-29
2.5.2
................................................................................ 2-29
2.5.3
.............................................................................................. 2-30
2.6
............................................................................. 2-31
2.6.1
Checking Contents (Card Reader-D1)
................................................................. 2-31
Summary of Contents for Color imageRUNNER C5180 Series
Page 22: ...Chapter 1 INTRODUCTION...
Page 64: ...Chapter 2 INSTALLATION...
Page 110: ...Chapter 3 BASIC OPERATION...
Page 119: ...Chapter 4 BASIC OPERATIONS AS A PRINTER...
Page 129: ...Chapter 5 MAIN CONTROLLER...
Page 138: ...Chapter 5 5 8 F 5 8 CPU HDD ROM access to the program at time of execution...
Page 165: ...Chapter 6 ORIGINAL EXPOSURE SYSTEM...
Page 209: ...Chapter 7 IMAGE PROCESSING SYSTEM...
Page 212: ...Chapter LASER EXPOSURE 8...
Page 239: ...Chapter 9 IMAGE FORMATION...
Page 324: ...Chapter 10 PICKUP FEEDING SYSTEM...
Page 435: ...Chapter 11 FIXING SYSTEM...
Page 460: ...Chapter 11 11 23 F 11 13 SEN3 SEN2 SEN1 SEN2 SEN3 SEN1 SEN2 SEN3 SEN1...
Page 491: ...Chapter 12 EXTERNALS CONTROLS...
Page 498: ...Chapter 12 12 5 F 12 2 FM1 FM7 FM9 FM2 FM13 FM14 FM12 FM11 FM10 FM5 FM3 FM4 FM8 FM6...
Page 512: ...Chapter 12 12 19 2 Remove the check mark from SNMP Status Enabled F 12 10...
Page 553: ...Chapter 13 MEAP...
Page 557: ...Chapter 14 RDS...
Page 569: ...Chapter 15 MAINTENANCE INSPECTION...
Page 578: ...Chapter 16 STANDARDS ADJUSTMENTS...
Page 597: ...Chapter 17 CORRECTING FAULTY IMAGES...
Page 612: ...Chapter 17 17 14 F 17 7 PLG1 ELCB1 SP1 H4 H3 H2 H1 H1 H2 LA1...
Page 617: ...Chapter 18 SELF DIAGNOSIS...
Page 644: ...Chapter 19 SERVICE MODE...
Page 778: ...Chapter 20 UPGRADING...
Page 823: ...Chapter 21 SERVICE TOOLS...
Page 828: ...APPENDIX...
Page 851: ......

