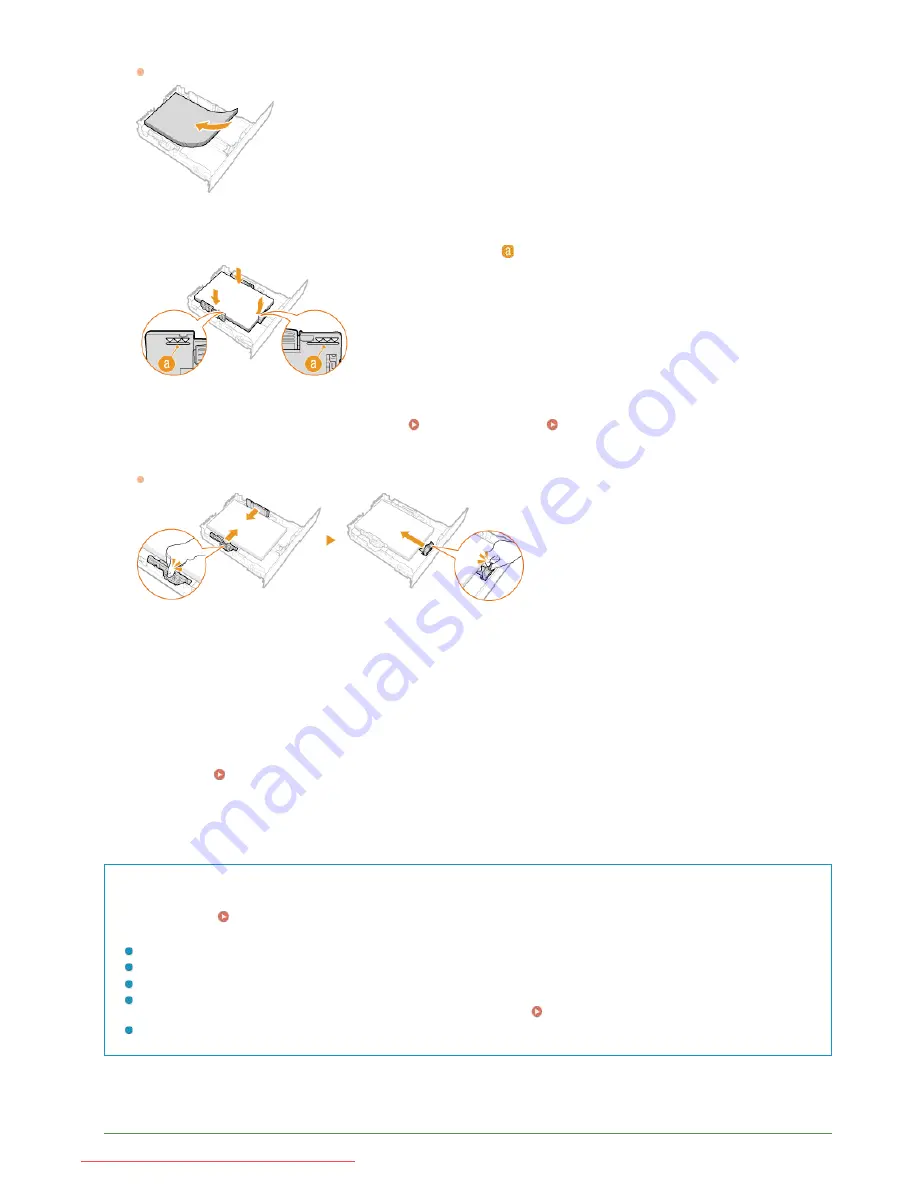
Load the paper so that the edge of the paper stack is aligned against the rear side of the paper drawer.
Fan the paper stack well, and tap it on a flat surface to align the edges.
IMPORTANT:
Do not exceed the load limit line when loading paper
Make sure that the paper stack does not exceed the load limit line (
). Loading too much paper can cause paper jams.
NOTE:
When loading envelopes or paper with a logo, see
Loading Envelopes
or
Loading Preprinted Paper
.
Align the paper guides against the edges of the paper.
Press the lock release lever and slide the paper guides inward until they are aligned securely against the edges of the paper.
IMPORTANT:
Align the paper guides securely against the edges of the paper
Paper guides that are too loose or too tight can cause misfeeds or paper jams.
Insert the paper drawer into the machine.
NOTE:
When Legal size paper is loaded
The front side of the paper drawer is not flush with the machine when the extended paper drawer is inserted.
Continue to
Specifying Paper Size and Type in the Paper Drawer
IMPORTANT:
When changing the paper size or type
The factory default settings for paper size and type are <A4> and <Plain 2>, respectively. If you load a different size or type of
paper into the machine, make sure to change the settings. If you do not change the settings, the machine cannot print properly.
Printing on the Back Side of Printed Paper (Manual 2-Sided Printing)
You can print on the back side of printed paper. Flatten any curls on the printed paper and insert it into the paper drawer or
manual feed slot (
Loading Paper in the Manual Feed Slot
), with the side to print face up (previously printed side face
down).
When using the manual feed slot, load one sheet of paper each time you print.
You can use only the paper printed with this machine.
You cannot print on the side that has previously been printed on.
If the printouts look faded, select <On> for <Drawer 1>, <Drawer 2>, or <Multi-Purpose Tray>, depending on the paper
source you are using, in <Manual Back Side Settings (for 2-Sided Only)>.
Special Processing
If you are using A5 paper, the reverse side may not be printed correctly.
LINKS
3
4
5
»
㻣㻡㻌㻛㻌㻢㻣㻢
Downloaded from ManualsPrinter.com Manuals
Summary of Contents for Color imageCLASS MF8280Cw
Page 1: ...㻝㻌㻛㻌㻢㻣㻢 Downloaded from ManualsPrinter com Manuals ...
Page 48: ...LINKS Receiving Faxes 㻠㻤㻌㻛㻌㻢㻣㻢 Downloaded from ManualsPrinter com Manuals ...
Page 76: ...Paper 㻣㻢㻌㻛㻌㻢㻣㻢 Downloaded from ManualsPrinter com Manuals ...
Page 106: ...the hook 㻝㻜㻢㻌㻛㻌㻢㻣㻢 Downloaded from ManualsPrinter com Manuals ...
Page 113: ...LINKS Basic Copy Operations 㻝㻝㻟㻌㻛㻌㻢㻣㻢 Downloaded from ManualsPrinter com Manuals ...
Page 169: ...LINKS Receiving Faxes 㻝㻢㻥㻌㻛㻌㻢㻣㻢 Downloaded from ManualsPrinter com Manuals ...
Page 188: ...㻝㻤㻤㻌㻛㻌㻢㻣㻢 Downloaded from ManualsPrinter com Manuals ...
Page 199: ...LINKS Printing a Document 㻝㻥㻥㻌㻛㻌㻢㻣㻢 Downloaded from ManualsPrinter com Manuals ...
Page 269: ...Configuring Scan Settings in ScanGear MF 㻞㻢㻥㻌㻛㻌㻢㻣㻢 Downloaded from ManualsPrinter com Manuals ...
Page 287: ...㻞㻤㻣㻌㻛㻌㻢㻣㻢 Downloaded from ManualsPrinter com Manuals ...
Page 353: ...LINKS Setting Up Print Server 㻟㻡㻟㻌㻛㻌㻢㻣㻢 Downloaded from ManualsPrinter com Manuals ...
Page 455: ...㻠㻡㻡㻌㻛㻌㻢㻣㻢 Downloaded from ManualsPrinter com Manuals ...
Page 656: ...㻢㻡㻢㻌㻛㻌㻢㻣㻢 Downloaded from ManualsPrinter com Manuals ...
Page 669: ...㻢㻢㻥㻌㻛㻌㻢㻣㻢 Downloaded from ManualsPrinter com Manuals ...
Page 677: ...㻝㻌㻛㻌㻣㻠 Downloaded from ManualsPrinter com Manuals ...
Page 726: ...The icon is added to the printer folder 㻡㻜㻌㻛㻌㻣㻠 Downloaded from ManualsPrinter com Manuals ...
Page 731: ...㻡㻡㻌㻛㻌㻣㻠 Downloaded from ManualsPrinter com Manuals ...
Page 733: ...㻡㻣㻌㻛㻌㻣㻠 Downloaded from ManualsPrinter com Manuals ...


