NOTE:
To edit registered server information
Click a text link under [Server Name] for the edit screen.
To delete registered server information
Click [Delete] on the right of the server name you want to delete
click [OK].
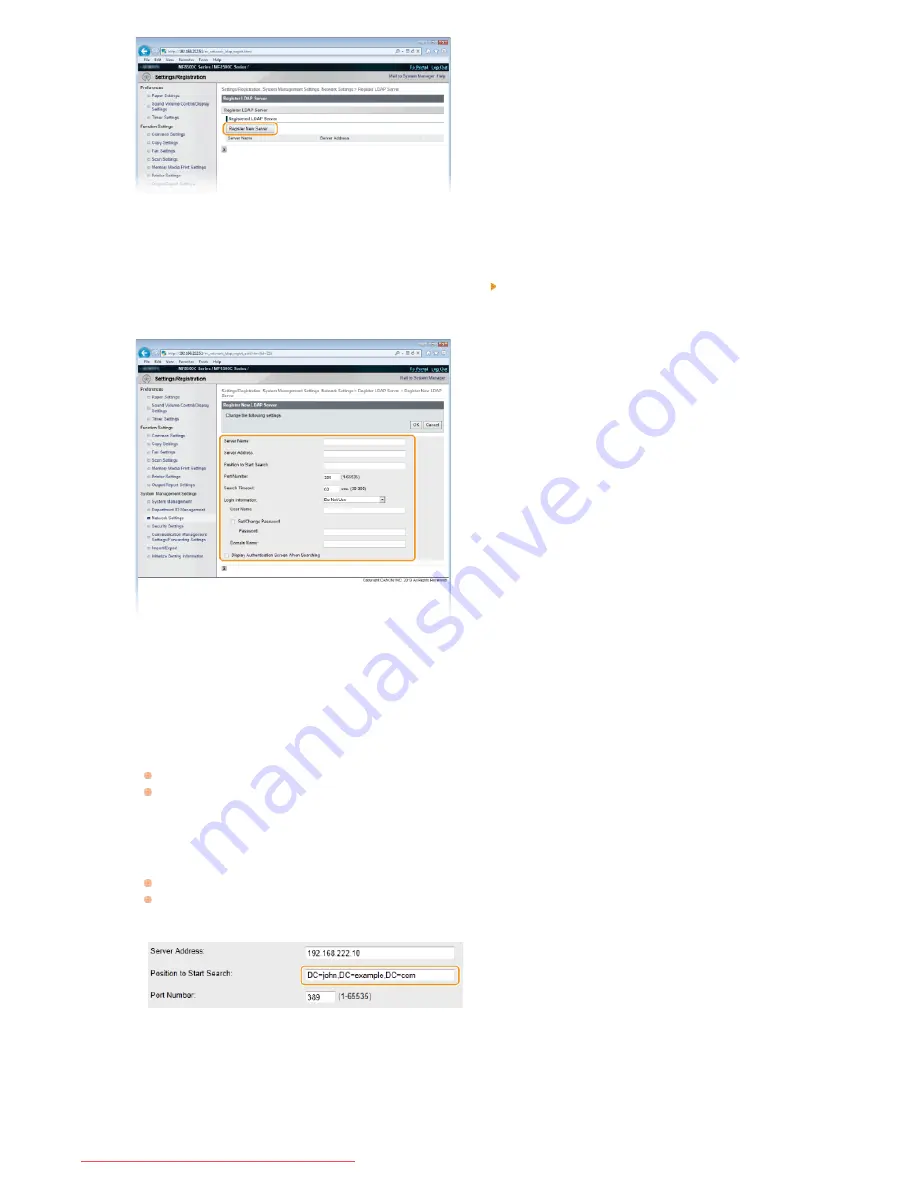
Specify the required settings.
[Server Name]
Enter up to 24 alphanumeric characters for identifying the LDAP server.
[Server Address]
Enter the IP address of the LDAP server or enter up to 47 alphanumeric characters for the host name of the server (example:
ldap.example.com).
IMPORTANT:
[Server Address] and DNS
To prevent errors from occurring when searching for destinations, make sure to check the following:
If the host name is entered for [Server Address], make sure that a DNS server is available in the network.
If the IP address is entered for [Server Address], check whether the DNS server supports only forward lookup. If the server
supports only forward lookup, select [Do Not Use] or [Use] for [Login Information]. If you select [Use (Security
Authentication)], make sure that the DNS server supports reverse lookup.
[Position to Start Search]
Specify the node in the directory information tree (DIT) that you want to start search from. Leaving the text box blank sets the
machine to start search from an arbitrary node selected automatically.
Depending on the type of characters used, up to 120 characters can be entered.
When specifying the node, enter "DC=", followed by a host name (a dot-delimited character string in the Active Directory
domain name), and separate each of the entries with a comma. If the domain name is "john.example.com", for example, enter
"DC=john,DC=example,DC=com."
[Port Number]
Enter the port number used for communicating with the LDAP server.
[Search Timeout]
Specify how long the machine searches. Enter between 30 and 300 seconds.
[Login Information]
Select [Do Not Use], [Use], or [Use (Security Authentication)] depending on the type of authentication implemented by the LDAP
5
㻟㻤㻠㻌㻛㻌㻢㻣㻢
Downloaded from ManualsPrinter.com Manuals
Summary of Contents for Color imageCLASS MF8280Cw
Page 1: ...㻝㻌㻛㻌㻢㻣㻢 Downloaded from ManualsPrinter com Manuals ...
Page 48: ...LINKS Receiving Faxes 㻠㻤㻌㻛㻌㻢㻣㻢 Downloaded from ManualsPrinter com Manuals ...
Page 76: ...Paper 㻣㻢㻌㻛㻌㻢㻣㻢 Downloaded from ManualsPrinter com Manuals ...
Page 106: ...the hook 㻝㻜㻢㻌㻛㻌㻢㻣㻢 Downloaded from ManualsPrinter com Manuals ...
Page 113: ...LINKS Basic Copy Operations 㻝㻝㻟㻌㻛㻌㻢㻣㻢 Downloaded from ManualsPrinter com Manuals ...
Page 169: ...LINKS Receiving Faxes 㻝㻢㻥㻌㻛㻌㻢㻣㻢 Downloaded from ManualsPrinter com Manuals ...
Page 188: ...㻝㻤㻤㻌㻛㻌㻢㻣㻢 Downloaded from ManualsPrinter com Manuals ...
Page 199: ...LINKS Printing a Document 㻝㻥㻥㻌㻛㻌㻢㻣㻢 Downloaded from ManualsPrinter com Manuals ...
Page 269: ...Configuring Scan Settings in ScanGear MF 㻞㻢㻥㻌㻛㻌㻢㻣㻢 Downloaded from ManualsPrinter com Manuals ...
Page 287: ...㻞㻤㻣㻌㻛㻌㻢㻣㻢 Downloaded from ManualsPrinter com Manuals ...
Page 353: ...LINKS Setting Up Print Server 㻟㻡㻟㻌㻛㻌㻢㻣㻢 Downloaded from ManualsPrinter com Manuals ...
Page 455: ...㻠㻡㻡㻌㻛㻌㻢㻣㻢 Downloaded from ManualsPrinter com Manuals ...
Page 656: ...㻢㻡㻢㻌㻛㻌㻢㻣㻢 Downloaded from ManualsPrinter com Manuals ...
Page 669: ...㻢㻢㻥㻌㻛㻌㻢㻣㻢 Downloaded from ManualsPrinter com Manuals ...
Page 677: ...㻝㻌㻛㻌㻣㻠 Downloaded from ManualsPrinter com Manuals ...
Page 726: ...The icon is added to the printer folder 㻡㻜㻌㻛㻌㻣㻠 Downloaded from ManualsPrinter com Manuals ...
Page 731: ...㻡㻡㻌㻛㻌㻣㻠 Downloaded from ManualsPrinter com Manuals ...
Page 733: ...㻡㻣㻌㻛㻌㻣㻠 Downloaded from ManualsPrinter com Manuals ...


