139
Cr
eat
ing Embroide
ry Pat
ter
ns Using Im
a
g
es
Importing Image Data
2.
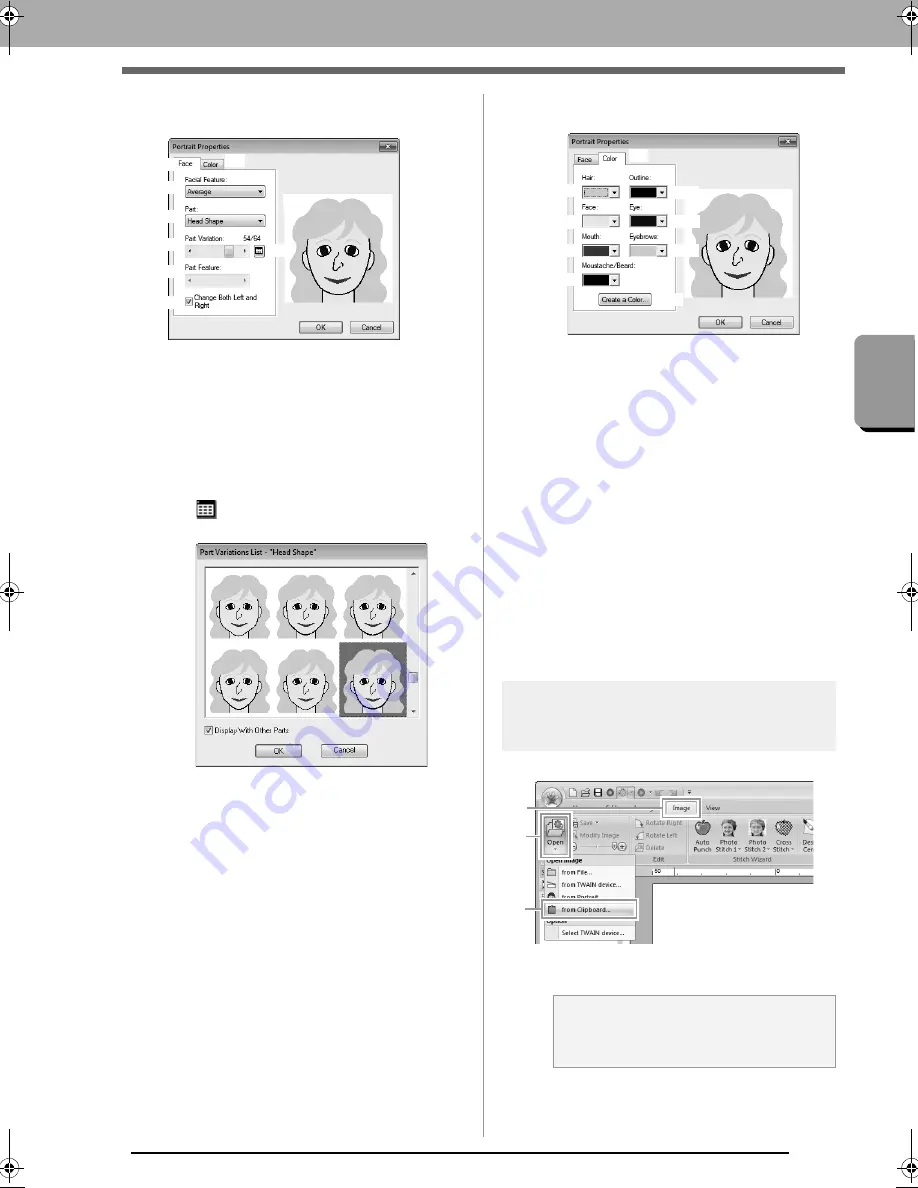
Specify the desired settings in the
Portrait
Properties
dialog box, and then click
OK
.
(1)
Face
tab: Select the shape of each part of
the portrait.
(2)
Facial Feature
: Select the overall contour
(appearance).
(3)
Part
: select the part to be changed.
(4)
Part Variation
: Select the variation for the
part selected in (3).
(5)
Displays a variations list for the part
selected in (3).
• Select a part from the list, and then click
OK
.
• With the
Display With Other Parts
check box,
select whether to display only the selected part
or all parts combined.
(6)
Part Feature
: select a part feature.
(7)
Change Both Left and Right
: Select
whether or not the same shape is
selected for the left and right eyes and
ears.
(8) Displays the selected parts.
Click a part to select it. Double-click a part
to display a variations list for that part.
(9)
Color
tab: Select the color of each part of
the portrait.
(10)
Hair
: Select the hair color.
(11)
Face
: Select the face color.
(12)
Mouth
: Select the mouth color.
(13)
Moustache/Beard
: Select the
moustache/beard color.
(14)
Outline
: Select the outline color.
(15)
Eye
: Select the eye color.
(16)
Eyebrows
: Select the eyebrow color.
(17)
Create a Color
: Add a specified color to
the color list selector. Specify the color in
the dialog box that appeared when
Create a Color
was clicked, and then
click
OK
.
The portrait image is displayed in the
Design Page.
Importing image from the
clipboard
Click
1
, then
2
, then
3
.
The image on the clipboard is imported
into the Design Page.
(1)
(2)
(3)
(4)
(6)
(7)
(9)
(8)
(5)
a
Note:
This can only be done when there is image
data on the Clipboard.
(10)
(11)
(12)
(13)
(17)
(14)
(15)
(16)
(9)
3
1
2
XE8656-001.book Page 139 Monday, May 24, 2010 5:44 PM


