Level 2
Level 3
Level 4
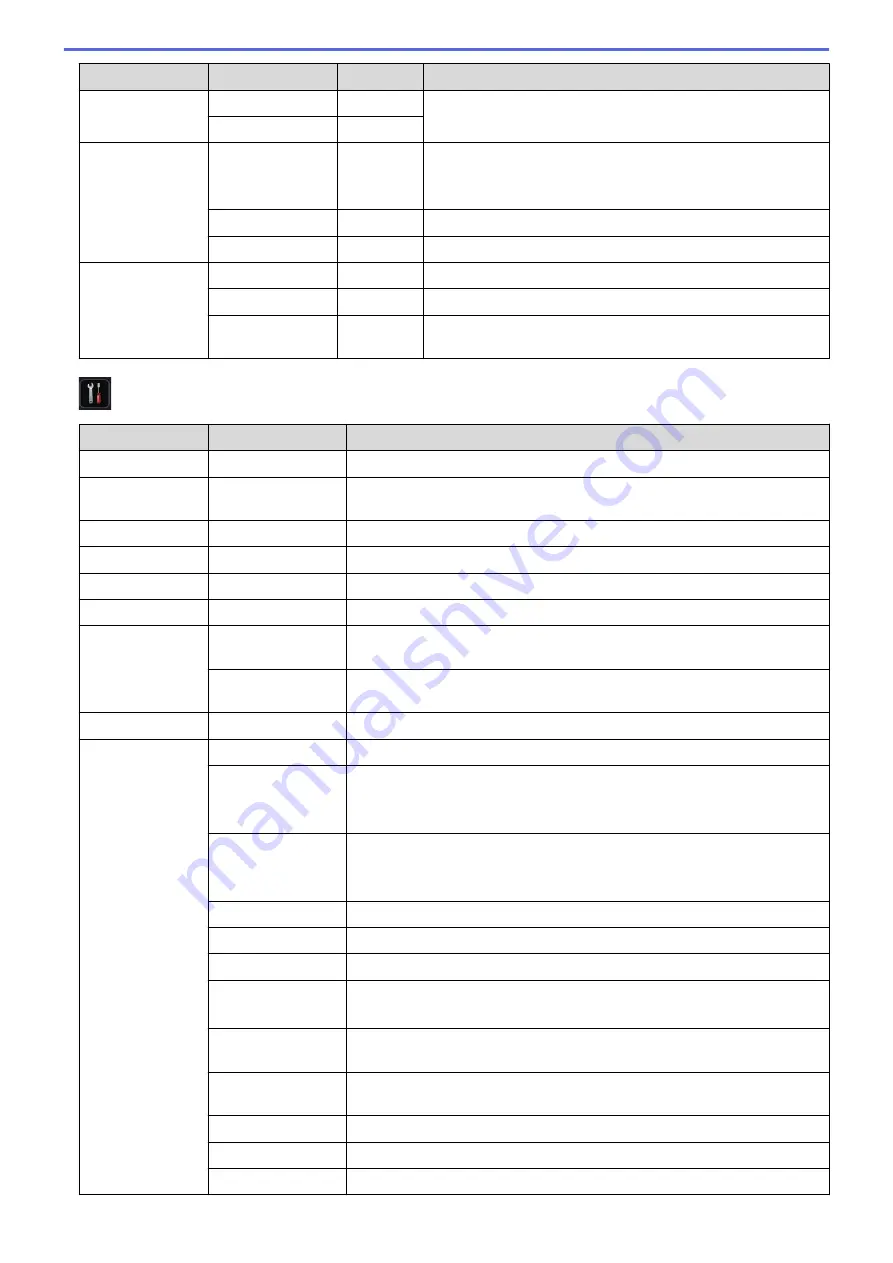
Descriptions
Setting Lock
Set Password
-
Restrict unauthorised users from changing the machine’s
settings.
Lock Off
⇒
On
-
Interface
Select
-
Select the interface to use.
If you select
Auto
, the machine changes the interface to USB
or Network depending on which interface is receiving data.
Auto IF Time
-
Set the time-out period for the auto interface selection.
Input Buffer
-
Increase or decrease the input buffer capacity.
Delete Storage Macro ID
-
Delete the registered Macro data.
Font ID
-
Delete the registered Font data.
Format
-
Restore the Macro and Font data of your machine to the
default settings.
[Settings]
>
[Print Menu]
Level 2
Level 3
Descriptions
Emulation
-
Choose the emulation mode.
Auto Continue
-
Select this setting if you want the machine to clear paper size errors or
media type errors, and use paper from other trays.
Paper Type
-
Set the type of paper.
Paper Size
-
Set the size of paper.
Copies
-
Set the number of printed pages.
Orientation
-
Set pages to print in either portrait or landscape orientation.
Print Position X Offset
Move the print start position (at the top-left corner of pages) horizontally up
to -500 (left) to +500 (right) dots in 300 dpi.
Y Offset
Move the print start position (at the top-left corner of pages) vertically up to
-500 (up) to +500 (down) dots in 300 dpi.
Auto FF
-
Allow the machine to print any remaining data automatically.
HP LaserJet
Font No.
Set the font number.
Font Pitch
Set the font pitch.
The
Font Pitch
menu appears when you choose
I012
to
I018
,
I031
to
I037
or
I097
to
I109
in
Font No.
setting.
Font Point
Set the font size.
The
Font Point
menu appears when you choose
I000
to
I011
,
I019
to
I030
or
I038
to
I096
in
Font No.
setting.
Symbol Set
Select the symbol or character set.
Table Print
Print the code table.
Auto LF
ON: CR -> CR+LF, OFF: CR -> CR
Auto CR
ON: LF -> LF+CR, FF -> FF+CR, or VT -> VT+CR
OFF: LF -> LF, FF -> FF, or VT -> VT
Auto WRAP
Choose whether a line feed and carriage return will happen when the
machine reaches the right margin.
Auto SKIP
Choose whether a line feed and carriage return will happen when the
carriage position reaches the bottom margin.
Left Margin
Set the left margin at column 0 to 70 columns at 1 cpi.
Right Margin
Set the right margin at column 10 to 80 columns at 1 cpi.
Top Margin
Set the top margin distance from the top edge of the paper.
336
Summary of Contents for HL-L5000D
Page 51: ...Related Information Print from Your Computer Windows Print Settings Windows 46 ...
Page 63: ... Create or Delete Your Print Profile Windows Print Settings Windows 58 ...
Page 90: ...Related Information Print Use a Macro from Your Computer Windows 85 ...
Page 128: ... Configure Your Wi Fi Direct Network Manually 123 ...
Page 132: ... Wi Fi Direct Network Configuration Overview 127 ...
Page 213: ... Manual Settings for an IPsec Template 208 ...
Page 220: ...Related Information Configure an IPsec Template Using Web Based Management 215 ...
Page 258: ...5 Put the paper tray firmly back in the machine Related Information Paper Jams 253 ...
Page 262: ...6 Close the front cover Related Information Paper Jams 257 ...
Page 277: ... I Want to Check that My Network Devices are Working Correctly 272 ...
Page 285: ...Related Information Troubleshooting 280 ...
Page 301: ... Clean the Drum Unit Clean the Paper Pick up Rollers 296 ...
Page 317: ...Related Information Pack and Ship Your Machine 312 ...
Page 350: ...Related Information Change Machine Settings Using Web Based Management 345 ...
Page 363: ... Configure Your Machine for a Wireless Network When the SSID Is Not Broadcast 358 ...
Page 368: ... Print Settings Windows Print Options Macintosh 363 ...


