


Examples of poor print quality
Recommendation
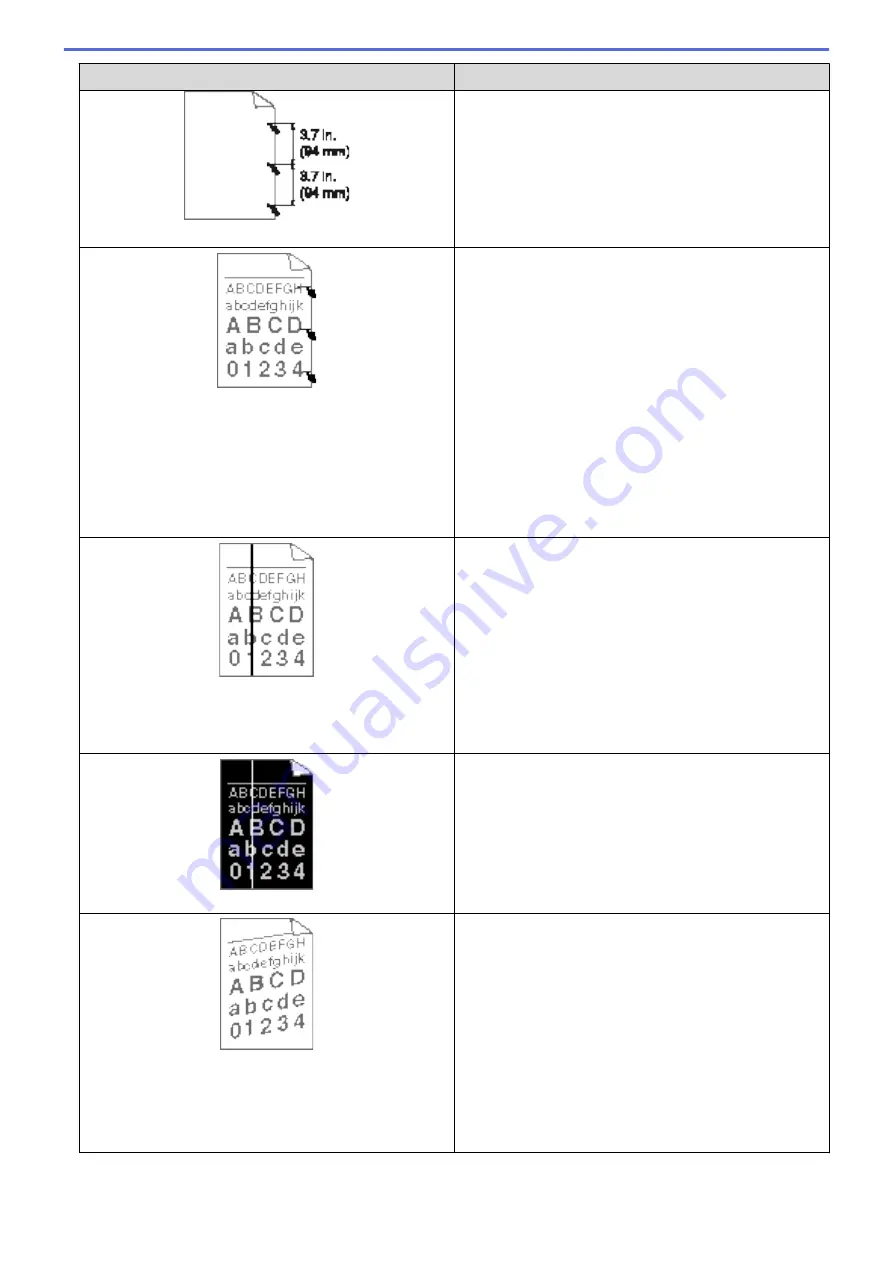
Black spots at 94 mm intervals
Black toner marks across the page
•
If you use label sheets for laser printers, the glue from
the sheets may sometimes stick to the drum surface.
Clean the drum unit.
See
Related Information
:
Clean the Drum Unit.
•
If you used paper that has clips or staples, the drum
unit may be damaged.
•
If the unpacked drum unit is in direct sunlight (or room
light for long periods of time), the unit may be
damaged.
•
Clean the drum unit.
•
The toner cartridge may be damaged.
Replace the toner cartridge with a new toner cartridge.
•
The drum unit may be damaged.
Replace the drum unit with a new drum unit.
Black lines down the page
Printed pages have toner stains down the page
•
Clean the corona wire inside the drum unit by sliding
the green tab.
Make sure that the green tab on the drum unit is in the
Home position.
•
The toner cartridge may be damaged.
Replace the toner cartridge with a new toner cartridge.
•
The drum unit may be damaged.
Replace the drum unit with a new drum unit.
•
The fuser unit may be contaminated.
Contact Brother customer service.
White lines down the page
•
Make sure foreign material such as a torn piece of
paper, sticky notes or dust is not inside the machine
and around the toner cartridge and drum unit.
•
The toner cartridge may be damaged.
Replace the toner cartridge with a new toner cartridge.
•
The drum unit may be damaged.
Replace the drum unit with a new drum unit.
Image skewed
•
Make sure the paper or other print media is loaded
correctly in the paper tray and the guides are not too
tight or too loose against the paper stack.
•
Set the paper guides correctly.
•
The paper tray may be too full.
•
Check the paper type and quality.
•
Check for loose objects such as torn paper inside the
machine.
•
If the problem only occurs during automatic 2-sided
printing, check for torn paper in the 2-sided tray. Verify
the 2-sided tray is inserted completely and the back
cover is closed completely.
265
Summary of Contents for HL-L5000D
Page 51: ...Related Information Print from Your Computer Windows Print Settings Windows 46 ...
Page 63: ... Create or Delete Your Print Profile Windows Print Settings Windows 58 ...
Page 90: ...Related Information Print Use a Macro from Your Computer Windows 85 ...
Page 128: ... Configure Your Wi Fi Direct Network Manually 123 ...
Page 132: ... Wi Fi Direct Network Configuration Overview 127 ...
Page 213: ... Manual Settings for an IPsec Template 208 ...
Page 220: ...Related Information Configure an IPsec Template Using Web Based Management 215 ...
Page 258: ...5 Put the paper tray firmly back in the machine Related Information Paper Jams 253 ...
Page 262: ...6 Close the front cover Related Information Paper Jams 257 ...
Page 277: ... I Want to Check that My Network Devices are Working Correctly 272 ...
Page 285: ...Related Information Troubleshooting 280 ...
Page 301: ... Clean the Drum Unit Clean the Paper Pick up Rollers 296 ...
Page 317: ...Related Information Pack and Ship Your Machine 312 ...
Page 350: ...Related Information Change Machine Settings Using Web Based Management 345 ...
Page 363: ... Configure Your Machine for a Wireless Network When the SSID Is Not Broadcast 358 ...
Page 368: ... Print Settings Windows Print Options Macintosh 363 ...


