72
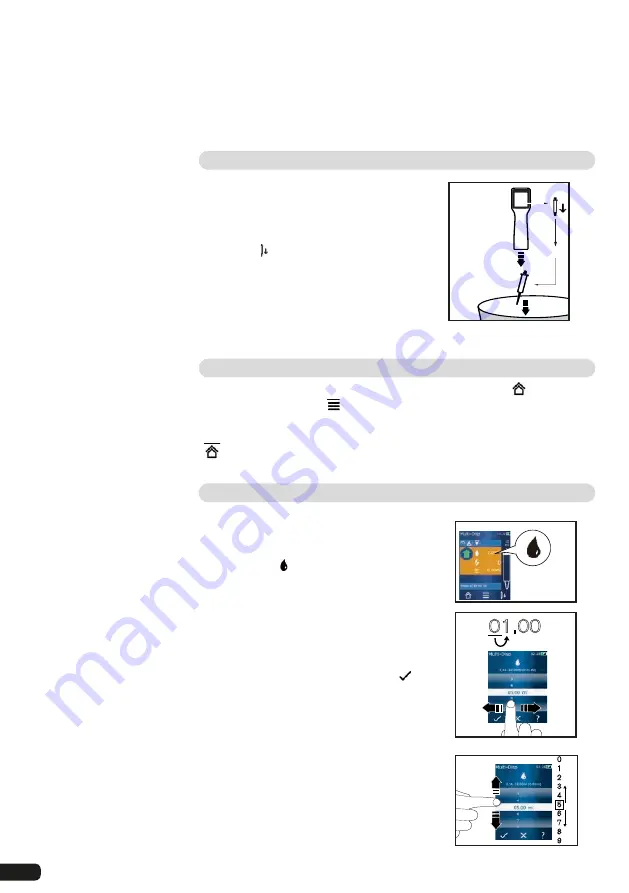
Discarding the residual volume
After dispensing all of the available STEPs, liquid with a volume of less than
1 STEP remains in the tip. The device automatically switches into the mode,
in which you can discard the remaining volume.
a. Press and hold the STEP button.
The tip is emptied completely.
Ejecting the tip
Condition
You have emptied the tip
a. Hold the device with the tip
over the waste bin.
b. Tap on , then press the STEP
button.
The tip is ejected.
The device moves into tip loading
position.
STEP
Switching the operating mode with a filled tip
You can switch from one operating mode to another via the
button or via
operating mode options (specific operating modes only). In doing so, the
device saves the activated settings (e.g. STEP volume, speed).
If you would like to switch to another operating mode with a filled tip via the
button, you will be asked if would like to empty the tip before switching.
Setting the volume
Condition
An operating mode has been selected.
a. Tap on the button.
The volume setting appears.
Set the volume by selecting a volume from
the range of values.
b. Swipe to the left or right to change the
position.
c. Swipe upward or downward to set the value.
d. Confirm the setting by tapping the
button. Discard the setting by pressing the
X
button.
The operating mode appears.
01.00
0
1
2
3
4
5
6
7
8
9
Summary of Contents for HandyStep touch
Page 3: ......
Page 12: ...12 Funktions und Bedienelemente...
Page 58: ...58 Functions and controls...
Page 104: ...104 104 l ments fonctionnels et de commande...
Page 150: ...150 Elementos de mando y ejecuci n de funciones...
Page 188: ...188 Navegaci n en el equipo...
Page 192: ...192 HandyStep touch USB 5 PD Tips 12 5 ml 5 ml 2 5 ml 1 25 ml 0 5 ml www brand de 1 Task a b c...
Page 193: ...193 HandyStep touch HandyStep touch S PD 1 2 3 4 5 6 194 7 8 9 STEP 10 11 12 13 223...
Page 194: ...194 1 USB 2 3 USB USB 4 5 1 2 3 4 5 6 7 230 226...
Page 195: ...195 226 228 HandyStep touch HandyStep touch S BRAND PD...
Page 196: ...196...
Page 197: ...197 1 2 3 USB 4 STEP 5 6 7 8 9 10 11 STEP STEP STEP STEP STEP STEP 2 STEP STEP...
Page 198: ...198 60 C 140 F 3 1 2 3 4 1 2 3 CE 4 a b c...
Page 199: ...199 USB STEP USB USB USB STEP STEP...
Page 200: ...200 a b a b c d 72 h...
Page 201: ...201 a b c d e f 72 h 15 HandyStep touch HandyStep touch S USB...
Page 204: ...204 pH...
Page 205: ...205 233 233 a a 209 209 b X 1 s 1 s c LED...
Page 206: ...206 a b a BRAND PD a b STEP...
Page 207: ...207 a b c STEP STEP STEP STEP PD Tip STEP STEP a b c STEP a STEP STEP...
Page 208: ...208 a b c STEP 2 STEP a STEP 2 a b 30 45 c STEP X...
Page 209: ...209 a b 30 45 STEP a STEP a b STEP STEP...
Page 210: ...210 a b c d X 01 00 0 1 2 3 4 5 6 7 8 9 a b 1 8 1 4 8 c X...
Page 212: ...212 30 s 1 min 2 min 5 min 199 Auto Power Off 10 STEP...
Page 213: ...213 MULTI DISP a b STEP a STEP a b STEP 2 208 STEP 209 207...
Page 214: ...214 a AUTO DISP 203 205 a STEP STEP b 210 214 STEP...
Page 216: ...216 b c 209 207 a PIP 210 a b STEP STEP a b STEP STEP...
Page 217: ...217 a STEP X 209 207...
Page 218: ...218 SEQ DISP 4 3 2 1 5 6 7 1 2 3 4 5 6 7 1 10 3 1 2 1 2 3 2 3 4 10 X 1 10 a b a...
Page 219: ...219 210 a STEP STEP a X a...
Page 221: ...221 a b 1 10 c SEQ DISP 218 218 218 a b c a 4 3 2 1 5 1 2 3 4 5 2 STEP STEP STEP...
Page 222: ...222 STEP STEP pH pH a b c STEP d e f a...
Page 223: ...223 UV C 220 nm 270 nm cm2 2 s 300 s USB...
Page 224: ...224 USB 212 212 5 Notice Error BRAND...
Page 225: ...225 SOP https www brand de sop 231 PD a PD PD Tip b c PD Tip d PD Tip 10 225 ISO 8655 SOP...
Page 232: ...232 2003 1 27 2002 96 EC 2006 9 6 2006 66 EC...
Page 233: ...233 s 1 10 10 1 1 10 ID STEP...


