51
Section 1
Registering and recalling mixer settings (Scene)
The BR-1600CD allows you to register up to 100 batches of
mixer and effect settings per song. Each of these batches of
settings is referred to as a Scene, and they can be quickly and
easily recalled whenever needed.
For example, if you wish to compare different mix balances
during mixdown, it is convenience to register each of the
different mixer setting as a scene.
In addition, you can also assign scenes to markers (p. 48) to
have them recalled automatically during recording or
playback, and this function is referred to as Auto Scene.
Registering, recalling, and
deleting scenes
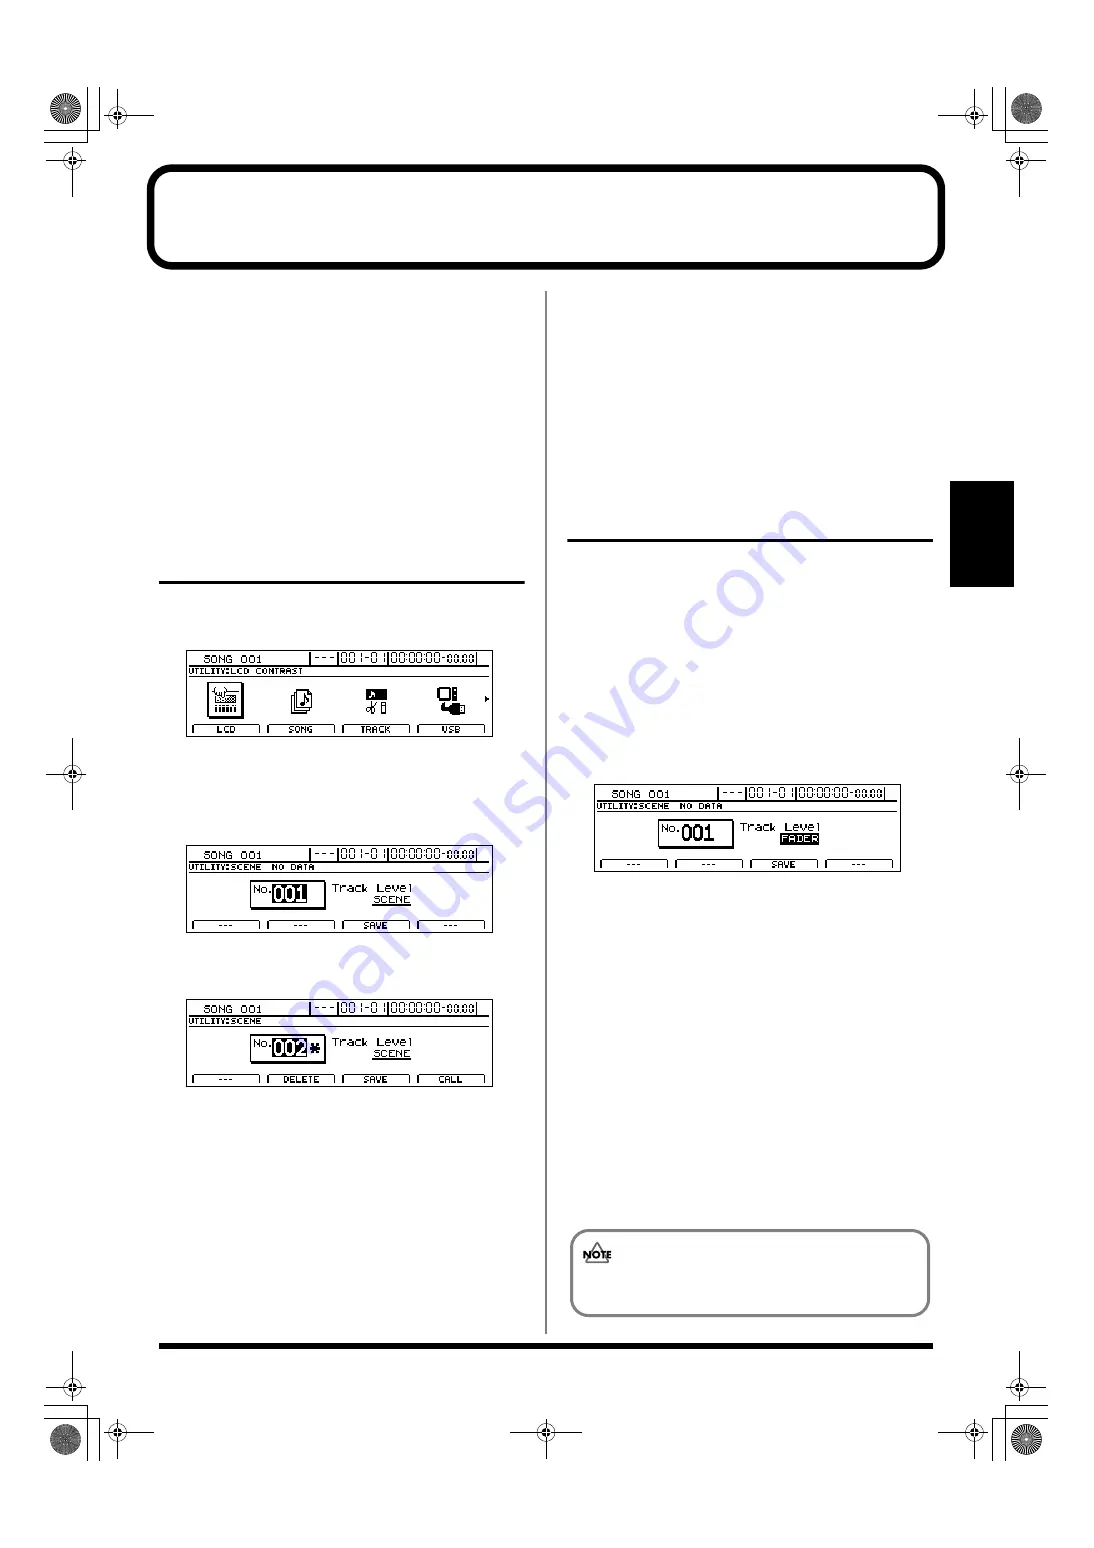
1.
Press [UTILITY].
The Utility Menu screen will appear.
fig.12-12d
2.
Move the cursor to the SCENE icon and press [ENTER/YES].
Alternatively, you can press [F3] (SCENE) if the SCENE
icon is currently displayed.
The Scene screen will appear.
fig.13-02d
3.
Use the TIME/VALUE dial to select the number of the
scene to be registered, recalled, or deleted.
fig.13-03d
If you select the number of a scene that has already been
registered, an asterisk (*) will be displayed before the
number to inform you of this fact.
4.
Register, recall, or delete a scene.
To recall:
Press [F4] (CALL).
To register:
Press [F3] (SAVE).
An asterisk (*) indicates that a scene has already been
registered. If you select such a scene, it will be
overwritten using the current settings.
To delete:
Press [F2] (DELETE).
The asterisk (*) indicating a registered scene will
disappear to show that the scene is no longer registered.
5.
Press [EXIT/NO] several times to return to the top screen.
6.
If you wish to store the scene settings, save the current
song (p. 72).
Recalling a scene without
changing track volumes
When you recall a scene, the track volumes change to the
levels stored in that scene, but the positions of the faders
remain the same. As a result, fader positions and actual
volumes will no longer match. However, the following
procedure can be used in situations where you want to recall
a scene without changing the track volumes from those
matching the current fader positions.
1.
Move to the Scene screen.
2.
Move the cursor to “Track Level” and select “FADER”
using the TIME/VALUE dial.
fig.13-04d
Track Level
This setting determines how track volumes will be
treated when a scene is recalled.
SCENE:
When a scene is recalled, the track volumes will change
to the levels stored in that scene. As a result, it is quite
possible that the front panel’s fader positions will no
longer match the actual track volumes.
FADER:
Even if a scene is recalled, the track volumes will stay at
the levels matching the positions of the front panel’s
faders.
3.
Press [EXIT/NO] several times to return to the top screen.
4.
If you wish to store the modified settings, save the
current song (p. 72).
If you do not save the song, your settings will not be
stored.
BR-1600_R_e.book 51 ページ 2007年12月6日 木曜日 午前9時52分
Summary of Contents for Digital Recording Studio BR-1600 CD
Page 41: ...41 Section 1 Advanced Use Section 1 Advanced Use BR 1600_R_e book 41...
Page 73: ...73 Section 2 Using Effects Section 2 Using Effects BR 1600_R_e book 73...
Page 145: ...145 Section 3 Using Rhythm Section 3 Using Rhythm BR 1600_R_e book 145...
Page 203: ...203 Section 4 Using the CD R RW Drive Section 4 Using the CD R RW Drive BR 1600_R_e book 203...
Page 220: ...220 MEMO BR 1600_R_e book 220...
Page 221: ...221 Section 5 Using MIDI Section 5 Using MIDI BR 1600_R_e book 221...
Page 239: ...239 Section 6 Using USB Section 6 Using USB BR 1600_R_e book 239...
Page 272: ...272 MEMO BR 1600_R_e book 272...
Page 273: ...273 Appendices Appendices BR 1600_R_e book 273...
Page 309: ...309 MEMO BR 1600_R_e book 309...


