246
Reading backup data back into the BR-1600CD from the PC (Recover)
2) Click [OK] in the “Safe To Remove Hardware” dialog
box that appears.
With Windows 2000/Me
1) In My Computer, right-click on the “BR-1600CD” icon
(or “Removable Disk (*:)” icon) to “Eject” the disk.
2) Click the
icon in the task tray, then click the
“Stop USB Disk-drive (*:)” message displayed there.
fig.52-100
3) Click [OK] in the “Safe To Remove Hardware” dialog
box that appears.
10.
Press BR-1600CD’s [EXIT/NO].
The message “Now Re-Loading...” will appear on the
BR-1600CD’s display, and the most recently selected
song will be reloaded.
When reloading has been completed, the display will
return to the USB screen.
• If you are using an OS other than Windows Me, the
message “Now Re-Loading...” will appear on the BR-
1600CD’s display immediately after “Remove
Hardware” is carried out, and the most recently selected
song will be reloaded. When reloading has been
completed, the display will return to the USB screen.
• If you press [EXIT/NO] without quitting the connection
to the computer, “Disconnect USB, OK?” appear. In this
case, pressing [ENTER/YES] returns the USB menu
screen to the display.
11.
Press [EXIT/NO] to return to the Top screen.
At this point, you can safely disconnect the USB cable
from the BR-1600CD and the computer.
With Macintosh
1.
Initialize the BR-1600CD’s hard disk. (p. 270)
Note that all of the data on the BR-1600CD’s hard disk
will be deleted as a result of this operation, and if
necessary, you should make a separate backup.
2.
Connect your computer and the BR-1600CD with a USB
cable.
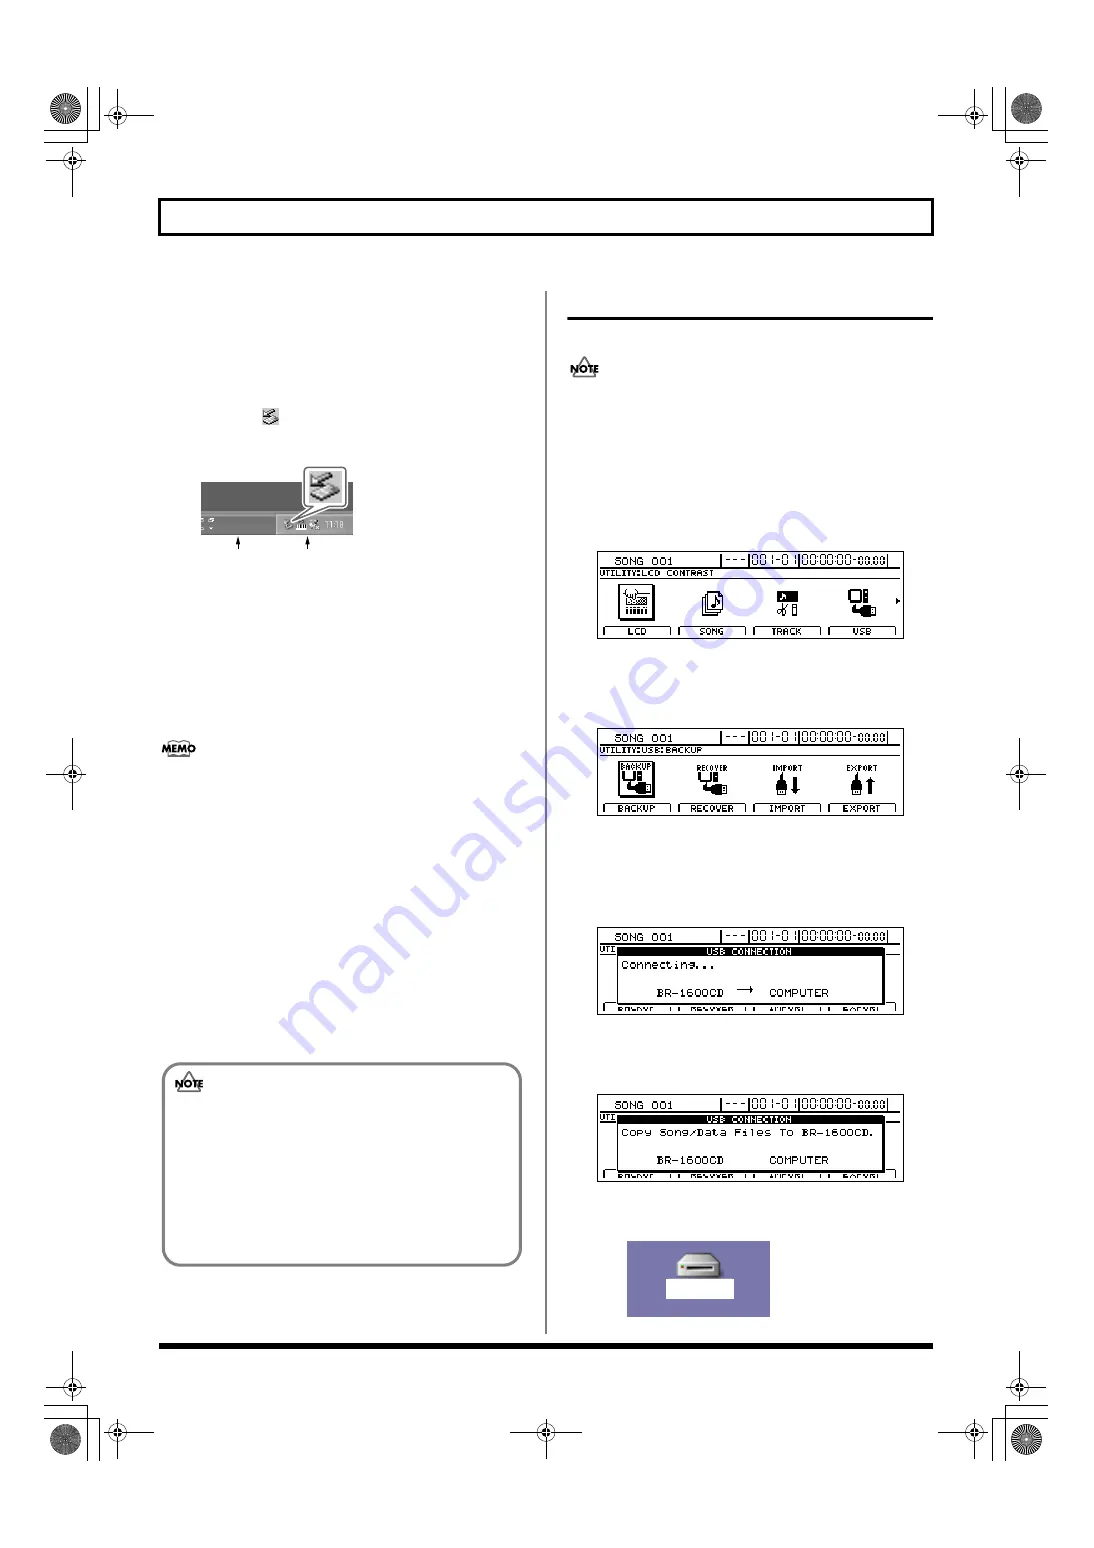
3.
Confirm that the recorder is stopped, then press [UTILITY].
The Utility Menu screen will appear.
fig.12-12d
4.
Move the cursor to the USB icon and press [ENTER/YES].
Alternatively, you can press [F4] (USB) if the USB icon is
currently displayed. The USB screen will appear.
fig.52-05d
5.
Move the cursor to “RECOVER” and press [ENTER/YES].
Alternatively, you can press [F2] (RECOVER).
“Waiting...” appears in the display, and then
“Connecting...” is displayed.
fig.52-06d
When connection with the PC has been established, the
message will change to “Copy Song/Data Files To BR-
1600CD.”
fig.52-11ed
Shortly after the connection has been established, the BR-
1600CD icon will appear on-screen.
fig.52-07b
Task tray
Task bar
If the current song contains newly recorded audio
data or newly modified settings, the message “Save
Current?” may be displayed during the recovery
procedure. If you want to save your song before
starting the recover process, press [ENTER/YES];
if this will not be necessary, press [EXIT/NO].
Remember that if you do not save a modified song
at this time, all newly recorded audio data, edited
data, modified mixer settings, etc. will be lost.
BR-1600CD
(Ex.)
BR-1600_R_e.book 246 ページ 2007年12月6日 木曜日 午前9時52分
Summary of Contents for Digital Recording Studio BR-1600 CD
Page 41: ...41 Section 1 Advanced Use Section 1 Advanced Use BR 1600_R_e book 41...
Page 73: ...73 Section 2 Using Effects Section 2 Using Effects BR 1600_R_e book 73...
Page 145: ...145 Section 3 Using Rhythm Section 3 Using Rhythm BR 1600_R_e book 145...
Page 203: ...203 Section 4 Using the CD R RW Drive Section 4 Using the CD R RW Drive BR 1600_R_e book 203...
Page 220: ...220 MEMO BR 1600_R_e book 220...
Page 221: ...221 Section 5 Using MIDI Section 5 Using MIDI BR 1600_R_e book 221...
Page 239: ...239 Section 6 Using USB Section 6 Using USB BR 1600_R_e book 239...
Page 272: ...272 MEMO BR 1600_R_e book 272...
Page 273: ...273 Appendices Appendices BR 1600_R_e book 273...
Page 309: ...309 MEMO BR 1600_R_e book 309...


