9. Advanced operation
9.1.4
The Geometry edit dialog
The images below show adjustments performed on a hatch pattern generated internally by the device (see
Internal patterns
).
The Geometry edit dialog
In the OSD, browse to
Geometry > Edit
, select one of the modes and press
ENTER
to display the semitransparent Geometry edit
dialog.
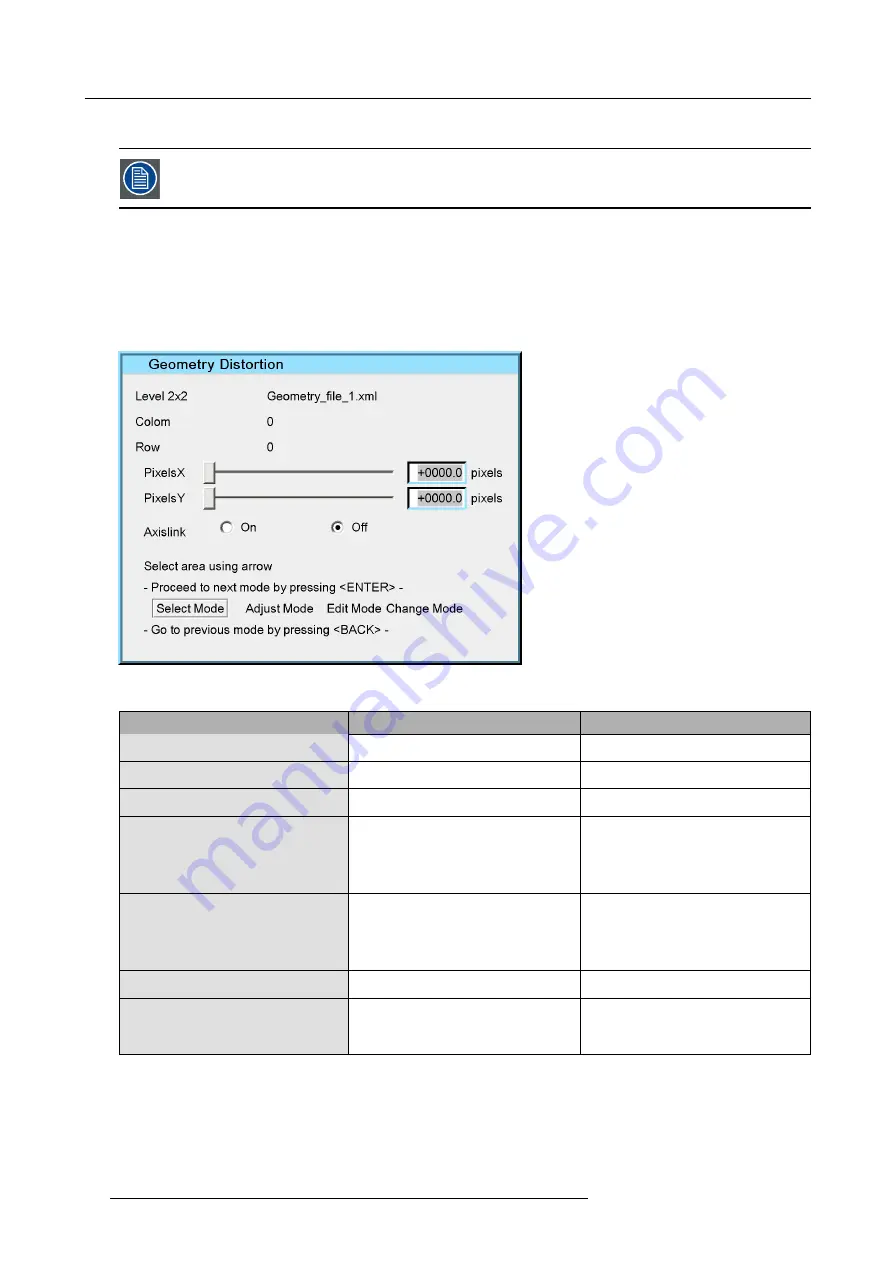
This Geometry edit dialog acts as an intuitive user interface to perform all the geometry adjustments on the
fl
y. Each individual
anchor point can be selected and moved to the desired location in real time.
Depending on the geometry mode, the dialog box may slightly differ, the dialog box below is for a 2x2 mode adjustment.
Image 9-7
The table below describes every item in the Geometry edit dialog box.
Field/Adjustment
Description
Notes
Level 2x2
Denotes the selected geometry adjustment
mode.
Level can be 2x2, 3x3, 5x5, 9x9, 15x15
or 33x33.
Column
Column number corresponding to the
selected anchor point.
This number refers to the 33 x 33 grid.
Row
Row number corresponding to the selected
anchor point.
This number refers to the 33 x 33 grid.
PixelsX
This slider bar and edit box are used to
de
fi
ne the new position of the anchor point
along the X axis, relative to its original
position.
In table front mode, and if
Axislink
is set
to off, a positive value moves the anchor
point to the right side.
High values can introduce some clipping
effects.
PixelsY
This slider bar and edit box are used to
de
fi
ne the new position of the anchor point
along the Y axis, relative to its original
position.
In table front mode, and if
Axislink
is set
to off, a positive value moves the anchor
point down.
High values can introduce some clipping
effects.
Axis link
See "Setting the Axis link to ON or OFF",
page 111.
It is advised to leave Axislink to its default
setting, being off.
Select Mode / Adjust Mode / Edit Mode /
Change Mode
See "Selecting an anchor point", page 102,
"Moving an anchor point in small steps",
page 104 and "Moving an anchor point in
large steps", page 105.
As soon as the Geometry dialog is displayed, the
fi
rst anchor point for this mode is by default selected.
Another anchor point in this adjustment mode can be selected at any time. The selected anchor point is marked with a small
yellow
dotted box
. The region of impact is marked with a
blue dotted box
.
98
R5909056 MCM-400 HFR 11/05/2016
Summary of Contents for MCM-400 HFR
Page 1: ...MCM 400 HFR User Guide R5909056 02 11 05 2016 ...
Page 8: ...Table of contents 4 R5909056 MCM 400 HFR 11 05 2016 ...
Page 36: ...4 Facility and system requirements 32 R5909056 MCM 400 HFR 11 05 2016 ...
Page 53: ...6 Setup and configuration 5 Exit the menu R5909056 MCM 400 HFR 11 05 2016 49 ...
Page 60: ...6 Setup and configuration Image 6 19 56 R5909056 MCM 400 HFR 11 05 2016 ...
Page 62: ...6 Setup and configuration 58 R5909056 MCM 400 HFR 11 05 2016 ...
Page 86: ...7 Getting started 82 R5909056 MCM 400 HFR 11 05 2016 ...
Page 154: ...10 Expert operation Image 10 61 150 R5909056 MCM 400 HFR 11 05 2016 ...
Page 161: ...10 Expert operation Image 10 68 R5909056 MCM 400 HFR 11 05 2016 157 ...
Page 176: ...11 Maintenance 172 R5909056 MCM 400 HFR 11 05 2016 ...
Page 192: ...12 MCM 400 HFR tools 188 R5909056 MCM 400 HFR 11 05 2016 ...
Page 204: ...14 RCU Control 200 R5909056 MCM 400 HFR 11 05 2016 ...
Page 208: ...15 Environmental information Image 15 1 204 R5909056 MCM 400 HFR 11 05 2016 ...


