background image

12. MCM-400 HFR tools

12.1.2 Creating Custom EDID

fi

les

Description

You can create new custom EDID

fi

les and enter the desired input timings.

Creating custom EDID

fi

les

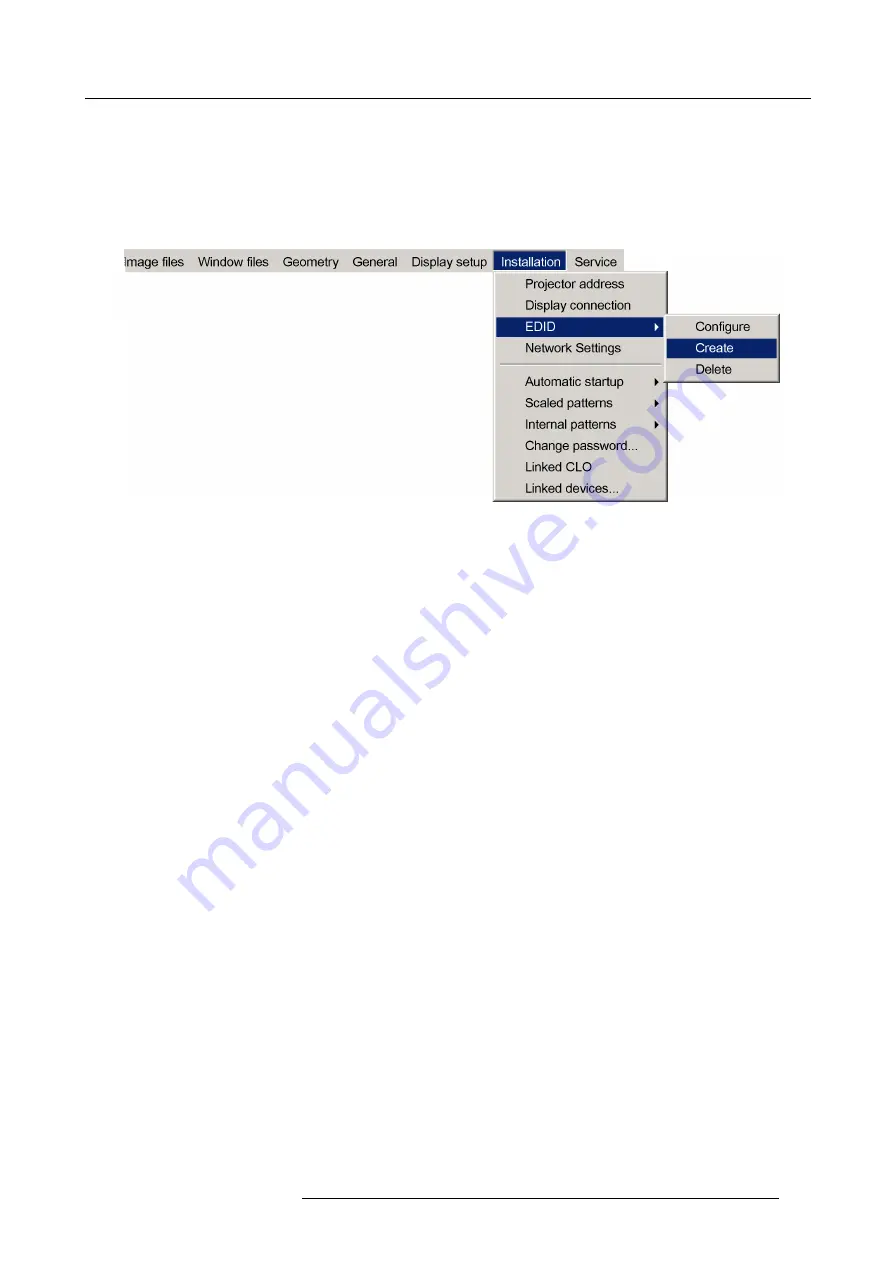
1. In the OSD, navigate to

Installation

>

EDID

>

Create...

and press

ENTER

to select.

Image 12-4

2. In the

Create Edid

dialog box that appears, enter the desired data.

-

Section

Timings

, enter the correct timings:

o

Active Pixels: horizontal resolution;

o

Active Lines: vertical resolution;

o

Frequency (Hz): amount of frames per second;

o

Calculation: select the correct (standard) video timings:

o

CVT: Coordinated Video Timings

o

CVT RB: Coordinated Video Timings Reduced Blanking

o

CVT MB: Coordinated Video Timings Minimum Blanking (not a standard)

o

GTF: Generalized Timing Formula

-

Section

Options

, :

o

set or clear the check box Stereo. You can leave it unchecked.

o

select the correct interface:

o

Interface Unde

fi

ned (standard)

o

Interface DVI 8 bit

o

Interface DVI 12 bit

o

Interface DisplayPort 8 bit

o

Interface DisplayPort 10 bit

o

Interface DisplayPort 12 bit

-

Filename

edit box: enter the name for the Custom EDID

fi

le.

R5909056 MCM-400 HFR 11/05/2016

177

Summary of Contents for MCM-400 HFR

Page 1: ...MCM 400 HFR User Guide R5909056 02 11 05 2016 ...

Page 2: ...Barco NV President Kennedypark 35 8500 Kortrijk Belgium Phone 32 56 36 82 11 Fax 32 56 36 883 86 Support www barco com en support Visit us at the web www barco com Printed in Belgium ...

Page 3: ...or compliance could void the user s authority to operate the equipment Guarantee and Compensation Barco provides a guarantee relating to perfect manufacturing as part of the legally stipulated terms of guarantee On receipt the purchaser must immediately inspect all delivered goods for damage incurred during transport as well as for material and manufacturing faults Barco must be informed immediate...

Page 4: ...neral Public License for more details You should have received a copy of the GNU General Public License along with eCos if not write to the Free Software Foundation Inc 59 Temple Place Suite 330 Boston MA 02111 1307 USA As a special exception if other files instantiate templates or use macros or inline functions from this file or you compile this file and link it with other works to produce a work...

Page 5: ...e RCU address 42 6 2 Powering the MCM 400 HFR 44 6 3 Activating the MCM 400 HFR 45 6 4 Setting the MCM 400 HFR address 46 6 5 Network configuration 47 6 5 1 Configuring the MCM 400 HFR for a Private Subnet 48 6 5 2 Configuring the MCM 400 HFR for a DHCP network 50 6 6 Checking the display connection 52 6 7 Linking MCM 400 HFR devices in a multi channel system 53 6 8 Linked CLO 57 7 Getting started...

Page 6: ...hape 127 10 2 3 General Soft Edge workflow 130 10 2 4 Alpha planes 134 10 2 5 Beta planes 135 10 2 6 The Soft Edge selection dialog 136 10 2 7 The Soft Edge edit dialog 138 10 2 8 Selecting an anchor point 140 10 2 9 Moving an anchor point in small steps 141 10 2 10 Moving an anchor point in large steps 142 10 3 Dynacolor 143 10 3 1 Dynacolor concept and expert use 144 10 3 2 The Dynacolor dialog ...

Page 7: ... and IR receivers 194 14 2 OSD navigation and selection 195 14 3 Data input 197 14 4 MCM 400 HFR control 199 15 Environmental information 201 15 1 Disposal information 202 15 2 Rohs compliance 203 15 3 Production address 205 15 4 Importers contact information 206 Index 207 R5909056 MCM 400 HFR 11 05 2016 3 ...

Page 8: ...Table of contents 4 R5909056 MCM 400 HFR 11 05 2016 ...

Page 9: ...aluable and critical information to ensure safety of the operator other people in the neighborhood of the device Overview Notice on safety Installation instructions Owner s record Warnings Plug types Heat and fire hazard Installation Prevent personal injury Device damage Environment condition check Service Cleaning Repacking R5909056 MCM 400 HFR 11 05 2016 5 ...

Page 10: ...equirements on the use of safety critical components materials and isolation in order to protect the user or operator against risk of electric shock and energy hazard and having access to live parts Safety standards also impose limits to the internal and external temperature rises radiation levels mechanical stability and strength enclosure construction and protection against the risk of fire Simu...

Page 11: ...ly and retain it for future reference Installation and preliminary adjustments can be performed after reading the documentation manuals in detail All warnings on the device and in the documentation manuals should be adhered to All instructions for operating and use of this equipment must be followed precisely R5909056 MCM 400 HFR 11 05 2016 7 ...

Page 12: ...rt number and serial number can be found on the label at the back side of the device Record these numbers in the table below Refer to them whenever you call your Barco dealer regarding this product Part Number Serial Number Dealer 8 R5909056 MCM 400 HFR 11 05 2016 ...

Page 13: ... will walk on the cord To disconnect the cord pull it out by the plug Never pull the cord itself If an extension cord is used with this product make sure that the total of the Ampere ratings on the products plugged into the extension cord does not exceed the extension cord Ampere rating Never push objects of any kind into this product through cabinet slots as they may touch dangerous voltage point...

Page 14: ...d with CEE 7 plug up to 16 A CEE 7 E N L Image 1 1 The colors of the mains lead are colored in accordance with the following code Green yellow Earth Ground Blue Neutral Brown Line Live b Power cord with NEMA 5 15 plug up to 15 A NEMA 5 15 E L N Image 1 2 The wires of the power cord are colored in accordance with the following code Green or yellow green Earth Ground Blue or white Neutral Brown or b...

Page 15: ...als away from the device at all times Mount the device in a well ventilated area away from sources of ignition and out of direct sun light Never expose the device to rain or moisture In the event of fire use sand CO2 or dry powder fire extinguishers never use water on an electrical fire Always have service performed on this device by authorized Barco service personnel Always insist on original Bar...

Page 16: ...vided for ventilation to ensure reliable operation of the product and to protect it from overheating these openings must not be blocked or covered The openings should never be blocked by placing the product on a bed sofa rug or other similar surface This product should never be placed near or over a radiator or heat register nor should it be placed in a built in installation or enclosure unless pr...

Page 17: ... damage always read this manual and all labels on the system before connecting to the wall outlet To prevent injuries take note of the weight of the device Before attempting to remove any of the device s covers you must turn off the device and disconnect from the wall outlet R5909056 MCM 400 HFR 11 05 2016 13 ...

Page 18: ...e spilled on or dropped inside the device If this does happen switch off and unplug the mains supply immediately Do not operate the device again until it has been checked by qualified service personnel The device must always be mounted in a manner which ensures free flow of air into its air inlets and unimpeded evacuation of the hot air exhausted from its cooling system Heat sensitive materials sh...

Page 19: ...cts of hostile airborne particles in the environment of the device The manufacturer reserves the right to refuse repair if a device has been subject to negligence abandon or improper use Ambient temperature conditions Max ambient temperature 40 C or 104 F Min ambient temperature 10 C or 51 F Storage temperature 35 C to 65 C 31 F to 149 F Humidity Conditions Storage 0 to 98 relative humidity non co...

Page 20: ...ent of the other controls may result in damage and will often require extensive work by a qualified technician to restore the product to normal operation If the product has been dropped or the cabinet has been damaged If the product exhibits a distinct change in performance indicating a need for service Replacement parts When replacement parts are required be sure the service technician has used o...

Page 21: ...cleaners Use a damp cloth for cleaning To keep the cabinet looking brand new periodically clean it with a soft cloth Stubborn stains may be removed with a cloth lightly dampened with mild detergent solution Never use strong solvents such as thinner or benzine or abrasive cleaners since these will damage the cabinet R5909056 MCM 400 HFR 11 05 2016 17 ...

Page 22: ...packing Save the original shipping carton and packing material they will come in handy if you ever have to ship your equipment For maxi mum protection repack your set as it was originally packed at the factory 18 R5909056 MCM 400 HFR 11 05 2016 ...

Page 23: ...anual s layout symbols and fonts used in this manual It also introduces you to the Barco MCM 400 HFR external warp box and describes its features and controls Overview About this manual Symbols and fonts Key features and benefits Know your MCM 400 HFR R5909056 MCM 400 HFR 11 05 2016 19 ...

Page 24: ... requirements lists requirements and guidelines 5 Physical installation instructions to install the device and to make all connections 6 Setup and configuration setup of resolution external communication and linking configuration 7 Getting started starting the device and displaying a source 8 OSD preferences Customizing the On Screen Display OSD or menu 9 Basic operation first level operator featu...

Page 25: ...juries Info general information about a term Note additional information about the subject Tip useful advice about the subject Font overview Buttons and keys are indicated in bold Menu items are indicated in italic Step related notes tips warnings and cautions are printed in italic Procedure related notes tips warnings and cautions are printed in bold between 2 lines preceded by an icon R5909056 M...

Page 26: ...ing key features and benefits Real time warping with minimal latency Using proprietary advanced scaling algorithms to retain maximal detail Advanced color matching using linked Dynacolor algorithms Electronic blend generation Pixel based alpha beta plane correction for black highlight levels Native and scaled pattern generation Linking of CLO in multi channel set up s Supports active and passive s...

Page 27: ... IR commands from the RCU 2 IR LED indicates the network connectivity status and the detection of RC5 signals 3 Error LED indicates a hardware error 4 ON LED indicates the active status 5 Standby LED indicates the standby status Rear panel 1 8 12 13 17 16 14 15 9 10 11 2 3 4 5 7 6 Image 2 2 Rear panel R5909056 MCM 400 HFR 11 05 2016 23 ...

Page 28: ... DisplayPort input to connect DisplayPort sources 12 Stereo input to connect stereo control signals 13 DisplayPort input to connect DisplayPort sources 14 Stereo input to connect stereo control signals 15 DisplayPort input to connect DisplayPort sources 16 DisplayPort out Output only active when a Barco Galaxy 4K projector is detected on the network correct IP address needs to be available 17 Disp...

Page 29: ...3 Packaging 3 PACKAGING About this chapter This chapter provides an overview of what is in the box and how to unpack Overview Content Unpacking R5909056 MCM 400 HFR 11 05 2016 25 ...

Page 30: ...ble below are delivered along with the device Ensure that everything is present and intact Contact your local dealer or Barco if anything is missing or damaged Never use a damaged unit e g MCM 400 HFR power cord power adaptor RCU Description Article number Image Quantity MCM 400 HFR R9898508 1 Remote Control Unit RCU 2 batteries R764277K 1 12 VDC power adaptor B557282 1 Power cord connectors C13 a...

Page 31: ...3 Packaging Description Article number Image Quantity Rack mount R874169 1 Screws to tighten the rack mount B364484 10 User Guide R5909056 1 Safety Guide R5905189WW 1 R5909056 MCM 400 HFR 11 05 2016 27 ...

Page 32: ...uture shipment For maximum protection while shipping the unit always pack it as it was packed during first delivery Unpacking the MCM 400 HFR 1 Carefully cut the tape on the top lid of the box Warning Follow the relevant safety precautions while using a knife 2 Open the box and lift out the content Image 3 1 28 R5909056 MCM 400 HFR 11 05 2016 ...

Page 33: ...s chapter provides information about the installation requirements such as temperature humidity power net safety area around the device Also the air intake and air outlet area guidelines are listed Overview Environmental requirements Installation requirements R5909056 MCM 400 HFR 11 05 2016 29 ...

Page 34: ... relative humidity non condensing Environment Do not install the device in a site near heat sources such as radiators or air ducts or in a place subject to direct sunlight excessive dust or humidity Be aware that room heat rises to the ceiling check that temperature near the installation site is not excessive Environment condition check The device must always be mounted in a manner which ensures t...

Page 35: ...must be installed Air flow guidelines The air intake is at the front side of the device and the air exhaust is at the back side It is necessary to keep these areas unblocked A free area of at least 40 cm should be available at the front side of the device A free area of at least 5 cm should be available at the back of the device Image 4 1 R5909056 MCM 400 HFR 11 05 2016 31 ...

Page 36: ...4 Facility and system requirements 32 R5909056 MCM 400 HFR 11 05 2016 ...

Page 37: ...TALLATION AND CONNECTIONS Overview RCU battery installation Installing the rack mount plate Connections DisplayPort connection Connecting the Galaxy 4K HFR or HDQ 4K40 series projector Power connection Network connection R5909056 MCM 400 HFR 11 05 2016 33 ...

Page 38: ... while pulling the cover upwards 2 1 2 Image 5 1 2 Insert the two AA size batteries making sure the polarities match the and marks inside the battery compartment Image 5 2 3 Insert 1 the lower tab of the battery cover in the gap at the bottom of the remote control and press 2 the cover until it clicks in place 1 2 Image 5 3 To prevent battery explosion Danger of explosion if battery is incorrectly...

Page 39: ... be mounted to enable installation in a 19 rack Device height is 5U Installing the rack mount plate 1 Remove the screws from the device 2 Fix the rack mount plate to the device using 10 screws reference 1 image 5 4 1 Image 5 4 3 Use the included strip of Velcro to fix the power supply to the cabinet optional Image 5 5 R5909056 MCM 400 HFR 11 05 2016 35 ...

Page 40: ... and connections 5 3 Connections Input boards Default configuration two DisplayPorts input boards Specifications can be found in the concerning appendix Device 1 2 Image 5 6 Layer 1 Layer 2 36 R5909056 MCM 400 HFR 11 05 2016 ...

Page 41: ...5 Physical installation and connections 5 4 DisplayPort connection How to connect 1 Connect the DisplayPort cable to one of the device s DisplayPort inputs Image 5 7 R5909056 MCM 400 HFR 11 05 2016 37 ...

Page 42: ... of the MCM 400 HFR 2 Connect the other end of the DisplayPort cables to the DP input connector of the Galaxy 4K HFR or HDQ 4K40 series projector resolution the output resolution of the MCM 400 HFR depends on the output mode which can be set in the OSD Navigate to Display setup Stereo mode vertical refresh rate in all modes mono passive stereo active stereo o Synchronous 23 5Hz 60 5Hz o Asynchrono...

Page 43: ...r 1 Connect the 8 pin DIN of the supplied power adaptor to the power socket reference 1 image 5 9 on the rear side of the MCM 400 HFR 2 Connect the other end of the power adaptor to your AC power source 100 240 VAC 1 2 TOP Image 5 9 Power connection 1 Power socket 2 Fuse CAUTION For continued protection against risk of fire replace only with same type and rating fuse T 8 AH 250V reference 2 image ...

Page 44: ...ssible file transfer for firmware upgrade storage of multiple device configurations and set ups wide range of control possibilities linking the devices to allow uniform color Linked Dynacolor The connection to the device can be done via a crossed cable or via a switch on the local network LAN Connecting the device to a network 1 Connect the RJ 45 male plug to the device s RJ 45 female connector Im...

Page 45: ...T O I M A G E S D I D V I V I D E O R G B S V I D E O P C L O G O P I P 0 C O N T R T I N T P H A S E C O L O R B R I G H T N PI P A D J U S T 100 240V 50 60Hz Image 6 1 1 DisplayPort connection with input channel 1 2 DisplayPort connection with input channel 2 3 DisplayPort connection for channel A between MCM 400 HFR and Galaxy 4K HFR or HDQ 4K40 series projector 4 DisplayPort connection for cha...

Page 46: ... range 0 9 See Setting the MCM 400 HFR address page 46 to learn how to check set the MCM 400 HFR address Setting the RCU address 1 Use a pencil to press the sunk down Address button on the RCU MENU BACK ENTER 1 2 3 4 5 6 7 8 9 PAUSE AUTO IMAGE SDI DVI VIDEO RGB S VIDEO PC LOGO PIP 0 CONTR TINT PHASE COLOR BRIGHTN P IP ADJUS T PAUSE Image 6 2 RCU Address button 2 Within 5 seconds after pressing the...

Page 47: ... M E N U B A C K E N T E R 1 2 3 4 5 6 7 8 9 P A U S E A U T O I M A G E S D I D V I V I D E O R G B S V I D E O P C L O G O P I P 0 C O N T R T I N T P H A S E C O L O R B R I G H T N P I P A D JU S T Image 6 4 IR receiver If no button is pressed within 5 seconds after the Address button has been pressed the RCU serial address remains unchanged Each MCM 400 HFR has a common address which by defau...

Page 48: ...se a specified power on sequence must be followed to allow EDID communication Powering the MCM 400 HFR Connect the power supply to both the MCM 400 HFR and the wall outlet Power on sequence 1 Network switch if present allows IP address assignment to MCM 400 HFR in case of a DHCP DNS network 2 Projector connected with the MCM 400 HFR Galaxy 4K HFR or HDQ 4K40 series projector 3 MCM 400 HFR 4 Source...

Page 49: ... standby Press the standby button on the RCU for 3 seconds MENU BACK ENTER 1 2 3 4 5 6 7 8 9 PAUSE AUTO IMAGE SDI DVI VIDEO RGB S VIDEO PC LOGO PIP 0 CONTR TINT PHASE COLOR BRIGHTN P IP ADJUS T Standby button Image 6 5 RCU standby button Switching the MCM 400 HFR from standby to active state Press the standby button on the RCU do not press longer than 1 second R5909056 MCM 400 HFR 11 05 2016 45 ...

Page 50: ...he Device address is used to address one MCM 400 HFR at a time This address can be set in the range 0 255 default is 1 It must be taken into account however that a standard RCU can only communicate with devices having their address set in the range 0 9 The MCM 400 HFR address and the RCU address must be set to the same value to allow communication Setting the MCM 400 HFR address 1 In the OSD navig...

Page 51: ... addresses in an organization s network This is done by a DHCP server in the same network The DHCP server must be up and running at any time Depending on the lease time a new IP address can be assigned to the MCM 400 HFR on a regular base Network settings The Ethernet configuration settings of the MCM 400 HFR are explained in the table below Parameter Description Type of field MAC Address MAC Addr...

Page 52: ...that is connected to the same subnet to a fixed IP address within the same subnet range Setting a fixed IP address in the MCM 400 HFR 1 In the OSD navigate to Installation Network Settings and press ENTER to select Image 6 8 2 In the dialog box that appears navigate to Use Fixed IP and press ENTER to select Image 6 9 The Fixed IP settings fields are enabled 3 Enter the following parameters IP addr...

Page 53: ...6 Setup and configuration 5 Exit the menu R5909056 MCM 400 HFR 11 05 2016 49 ...

Page 54: ...e can vary depending on the speed of the network connection When the DHCP mode is enabled but no DHCP server is running on the network or no Ethernet cable is plugged in the network detection cannot be completed after 5 seconds a time out occurs and the network configu ration retreats to a default mode in which a fixed IP address 169 254 0 1 is set Once the Ethernet cable is connected or the DHCP ...

Page 55: ... The DHCP settings field is enabled 4 In the Hostname edit box enter the Host name of the MCM 400 HFR 5 Select Apply settings A dialog box is displayed showing the progress of the update 6 Exit the menu R5909056 MCM 400 HFR 11 05 2016 51 ...

Page 56: ... connection and press ENTER to select Image 6 12 2 In the Display connection dialog box check whether the present display Galaxy 4K HFR or HDQ 4K40 series projector is con nected to your MCM 400 HFR Image 6 13 Green bullet connected Yellow bullet trying to connect Red bullet not connected 3 Exit the menu 52 R5909056 MCM 400 HFR 11 05 2016 ...

Page 57: ...ign the Master MCM 400 HFR as being the Master In the Master MCM 400 HFR define all Slave MCM 400 HFR devices IP address or Host name Decide for which Slave MCM 400 HFR devices the linking must be activated and what features need to be linked During alignment one can now choose to match the colors of all projectors or monitors by simply clicking one of the Dynacolor buttons This assumes however th...

Page 58: ...FR navigate to Installation Linked devices and press ENTER to select Image 6 16 2 In the dialog box that appears select the Host x checkbox and press ENTER Note x represents the number of the Host The IP address edit box is enabled 3 Fill in the IP address or Hostname of the Slave MCM 400 HFR 54 R5909056 MCM 400 HFR 11 05 2016 ...

Page 59: ...ld be controlled by the master during color alignment 5 Set the CLO checkbox if the CLO of the Slave projector should be controlled by the master Setting an MCM 400 HFR to be Slave 1 In the OSD of the MCM 400 HFRs to be Slave navigate to Installation Linked devices and press ENTER to select Image 6 18 2 In the dialog box that appears clear the Master check box R5909056 MCM 400 HFR 11 05 2016 55 ...

Page 60: ...6 Setup and configuration Image 6 19 56 R5909056 MCM 400 HFR 11 05 2016 ...

Page 61: ...the list of Linked devices See procedure Linking MCM 400 HFR devices in a multi channel system page 53 How to link CLO 1 In the OSD of the MCM 400 HFR navigate to Installation Linked CLO and press ENTER to select Image 6 20 2 In the dialog box that appears set the enabled CLO check box and fill in the target foot lambert fL Image 6 21 R5909056 MCM 400 HFR 11 05 2016 57 ...

Page 62: ...6 Setup and configuration 58 R5909056 MCM 400 HFR 11 05 2016 ...

Page 63: ...and configured it is ready for daily use and or for advanced configuration and alignment This chapter describes basic procedures Overview Starting the MCM 400 HFR Displaying a single source Displaying multiple sources Stitched Layouts Basic image adjustment R5909056 MCM 400 HFR 11 05 2016 59 ...

Page 64: ...etting started 7 1 Starting the MCM 400 HFR Power up the MCM 400 HFR See Powering the MCM 400 HFR page 44 Activate the MCM 400 HFR See Activating the MCM 400 HFR page 45 60 R5909056 MCM 400 HFR 11 05 2016 ...

Page 65: ... connectors How to select a source from OSD 1 In the OSD navigate to Source selection and open the drop down menu 2 Select the source to be displayed Image 7 1 3 Press ENTER to display the selected source An available source is indicated by a Barco logo in the prefix A displayed source is indicated by a bullet in the prefix WARNING Check the connection with the display If this connection is not es...

Page 66: ...le below describes the different Stitch Layouts and scan directions Type of layout Description Mode Single Top down The source is displayed in full screen with image being scanned from top left to bottom right in one continuous process Mono Active stereo Dual 1 x 2 Top down Two inputs are required The sources are displayed next to each other The images are scanned from top left to bottom right Mon...

Page 67: ...esolution they are first stitched then stretched or shrunk to fit the device s native resolution and aspect ratio If multiple source signals are used to make up the full image Stitch Layout Dual or Quad and they have different resolutions or if one signal is missing each source signal is centered in its target area in its native resolution If the source image is too large it is cropped If it is to...

Page 68: ... lines from the frame start of the Lock source Moreover it must be less than the Sync Variance Limit setting see concerning topic If the deviation of the frame start of each source in lines that make up the Stitch layout is known in relation to the frame start of the Lock source and if this deviation is within specification of the projector the Sync Variance Limit must be set to a value that is a ...

Page 69: ...youts and other configurations are similar How to create a Window file 1 In the OSD navigate to Window files Create Mono Active stereo or Passive Stereo and press ENTER to select Image 7 4 The following dialog appears Image 7 5 2 Select Stitch Layout Dual 2 x 1 Top down and press Next to continue 3 In the Sources section click the source or input to be displayed on the top half of the image R59090...

Page 70: ...on 4 Select a source or input to be displayed on the bottom image half Image 7 8 The selected source appears in the second button indicating the bottom half of the Selection section and is disabled from the Sources section 5 Click Next 6 In the section Lock on source select the input from which the sync should be used to display the image 66 R5909056 MCM 400 HFR 11 05 2016 ...

Page 71: ...7 Getting started Image 7 9 7 Click Finish to confirm Note The image might take a few seconds to load according to the settings R5909056 MCM 400 HFR 11 05 2016 67 ...

Page 72: ...he center position of the slider bar If all sources are locked externally as they should be their sliders will also be positioned in the center of the respective slider bars Only if a source is not in sync with the lock source the corresponding slider is drifting on its slider bar indicating an external sync problem to be solved since it results in image artifacts How to view Window file informati...

Page 73: ...xisting Window file can be edited at any time using the Edit option The following procedures explain the steps to edit a Window file Overview Locking to the sync of another source Editing Stitch Layout Input Stereo Sync settings R5909056 MCM 400 HFR 11 05 2016 69 ...

Page 74: ...d at any time How to lock to another source 1 In the OSD navigate to Window files Edit Lock source and press ENTER to select Image 7 12 2 From the dialog box select the input from which the sync master sync should be used to display the image Image 7 13 3 Press OK to confirm 4 Exit the menu 70 R5909056 MCM 400 HFR 11 05 2016 ...

Page 75: ... inputs How to edit source layout 1 In the OSD navigate to Window files Edit Source layout and press ENTER to select Image 7 14 2 In the dialog box click the two sources that need swapping position Image 7 15 3 Click Apply if you want to swap the position of two other sources and go back to step 2 4 Press OK to confirm R5909056 MCM 400 HFR 11 05 2016 71 ...

Page 76: ...scription Select if the Input Stereo Sync has to be swapped or not normal How to set the Input Stereo Sync 1 In the OSD navigate to Window files Edit Input Stereo Sync Normal or Swapped and press ENTER to select Image 7 16 72 R5909056 MCM 400 HFR 11 05 2016 ...

Page 77: ...g Save as How to copy a Window file 1 Make sure that a Window file is active and in the OSD navigate to Window files Save as Image 7 17 2 Press ENTER to select 3 In the dialog box enter the desired name for the copied file Image 7 18 4 Confirm by pressing ENTER 5 Exit the menu R5909056 MCM 400 HFR 11 05 2016 73 ...

Page 78: ...on a different source sync How to load a Window file 1 In the OSD navigate to Window files Load and press ENTER to select Image 7 19 2 In the dialog box navigate to the desired Window file Image 7 20 For every Window file selected the details of the sources that will be displayed in each half or quadrant or full screen is shown 3 Press ENTER to confirm 4 Exit the menu 74 R5909056 MCM 400 HFR 11 05...

Page 79: ...es Rename and press ENTER to select Image 7 21 2 In the dialog that appears select the Window file to be renamed and press ENTER to confirm Image 7 22 The selected file name appears in the edit box at the bottom of the dialog box 3 In the edit box change the file name to your wishes 4 Confirm by pressing ENTER 5 Exit the menu R5909056 MCM 400 HFR 11 05 2016 75 ...

Page 80: ...Copy and press ENTER to select Image 7 23 2 In the list of the dialog box navigate to the Window file that needs to be copied and press ENTER to confirm Image 7 24 The selected file name appears in the edit box at the bottom of the dialog box 3 In the edit box enter the name of the copy by changing the original file name 4 Confirm by pressing ENTER 5 Exit the menu 76 R5909056 MCM 400 HFR 11 05 201...

Page 81: ... How to delete a Window file 1 In the OSD navigate to Window files Delete and press ENTER to select Image 7 25 2 In the list of the dialog box navigate to the Window file to be deleted Image 7 26 3 Confirm by pressing ENTER A confirmation window appears follow the instruction and make your choice Image 7 27 4 Exit the menu R5909056 MCM 400 HFR 11 05 2016 77 ...

Page 82: ...nd gamma Brightness and Contrast should never be changed in case of multiple channel systems other ways of alignment are used in similar display systems Gamma should always be set to the value corresponding to the gamma setting of the image generator Overview Adjusting the brightness Adjusting the contrast Adjusting the gamma 78 R5909056 MCM 400 HFR 11 05 2016 ...

Page 83: ... 128 In multiple channel systems the default value must be set on all projectors How to adjust brightness 1 In the OSD navigate to Image Settings Brightness and press ENTER to select Image 7 28 2 In the dialog box select the source for which you want to change the brightness Image 7 29 3 Change the value to your wishes Image 7 30 4 Exit the menu R5909056 MCM 400 HFR 11 05 2016 79 ...

Page 84: ...f full white compared to full black In multiple channel systems the contrast must be set to the default value on all projectors How to adjust contrast 1 In the OSD navigate to Image Settings Contrast and press ENTER to select Image 7 31 2 In the dialog box select the source for which you want to change the contrast Image 7 32 3 Change the value to your wishes Image 7 33 4 Exit the menu 80 R5909056...

Page 85: ...eps of 0 2 Default value is 2 2 This value should meet the gamma setting of the source e g graphical card of a computer that is used as a source In case of doubt leave the gamma to its default setting How to adjust gamma 1 In the OSD navigate to Image Settings Gamma and press ENTER to select Image 7 34 2 In the dialog box select the source for which you want to change the gamma Image 7 35 3 Change...

Page 86: ...7 Getting started 82 R5909056 MCM 400 HFR 11 05 2016 ...

Page 87: ...e below Image 8 1 From each of the menu items a drop down menu box can be opened From the menu items of a drop down menu showing a at the end another drop down menu can be opened e g Settings From menu items showing three dots e g Gamma a dialog box can be opened Dialog boxes can be purely informative or they provide features to change settings or data Some menu items can be selected to simply ena...

Page 88: ...ghlighted item indicates the selected item 3 Press the arrow key to open the drop down menu 4 Press the arrow key a multiple times to select More 5 Press ENTER to open the dialog box 6 Enter the password press or to select the character to be changed press or to change the value of the selected character or enter a digit by pressing the according key on the RCU 7 Confirm the password by pressing E...

Page 89: ... RCU use the arrows and to navigate through the menu items a highlighted menu item indicates the actual position Note The same rules apply when navigating within a dialog box Scrolling through the menu bar or through the drop down menus or through a list is a cycle which means that after the last item has been selected the next selected item will be the first item again R5909056 MCM 400 HFR 11 05 ...

Page 90: ... menu bar 1 Navigate to the desired menu item 2 On the RCU press to open the drop down menu How to open a drop down menu from a drop down menu item 1 Navigate to the desired menu item having an arrow next to it 2 On the RCU press to open the drop down menu 86 R5909056 MCM 400 HFR 11 05 2016 ...

Page 91: ...nces 8 4 Opening a dialog box How to open a dialog box 1 Navigate to the desired menu item having three dots next to it e g Contrast 2 On the RCU press ENTER to open the dialog box R5909056 MCM 400 HFR 11 05 2016 87 ...

Page 92: ...activate a menu item of a drop down menu e g On Off 1 Navigate to the menu item of your choice a highlighted menu item indicates the selection 2 Confirm by pressing ENTER The activated item is indicated by a bullet in front of it Image 8 3 88 R5909056 MCM 400 HFR 11 05 2016 ...

Page 93: ...slider in a slider box How to move a slider in a slider box 1 From a menu item open the slider box by pressing ENTER The slider box appears E g Image 8 4 2 Use or to move the position of the slider R5909056 MCM 400 HFR 11 05 2016 89 ...

Page 94: ...or is selected Image 8 5 2 Press ENTER to activate it 3 Enter the value digits or characters use and to select the character to be changed a highlighted character blue background color can be changed use and to change the value of the highlighted character or press the desired digit button on the RCU 4 Press ENTER to confirm 90 R5909056 MCM 400 HFR 11 05 2016 ...

Page 95: ...een if this is not fully achievable by mechanical positioning and lens shift and zoom Mainly keystone correction and basic geometry correction for single curved screens are explained in this section Read the Geometry section in the Expert chapter for more details about geometry correction Also Dynacolor sets are described in detail which sets are used depending on the device parameters and options...

Page 96: ...ined By pre distorting the image inside the projector a correct geometry can be achieved on curved screens without requiring additional computational power on the image generator This section explains the geometry adjustment principle and lists the procedures to perform geometry adjustment this enables us to correct vertical and horizontal keystone to create bows to meet the shape of cylindrical a...

Page 97: ...t on a small area only The full image is divided in 33 x 33 regions The smallest region of impact is one of these 99 regions 0 1 2 3 4 5 6 7 8 9 10 11 12 13 14 15 16 17 18 19 20 21 22 23 24 25 26 27 28 29 30 31 32 0 2 1 3 4 6 5 7 8 10 9 11 12 14 13 15 16 18 17 19 20 22 21 23 24 26 25 27 28 30 29 31 32 Image 9 1 SIM 10 33 x 33 regions in an image Geometry adjustment is divided in six modes 2 x 2 hi...

Page 98: ...20 20 20 20 20 20 20 20 20 20 20 20 20 15 15 14 12 15 15 15 15 14 14 13 13 21 20 21 21 21 21 21 21 19 20 18 20 19 20 20 21 17 21 21 18 21 20 21 19 21 21 20 21 21 21 21 21 21 19 20 18 20 19 20 20 21 17 21 21 18 21 20 21 19 21 21 20 21 21 21 21 21 21 19 20 18 20 19 20 20 21 17 21 21 18 21 20 21 19 21 21 20 21 21 21 21 21 21 19 20 18 20 19 20 20 21 17 21 21 18 21 20 21 19 21 21 20 21 21 21 21 21 21 1...

Page 99: ...dvanced operation This logic can be extrapolated for the lower models and levels being level seven to level 21 however in practice these modes and levels are rarely used R5909056 MCM 400 HFR 11 05 2016 95 ...

Page 100: ...ting an anchor point page 102 3 Move the selected anchor point to the desired position See Moving an anchor point in small steps page 104 and Moving an anchor point in large steps page 105 Note Anchor points should only be moved inside the visible image area since moving an anchor point to the outside causes loss of image content Image 9 6 Keystone correction 4 Select each of the other anchor poin...

Page 101: ...05 Note Anchor points should only be moved inside the visible image area since moving an anchor point to the outside causes loss of image content 4 Select each of the other anchor points in this level in turn and move them to the desired position 5 Then select each of the anchor points of the next lower level in the selected geometry mode and adjust their position 6 Repeat the previous step for al...

Page 102: ... the 33 x 33 grid PixelsX This slider bar and edit box are used to define the new position of the anchor point along the X axis relative to its original position In table front mode and if Axislink is set to off a positive value moves the anchor point to the right side High values can introduce some clipping effects PixelsY This slider bar and edit box are used to define the new position of the an...

Page 103: ...dvanced operation 1 2 Image 9 8 Geometry edit dialog Adjustment points 1 Selection box 2 Interaction box Applying the relocation of an anchor point may take a few seconds R5909056 MCM 400 HFR 11 05 2016 99 ...

Page 104: ... 9x9 or 15x15 or 33x33 and press ENTER to select Image 9 9 In the Geometry edit dialog the selected Level 2x2 appears Image 9 10 Always start adjusting the geometry at the highest level i e 2 x 2 and go down only one level at the time Select Mode is enabled and the top left row 0 column 0 corner is selected 100 R5909056 MCM 400 HFR 11 05 2016 ...

Page 105: ...9 Advanced operation Image 9 11 Geometry adjustment Select mode R5909056 MCM 400 HFR 11 05 2016 101 ...

Page 106: ... point 1 After selecting the level from the Geometry Distortion edit dialog by default Select Mode is enabled and the top left row 0 column 0 corner is selected Image 9 12 Selection Row 0 Column 0 2 Use the arrow keys on the RCU and to select the another adjustment point E g In 3 x 3 mode would jump to column 15 row 0 In 2 x 2 mode would jump to column 32 row 0 See image below Image 9 13 Selection...

Page 107: ...9 21 21 20 21 21 21 21 21 21 19 20 18 20 19 20 20 21 17 21 21 18 21 20 21 19 21 21 20 21 21 21 21 21 21 19 20 18 20 19 20 20 21 17 21 21 18 21 20 21 19 21 21 20 21 21 21 21 21 21 19 20 18 20 19 20 20 21 17 21 21 18 21 20 21 19 21 21 20 21 21 21 21 21 21 19 20 18 20 19 20 20 21 17 21 21 18 21 20 21 19 21 21 20 21 21 21 21 21 21 19 20 18 20 19 20 20 21 17 21 21 18 21 20 21 19 21 21 20 21 21 21 21 21...

Page 108: ...t the anchor point on row 0 column 0 along the X axis in 2x2 mode Using the arrow keys to move an anchor point 1 After selecting the anchor point in Select mode press ENTER to switch to Adjust Mode Image 9 15 2 Press and a multiple times or keep the arrow pressed to move the anchor point along the X axis Also notice the impact of moving a top level anchor point in the example below Image 9 16 Adju...

Page 109: ... X axis can be negative or PixelsY i e relative movement along the Y axis can be negative Editing the values of X and Y coordinates 1 In the Geometry edit dialog navigate to Edit Mode by pressing ENTER 2 Press or to select the edit box of PixelsX or the edit box of PixelsY Image 9 17 3 Press ENTER to select Change Mode The selected PixelsX or PixelsY edit box is highlighted 4 Enter a new value Ima...

Page 110: ...y adjustments of the lower modes are reset all geometry correction values are set to 0 The correction values of the selected mode and all the higher modes are retained E g if you select Restore to 3x3 all adjustment values in modes 5x5 9x9 17x17 and 33x33 are set to 0 Resetting all levels 1 In the OSD navigate to Geometry Edit Reset Reset all levels and press ENTER to select Image 9 19 2 Exit the ...

Page 111: ...9 Advanced operation The following diagram illustrates the geometry adjustment restored to mode 9x9 Image 9 21 Restore to 9x9 2 Exit the menu R5909056 MCM 400 HFR 11 05 2016 107 ...

Page 112: ...he optional Infitec filter in the projector is not inserted Set 2 standard Dynacolor set can be selected if the optional Infitec filter in the projector is not inserted Infitec set Dynacolor set with advanced color tracking should be selected when the optional Infitec filter in the projector is inserted How to select a Dynacolor set 1 In the OSD navigate to Display setup Dynacolor Active set Set 1...

Page 113: ...onic blend is explained in detail in multiple channel display systems we can make the images of adjacent channels overlap in part To correct for the doubled brightness in the overlap areas electronic soft edge can be used The same feature can also be used to blank parts of the image In the overlap area of multiple channel display systems we can adjust black color to make it meet the black of the n...

Page 114: ...data can be managed how the image can be shifted on the projector and how we can manually set the time that can be used for geometry adjustment processing This turns out to be very important in multiple channel display systems Overview Setting the Axis link to ON or OFF Working with Geometry files Shifting the image on the projector panel Transport delay 110 R5909056 MCM 400 HFR 11 05 2016 ...

Page 115: ...e of PixelsX row 0 col 0 to 300 to move the top left corner to the right X Y Image 10 1 Example Axis link set to Off 4 Now adjust the PixelsY position to 300 to move the top left corner down The left corner is shifted downwards along the Y axis which is still vertical Y 300 300 300 X Y Image 10 2 Example Axis link set to Off Example 2 x 2 mode Axis link set to On Following procedure illustrates a ...

Page 116: ...Image 10 3 This operation introduces a tilt to the Y axis X Y Image 10 4 Example Axis link set to On 4 Now adjust the PixelsY position to 300 to move the left top corner down Image 10 5 112 R5909056 MCM 400 HFR 11 05 2016 ...

Page 117: ...10 Expert operation The left corner is shifted down in the direction of the tilted Y axis 216 300 Y 3 0 0 X Y Image 10 6 Example Axis link set to On R5909056 MCM 400 HFR 11 05 2016 113 ...

Page 118: ...andard Geometry file the content is copied to a Custom Geometry file first and then the data is changed It is possible to Upload Custom Geometry files from a computer to the projector or to download Custom Geometry files from the projector to a computer if this computer is in the same network as the projector The file notation in the Geometry files menu describes a file path For example Standard N...

Page 119: ...m Geometry file to display the source image with the geometry adjustments as defined in the selected file Loading a Geometry file 1 In the OSD navigate to Geometry Load and press ENTER to select Image 10 7 2 In the dialog box navigate to the Geometry file and press ENTER to select Image 10 8 3 Exit the menu R5909056 MCM 400 HFR 11 05 2016 115 ...

Page 120: ...D navigate to Geometry Rename and press ENTER to select Image 10 9 2 In the dialog box navigate to the Geometry file to be renamed and press ENTER to select The selected file name appears in the edit box at the bottom of the dialog box 3 In the edit box change the name to your wishes and press ENTER to confirm Image 10 10 4 Exit the menu 116 R5909056 MCM 400 HFR 11 05 2016 ...

Page 121: ...e 10 11 2 In the dialog box navigate to the Geometry file to be copied and press ENTER to select Image 10 12 The selected file name appears in the edit box at the bottom of the dialog box 3 In the edit box change the original file name to the desired name for the copy 4 Confirm by pressing ENTER 5 Exit the menu R5909056 MCM 400 HFR 11 05 2016 117 ...

Page 122: ...In the OSD navigate to Geometry Delete and press ENTER to select Image 10 13 2 In the dialog box navigate to the Geometry file to be deleted and press ENTER to select Image 10 14 3 Confirm by pressing ENTER Image 10 15 A confirmation window appears follow the instruction and make your choice 4 Exit the menu 118 R5909056 MCM 400 HFR 11 05 2016 ...

Page 123: ... movement of the 4 corner points in 2 x 2 mode The Geometry edit dialog box is used for adjusting the shift After shifting the image on the projector panel parts of the image might not be visible anymore Shifting the image on the projector panel 1 In the OSD navigate to Geometry Edit Shift and press ENTER to select Image 10 16 Image 10 17 R5909056 MCM 400 HFR 11 05 2016 119 ...

Page 124: ...e arrow keys on the RCU to shift the image only a few pixels or press ENTER to navigate to Edit mode if you want to shift the image over a bigger distance Image 10 19 3 Use the and arrow keys on the RCU to select the PixelsX horizontal shift or PixelsY vertical shift edit box 4 Press ENTER to navigate to Change mode 120 R5909056 MCM 400 HFR 11 05 2016 ...

Page 125: ...Image 10 20 5 Use the arrow keys on the RCU to enter a new value in the selected edit box The image is shifted according to the value entered Image 10 21 Shift adjustment 6 Exit the menu R5909056 MCM 400 HFR 11 05 2016 121 ...

Page 126: ...ce 1 Make sure that the Transport delay of all projectors is set to Automatic 2 Adjust the geometry until it is well aligned in all devices 3 Check the Transport delay value in all devices and find the highest value 4 Switch Transport delay to Manual in all projectors 5 Enter the highest value that was found as new Transport delay value in all devices A Transport delay set too short will introduce...

Page 127: ...10 Expert operation Image 10 24 Note The Transport Delay is by default set to 200 3 Exit the menu R5909056 MCM 400 HFR 11 05 2016 123 ...

Page 128: ...evel explained Soft Edge area shape General Soft Edge workflow Alpha planes Beta planes The Soft Edge selection dialog The Soft Edge edit dialog Selecting an anchor point Moving an anchor point in small steps Moving an anchor point in large steps 124 R5909056 MCM 400 HFR 11 05 2016 ...

Page 129: ...e Electronic Soft Edge Matching ESEM feature of the projector especially used in case of bright images Image with hard edge Image without soft edge adjustment Image with soft edge adjustment Image 10 25 Example Soft edge blending Light output Channel 1 Channel 2 Channel 1 Channel 1 2 Channel 2 Image 10 26 Without Soft Edge Light output Channel 1 Channel 2 Channel 1 Channel 2 Channel 1 2 Image 10 2...

Page 130: ... correct shape of the Soft Edge area in a flexible way By using the Black Level user interface only pixels outside the overlap areas as defined with the Soft Edge user interface are changed External Alpha and Beta Planes It is also possible to create your own Alpha Plane and Beta Plane and upload it to the projector These external planes must meet some rules The bitmap resolution must be 2048 x 10...

Page 131: ...ng is to be applied has a grid of anchor points Depending on the selected level the amount of anchor points can vary from 4 to 25 By default the grid is rectangular symmetric and it covers 12 5 of the width or height of the image Image 10 28 Soft Edge anchor points The anchor points are numbered from 0 to 24 and can be moved to the desired location to determine the size and shape of the Soft Edge ...

Page 132: ...presents a group of anchor points and interacts with other levels moving an anchor point on a certain level affects points in the levels underneath Therefor it is required to start shaping the Soft Edge area from the highest level and go to lower levels while completing the procedure In Level 1 the four corners of the default soft edge zone act as anchor points Moving any of them affects the whole...

Page 133: ...points of a higher level are marked by a bigger square than anchor points of a lower level Anchor points are color coded Red square the selected anchor point i e the anchor point that can be moved Green square anchor point s belonging to the same level as the selected anchor point White square anchor point s belonging to a different level than the selected one An anchor point cannot be moved beyon...

Page 134: ...etup Soft edge and alpha beta planes Edit and press ENTER to open the Soft Edge Selection dialog Image 10 33 2 In the Soft Edge Selection dialog enter the following selections Plane set checkbox Internal Source click Full white Edges set the check boxes of the edges where you want to create a Soft Edge Adjustment guide click On Hierarchy levels select the lowest level you expect to need Image 10 3...

Page 135: ...me See The Soft Edge selection dialog page 136 9 Repeat step 4 to step 8 to create the correct Soft Edge shape for each of the other edges Creating a blanked area 1 In the OSD browse to Display setup Soft edge and alpha beta planes Edit and press ENTER to open the Soft Edge Selection dialog Image 10 36 2 In the Soft Edge Selection dialog enter the following selections Plane set checkbox Internal S...

Page 136: ...o if required See Selecting an anchor point page 140 Moving an anchor point in small steps page 141 and Moving an anchor point in large steps page 142 9 If you need to further shape the blanking area on the selected side proceed to Level 3 See Selecting an anchor point page 140 10 Adjust the position of anchor points one and three if required See Selecting an anchor point page 140 Moving an anchor...

Page 137: ... Use the arrow buttons or the edit box to match the black level in the non overlap areas to the black level of the overlap area or small step or bigger step or jump the limit of the range Note The value can be set in the range 0 to 255 Default value is 0 R5909056 MCM 400 HFR 11 05 2016 133 ...

Page 138: ...lane Uploading and activating an external Alpha Plane 1 Make sure that the computer from where you want to upload the external Alpha Plane is in the same network as the projector 2 Open your Internet Browser and browse to the projector using FTP e g ftp Hostname 3 Copy and paste the external Alpha Plane in the following folder on the device s flash D Display Softedge 4 Browse to Display setup Soft...

Page 139: ...eta plane Uploading and activating an external Beta Plane 1 Make sure that the computer from where you want to upload the external Beta Plane is in the same network as the projector 2 Open your Internet Browser and browse to the projector using FTP e g ftp Hostname 3 Copy and paste the external Beta Plane in the following folder on the device s flash D Display Softedge 4 Browse to Display setup So...

Page 140: ...es In this section the edges of the total image where Soft Edge blending needs to be applied must be selected Left Top Right Bottom Disabled edges are hard edges Adjusting a hard edge results in creating a blanked area without Soft Edge blending on that edge Adjustment guide The adjustment guide consists of a four brightness graduated bars applied on the selected edge s The four bars coincide with...

Page 141: ...10 Expert operation Image 10 46 Soft Edge Adjustment guide ON R5909056 MCM 400 HFR 11 05 2016 137 ...

Page 142: ... square Selection Position X and Y Indicate the X and Y coordinate of the active anchor point In table front mode the left top corner of the image is the coordinate system origin Positive values are right and down Help Select mode Explains the controls in Select mode In Select mode you can select an edge or side a level or an anchor point The levels that can be selected are limited by the Hierarch...

Page 143: ...10 Expert operation Image 10 49 Image 10 50 As soon as the Soft Edge edit dialog is displayed the first anchor point of Level 1 is by default selected R5909056 MCM 400 HFR 11 05 2016 139 ...

Page 144: ...nd on the RCU to select another anchor point in the same level 3 Use the arrow key on the RCU to go to a higher level If you are at Level 1 pressing activates the first anchor point on the next edge of the image 4 Use the arrow key on the RCU to go to a lower level If you are at the lowest level in your selection see the setting in the Soft Edge selection dialog pressing activates the first anchor...

Page 145: ...nts the Adjust mode is not ideal In this case the use of the Edit mode and Change mode is more appropriate Using the arrow keys to move an anchor point 1 From the Soft Edge edit dialog press ENTER or BACK to navigate to Adjust mode Image 10 52 2 On the RCU press or multiple times of keep the arrow pressed to move the selected anchor point in the direction of the X axis 3 Press or multiple times or...

Page 146: ...axis can be negative The actions that can be performed in Edit mode and in Change mode are explained in the Help section of the Soft Edge edit dialog Editing the values of Position X or Position Y 1 From the Soft Edge edit dialog press ENTER or BACK to navigate to Edit mode Image 10 53 2 Use the arrows or to select the Position X or Position Y edit box 3 Press ENTER to navigate to Change mode Imag...

Page 147: ...e used to fine tune the colors of the displayed image and to match the colors of multiple projectors in a display system Overview Dynacolor concept and expert use The Dynacolor dialog Enabling Dynacolor Color fine tuning Color calibration Dynacolor for Infitec R5909056 MCM 400 HFR 11 05 2016 143 ...

Page 148: ... CIE chromaticity diagram where each vertex is defined by the x and y coordinate of the primary colors The white point W can be moved within the color triangle by changing its x and y coordinates resulting in different color temperatures Due to the tolerance on optical components the X Y value of the primary colors of different devices is slightly different x y 0 0 4 0 2 0 6 0 8 0 0 4 0 8 0 6 0 2 ...

Page 149: ...lue of the white point in the active Dynacolor set to match the colors Always keep the CIE chromaticity diagram in mind while changing the white point position Increasing the desired X value of the white point makes the image look more reddish Decreasing the desired X value of the white point makes the image look more cyanish Increasing the desirYed X value of the white point makes the image look ...

Page 150: ...le as desired values in the active Dynacolor set of each projector we closely come to a color matched system Only fine tuning might still be required x y 0 0 2 0 4 0 6 0 0 2 0 4 0 6 0 8 A C B C Image 10 58 Common color triangle A Native color triangle of projector 1 B Native color triangle of projector 2 C Common color triangle Barco can provide calculation tools where the Measured Dynacolor value...

Page 151: ...the same color gamut Dynacolor sets If you use your projector s in different sceneries where different Dynacolor sets are used like Set 1 or Set 2 or Infitec Set you need to perform the Dynacolor adjustment i e Color fine tuning Calculating common triangles for each of the Sets Activate a scenery and align the colors Then activate another scenery for which another Dynacolor set is used and again a...

Page 152: ...10 Expert operation Image 10 60 2 Press ENTER A bullet indicates the active setting 148 R5909056 MCM 400 HFR 11 05 2016 ...

Page 153: ...lors of the projector Only Barco engineers may change these values to force a common color triangle Barco trained and qualified engineers may also change the X and Y coordinates of the white point to fine tune the colors X and Y coordinates Coordinates in the CIE Chromaticity diagram Red Green Blue White Desired primary colors and desired white of the projector Cyan Yellow Magenta Desired secondar...

Page 154: ...10 Expert operation Image 10 61 150 R5909056 MCM 400 HFR 11 05 2016 ...

Page 155: ...ion 10 3 3 Enabling Dynacolor Starting up Dynacolor 1 In the OSD navigate to Display setup Dynacolor Enable On or Off Image 10 62 2 Press ENTER A bullet indicates the active setting R5909056 MCM 400 HFR 11 05 2016 151 ...

Page 156: ...triangle are calculated from the native i e measured color coordinates for R G B and W of each projector and entered as desired coordinates in the appropriate Dynacolor set After applying a common triangle some final color fine tuning might be required to come to a fully color matched overall image Fine tuning the color of the projected image 1 Check to see what Dynacolor Set is currently active D...

Page 157: ... within the desired color triangle For example if you increase the x value of the white point in the Desired field from 0 3260 to 0 3560 the white point will shift towards the red region and the overall look of the image will be more reddish R5909056 MCM 400 HFR 11 05 2016 153 ...

Page 158: ...R1 B1 X Y 0 1 0 0 0 2 0 3 0 4 0 5 0 6 0 7 0 8 0 1 0 2 0 3 0 4 0 5 0 6 0 7 0 8 0 9 W1 W1 Image 10 65 Adjusting the X and Y coordinate of White 5 The same procedure applies for the other sets 154 R5909056 MCM 400 HFR 11 05 2016 ...

Page 159: ...inates for a common color triangle can be calculated Necessary tools Spectrometer Calibrating the colors of a display channel 1 Check to see which Dynacolor set is currently active Display setup Dynacolor Active set the set that has the radio button is the active set 2 In the OSD navigate to the active Dynacolor set Display setup Dynacolor Adjust Set 1 or Adjust Set 2 and press ENTER to select Ima...

Page 160: ...t pattern is displayed 7 Proceed in the same way for Green Blue and White as for Red 8 The values are finally updated in the Measured values of the Dynacolor set 9 Click Default desired to copy the Measured values for Red Green and Blue and White to the Desired values and to calculate the secondary colors Cyan Yellow and Magenta 156 R5909056 MCM 400 HFR 11 05 2016 ...

Page 161: ...10 Expert operation Image 10 68 R5909056 MCM 400 HFR 11 05 2016 157 ...

Page 162: ...Display setup Dynacolor Adjust Set Infitec set A Image 10 69 2 Press ENTER to confirm your selection 3 Change the values if needed 4 Repeat from step 1 but now for the Infitec set B Matching Infitec set A and Infitec set B 1 In the OSD navigate to Display setup Dynacolor Adjust Set Match Infitec A B Image 10 70 2 Press ENTER Common color coordinates are calculated and filled in as the desired valu...

Page 163: ...med by the operator or by qualified technical service personnel This chapter also lists the basic troubleshooting tips to be followed in case of an irregularity Overview Maintenance general overview Cleaning housing and mechanical structure Firmware upgrade Diagnostics through the OSD Diagnostic LEDs Identification Internal and scaled patterns Troubleshooting R5909056 MCM 400 HFR 11 05 2016 159 ...

Page 164: ...ased maintenance The table below lists the maintenance tasks that must be performed on certain conditions Condition Maintenance task description To be performed by New version of device software Upgrade the device software depending on the necessity Barco trained and qualified engineer Changes in device settings Make a backup of the device using Support tool Barco trained and qualified engineer 16...

Page 165: ... structure Cleaning the housing and mechanical structure 1 Power down the unit and unplug the power cord 2 Clean with a damp cloth 3 Remove stubborn stains with a cloth lightly dampened with a mild detergent solution R5909056 MCM 400 HFR 11 05 2016 161 ...

Page 166: ...itch off the MCM 400 HFR nor the computer during the upgrade procedure Note In case of problems during the upgrade procedure the following two buttons can be used for diagnostics reasons Save text will save the text inside the Barco Networked Projector Upgrade Tool in a file Screen shot will save a screen shot of the displayed screen at that particular time 8 When the upgrade is successful a green...

Page 167: ... Description In the OSD several menu items can be helpful to troubleshoot the MCM 400 HFR or to collect some information that can be sent to Barco s helpdesk in case of a problem Overview I2C Board identification R5909056 MCM 400 HFR 11 05 2016 163 ...

Page 168: ...cs window it is not recognized and needs to be replaced If the board is in the list showing a red bullet in front of it instead of a green bullet something is wrong and the board needs to be replaced as well Displaying the I2C Diagnostics window 1 In the OSD navigate to Service Diagnostics I2C and press ENTER to select Image 11 3 A dialog box pops up showing some information 2 Exit the menu 164 R5...

Page 169: ...oards PMP Pixel Map Processor image processing board Layer 1 TwinDisplayPort board Layer 2 TwinDisplayPort board Layer 4 DisplayPortOutput board Displaying the Board identification window 1 In the OSD navigate to Service Board identification and press ENTER to select Image 11 4 A dialog box pops up showing some information Image 11 5 2 Exit the menu R5909056 MCM 400 HFR 11 05 2016 165 ...

Page 170: ...ED Status Not powered Standby Configuring standby active Active IR activity Hardware error STANDBY LED red OFF ON ON OFF NA NA ON LED green OFF OFF ON ON NA NA ERROR LED red OFF OFF OFF OFF NA ON IR LED green OFF ON in case of network connection OFF no network connection ON ON in case of network connection OFF no network connection BLINKING NA 166 R5909056 MCM 400 HFR 11 05 2016 ...

Page 171: ...l number of the projector and projector runtime This data should always be known when contacting Barco s Helpdesk Viewing the MCM 400 HFR identification 1 In the OSD navigate to General Identification and press ENTER to select Image 11 7 2 In the text box that appears you can view the identification data Image 11 8 3 Exit the menu R5909056 MCM 400 HFR 11 05 2016 167 ...

Page 172: ...If a source image shows some artefacts but the scaled patterns look fine the cause for the artefacts must be looked for in the input board the wires or the image generator If a source image shows some artefacts and the scaled pattern shows the same artefacts the cause should be looked for in the image processing board The scaled patterns are distorted according to the geometry distortion defined i...

Page 173: ...d patterns menu Displaying an internal pattern 1 In the OSD navigate to Installation Internal patterns Image 11 11 2 Open the drop down menu and select the pattern of your choice The selected Internal pattern disappears on exiting the Internal patterns menu R5909056 MCM 400 HFR 11 05 2016 169 ...

Page 174: ...th the device the following checks and measures must be done first This is a first level tool which implies that it might not be possible to come to a solution at all times In that case you can contact a trained and qualified technician 170 R5909056 MCM 400 HFR 11 05 2016 ...

Page 175: ...ears on the display Situation Solution No source is selected Select a source via the OSD No source signal can be found 1 Check if the projector is operational 2 Check if the MCM 400 HFR output mode and the projector input mode are matching MCM 400 HFR is in standby state Switch to active state No image at the output Check the network connection between the MCM 400 HFR and the projector Artefacts a...

Page 176: ...11 Maintenance 172 R5909056 MCM 400 HFR 11 05 2016 ...

Page 177: ... out the desired image timings Using internal and external patterns for image adjustment Enabling full screen synchronous representation of a source signal Hiding text boxes to avoid pop ups during a mission or session Positioning the menu bar status bar and slider boxes Overview EDID Patterns Textboxes Menu bar position Status bar position Positioning the slider box Sync Variance Limit Full scree...

Page 178: ...table image signal From the OSD you can for each input connector choose to use the Standard EDID file or create and force your custom made EDID file The selection of the EDID file to be used is made in the Edid Configuration dialog Making your own custom EDID file s is done through the Create EDID dialog Custom EDID files can be deleted at any time The Standard EDID includes two timings 2048x2160 ...

Page 179: ... for each input Selecting an EDID file 1 In the OSD navigate to Installation Edid Configure and press ENTER to select Image 12 1 2 In the Edid Configuration dialog box that appears select Standard or Custom timings for one of the inputs Image 12 2 3 In case you select Custom a list of Custom EDID files appears from which you can make your selection Image 12 3 R5909056 MCM 400 HFR 11 05 2016 175 ...

Page 180: ...TER to return to the Edid Configuration dialog 5 Repeat step 2 to step 4 until you have selected the correct EDID for all inputs 6 Press Apply to confirm and store the new settings 7 Exit the menu 176 R5909056 MCM 400 HFR 11 05 2016 ...

Page 181: ...ncy Hz amount of frames per second o Calculation select the correct standard video timings o CVT Coordinated Video Timings o CVT RB Coordinated Video Timings Reduced Blanking o CVT MB Coordinated Video Timings Minimum Blanking not a standard o GTF Generalized Timing Formula Section Options o set or clear the check box Stereo You can leave it unchecked o select the correct interface o Interface Und...

Page 182: ...12 MCM 400 HFR tools Image 12 5 3 Click Create and press ENTER to confirm and save the new Custom EDID file 4 Exit the menu 178 R5909056 MCM 400 HFR 11 05 2016 ...

Page 183: ...eting a Custom EDID file 1 In the OSD navigate to Installation EDID Delete and press ENTER to select Image 12 6 2 In the Delete EDID file dialog box navigate to the EDID file to be deleted Image 12 7 Or navigate to All EDID files to delete all the custom EDID files 3 Press ENTER to delete 4 Exit the menu R5909056 MCM 400 HFR 11 05 2016 179 ...

Page 184: ...versus scaled patterns The device can generate built in patterns called internal and scaled patterns that can be used for adjustment measurement and diagnostic purposes See Internal and scaled patterns page 168 180 R5909056 MCM 400 HFR 11 05 2016 ...

Page 185: ...using the direct keys on the RCU to control Brightness Contrast etc When this option is disabled no text box is displayed on these actions Enabling or disabling the Textbox 1 In the OSD navigate to Display setup TextBox On or Off Image 12 8 2 Press ENTER to select your option R5909056 MCM 400 HFR 11 05 2016 181 ...

Page 186: ...le of the screen in table mode This can be useful in applications where the top image content is not visible on the screen e g Soft Edge region Moving the Menu bar 1 In the OSD navigate to Display setup Menu bar position and press ENTER to select Image 12 9 2 Use and to position the menu bar 3 Exit the menu 182 R5909056 MCM 400 HFR 11 05 2016 ...

Page 187: ...reen to the middle of the screen This can be useful in applications where the bottom image content is not visible on the screen e g Soft Edge region Moving the Status bar 1 In the OSD navigate to Display setup Status bar position and press ENTER to select Image 12 10 2 Use and to position the status bar R5909056 MCM 400 HFR 11 05 2016 183 ...

Page 188: ...the image is not visible on screen e g Soft Edge area Moving the Slider box 1 In the OSD navigate to Display setup Sliderbox position and press ENTER to select Image 12 11 A slider box is displayed 2 Use the arrow keys on the RCU to position the slider box You can toggle between standard or small steps to move the slider box position by pressing ENTER when slider box is displayed 184 R5909056 MCM ...

Page 189: ...is good x incoming signal signal processing in PMP 1st step incoming signal signal processing in PMP 1st step incoming signal signal processing in PMP 1st step Image 12 12 If the Sync Variance Limit value is only just high enough critical value it might be possible that sometimes the actual frame is processed and sometimes the previous frame is processed This will lead to a jumping image or frame ...

Page 190: ...west value increase the value in steps of 25 until you get to the range where frame tearing is clearly visible 4 Further increase the value until this frame tearing disappears again 5 Increase the actual value by 25 or 50 6 Exit the menu 186 R5909056 MCM 400 HFR 11 05 2016 ...

Page 191: ...nd 60 Hz When the vertical refresh is not within this range the input will be displayed asynchronously at 60 Hz This applies only if Full sceen synchronous rep resentation is set to On Enabling or disabling full screen synchronous representation 1 In the OSD navigate to Display setup Full screen synchronous representation On or Off Image 12 15 2 Press ENTER to select to select your option R5909056...

Page 192: ...12 MCM 400 HFR tools 188 R5909056 MCM 400 HFR 11 05 2016 ...

Page 193: ...13 Specifications 13 SPECIFICATIONS Overview General specifications Dimensions Technical Regulations R5909056 MCM 400 HFR 11 05 2016 189 ...

Page 194: ...ojectors Dimensions 4 RU 295 mm x 290 mm x 215 mm 11 6 x 11 4 x 8 46 Power External power supply 100 250V 50 60 Hz Electromagenetic Interference Complies with FCC rules regulations part 15 Class A and CE EN55022 Class A Weight 6 11 kg without packaging 7 11 kg with packaging WARP Hardware based real time warping with easy on screen menu Humidity Storage 0 to 98 rel humidity non condensing Operatio...

Page 195: ...ications 13 2 Dimensions Outer dimensions of the MCM 400 HFR IR ERROR ON STANDBY 298 276 10 437 6 279 465 9 482 6 140 177 8 222 215 Image 13 1 Dimensions given in millimeters R5909056 MCM 400 HFR 11 05 2016 191 ...

Page 196: ...13 Specifications 13 3 Technical Regulations Certificates Image 13 2 EAC mark 10 Image 13 3 Rohs RoHS Image 13 4 Rohs OK Image 13 5 CE mark 192 R5909056 MCM 400 HFR 11 05 2016 ...

Page 197: ...from the RCU though IR signals To enable communication between RCU and MCM 400 HFR both must be set to the same IR address We can classify the RCU buttons in functional groups buttons for OSD navigation and selection buttons used for data input buttons to control the device buttons to adjust image settings Overview Range of RCU and IR receivers OSD navigation and selection Data input MCM 400 HFR c...

Page 198: ...TANDBY M E N U B A C K E N T E R 1 2 3 4 5 6 7 8 9 P A U S E A U T O I M A G E S D I D V I V I D E O R G B S V I D E O P C L O G O P I P 0 C O N T R T I N T P H A S E C O L O R B R I G H T N P I P A D J U S T 45 45 30 m 100 ft M E N U B A C K E N T E R 1 2 3 4 5 6 7 8 9 P A U S E A U T O I M A G E S D I D V I V I D E O R G B S V I D E O P C L O G O P I P 0 C O N T R T I N T P H A S E C O L O R B R...

Page 199: ...o return one step ENTER to confirm or select Navigation buttons up down left right Used to navigate through the OSD Example How to navigate to the IP address edit box in the Network settings dialog box 1 On the RCU press MENU to display the OSD 2 Press the arrow key a multiple times until Installation is highlighted dark background 3 Press the arrow key to open the drop down menu 4 Press the arrow...

Page 200: ...ntrol Image 14 3 6 Press the arrow key a multiple times until IP address is highlighted an outline is visible around the word IP address 7 Press ENTER to activate the edit box 196 R5909056 MCM 400 HFR 11 05 2016 ...

Page 201: ... to enter a new Standby timer value Assume that we want to change the timer value from 300 to 180 seconds 1 In the OSD navigate to General Standby timer 2 Press ENTER to select A dialog box is displayed Image 14 5 3 Navigate to the edit box and press ENTER to activate it 4 Use the arrow to highlight the digit 3 5 Press the arrow twice to change the digit from 3 down to 1 6 Use the arrow to highlig...

Page 202: ...14 RCU Control Image 14 6 8 Press ENTER to confirm 9 Press BACK to go one step back in the menu or press MENU to exit the menu 198 R5909056 MCM 400 HFR 11 05 2016 ...

Page 203: ...e to freeze unfreeze the image Source selection buttons 1 RGB 2 PC 3 VIDEO 4 S VIDEO 5 DVI 7 SDI These buttons can be used as shortcut keys to display a source full screen or in a window in native resolution Pressing a multiple times cycles through the sources connected to the same type of connector Example two DVI sources are connected to the MCM 400 HFR on to the DVI D connector on input layer 3...

Page 204: ...14 RCU Control 200 R5909056 MCM 400 HFR 11 05 2016 ...

Page 205: ...15 Environmental information 15 ENVIRONMENTAL INFORMATION Overview Disposal information Rohs compliance Production address Importers contact information R5909056 MCM 400 HFR 11 05 2016 201 ...

Page 206: ...hem responsibly to promote the sustainable reuse of material resources For more information about recycling of this product please contact your local city office or your municipal waste disposal service For details please visit the Barco website at http www barco com en AboutBarco weee Disposal of batteries in the product This product contains batteries covered by the Directive 2006 66 EC which mu...

Page 207: ... 0 x 0 0 0 文件说明书 Paper Manuals 0 0 0 0 0 0 光盘说明书 CD Manual 0 0 0 0 0 0 本表格依据SJ T 11364的规定编制 This table is prepared in accordance with the provisions of SJ T 11364 O 表示该有毒有害物质在该部件所有均质材料中的含量均在 GB T 26572 标准规定的限量要求以下 O Indicates that this toxic or hazardous substance contained in all of the homogeneous materials for this part is below the limit requirement in GB T 26572 X 表示该有毒有害物质至少在该部件的某一均质材料中的含量超出...

Page 208: ...15 Environmental information Image 15 1 204 R5909056 MCM 400 HFR 11 05 2016 ...

Page 209: ... 36 82 11 Fax 32 56 36 883 86 Support www barco com esupport Visit us at the web www barco com Made in information The made in country is indicated on the product ID label on the product itself Production date The month and year of production is indicated on the product ID label on the product itself R5909056 MCM 400 HFR 11 05 2016 205 ...

Page 210: ...5 4 Importers contact information Contact To find your local importer contact Barco directly or one of Barco s regional offices via the contact information given on Barco s web site www barco com 206 R5909056 MCM 400 HFR 11 05 2016 ...

Page 211: ...ncept 144 Expert use 144 Communication 40 Network 40 Configuration 41 47 Ethernet 47 Network 47 configure 175 EDID 175 Configure 50 DHCP network 50 Connection 37 40 52 Digital source 37 display 52 DisplayPort source 37 Galaxy 4K HFR or HDQ 4K40 series projector 38 Network 40 Power 39 RJ45 40 Connections 33 36 Constant Light Output 91 content 26 contrast 78 Controlling 199 MCM 400 HFR 199 copy 76 1...

Page 212: ...rightness 78 contrast 78 gamma 78 Importer 206 Infitec 158 Dynacolor 158 Input Stereo Sync settings 72 installation 46 IR address 46 MCM 400 HFR address 46 Installation 31 33 168 Air flow 31 Internal patterns 168 Physical 33 Rack mount 31 Scaled patterns 168 Table mount 31 Installing 35 Rack mount plate 35 Internal patterns 180 introduction 20 MCM 400 HFR 20 Introduction 19 21 fonts 21 symbols 21 ...

Page 213: ...n instructions 7 instructions 5 notice 6 owner s record 8 plug types 10 prevent personal injury 13 repacking 18 servicing 16 warnings 9 Safety 34 Battery explosion 34 save 73 Window file 73 Scaled patterns 180 Select Mode 102 Service 164 165 Board identification 165 Diagnostics 164 I2C 164 servicing 16 Set 111 Axis link 111 Off 111 On 111 Setup 41 53 Linking 53 Shift 119 Image shift 119 Single sou...

Page 214: ... delete EDID files 179 EDID file creation 177 TOD 91 Tools 173 transport delay 122 automatic 122 manual 122 Troubleshooting 170 Troubleshooting checklist 171 U Unpacking 25 Upgrade 162 V view 68 Window file information 68 W Window file 65 Create 65 Window information 68 Workflow 97 130 Geometry adjustment 97 Soft Edge 130 210 R5909056 MCM 400 HFR 11 05 2016 ...

Reviews: