7. Getting started
7.3
Displaying multiple sources: Stitched Layouts
Introduction
The
fi
rst time you use your new MCM-400, the selected source is displayed in the device’s native resolution (2x 2048 x 2160@60
Hz (Mono)). If the resolution of the source is different to the projector’s resolution, the image is stretched or shrunk.
It is however possible to con
fi
gure and display two or four source signals to make up one single image in full native resolution. This
is called a
Stitch Layout
: the sources are stitched together.
Depending on the selected Stitch Layout you can for each input select in which half or quadrant it must be displayed.
Further you can select the sync of which input (or source) must be used by the projector to display the full image.
The selected Stitch Layout type is stored in a
Window File
, that is an XML con
fi
guration
fi
le.
The scan direction de
fi
ned in the Window
fi
le must meet the source signal scan direction.
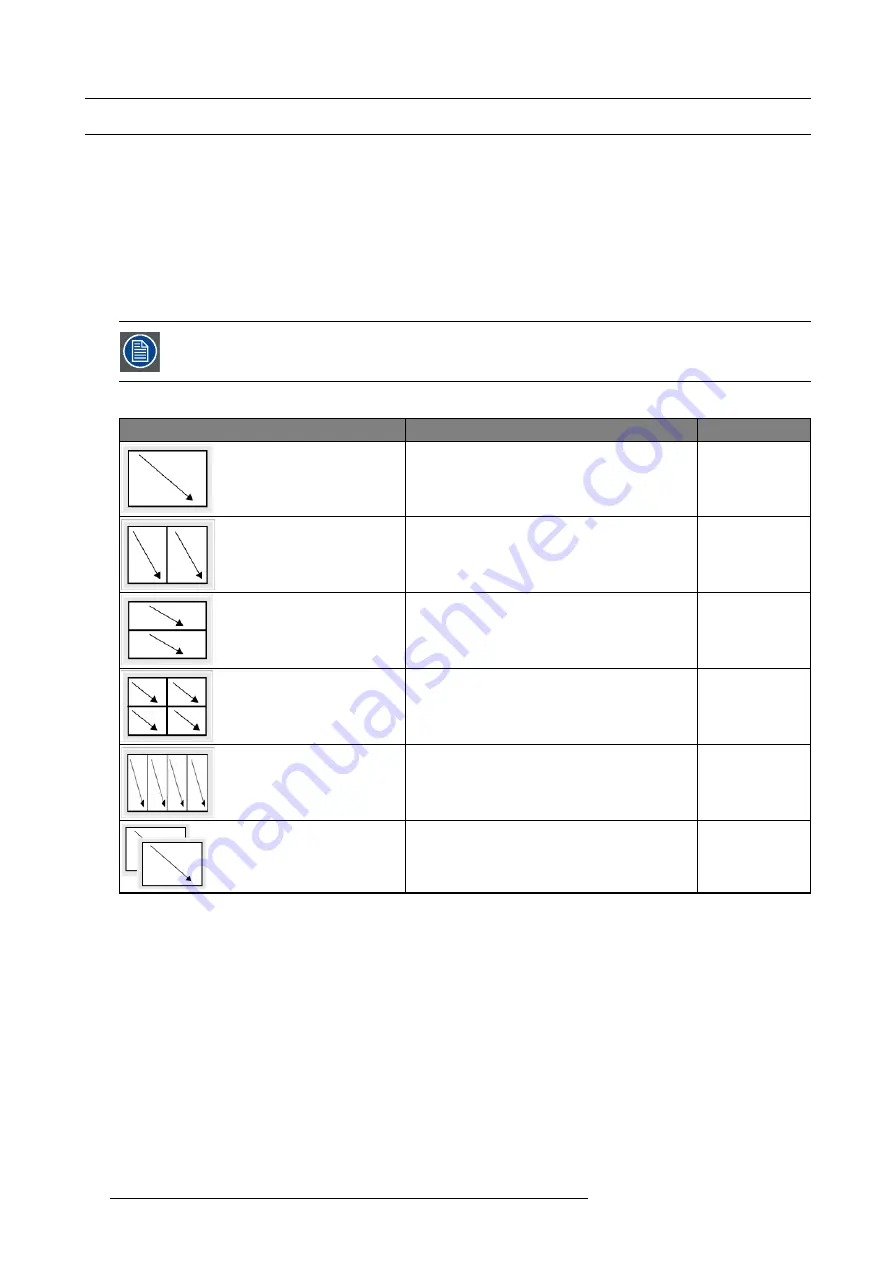
The table below describes the different Stitch Layouts and scan directions.
Type of layout
Description
Mode
: Single (Top down)
The source is displayed in full screen with image being
scanned from top left to bottom right in one continuous
process.
Mono / Active stereo
: Dual 1 x 2 (Top down)
Two inputs are required. The sources are displayed
next to each other. The images are scanned from top
left to bottom right.
Mono / Active stereo
: Dual 2 x 1 (Top down)
Two inputs are required. The sources are displayed
on top of each other. The images are scanned from
top left to bottom right.
Mono / Active stereo
: Quad 2 x 2 (Top down)
Four inputs are required. The sources are displayed
in four quadrants. The images in all the quadrants are
scanned from top left to bottom right.
Mono / Active stereo
: Quad 1 x 4 (Top down)
Four inputs are required. The sources are displayed
next to each other. The images in all the quadrants
are scanned from top left to bottom right.
Mono / Active stereo
: 2 x single (Top down)
Two inputs are required. The sources are displayed
one above the other. The images are scanned from
top left to bottom right.
Passive stereo
62
R5909056 MCM-400 HFR 11/05/2016
Summary of Contents for MCM-400 HFR
Page 1: ...MCM 400 HFR User Guide R5909056 02 11 05 2016 ...
Page 8: ...Table of contents 4 R5909056 MCM 400 HFR 11 05 2016 ...
Page 36: ...4 Facility and system requirements 32 R5909056 MCM 400 HFR 11 05 2016 ...
Page 53: ...6 Setup and configuration 5 Exit the menu R5909056 MCM 400 HFR 11 05 2016 49 ...
Page 60: ...6 Setup and configuration Image 6 19 56 R5909056 MCM 400 HFR 11 05 2016 ...
Page 62: ...6 Setup and configuration 58 R5909056 MCM 400 HFR 11 05 2016 ...
Page 86: ...7 Getting started 82 R5909056 MCM 400 HFR 11 05 2016 ...
Page 154: ...10 Expert operation Image 10 61 150 R5909056 MCM 400 HFR 11 05 2016 ...
Page 161: ...10 Expert operation Image 10 68 R5909056 MCM 400 HFR 11 05 2016 157 ...
Page 176: ...11 Maintenance 172 R5909056 MCM 400 HFR 11 05 2016 ...
Page 192: ...12 MCM 400 HFR tools 188 R5909056 MCM 400 HFR 11 05 2016 ...
Page 204: ...14 RCU Control 200 R5909056 MCM 400 HFR 11 05 2016 ...
Page 208: ...15 Environmental information Image 15 1 204 R5909056 MCM 400 HFR 11 05 2016 ...


