A-Series Dobby Loom Assembly Manual
Attaching the Harness Cables
A
TTACHING THE
Note:
For some of the steps in this process, you will need to access the top of the
loom. You may need a small ladder or step
The Harness Cable has three ends, two that end with loops and one with a
clip. The two ends
the left side of the harness and the shorter one is for the right side. The clip
attaches to the corresponding cable on the dobby head.
On wider
the harness wires to the harness. The yoke forms a "Y"
pair of screw
1)
2)
Note:
To spread the clip, press the
one of the exposed e
Now, work the cable loop toward the other side until
the clip and the clip sides are together
Figure
Series Dobby Loom Assembly Manual
Attaching the Harness Cables
TTACHING THE
For some of the steps in this process, you will need to access the top of the
loom. You may need a small ladder or step
The Harness Cable has three ends, two that end with loops and one with a
clip. The two ends
the left side of the harness and the shorter one is for the right side. The clip
attaches to the corresponding cable on the dobby head.
wider 32 and 40 harness looms, you will also have yokes
the harness wires to the harness. The yoke forms a "Y"
pair of screw eyes.
Find the bag labeled harness cables
together. You can leave them fastened together until they are
attached to the dobby
Attach the clip to the loop at the end of
head. The cable for the first harness is closest to the front of the
loom.
To spread the clip, press the
one of the exposed e
Now, work the cable loop toward the other side until
the clip and the clip sides are together
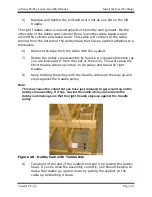
Figure 54 - Clip opened with pliers
Series Dobby Loom Assembly Manual
Attaching the Harness Cables
TTACHING THE
H
ARNESS
For some of the steps in this process, you will need to access the top of the
loom. You may need a small ladder or step
The Harness Cable has three ends, two that end with loops and one with a
clip. The two ends with loops support the harness. The longer side goes to
the left side of the harness and the shorter one is for the right side. The clip
attaches to the corresponding cable on the dobby head.
32 and 40 harness looms, you will also have yokes
the harness wires to the harness. The yoke forms a "Y"
eyes.
the bag labeled harness cables
together. You can leave them fastened together until they are
attached to the dobby
ttach the clip to the loop at the end of
The cable for the first harness is closest to the front of the
To spread the clip, press the
one of the exposed ends
Now, work the cable loop toward the other side until
the clip and the clip sides are together
Clip opened with pliers
Series Dobby Loom Assembly Manual
ARNESS
For some of the steps in this process, you will need to access the top of the
loom. You may need a small ladder or step
The Harness Cable has three ends, two that end with loops and one with a
with loops support the harness. The longer side goes to
the left side of the harness and the shorter one is for the right side. The clip
attaches to the corresponding cable on the dobby head.
32 and 40 harness looms, you will also have yokes
the harness wires to the harness. The yoke forms a "Y"
the bag labeled harness cables
together. You can leave them fastened together until they are
attached to the dobby head.
ttach the clip to the loop at the end of
The cable for the first harness is closest to the front of the
To spread the clip, press the two sides together and slip the cable loop onto
nds of the clip.
Now, work the cable loop toward the other side until
the clip and the clip sides are together
Clip opened with pliers
ARNESS
C
ABLES
For some of the steps in this process, you will need to access the top of the
loom. You may need a small ladder or step-stool.
The Harness Cable has three ends, two that end with loops and one with a
with loops support the harness. The longer side goes to
the left side of the harness and the shorter one is for the right side. The clip
attaches to the corresponding cable on the dobby head.
32 and 40 harness looms, you will also have yokes
the harness wires to the harness. The yoke forms a "Y"
the bag labeled harness cables.
together. You can leave them fastened together until they are
head.
ttach the clip to the loop at the end of
The cable for the first harness is closest to the front of the
two sides together and slip the cable loop onto
the clip. You can use pliers to squeeze the hook.
Now, work the cable loop toward the other side until
the clip and the clip sides are together again.
Clip opened with pliers
ABLES
For some of the steps in this process, you will need to access the top of the
stool.
The Harness Cable has three ends, two that end with loops and one with a
with loops support the harness. The longer side goes to
the left side of the harness and the shorter one is for the right side. The clip
attaches to the corresponding cable on the dobby head.
32 and 40 harness looms, you will also have yokes
the harness wires to the harness. The yoke forms a "Y"
. The cables will be fastened
together. You can leave them fastened together until they are
ttach the clip to the loop at the end of the first
The cable for the first harness is closest to the front of the
two sides together and slip the cable loop onto
You can use pliers to squeeze the hook.
Now, work the cable loop toward the other side until it is
again.
Install the Inner Workings
For some of the steps in this process, you will need to access the top of the
The Harness Cable has three ends, two that end with loops and one with a
with loops support the harness. The longer side goes to
the left side of the harness and the shorter one is for the right side. The clip
attaches to the corresponding cable on the dobby head.
32 and 40 harness looms, you will also have yokes that
the harness wires to the harness. The yoke forms a "Y" by connecting to a
The cables will be fastened
together. You can leave them fastened together until they are
the first cable in the dobby
The cable for the first harness is closest to the front of the
two sides together and slip the cable loop onto
You can use pliers to squeeze the hook.
it is free to move inside
Install the Inner Workings
Page |
For some of the steps in this process, you will need to access the top of the
The Harness Cable has three ends, two that end with loops and one with a
with loops support the harness. The longer side goes to
the left side of the harness and the shorter one is for the right side. The clip
that connect
by connecting to a
The cables will be fastened
together. You can leave them fastened together until they are
cable in the dobby
The cable for the first harness is closest to the front of the
two sides together and slip the cable loop onto
You can use pliers to squeeze the hook.
free to move inside
Install the Inner Workings
Page | 49
For some of the steps in this process, you will need to access the top of the
The Harness Cable has three ends, two that end with loops and one with a
with loops support the harness. The longer side goes to
the left side of the harness and the shorter one is for the right side. The clip
connect
by connecting to a
The cables will be fastened
cable in the dobby
The cable for the first harness is closest to the front of the
two sides together and slip the cable loop onto
You can use pliers to squeeze the hook.
free to move inside

