A-Series Dobby Loom Assembly Manual
Installing Treadles
2)
3)
4)
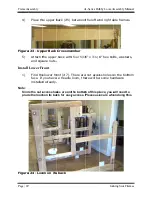
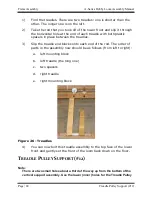
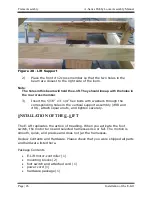
Figure
Note:
If your loom has treadles, leave the loom on its back for now. If you have an e
lift or an a
I
NSTALLING
Removing Rods and
The treadles will fasten to the front of the loom. There are
mounting blocks
They hold
to be removed in order to place the treadles on the loom.
1)
Installation of Treadles
Note:
Your loom will have treadles, an E
instru
section starting on page
page
Series Dobby Loom Assembly Manual
Installing Treadles
Place the lower front
From the outside of the loom, insert the
bolts into the holes in the left side
tighten.
Insert the
through the lower front, attach the nuts and tighten
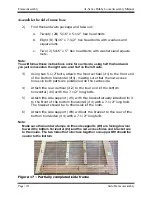
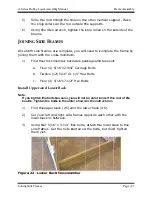
Figure 25 - Attaching front crossmember
If your loom has treadles, leave the loom on its back for now. If you have an e
lift or an a-lift, you can place the loom on its feet again
NSTALLING
Removing Rods and
The treadles will fasten to the front of the loom. There are
mounting blocks
They hold one 3/8" steel rod and
to be removed in order to place the treadles on the loom.
Remove both blocks and separate
the “rod hole” is off
will need to
Installation of Treadles
Your loom will have treadles, an E
instructions in this section. For an E
section starting on page
page 148.
Series Dobby Loom Assembly Manual
Place the lower front
From the outside of the loom, insert the
bolts into the holes in the left side
tighten.
Insert the two 5/16" x 3
through the lower front, attach the nuts and tighten
Attaching front crossmember
If your loom has treadles, leave the loom on its back for now. If you have an e
lift, you can place the loom on its feet again
NSTALLING
T
READLES
Removing Rods and Blocks
The treadles will fasten to the front of the loom. There are
already attached to the top of the lower front cross piece.
one 3/8" steel rod and
to be removed in order to place the treadles on the loom.
Remove both blocks and separate
the “rod hole” is off
will need to reassemble
Installation of Treadles
Your loom will have treadles, an E
ctions in this section. For an E
section starting on page
Series Dobby Loom Assembly Manual
Place the lower front on the loom
From the outside of the loom, insert the
bolts into the holes in the left side
two 5/16" x 3-1/4" hex bolts in the right side frame
through the lower front, attach the nuts and tighten
Attaching front crossmember
If your loom has treadles, leave the loom on its back for now. If you have an e
lift, you can place the loom on its feet again
READLES
Blocks
The treadles will fasten to the front of the loom. There are
already attached to the top of the lower front cross piece.
one 3/8" steel rod and two round
to be removed in order to place the treadles on the loom.
Remove both blocks and separate
the “rod hole” is off-set (slightly) away
reassemble the
Your loom will have treadles, an E-
ctions in this section. For an E
section starting on page 24. Instructions
on the loom.
From the outside of the loom, insert the
bolts into the holes in the left side fra
1/4" hex bolts in the right side frame
through the lower front, attach the nuts and tighten
Attaching front crossmember
If your loom has treadles, leave the loom on its back for now. If you have an e
lift, you can place the loom on its feet again
The treadles will fasten to the front of the loom. There are
already attached to the top of the lower front cross piece.
two round plastic
to be removed in order to place the treadles on the loom.
Remove both blocks and separate them
set (slightly) away
the blocks the
-Lift, or an A
ctions in this section. For an E-Lift, follow the instructions in the next
Instructions for an A
From the outside of the loom, insert the two 5/16" x 3
frame, attach the nuts and
1/4" hex bolts in the right side frame
through the lower front, attach the nuts and tighten
Attaching front crossmember
If your loom has treadles, leave the loom on its back for now. If you have an e
lift, you can place the loom on its feet again
The treadles will fasten to the front of the loom. There are
already attached to the top of the lower front cross piece.
plastic spacers
to be removed in order to place the treadles on the loom.
them from t
set (slightly) away from the
the same way
Lift, or an A-Lift. For treadles, follow the
Lift, follow the instructions in the next
r an A-Lift are in the appendix
two 5/16" x 3-
me, attach the nuts and
1/4" hex bolts in the right side frame
through the lower front, attach the nuts and tighten.
If your loom has treadles, leave the loom on its back for now. If you have an e
lift, you can place the loom on its feet again.
The treadles will fasten to the front of the loom. There are two woode
already attached to the top of the lower front cross piece.
spacers. These will need
to be removed in order to place the treadles on the loom.
from the rod (notice that
the lower
way.
Lift. For treadles, follow the
Lift, follow the instructions in the next
are in the appendix
Frame Assembly
Page |
-1/4" hex
me, attach the nuts and
1/4" hex bolts in the right side frame
If your loom has treadles, leave the loom on its back for now. If you have an e
two wooden
already attached to the top of the lower front cross piece.
. These will need
he rod (notice that
front). You
Lift. For treadles, follow the
Lift, follow the instructions in the next
are in the appendix, go
Frame Assembly
Page | 23
1/4" hex
If your loom has treadles, leave the loom on its back for now. If you have an e-
already attached to the top of the lower front cross piece.
. These will need
he rod (notice that
front). You
Lift. For treadles, follow the
Lift, follow the instructions in the next
, go

