background image


103 

Click the checkbox to enable (default setting) or disable “cascade in” for each card ID number. Disabling 
(or removing the checkmark) will cause the previous link on the particular ID number to be broken. This 
will cause the monitor to only display the linked cards after the broken link. 
 
Change the ID number designation only (by clicking a card and dragging up or down using the   
symbol); this will not affect the actual physical connection of the Rainier 3G Plus. 


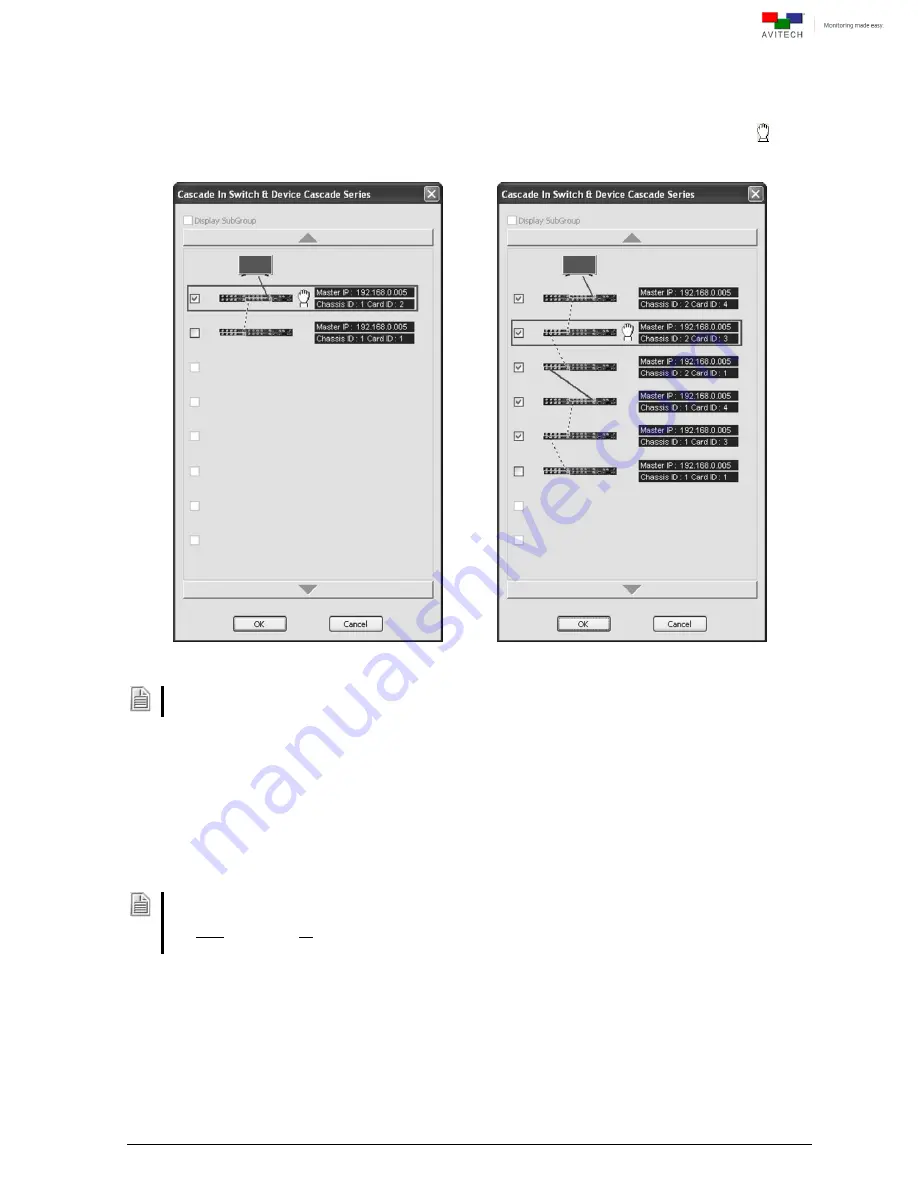
Figure 6-4

 Phoenix-Q Software: Drag to Change the ID Number Designation Only 


Make sure the ID number designation matches the actual physical connection of the cascaded Rainier 3G 
Plus. 


Click 

Clear Tally Status

 to clear up any tally that has appeared on screen. 


Click 

Import (.txt)

Label

 to apply the labels you created. Click 

Export (.txt)

Label

 to edit the 

labels externally. The most convenient way is to export the label file as: 


ANSI


– up to 30 characters; can contain the English characters A–Z, a–z, 0–9, or 


BMP Label

 (Unicode 

– up to 15 characters; useful for displaying text other than the 

English language) 

txt

 file 


1.  Settings here will only affect the labels of the windows within the selected Group. However, the process 

of editing and importing the labels is the same as described on page 55. 
Note: To change all the labels in the System see page 55. 

2.  These items are only available when the computer is connected to the Rainier 3G Plus. 


Summary of Contents for Rainier 3G Plus

Page 1: ...User Manual Rainier 3G Plus Multiviewing experience taken to the next level Revision 1 0 0 May 2014 ...

Page 2: ...ames are trademarks or registered trademarks of their respective companies COPYRIGHT The information in this manual is subject to change without prior notice No part of this document may be reproduced or transmitted in any form or by any means electronic or mechanical for any purpose without the express written permission of Avitech International Corporation Avitech International Corporation may h...

Page 3: ...usly Installed Card 11 3 Cascading 13 3 1 Internal Cascading 13 3 1 1 Example 1 Cascade 2 cards and duplicate display 13 3 1 2 Example 2 Cascade 2 cards and independent quads 15 3 1 3 Example 3 Cascade 3 cards and independent quad 17 3 1 4 Example 4 Cascade all 4 cards 18 3 2 External Cascading 20 3 2 1 Example 1 Take SDI output of any card to the next chassis cascade input22 3 2 2 Example 2 Assig...

Page 4: ...pendix A Using the LCD Panel 104 A 1 Welcome Screen 104 A 2 Navigating the Main Menu 106 A 3 Navigating the System Parameters Menu 111 Appendix B Setting Up Audio 113 Sample illustration 1 121 Sample illustration 2 122 Sample illustration 3 123 Appendix C Setting Up the Alarm Sound 125 C 1 Alarm Sound Setup for No Video Video Black Video Freeze Occurrence 125 C 2 Alarm Sound Setup for No Audio Occ...

Page 5: ...v Appendix F Compatibility With Tally Interface Device 138 F 1 Using the Pacific GPIO Box as GPI Interface 138 F 2 Sony Production Switcher 140 ...

Page 6: ...y Period Avitech makes its best offer to repair a product that is outside the warranty period provided the product has not reached its end of life EOL The minimum charge for such repair excluding shipping and handling is 200 US dollars AVITECH INTERNATIONAL CORPORATION 15377 NE 90th Street Redmond WA 98052 USA TOLL FREE 1 877 AVITECH PHONE 1 425 885 3863 FAX 1 425 885 4726 info avitechvideo com ht...

Page 7: ...scading This flexibility allows all 4 cards up to 16 signals to easily be displayed on one monitor and or be duplicated to other monitors The Rainier 3G Plus is also extremely scalable users can easily expand the system by cascading up to 10 chassis which allows for the monitoring of up to 160 signal sources on multiple screens This chapter introduces the features and specifications as well as the...

Page 8: ...nstalled on Rainier 3G Plus upon order for assembly on to rack mount DVI to HDMI Adapter optional D Table 1 1 Package Contents The following items are included if an optional rack mount kit is ordered refer to the Rack Mount Assembly Reference Guide for details Rack Tray Ear left and right pc Ear A 2 pcs ...

Page 9: ...cs Used on 700 750 800mm rack depth 27 56 29 53 31 49 inch Tray Screw 3 4mm 4 pcs D Screw 3 7mm 6 pcs Screw 3 5mm 12 pcs D Screw 3 6mm 2 pcs Cable Tie 370 4 8mm 2 pcs Table 1 2 Optional Rack Mount Package Contents ...

Page 10: ...tion Supports Avitech ASCII Protocol AAP Robust Design Passed Extensive Vibration Test MIL STD 810G vibration test method 514 6 for US truck under random vibration while in operation Dual power supply with DC input one main and one redundant interchangeable Field serviceable front fan module Video Control 1 Rainier 3G Plus 1 Free scaling windows quad view full screen view adjustable safe area and ...

Page 11: ...BNC connector Automatic sensing the following input signals are supported 3G SDI 1080p60 1080p59 94 1080p50 YUV 4 2 2 10 bit HD SDI 1080p30 1080p29 97 1080PsF29 97 segmented frame 1080p25 1080PsF24 1080PsF23 98 1080i60 1080i59 94 1080i50 1035i60 1035i59 94 720p60 720p59 94 720p50 720p30 720p29 97 720p25 SD SDI 480i60 576i50 CVBS NTSC PAL Output HDMI and DVI through HDMI to DVI adapter Normal VESA ...

Page 12: ...Card Specifications Rainier 3G Plus Control card Control interface serial connector For connecting to TSL port of the TSL controller for TSL interface Cascade BNC connector For multimedia input coming from SDI Out port cascadable to any other Rainier 3G Plus 1 card but not cascadable to Rainier 3G Plus Q card LTC BNC connector Linear or Longitudinal Time Code input encoding of SMPTE Time Code data...

Page 13: ...Moves the cursor one character to the right Upon reaching the last character a space will be added e g set password Enter next menu level or select item Note Refer to Appendix A for functions that can be changed by the control buttons Release Screw Turn the screw counter clockwise to loosen and clockwise to secure the front panel to the chassis Table 1 6 Rainier 3G Plus Front Component Description...

Page 14: ...ts to TSL port of the TSL controller for TSL interface through the proprietary RJ 45 to RS 232 DB9 FM cable Note This port is not available for connecting to a computer for configuration and control Phoenix Q utility Likewise it cannot be used for entering the Avitech ASCII Protocol AAP X command interface Ethernet IP For setup through Avitech Phoenix Q utility through network connection For enter...

Page 15: ...G Plus 1 card Rainier 3G Plus PI card Control Card Cover Plate Remove the cover plate to install the Rainier 3G Plus control card Power DC 24V Connects to the 24 V DC power adapter Note When connecting 2 power adapters for redundant power supply make sure the power adaptors are at least 10 cm away from each other Table 1 10 Rainier 3G Plus Chassis Component Description ...

Page 16: ...ng from the power strip to Rainier 3G Plus before making any changes to the hardware configuration 2 1 Installing New Card on Blank Slot The Rainier 3G Plus chassis accept any of the following cards Rainier 3G Plus Q card Rainier 3G Plus 1 card Rainier 3G Plus PI card Step 1 Remove the two screws securing the back plate Figure 2 1 Remove the 2 Back Plate Screws Step 2 Remove the back plate Figure ...

Page 17: ...ssis Figure 2 4 Secure the Screws on Both Sides 2 2 Removing a Previously Installed Card Step 1 Use a flat screwdriver to unscrew the left and right puller screws on the control board module Figure 2 5 Remove the Left and Right Puller Screws on Control Board Step 2 Use the just removed puller screws and screw them to both sides of the card to be removed Figure 2 6 Screw the Left and Right Puller S...

Page 18: ...Figure 2 7 Remove the Left and Right Screws Step 4 Grasp both left and right puller screws and pull the card away from the chassis Figure 2 8 Pull the Left and Right Puller Screws Step 5 Remove the puller screws on the just removed card and return them to the control board module ...

Page 19: ...ally daisy chaining 2 or more up to 10 Rainier 3G Plus chassis to increase windows on one screen up to 160 achieved by cascading 10 Rainier 3G Plus with 4 windows from each of the 4 cards Multiple cards allow multiple SDI signals on one display The following examples require a working knowledge of Phoenix Q software For an in depth understanding of Phoenix Q skip to chapters 4 and 5 for more infor...

Page 20: ...ations depicted below will work and then click OK Figure 3 3 Phoenix Q Software Set Subgroup Configuration There is no need to make any adjustments to the HDMI OUT item in Properties panel as the software will automatically make the necessary adjustments Figure 3 4 Phoenix Q Software Properties HDMI OUT Display Source ...

Page 21: ...s and independent quads Step 1 Make sure that the 2 card IDs belong to the same group while the other 2 card IDs are each assigned a group by themselves Verify this as shown on the Group View tree found on the left panel of the Phoenix Q software To change the group setup go to System Configuration Figure 3 6 Phoenix Q Software Group View Panel ...

Page 22: ...m in Properties panel as the software will automatically make the necessary adjustments Figure 3 7 Phoenix Q Software Properties HDMI OUT Display Source The following figure illustrates the above setup Figure 3 8 Cascade 2 Cards and 2 Independent Quad Illustration ...

Page 23: ...own on the Group View tree found on the left panel of the Phoenix Q software To change the group setup go to System Configuration Figure 3 9 Phoenix Q Software Group View Panel There is no need to make any adjustments to the HDMI OUT item in Properties panel as the software will automatically make the necessary adjustments Figure 3 10 Phoenix Q Software Properties HDMI OUT Display Source ...

Page 24: ...Illustration 3 1 4 Example 4 Cascade all 4 cards Step 1 Make sure that all 4 card IDs belong to the same group Verify this as shown on the Group View tree found on the left panel of the Phoenix Q software To change the group setup go to System Configuration Figure 3 12 Phoenix Q Software Group View Panel ...

Page 25: ...DMI OUT item in Properties panel as the software will automatically make the necessary adjustments Figure 3 13 Phoenix Q Software Properties HDMI OUT Display Source The following figure illustrates the above setup Figure 3 14 Cascade 4 Cards Illustration ...

Page 26: ...ingle Rainier 3G Plus and the other end to the CASCADE IN BNC port of the next Rainier 3G Plus in the chain Step 3 Cascading through the RJ 45 RS 485 port is used to loop communication from one Rainier 3G Plus to the next The data stream carries control and configuration information Connect one end of RS 485 cascading cable to the RS 485 OUT of the first Rainier 3G Plus and the other end to RS 485...

Page 27: ...21 The following illustration shows a typical setup of cascaded Rainier 3G Plus Figure 3 15 Cascaded Rainier 3G Plus Illustration ...

Page 28: ...p will display the second group s window on a second monitor Below we provide examples for cascading input signals from 1 2 3 or 4 cards Card ID 1 output to the next chassis cascade input Figure 3 16 Phoenix Q Properties HDMI OUT Display Source Setting If we select Card 1 for HDMI 1 as shown in Figure 3 16 then only the 4 windows of card ID 1 plus the 16 windows of chassis ID 2 will be displayed F...

Page 29: ...ll be displayed Figure 3 18 SDI Output of Card ID 1 to the Next Chassis Cascade Input Illustration 2 If we select Card 3 for HDMI 1 then only the 12 windows of card ID 1 2 and 3 plus the 16 windows of chassis ID 2 will be displayed Figure 3 19 SDI Output of Card ID 1 to the Next Chassis Cascade Input Illustration 3 ...

Page 30: ... ID 1 plus the 16 windows of chassis ID 2 will be displayed If we select Card 2 for HDMI 2 then only the 8 windows of card ID 1 and 2 plus the 16 windows of chassis ID 2 will be displayed If we select Card 3 for HDMI 2 then only the 12 windows of card ID 1 2 and 3 plus the 16 windows of chassis ID 2 will be displayed If we select Card 4 for HDMI 2 then all 16 windows of card ID 1 2 3 and 4 chassis...

Page 31: ...windows of card ID 1 and 2 plus the 16 windows of chassis ID 2 will be displayed If we select Card 3 for HDMI 3 then only the 12 windows of card ID 1 2 and 3 plus the 16 windows of chassis ID 2 will be displayed If we select Card 4 for HDMI 3 then all 16 windows of card ID 1 2 3 and 4 plus the 16 windows of chassis ID 2 will be displayed Figure 3 22 SDI Output of Card ID 3 to the Next Chassis Casc...

Page 32: ...s of card ID 1 and 2 plus the 16 windows of chassis ID 2 will be displayed If we select Card 3 for HDMI 4 then only the 12 windows of card ID 1 2 and 3 plus the 16 windows of chassis ID 2 will be displayed If we select Card 4 for HDMI 4 then all 16 windows of card ID 1 2 3 and 4 chassis ID 1 plus the 16 windows of chassis ID 2 will be displayed Figure 3 23 SDI Output of Card ID 4 to the Next Chass...

Page 33: ...e assigning card s to another group will display the second group s window on a second monitor For the purpose of this example we will focus on the Phoenix Q setting for chassis ID 2 To display the input source signals of card ID 1 from chassis ID 2 select Card 1 for HDMI 4 Only the 4 windows of chassis ID 2 card ID 1 16 windows of chassis ID 1 16 windows of chassis ID 3 will be displayed Figure 3...

Page 34: ...D 1 and 2 from chassis ID 2 select Card 2 for HDMI 4 Only the 8 windows of chassis ID 2 card ID 1 and 2 16 windows of chassis ID 1 16 windows of chassis ID 3 will be displayed Figure 3 25 Assign Any or Multi cards to the Cascade Output Illustration 2 ...

Page 35: ... and 3 from chassis ID 2 select Card 3 for HDMI 4 Only the 12 windows of chassis ID 2 card ID 1 and 2 and 3 16 windows of chassis ID 1 16 windows of chassis ID 3 will be displayed Figure 3 26 Assign Any or Multi cards to the Cascade Output Illustration 3 ...

Page 36: ...rds from chassis ID 2 select Card 4 for HDMI 4 All 16 windows of chassis ID 2 card ID 1 and 2 and 3 and 4 16 windows of chassis ID 1 16 windows of chassis ID 3 will be displayed Figure 3 27 Assign Any or Multi cards to the Cascade Output Illustration 4 ...

Page 37: ...ce signals of all 4 cards from chassis ID 2 select Cascade In for HDMI 4 Only the 16 windows of chassis ID 1 16 windows of chassis ID 3 will be displayed Figure 3 28 Assign Any or Multi cards to the Cascade Output Illustration 5 ...

Page 38: ...Plus to the controlling computer through an Ethernet cable IP address Before connecting the computer to the Rainier 3G Plus the computer will need to be changed to a static IP and its subnet mask must be set to a similar range as the Rainier 3G Plus e g 192 168 0 5 factory default setting Or the IP address of the Rainier 3G Plus Master chassis must be changed to a similar range as the controlling ...

Page 39: ... Up the Phoenix Q Software Step 1 Run the Phoenix Q software by double clicking Phoenix Q exe Step 2 Make sure to set the correct IP address see Appendix D for details Step 3 Select the IP Port checkbox Serial Port is for connecting to a TSL controller interface only Then click Connect Figure 4 3 Phoenix Q Software Select the Ethernet Connection Method ...

Page 40: ...ifferent rotary ID setting selected e g 1 2 3 on their rear control board The Group View window will list the card s found and will initially be listed under Idle Group 1 If there are 2 or more chassis cascaded they should also be detected 2 Make sure that the cascaded chassis baud rate and resolution is the same as the master chassis Figure 4 5 Phoenix Q Software Idle Group ...

Page 41: ...35 Step 4 Click System Configuration Figure 4 6 Phoenix Q Software Click System Configuration The Group Setup window will appear Figure 4 7 Phoenix Q Software Group Setup ...

Page 42: ... the right panel e g Group 001 Figure 4 8 Phoenix Q Software Assign Group to Idle Device You may also click the One Device Per Group button to assign a card to each group or click All Devices in Group 1 to assign all cards to Group 1 The Rainier 3G Plus PI card must be assigned a group by itself ...

Page 43: ... window Phoenix Q will save the configuration file System agi to the device s flash memory Figure 4 10 Phoenix Q Software Update Configuration Progress After group setup has been completed every time the IP address of the master chassis has been changed see Appendix D perform the simple step of entering Group Setup window and then clicking OK to exit there is no need to re assign grouping This wil...

Page 44: ...port Figure 4 11 Phoenix Q Software Chassis and Card ID Audio Output Place the mouse pointer over a specific card ID to show various information such as Master IP Chassis ID Card ID Audio Output reference guide Figure 4 12 Phoenix Q Software Device Information and Reference 4 4 Obtaining the UMD Under Monitor Display Data from Router Step 1 Click System Disconnect Figure 4 13 Phoenix Q Software Cl...

Page 45: ...39 The progress of disconnection will appear on screen Figure 4 15 Phoenix Q Software Disconnection Progress Step 2 Click System Options Figure 4 16 Phoenix Q Software Click System Options ...

Page 46: ...Q Software Enable External Device Step 4 Make sure that the IP Address corresponds to the IP address of the computer running the tpcGW utility If not click the IP Address button and when the IP Address screen appears enter the correct value Then click OK to exit Figure 4 18 Phoenix Q Software Enter Correct IP Address ...

Page 47: ...igure 4 19 Phoenix Q Software Enter Correct Port Number Make sure the values appearing for both IP Address and Port Number are similar to the values entered in the tpcGW utility otherwise you will not be able to successfully connect to the router Step 6 To allow the Phoenix Q software to connect to the router use the tpcGW utility refer to the tpcGW Utility Quick Reference Guide for details ...

Page 48: ...e particular model will depend on the monitor s resolution as well as the smallest window size limitation Figure 4 20 Phoenix Q Software Group Layout Upon selecting Custom Layout specify the Window Ratio Normal 4 3 16 9 If Normal is selected then set the Horizontal and Vertical number of windows 2 to 8 as possible grid positions on the monitor If 4 3 or 16 9 is selected then only set the Horizonta...

Page 49: ...ndow and drop to a new position It will be updated on the monitor Or upon selecting a window use the left right up down arrow buttons on the keyboard 4 5 3 Full Screen Mode Swap Window Contents Full Screen Mode Double click a window to enter full screen mode Double click again to return from full screen mode Swap Window Move cursor to the bottom left hand corner of a window until a letter S appear...

Page 50: ... Setting Step 2 Click to select the particular Group card ID on the left column Click the destination Visual Studio group on the right column Click the right arrow button Select other Group card ID to belong to a Visual Studio group Multiple Group card ID can be assigned to the same Visual Studio group Finally click OK to exit the Visual Studio Setup window To remove a particular Group from the pr...

Page 51: ...ally the card IDs appearing on the Visual Studio tab may be stacked on top of each other Select a Layout to display the other card IDs Quick Information Positioning the cursor on top of a window will provide quick information for the window A prompt Double click window label will allow you to quickly bring up the particular group s layout view in the main window of Phoenix Q Figure 4 27 Visual Stu...

Page 52: ...und right click anywhere on a window and click Color Setting Figure 4 29 Visual Studio Set the Border and Label Color Auto Arrange Allow the system to automatically arrange the layout of the windows appearing in the Visual Studio tab Figure 4 30 Visual Studio Auto Arrange ...

Page 53: ...to be turned on and in the Properties tab click Image Enable On Figure 4 32 Properties Tab Turn On Image Window Method 2 Drag the window to be enabled to the Group xxx tab Action drag window to an empty location will allow the selected window to appear in the previously empty space Action drag window on top of another window will cause the former occupant window to be disabled turned off and moved...

Page 54: ...on on the Properties window except with icon and click the following to quickly apply the settings to 1 all the windows Card All 2 to a particular window Card Image 1 2 3 4 3 all the cards belonging to the same Group 4 to the entire System Figure 4 35 Phoenix Q Software Right click Item to Quickly Apply Settings to Card Group System The properties of a window can be copied to another window on the...

Page 55: ... The properties that can be copied include the following Window size 1 width and 2 height Label 1 on off switch 2 type ANSI or BMP label 3 font color and 4 background color Aspect ratio 1 on off switch 2 sync type and 3 fit image size Safe area 1 on off switch 2 horizontal and vertical markers Meter 1 on off switch 2 layout and alarm trigger 3 group 4 width 5 vertical coordinates and 6 VU PPM swit...

Page 56: ...etup set to default state 4 5 8 Align Windows Align a set of windows horizontally or vertically Choose how the windows will be lined up in relation to each other For example clicking the Align Right button aligns the right edges of the windows with each other To align a set of windows horizontally vertically Step 1 Select the windows by clicking the first window with the left mouse button and the ...

Page 57: ...ear on screen click one of the following buttons The window s size will follow the width height size of the last window selected copy width copy height To prevent distortion on the window s image for interlaced input signal make sure the height of the image excluding label and border IS NOT smaller than one half of the vertical active region of input source e g if resolution is set at 1080i 50Hz t...

Page 58: ...enix Q Step 2 To eliminate the vertical horizontal spacing between the windows click one of the following buttons The position of the last window selected do not change but the other window s changes position to remove any vertical horizontal spacing in between horizontal vertical 1 Remove Horizontal Spacing button is disabled grayed out if any of 2 consecutive windows selected are overlapped hori...

Page 59: ... the data Figure 4 40 Phoenix Q Software Save Log Window Information Refer to the computer s hard drive C Avitech Backup Backup_date_time Log folder for various system log messages text file Figure 4 41 Phoenix Q Software Location of Auto save Log File ...

Page 60: ...e to flash in order to write all the presets into the internal flash memory of the Rainier 3G Plus To save a preset perform the following steps Step 1 Configure the window layout to how it is to be displayed Step 2 Click Save Preset Step 3 Enter a unique filename for the preset and select OK to save Repeat these steps for each additional preset Figure 5 2 Phoenix Q Software Enter Unique Filename f...

Page 61: ...earing on the window right click anywhere inside the window except on a filename and click Delete All When the confirmation window appears click OK to proceed Figure 5 4 Phoenix Q Software Delete All Preset Files Confirmation Step 4 After creating presets click Load Preset to load the file to be the master layout which is automatically loaded when the Rainier 3G Plus is powered on ...

Page 62: ... To delete all the files appearing on the window right click anywhere inside the window except filename itself and click Delete All When the confirmation window appears click OK to proceed Step 6 Click Exit to close the Phoenix Q software and all the changes would be automatically saved to the configuration file System agi in the device s flash memory 5 2 Edit Menu Figure 5 6 Phoenix Q Software Ed...

Page 63: ... On the next screen click Font settings Step 4 On the next screen click to unselect the Hide fonts based on language settings checkbox Then click OK to exit Step 5 On the Phoenix Q software click to select Arial as the default Font and click OK 5 3 View Menu Figure 5 8 Phoenix Q Software View Menu View Menu Toolbars and Docking Windows Enable with checkmark or disable the display of any of the too...

Page 64: ...ell as Customize display Figure 5 9 Phoenix Q Software Toolbars and Docking Windows Menu Customize Click Customize to design the look of the menus and commands appearing on the Phoenix Q software Click the particular folder Commands Toolbars Menu and Options and then make the necessary changes Click Close when finished to exit Figure 5 10 Phoenix Q Software Customize the Toolbars Window ...

Page 65: ... the overall design and theme of the Phoenix Q software Click on the themes title to view the theme Note The dot to the left of Visual Studio NET 2005 signifies that it is the currently selected theme Figure 5 11 Phoenix Q Software Application Look Menu ...

Page 66: ...lash memory Communication Click Communication to select the IP Port Ethernet mode of connection between the computer and Rainier 3G Plus Note This item is not available when the computer is connected to the Rainier 3G Plus Simulation Note For factory testing only this item is not available Restore To restore a preset follow the steps outlined in figures 5 13 to 5 16 Setup Speaker ID Use Setup Spea...

Page 67: ...ary ID setting of the chassis being restored matches the old chassis setting Step 3 Click System Restore Configuration and Files Figure 5 13 Phoenix Q Software Click System Restore Configuration and Files Step 4 The Date window shows various folders with the date automatically generated when the preset s were previously saved The Preview Configuration window shows the setup of the just selected fo...

Page 68: ...resent Configuration window is different from the setup in the Preview Configuration window e g upon selecting Backup_2013_03_15_17_20_41 folder in the Date window then restore is not allowed by the system and the Restore button remains grayed out Step 6 Click Restore The progress of restoration will be shown Figure 5 15 Phoenix Q Software Restore Progress Step 7 Reboot the Rainier 3G Plus to comp...

Page 69: ...d ID to output to a chassis ID headset output Make sure to first assign 2 or more chassis ID cards to the same group Figure 5 17 Phoenix Q Software Click System Setup Speaker ID Figure 5 18 Phoenix Q Software Card Speaker ID This item is only available when the computer is connected to the Rainier 3G Plus ...

Page 70: ... the Import Export Alarm Sound function To change the label the label must be exported to be edited externally Follow the steps below to change the Rainier 3G Plus labels The most convenient way is to export the file label as ANSI up to 30 characters can contain the English characters A Z a z 0 9 or BMP Label Unicode up to 15 characters useful for displaying text other than the English language tx...

Page 71: ...ext file The first row of text provides a guide to the 2 types of labels A for ANSI B for BMP Label Change the label type as desired by typing A or B after the dash highlighted below Figure 5 21 Phoenix Q Software Change Label Type ...

Page 72: ...low When done editing the label save the txt file and import it The on screen labels will be updated Figure 5 22 Phoenix Q Software Change Label Text Options Opens a popup window with system configuration settings Figure 5 23 Phoenix Q Software Click System Options ...

Page 73: ...ath type the desired path in the Value column only available when Phoenix Q is not connected to chassis Figure 5 24 Options System General Backup Path Or click the select folder button and when the Select Folder screen appears choose from the existing folders or click the Make New Folder button to create a new folder Then click OK to exit Figure 5 25 Phoenix Q Software Select Folder Window ...

Page 74: ...Program Startup General General New Device Detected Click the drop down button click the cell s rightmost portion to select Open Group Setup window that allows the Phoenix Q program to automatically open the Group Setup window when a new device has been detected Figure 5 27 Options System General New Device Detected To prevent errors when detecting new devices it is highly recommended to return th...

Page 75: ...eft corner of the monitor Figure 5 28 Options System General Layout Display General General Display Device ID Group View To display the device ID information in the Group View panel make sure Display Device ID Group View is enabled set On Click the drop down button click the Display Device ID Group View cell s rightmost portion to select On Figure 5 29 Options System General Display Device ID Grou...

Page 76: ...eers mV stands for millivolt Figure 5 30 Options System General Video Black Threshold Unit General General HDMI Audio Output Follow SDI SPDIF Audio Output To make the HDMI audio output the same as the SDI audio output Properties portion Card Parameters Headphone Local Source make sure HDMI Audio Output Follow SDI SPDIF Audio Output is enabled set On Click the drop down button click the HDMI Audio ...

Page 77: ...tch to the window that just entered full screen mode make sure Audio Output From Full Screen Window is enabled set On Click the drop down button click the Audio Output from Full Screen Window cell s rightmost portion to select On Audio output will return to the previous window source upon exiting from full screen mode Figure 5 33 Options System General Audio Output From Full Screen Window Not appl...

Page 78: ... enabled set On Click the drop down button click the Special Audio Link Between Cascaded Device cell s rightmost portion to select On Figure 5 34 Options System General Special Audio Link between Cascaded Device General Visual Studio Name To change the Visual Studio group s name click the Visual Studio group name to change and then type the Visual Studio group s new name up to 30 characters Figure...

Page 79: ...down button click the Type cell s rightmost portion and select Custom Figure 5 36 Options System General Type General Display Name Custom Name To change the group s name click the Group name to change then type the group s new name up to 30 characters Figure 5 37 Options System General Custom Name ...

Page 80: ...ollowing scenarios will only occur if Play Special Layout No Video is Enabled set On Sample scenario 1 a single window loses video signal Regardless of the present monitor s window layout the quad full screen layout would be displayed and the single window without video signal would occupy the top left position full screen to warn the user that the particular window has no video signal Sample scen...

Page 81: ...ollowing scenarios will only occur if Play Special Layout No Video and Auto Restore are Enabled set On Sample scenario 1 all windows regain video signal If Auto Restore is set On all windows will revert to the original layout Sample scenario 2 window 2 has regained video signal out of the three windows that lost video signal If Auto Restore is set On window 2 which has regained video signal will b...

Page 82: ...hat Device Enable is set On Figure 5 40 Options External Device Communication Device Enable External Device IP Address Make sure that the IP Address corresponds to the IP address of the computer running the tpcGW utility If not click the IP Address button and when the IP Address screen appears enter the correct value Then click OK to exit Figure 5 41 Options External Device Communication IP Addres...

Page 83: ...tup Figure 5 42 Options External Device Communication Port Number To be able to successfully connect to the router make sure the values for both the IP Address and the Port Number are similar to the value entered in the tpcGW utility Upon clicking OK to exit the Options setup the following message appears Click OK to close the message Figure 5 43 Options Audio Output Auto Off Message When Exiting ...

Page 84: ...rade Reference Guide for details About Click About to see a pop up window which displays information about the Phoenix Q software i e version number Table 5 4 Phoenix Q Software Help Menu Description Export Current Firmware Version Follow the steps below to export the current version of the Rainier 3G Plus firmware Step 1 Click Firmware Version Figure 5 45 Phoenix Q Software Firmware Version Step ...

Page 85: ...ade Firmware Click Upgrade Firmware to bring the device s firmware up to date see Firmware Upgrade Reference Guide for Rainier 3G Plus for details Click System Disconnect first before firmware upgrade About Click About to see a pop up box showing the Phoenix Q software information Figure 5 47 Phoenix Q Software Version Information ...

Page 86: ...ck Add Step 2 Enter the Process name specify the Time H M S then select the previously saved preset File Click OK to continue Continue adding new processes Figure 5 49 Phoenix Q Software Add Process Window Step 3 On the drop down menu select Auto Play Auto Play Repeat Manual or Manual Repeat Click play to start the sequence Figure 5 50 Briefing Select Type of Playback ...

Page 87: ...ick to select the Card on the Group View window left panel and the Properties window right panel will list the parameters available for setup Figure 6 1 Phoenix Q Software Properties Window Some of the items appearing on the Properties window may not be available for the Rainier 3G Plus ...

Page 88: ...with a TSL connection Note The RS 232 port is not for connecting to a computer for configuration Phoenix Q utility Likewise it cannot be used for entering any Avitech ASCII commands When configuring connect the Master Rainier 3G Plus to the controlling computer through an Ethernet connection and then connect the Master Rainier 3G Plus RS 232 port to the TSL router Note To implement TSL aside from ...

Page 89: ...te To implement TSL aside from selecting Enable TSL UMD Properties must be On and Display Address Option must be configured Refer to Appendix F for details on using TSL UMD Properties to set Compatibility With Tally Interface Device Label Display Type for the particular Window must be configured UMD or D Name UMD When TSL UDP Parameter is enabled Serial Port TSL V3 1 will automatically be disabled...

Page 90: ...he audio output port Sound Stereo Mono Left Mono Right Select whether audio output is coming from one side or both sides of the headphone Volume dB 64 up to 12 Set the volume level of audio output Analog gain 0 0 14 6 28 6 42 9 57 1 71 4 85 7 100 0 Adjust the proper volume level previous item and proper audio analog amplifier s gain this item to achieve the best SNR signal to noise ratio Signal to...

Page 91: ...VESA The HDMI OUT port supports both Normal and VESA Special Control Mode HOB 1 2 Allows the proportional display of Titan 9000 HOB 1 2 wall display windows in the Visual Studio tab Note This item is only available for Titan 9000 HOB card Color Correction Cascade In SDI Out On Off Turn on the encoder signal in out stage to completely fix any color anomaly that may appear on color edge Select off t...

Page 92: ... set Display Addresses for all images right click any Display Address click Quick Setting and set the starting and ending number 0 126 to be displayed for each image e g Set 100 as the Start Number for Image 1 and set 126 as the End Number Then 100 would be shown as the Display Address for Image 1 101 for Image 2 and so forth Option First 8 Characters All 16 Characters Select to display 8 or 16 dy...

Page 93: ...ll synchronized on the monitor wall display Note By default the audio signal is approximately 5 56 ms Embedded Audio SDI Out Type Pass through embedded audio or Local Select the source of embedded audio signal that will be outputted through SDI HDMI OUT ports choose whether the signal will be Local from the card s VIDEO IN ports or Pass through embedded audio from cascaded signal source Note Refer...

Page 94: ...ock Hide Full screen mode On Off Hide or display the clock during full screen mode Clock Font Color Set the color of any font on the clock Click Others for more color choices Standard tab or customize the color Custom tab by setting Hue Saturation Luminance as well as Red Green Blue values Clock Background Color Set the background color of the clock Click Others for more color choices Standard tab...

Page 95: ...g Counter in Source Reset Counter Allows resetting of the counter Note This item is only available when selecting Counter in Source Format 12 hour 24 hour Select the clock display format Note This item is not available when selecting Counter in Source Display Frame On Off Enable the video s frame per second fps value to be shown on screen Note This item is only available when selecting LTC in Sour...

Page 96: ... content of label string directly type in the desired content Size 1 2 3 4 Specify the clock label s size Label Font Color Specify the clock label s font color Click Others for more color choices Standard tab or customize the color Custom tab by setting the Hue Saturation Luminance as well as the Red Green Blue values Label Background Color Specify the clock label s background color Click Others f...

Page 97: ... signals make sure the height of the image excluding the label and border IS NOT smaller than one half of the vertical active region of the input source e g if resolution is set at 1080i 50Hz then the image s height must not be less than 540 pixels Lock Position On Off Lock or unlock the position of the window appearing on screen Label Display On Off Show the label appearing on the window Keep in ...

Page 98: ...be 4 3 16 9 Sync Type Default AFD Upon selecting Default aspect ratio will be fixed at 16 9 for HD SDI and 4 3 16 9 for SD SDI Composite Upon selecting AFD the protected area shown on screen takes priority Fit Image Size On Off Upon selecting On and if the previous item Sync Type Default was selected the image will fit the window size fixed at 16 9 for HD SDI or 4 3 16 9 for SD SDI Composite If th...

Page 99: ...93 Image Layout and Alarm Trigger Change Audio meter scale ...

Page 100: ...of the left and right VU meter of either the master or secondary channel on the left and right side of the window just as the menu depicts Adjust the Phase Out of phase slider VU one slider Sound High Low sliders If there is no audio detected NO VU meters will be shown Audio Meters Groups Along with the video signal s each input signal may contain up to sixteen channels 8 pairs of embedded audio T...

Page 101: ... type of PPM scale Nordic BBC EBU DIN Whereas the VU meter has fairly equal attack and release times the PPM is characterized by having a very slow fall back time taking over 1 5 seconds to fall back 20dB the specifications vary slightly for Type I and II meters The reasoning for the slow fall back was to reduce eye fatigue and make the peak indication easier to assimilate The specifications of al...

Page 102: ...e the vividness of color Create a black and white image effect by moving the slider all the way to the left so that all color in the image is removed Contrast 0 to 1023 Adjust the difference in tone between the dark and light areas of the input signal Moving the slider to the right increases the contrast making the light areas lighter and the dark areas darker For example if the image has a dull g...

Page 103: ...ivity Level 1 to 128 Set the motion sensitivity of the image when video freeze alarm will be triggered Adjust the sensitivity according to the signal being monitored on a range of 1 for filtering out the noise in a noisy signal to 128 for a clean signal If the sensitivity level is set very low a lack of any change in frame by frame content comparison in the detect area e g a talk show video where ...

Page 104: ...cted in a particular window Note To enable alarm sound playback click Start Alarm Sound System icon will become grayed out Set Playback Duration 5 to 3600 seconds Always on Set video alarm sound duration seconds for specific window Note To shut off alarm sound playback before the time set has elapsed click the Stop Alarm Sound System icon which will become grayed out File Change Click the cell s r...

Page 105: ...e Width percentage Table 6 1 Phoenix Q Software Setting Group Card Properties for Rainier 3G Plus 1 Q 6 2 Rainier 3G Plus PI Properties Setup Connection Properties Change Set network Connection Properties by entering IP address Subnet mask and Gateway Or set Baud rate when using Serial Port to connect Serial Port TSL V3 1 On Off Enable Disable TSL V3 1 for configuring RS 232 port TSL connection No...

Page 106: ...his function HDMI OUT Display Source HDMI 1 2 3 4 Card 1 2 3 4 cascade in Select the display source for the output to the other card s HDMI OUT port belonging to the same chassis Select another card s VIDEO IN source as the output to another card s HDMI OUT port Or use the source signal coming into the chassis CASCADE IN port as output to a card Note When the Rainier 3G Plus contains a PI card it ...

Page 107: ...sh all cards belonging to the same group Click Set to Default to return all cards belonging in that group to the default settings 1080p output resolution 60 Hz vertical frequency Normal output timing Default preset layout 8 windows per row total number of rows depending on number of cards on each chassis as well as the total number of cascaded chassis if any Label is set On background color dark g...

Page 108: ... cards within a Rainier 3G Plus left figure below the solid line linking the third and fourth unit in the figure to the right signifies external cascading between 2 Rainier 3G Plus Likewise a solid line links the last internal cascaded card or last external cascaded card to the monitor Figure 6 3 Phoenix Q Software Cascade In Switch Device Cascade Series Window standalone Rainier 3G Plus left 2 ca...

Page 109: ...physical connection of the cascaded Rainier 3G Plus Click Clear Tally Status to clear up any tally that has appeared on screen Click Import txt Label to apply the labels you created Click Export txt Label to edit the labels externally The most convenient way is to export the label file as ANSI up to 30 characters can contain the English characters A Z a z 0 9 or BMP Label Unicode up to 15 characte...

Page 110: ...rently highlighted item Figure A 1 LCD Panel Busy State 1 When the busy state PLEASE WAIT message is displayed on the LCD panel see sample screen above DO NOT disconnect or connect any signal cables 2 Also DO NOT change any of the incoming signal s display resolutions while the Rainier 3G Plus is in the busy state A 1 Welcome Screen Upon starting up the LCD panel the welcome screen is shown for a ...

Page 111: ...105 Figure A 4 LCD Panel Menu Tree ...

Page 112: ...3G Plus PI card only Exit Exit the output resolution and frequency setup menu Table A 1 Output Resolution and Frequency Output Timing Only applicable for Rainier 3G Plus 1 card and Rainier 3G Plus Q card Standard Normal select this for SDI output VESA select this for HDMI DVI VGA output Exit Exit the output timing setup menu Table A 2 Output Timing User Logo Only applicable for Rainier 3G Plus 1 c...

Page 113: ... the primary group for HDMI audio Group 1 2 3 4 Secondary Group select the secondary group for HDMI audio Group 1 2 3 4 Exit Exit the headphone audio setup menu Table A 4 Audio Cascade Status On enable the card s cascade feature SOURCE select the card s 1 2 3 4 cascade source Card 1 2 3 4 Cascade In default for Rainier 3G Plus 1 Card Off disable cascade feature default for Rainier 3G Plus Q Card N...

Page 114: ...tem parameter save when quitting the Phoenix Q program Exit Exit the preset file setup menu Table A 7 Preset File Color Correction Only applicable for Rainier 3G Plus 1 card and Rainier 3G Plus Q card Status On enable the color correction feature Off disable the color correction feature Exit Exit the color correction setup menu Table A 8 Color Correction For Rainier 3G Plus Q card Make sure to tur...

Page 115: ...or the purpose of identifying the video payload AFD solves a problem in the transition from conventional 4 3 display devices to widescreen 16 9 displays Active area signaling allows the display device to process the incoming signal to make the highest resolution and most accurate picture possible Video payload is defined as the picture carried by a digital interface and comprising a matrix of hori...

Page 116: ...19 Window Safe Area Label Only applicable for Rainier 3G Plus 1 card and Rainier 3G Plus Q card Status On display the label for the particular window Destination Name input the text string appearing on label of the window up to 32 characters Use the buttons to scroll through the available ASCII characters for setting the label A quick press of the button moves the cursor one character to the left ...

Page 117: ...nt of 5 minutes Off disable the LCD panel backlight default is On Exit Exit the image adjustment setup menu Table A 23 LCD Panel Backlight LCD Panel Contrast Adjust the LCD panel contrast 0 to 26 Table A 24 LCD Panel Contrast Lock LCD Panel Status On enable the lock LCD panel feature when a set idle time has elapsed Password input the text string for unlocking the LCD panel up to 7 characters Defa...

Page 118: ...reen display FPGA Cx ST 1 chip 1 Cx ST 2 chip 2 Cx Font Exit Exit the firmware version setup menu Table A 26 Firmware Version IP Address Status Allow user to modify the following based on their Ethernet environment IP address Subnet Mask Gateway Exit Exit the IP address setup menu Table A 27 IP Address Dual Power Status On turn on the power alarm feature that is triggered when either one of the po...

Page 119: ...signal to a particular chassis headset connector Make sure that 2 or more cascaded chassis cards belong to the same group Step 2 To allow audio monitoring through the headphone connected to the headset port of the chassis make sure to select the correct settings for the items under Headphone Parameters Mute Off Sound Volume dB and Analog gain ...

Page 120: ...ne Local Enable On and Source Headphone will be disabled upon selecting Pass through embedded audio Group View column provides quick information on 2 settings in Properties Card Parameters section Scenario 1 O H S HDMI Audio Mute Off Headphone Local Enable On Scenario 2 O H HDMI Audio Mute Off Headphone Local Enable Off Scenario 3 O S HDMI Audio Mute On Headphone Local Enable On ...

Page 121: ... CH2 or CH3 CH4 for a two channel stereo audio system only the first group is applicable Group 1 CH1 CH2 Step 5 Select the output type of embedded audio signal when available see the Note below Select Local to allow output to come from the embedded audio signal of the selected Source image next item Select Pass through embedded audio to allow audio output from another internally cascaded card or a...

Page 122: ...n setting 2 to 4 cascaded cards in a group internal cascade only When there is one card in group and System Options HDMI audio output follow SDI audio output Off SDI Out Type is unavailable grayed out but HDMI Out Type is available for setting Upon setting 2 or more cascaded cards in a group external cascade only Both SDI Out Type and HDMI Out Type will be unavailable grayed out Step 6 Select the ...

Page 123: ...ndary Group to be monitored For an 8 channel 7 1 and six channel 5 1 surround audio system select Group 1 or Group 2 For a 2 channel stereo audio system only Group 1 is applicable for both Primary Group and Secondary Group Step 8 Turn on audio meter monitoring ...

Page 124: ...roups CH1 to CH4 with a master Meter 1 2 and secondary channel Meter 3 4 for each group This will display the left and right VU meter of either the master or secondary channel on the left and right side of the window just as the menu depicts Adjust the Phase Out of phase slider VU one slider Sound H L sliders If there is no audio detected NO VU meters will be shown ...

Page 125: ...area Note This is not allowed when the image width is less than 128 pixels Meter 1 2 Group Left 6 bars Select the audio meter s group embedded audio Meter 3 4 Group Right 6 bars Width Select the audio meter s width 2 4 6 8 10 12 14 Vertical Offset 0 to 144 Specify the location of the meter appearing on screen by setting the vertical coordinate ...

Page 126: ...est factor Upon selecting PPM clicking Layout and Alarm Trigger Change selects the type of PPM scale Nordic BBC EBU DIN Whereas the VU meter has fairly equal attack and release times the PPM is characterized by having a very slow fall back time taking over 1 5 seconds to fall back 20dB the specifications vary slightly for Type I and II meters The reasoning for the slow fall back was to reduce eye ...

Page 127: ...ach of the 4 cards individually take note that only 1 card can be enabled at a time turning on one card s local headphone will cause the other card s local headphone to be turned off automatically Headphone Local Source card level select from among the 4 image s audio signal Headphone Local Channel Group 1 CH1 CH2 this is the default setting card level depending on the signal source select another...

Page 128: ...that only 1 card can be enabled at a time turning on card ID 3 s local headphone will cause the other card s local headphone to be turned off automatically Headphone Local Source card level select from among the 4 image s audio signal Headphone Local Channel Group 1 CH1 CH2 this is the default setting card level depending on the signal source select another group to monitor if available Embedded A...

Page 129: ...123 Sample illustration 3 Figure B 3 Audio Output From Chassis ID 2 Card ID 4 Image 3 Plus Chassis ID 1 Headset ...

Page 130: ... only 1 card can be enabled at a time turning on card ID 4 s local headphone will cause the other card s local headphone to be turned off automatically Headphone Local Source card level so this must be set for chassis ID 2 card ID 4 select Image 3 embedded audio Headphone Local Channel Group 1 CH1 CH2 this is the default setting card level depending on the signal source select another group to mon...

Page 131: ...teps to setup playback of alarm sound C 1 Alarm Sound Setup for No Video Video Black Video Freeze Occurrence Step 1 Select On in Alarm Enable located in the Properties portion of the Phoenix Q software to enable the various alarm features Step 2 Select On in Video Alarm Enable to enable the various video signal alarm feature Step 3 Select On in Video Black Enable to enable the video black alarm fe...

Page 132: ...arm will temporarily use the mask area border to help set the Video Alarm Step 5 Set the level mV IRE of the detect area below which the signal will be considered to be black IRE mV unit will depend on the choice in System Option General Video black threshold unit Step 6 Set the video black alarm response time second Step 7 Select On in Video Freeze Enable to enable the video freeze alarm feature ...

Page 133: ...Set the video freeze alarm response time second Video Black and Video Freeze cannot happen simultaneously When both conditions exist Video Black has the higher priority Likewise both functions are not available for analog input signal Step 10 Select On in Alarm Sound Video Enable to enable playback of alarm sound when no video video black video freeze is detected in a particular image source windo...

Page 134: ...udio Alarm Enable to enable audio loss detection to be monitored on a single channel or group Step 3 Select On in No Audio Alarm Single Meter to enable the alarm that is triggered when no audio signal is detected on any of the meters enabled with checkmark in Set Meter dialog box refer to step 9 Step 4 Set the Signal In Out alarm Response Time such as when inputting the signal or change of status ...

Page 135: ...mage source window Step 7 Click Change in File to choose another alarm sound to play when audio alarm occurs for the particular source image window Click the browse button to select the location of the audio file Click Play to hear a sampling of the alarm sound selected Then click OK to exit At present only the WAV audio file format is supported Step 8 Select On in Meter Meter Enable to turn on au...

Page 136: ...ns as the main switch will become grayed out To shut off alarm sound playback before the time set has elapsed duration click Stop Alarm Sound System icon will become grayed out Right click an item with icon on the Properties window except with icon and click the following to quickly apply the settings to all the windows Card All to a particular window Card Image 1 2 3 4 all the cards belonging to ...

Page 137: ...y using a text editor e g Microsoft Notepad and then import the edited Alarm Sound parameters Figure C 1 Phoenix Q Software Click System Import Export txt Alarm Sound Step 1 Click System Export txt Alarm Sound and assign a filename Then click Save Figure C 2 Phoenix Q Software Export Alarm Sound ...

Page 138: ...ing the contents of the file Video Sound File file path filename wav where only a space must be located before and after the dash Figure C 3 Phoenix Q Software Change Alarm Sound File Step 3 When done editing the alarm sound filename save the txt file and import it The alarm sound WAV file s will be updated ...

Page 139: ...icon would be disabled grayed out Click the third icon to activate special screen layout alert when No Video occurs Figure C 5 Phoenix Q Software Enable Special Layout Button When the special screen layout alert occurs and to deactivate it click the last icon Notice that when the special screen layout alert occurs many functions on the Phoenix Q software are disabled e g Group View window Properti...

Page 140: ... allow Rainier 3G Plus to be in the same network mask as the connected computer Method 1 Change the IP Address of the Rainier 3G Plus Master Chassis Step 1 Run the Phoenix Q software by double clicking Phoenix Q exe Figure D 1 Phoenix Q Software Initial Screen ...

Page 141: ...indow Then click Change Connection Properties Figure D 2 Phoenix Q Software Click Change Connection Properties The present IP address is shown in the IP address field The corresponding Subnet Mask and Gateway belonging to the present IP address is also displayed Figure D 3 Phoenix Q Software Connection Properties Screen ...

Page 142: ...4 When the next screen appears click the radio button to select Use the following IP address and then enter the IP address 192 168 0 x where x is any value from 1 4 or 6 253 and Subnet mask 255 255 255 0 Step 5 Click OK to exit For Windows 7 Step 1 Click Start and type in Network and Sharing Center Step 2 Click Change Adapter Settings on the left Step 3 Right click Local Area Connection the Rainie...

Page 143: ...he Rainier 3G Plus Step 2 Push the number 2 dip switch located on the control card downward to the ON position Figure E 1 Push Number 2 Dip Switch Downward Step 3 Power on the Rainier 3G Plus by restoring power from the power strip Step 4 Push back the number 2 dip switch upward to the default position ...

Page 144: ...al cable it serves as a bridge between Rainier 3G Plus and Sony switcher The Pacific GPIO box serves as the GPI interface to receive tally information from a switcher whose specific protocol the multiviewer does not support This is based on the assumption that the switcher is capable of communicating through GPI No software configuration is needed on the Pacific GPIO box only the hardware connecti...

Page 145: ... wishes to communicate with Figure F 3 Phoenix Q Software Enable Image s TSL UMD Properties Step 6 Make sure that the Display Address corresponds to the assigned value of the Sony switcher If not select the correct value from the drop down menu Figure F 4 Phoenix Q Software Select the Correct Display Address That Matches the Sony Switcher Setting the next item Option is not necessary ...

Page 146: ... a Sony switcher The procedure below describes how to set up Rainier 3G Plus to interface with a Sony production switcher Step 1 Connect an Ethernet cable between Rainier 3G Plus IP port and router Step 2 Connect an Ethernet cable between Pacific GPIO IP port and router Step 3 Connect a special re worked serial cable between Sony switcher s RS 422 serial tally port and RS 232 to 422 converter Figu...

Page 147: ...nd the other end to the Pacific GPIO RS 232 1 port Figure F 7 Physical Connection Sony Switcher Only the RS 232 1 port in Pacific GPIO can be used to connect to the mini null modem adapter Step 5 Enable serial tally on one of the switcher s ports refer to Sony Production Switcher System User s Guide for details ...

Reviews: