AstroNova QuickLabel Kiaro! QL-120 User Manual Download Page 87

Printer Maintenance

QL-120 User Guide

87


3.

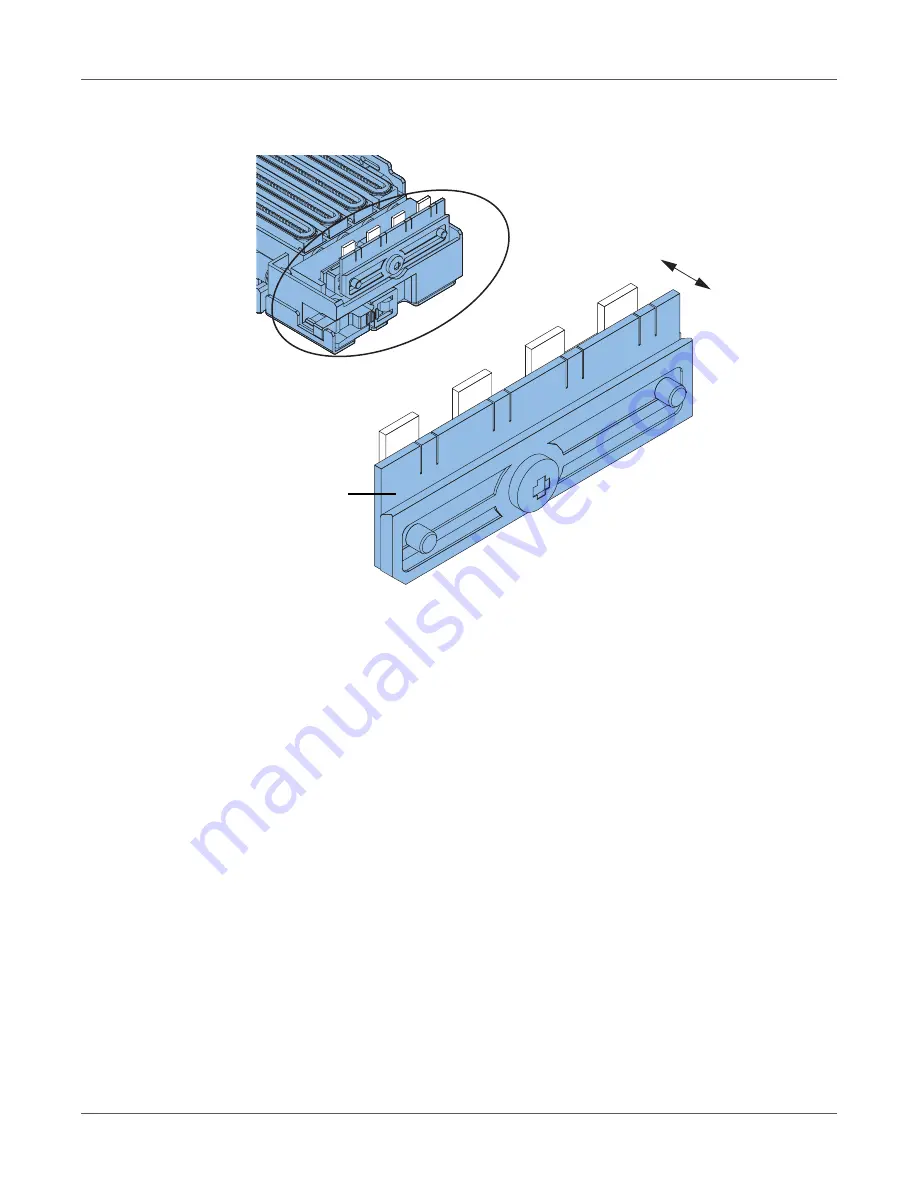
Refer to the illustration during the cleaning process. Use a new cleaning stick to wipe the 
top surface of the blade (A, B, C, and D) in the directions indicated by the arrows.

4.

After wiping the top surface, wipe the face surface of the blade (A, B, C, and D). Then 
wipe the back surface of this blade.

5.

Reinstall the purge unit and complete the maintenance wizard.

Do not clean

A

B

C

D

Summary of Contents for QuickLabel Kiaro! QL-120

Page 1: ...U S E R G U I D E...

Page 2: ...ickLabel An AstroNova Division World Headquarters 600 East Greenwich Ave West Warwick RI 02893 Tel 877 757 7978 Fax 401 822 2430 E mail info QuickLabel com www QuickLabel com Technical Support Tel 877...

Page 3: ...ny form by any means without written permission of AstroNova Trademarks QL 120 and Custom QuickLabel Omni are registered trademarks of AstroNova Inc Adobe Photoshop and Illustrator are registered trad...

Page 4: ...0 quicklabel de Canada 3505 Rue Isabelle Suite O Brossard QC J4Y 2R2 Tel 1 800 565 2216 quicklabel ca Latin America Av Insurgentes Sur No 1602 4 Piso Suite 467 Col Credito Constructor Ciudad de Mexico...

Page 5: ...encouraged to try to correct the interference by one or more of the following measures Reorient or relocate the receiving antenna Increase the separation between the equipment and receiver Connect th...

Page 6: ...o the effective usage of natural resources For more information about the recycling of this product please contact your local city office waste authority approved scheme or your household waste dispos...

Page 7: ...ov hazardouswaste perchlorate for detail European Union and EEA only Contains a preservative to control microbial deterioration Contains 1 2 benzisothiazol 3 2H one May produce an allergic reaction Co...

Page 8: ...rt 15B Class B ICES 003 Issue 6 Class B Application of Council Directives Application des Decisions du Conseil Anwendbar fur die Richtlinien Applicazione delle Direttive del Comitato 2011 65 EU 2014 3...

Page 9: ...Overview 56 Printer Part Names and Functions 56 Switching the Printer On and Off 60 QL 120 Status Monitor 61 QL 120 Maintenance Utility 62 Chapter 3 Designing and Printing Labels 63 Designing Labels 6...

Page 10: ...er 142 Resolving Windows 7 8 10 USB Installation Issues 147 Chapter 6 RW 5 1 Rewinder 150 Before Installing the Rewinder 150 Installing the Rewinder 150 Rewinding Labels 153 Chapter 7 UW 5 1 Unwinder...

Page 11: ...re met See Choosing an Installation Location on page 12 See Installation Precautions on page 13 See System Requirements on page 13 2 Unpack the printer and make sure that all parts are included See Un...

Page 12: ...in 59 to 86 degrees Fahrenheit 15 to 30 degrees Celsius Ensure the environment humidity is within 10 to 80 relative humidity Avoid placing the printer in areas exposed to high temperature and humidity...

Page 13: ...persons standing at the front and back of the printer respectively must lift the printer by holding it with their hands under the bottom handles two at the front one at the left and one at the right...

Page 14: ...materials to protect it against vibrations and shock during transportation Use the following procedure to unpack the printer Keep the packing materials for future transportation 1 Remove the four grip...

Page 15: ...kilograms Two persons are required to lift the printer Two persons standing at the front and back of the printer respectively must lift the printer by holding it with their hands under the bottom han...

Page 16: ...16 6 Open the roll cover 7 Remove all pieces of tape securing the roll holder 8 Push down the upper unit release lever and then open the upper unit 9 Remove all pieces of tape cushioning material and...

Page 17: ...Check to make sure the following items are included with the printer Printhead unit Starter ink cartridges one for each color AC power cables North American and European USB cable 4x5 inch media for t...

Page 18: ...he system with ink Installing the Printhead Use the following instructions to install the printhead Caution The printhead is a sensitive electronic component Use extreme caution when installing it Fol...

Page 19: ...Getting Started QL 120 User Guide 19 3 Remove the two thumbscrews to remove the main maintenance cover from the upper unit 4 Close the upper unit...

Page 20: ...Getting Started QL 120 User Guide 20 5 Remove the print module cover Then open the upper printhead release lever and lower printhead release lever Remove the blade cleaner...

Page 21: ...rom the package Caution Do not touch the printhead face An ink injection problem can occur Hold the printhead only by the end tab 7 Remove the cover protecting the terminals of the printhead PC boards...

Page 22: ...Getting Started QL 120 User Guide 22 8 Remove the caps from the printhead ink supply ports 9 Remove the printhead from the head protector...

Page 23: ...head in until it stops moving If printhead is insufficiently inserted the lower printhead release lever cannot be closed To confirm printhead is in the correct position see if the end of printhead gri...

Page 24: ...elease lever 13 Check that numbers 1 2 and 3 indicated on Print Module are visible If any numbers 1 2 or 3 are invisible the printhead release lever 1 2 has not been closed or the blade cleaner 3 has...

Page 25: ...0 User Guide 25 15 Push down the upper unit release lever and then open the upper unit 16 Install the main maintenance cover on the upper unit with the two thumbscrews 17 Close the upper unit and then...

Page 26: ...for each color while pushing it downward 3 Take out the starter ink cartridges from the package Then remove the packing materials Do not touch the ink outlet and terminal to prevent soiling of the sur...

Page 27: ...each color Caution There are sharp pins in the ink cartridge slot Never put your fingers in this area Note The printer is designed so that ink cartridges cannot be inserted in the wrong ink cartridge...

Page 28: ...the ink loading causes extra ink waste 1 Connect the power cord to the printer Several power cords come with the printer Use the power cord appropriate for the power supply used at the installation si...

Page 29: ...Getting Started QL 120 User Guide 29 Loading Media Loading Media on the Roll Holder 1 Open the roll cover 2 Remove the roll holder...

Page 30: ...d remove the holder stopper from the roll holder 4 Load roll media on the roll holder with it oriented as shown such that the bottom of the roll touches the roll holder surface with no clearance 5 Ins...

Page 31: ...ia in the Printer 1 Make sure that the Power LED stays lit If the Power LED does not stay lit or it is not blinking press the power key to put the printer in the power on state 2 Open the roll cover 3...

Page 32: ...rightward until it stops 5 Mount the roll holder in the printer The flanges and corresponding installation points in the printer are color coded Orient the roll holder so the black flange matches the...

Page 33: ...p media cut the media between labels as illustrated by the dashed red line below The arrow indicates the direction of media feed into the printer Reflective mark media has black cue marks printed on t...

Page 34: ...e roller in the feeder slot Media at the roller in the feeder slot is automatically pulled in slightly 8 Slide the transport guide right in accordance with the width of the media Note Do not press the...

Page 35: ...Getting Started QL 120 User Guide 35 10 Slowly push the paper guide down until it clicks locks When it locks media is transported automatically 11 Close the roll cover...

Page 36: ...sure the printer is powered on but not connected to your computer via the USB cable Important Do not connect the USB cable until prompted later in this procedure 2 Download the QL 120 driver from http...

Page 37: ...n the installer folder and then open the Drivers sub folder Double click the setup exe file The QuickLabel QL 120 Installation Wizard window will open 6 The first page shows the printer model and soft...

Page 38: ...Getting Started QL 120 User Guide 38 7 The next page shows connection options for the printer Select USB and then select the Next button...

Page 39: ...at the driver is being installed When the installation has completed the next page indicates a successful installation Select the Finish button 9 Connect the smaller end of the USB cable to the printe...

Page 40: ...9100 UDP 50001 50002 The printer cannot be used on a network where other devices on the network use the same ports Note This procedure requires administrator rights in Windows Note When the Windows p...

Page 41: ...lder has the same name as the original installer file you downloaded 5 Open the installer folder and then open the Drivers sub folder Double click the setup exe file The QuickLabel QL 120 Installation...

Page 42: ...know the IP address of the QL 120 series printer and you would like to enter it manually You can view and set the printer IP address if needed prior to network installation See Viewing and Configuring...

Page 43: ...you selected the Enter an IP address option follow this step Otherwise proceed to the next step Enter the IP address of the printer You can also provide a printer name and select whether to make it t...

Page 44: ...nd on the network If needed you can search the network again by selecting the Refresh button Select the Next button Select the networking options for the printer DHCP Select this option to configure t...

Page 45: ...Getting Started QL 120 User Guide 45 You can also provide a printer name and select whether to make it the default printer Select the Next button...

Page 46: ...ng Started QL 120 User Guide 46 10 The next page indicates that the driver is being installed When the installation has completed the next page indicates a successful installation Select the Finish bu...

Page 47: ...ility A language and printer prompt will open Select a display language and the QL 120 series printer you want to connect to Choose OK 3 Choose the Network Settings tab 4 To read the network settings...

Page 48: ...he QL 120 driver from https quicklabel com support downloads Save the file to your desktop for convenience This file is a self extracting executable file with a exe extension Important Wait until the...

Page 49: ...Printer window will open 7 Select the Add a network wireless or Bluetooth printer option Then select the Next button Follow the instructions in the prompts to select the QL 120 series printer During...

Page 50: ...ngs button The Configure Standard TCP IP Port Monitor window will open 9 Enter a Port Name and Printer Name or IP Address 10 Enter 50000 in the Port Number field Then select the OK button 11 Select th...

Page 51: ...20 User Guide 51 12 Select the Have Disk button The Install from Disk window will open 13 Select the Browse button Browse to the installer folder and then open the Drivers sub folder Select the QuickL...

Page 52: ...the OK button in the Install from Disk window The QuickLabel QL 120 series printer will appear in the printer list 15 Select the QuickLabel QL 120 series printer from the list Then select the Next but...

Page 53: ...tion will continue After several moments you will be prompted for printer sharing preferences 17 Define your printer sharing preferences Then select the Next button in the Add Printer window A success...

Page 54: ...ame network Note This procedure requires administrator rights in Windows 1 Open the appropriate printer window based on your version of Windows In Windows 7 choose Start Devices and Printers In Window...

Page 55: ...s also enabled Then choose OK 4 From the Windows Control Panel choose Network and Internet Network and Sharing Center Change advanced sharing settings 5 In the current profile make sure the Turn on ne...

Page 56: ...int modules circuit boards and other internal components 2 Operation Panel Keys necessary for operation and LEDs to indicate the state of the printer are provided on this panel 3 Ink Cartridge Door Op...

Page 57: ...te A serial number for identifying the printer is shown on this plate The serial number is required when you ask for repair of the printer or to register yourself as a user 3 RS232C Port Reserved 4 RS...

Page 58: ...Pull down this lever when media is jammed 4 Transport Guide Right This guide is used to transport media straight and detect the width of the media 5 Media Guide This guide prevents media from floatin...

Page 59: ...n attaching or detaching the holder stopper Part Description 1 Power Key LED On Power is on Blinking Sleep mode Off Power is off 2 PAUSE Key Printing Pressing this key suspends printing Paused Pressin...

Page 60: ...l also wake up from the sleep mode automatically as soon as it starts receiving a print job 4 BACK FEED Key Pressing this key feeds media one page backward Pressing and holding this key feeds media ba...

Page 61: ...t If the printer is to remain operational it should be powered on to prime clean the printheads every 2 weeks If the printer is to be stored it should be powered on to prime clean the printheads every...

Page 62: ...u install the printer driver The utility allows you to view printer information and perform a variety of maintenance functions You can access the QL 120 Maintenance Utility by choosing Start All Progr...

Page 63: ...th the QL 120 series printer Reflective Mark Media Reflective mark media has black cue marks printed on the back of the label liner These marks are read by a sensor on the printer to determine the sta...

Page 64: ...material is removed and the liner exposed the die cut labels are separated by gaps These gaps are read by a sensor on the printer to determine the starting point of new labels Continuous Media Contin...

Page 65: ...e following illustration shows text with anti aliasing disabled top and enabled bottom Note the smooth color transitions when anti aliasing is enabled When designing labels that will be printed on QL...

Page 66: ...ing black If RGB color values are not between 0 and 1 process black will be used For example images with RGB values of 2 2 2 or 1 1 2 or 0 0 30 will print using a mixture of inks in a process black Se...

Page 67: ...to the QL 120 Driver Help for details 3 Open the label file using the appropriate software Then choose to print the label and enter the number of copies you would like to print Note If your software...

Page 68: ...ll remaining labels including the unfinished in progress label when a new roll of labels is loaded in the printer For example during a print job of 10 labels the printer runs out of media while printi...

Page 69: ...g Labels QL 120 User Guide 69 2 Push the lever of the paper guide to open the guide 3 Open the transport guide right and slide it rightward until it stops 4 While pressing the pinch roller release lev...

Page 70: ...igning and Printing Labels QL 120 User Guide 70 5 Remove the roll holder 6 Release the holder stopper screw and remove the holder stopper from the roll holder 7 Remove the media roll from the roll hol...

Page 71: ...0 User Guide 71 Removing an Empty Media Roll When the media has been used up a message will be displayed on the Status Monitor and the printer will stop 1 Open the roll cover 2 Locate the tape adhered...

Page 72: ...de 72 3 Push the lever of the paper guide to open the guide 4 Remove the tape 5 While pushing the pinch roller release lever pull out media through the delivery slot 6 Remove the empty roll holder Rem...

Page 73: ...holder stopper screw and remove the holder stopper from the roll holder 2 Load roll media on the roll holder with it oriented as shown such that the bottom of the roll touches the roll holder surface...

Page 74: ...the Media in the Printer 1 Make sure that the Power LED stays lit If the Power LED does not stay lit or it is not blinking press the power key to put the printer in the power on state 2 Open the roll...

Page 75: ...lide it rightward until it stops 5 Mount the roll holder in the printer The flanges and corresponding installation points in the printer are color coded Orient the roll holder so the black flange matc...

Page 76: ...sing gap media cut the media between labels as illustrated by the dashed red line below The arrow indicates the direction of media feed into the printer Reflective mark media has black cue marks print...

Page 77: ...s at the roller in the feeder slot Media at the roller in the feeder slot is automatically pulled in slightly 8 Slide the transport guide right in accordance with the width of the media Note Do not pr...

Page 78: ...Designing and Printing Labels QL 120 User Guide 78 10 Slowly push the paper guide down until it clicks locks When it locks media is transported automatically 11 Close the roll cover...

Page 79: ...inthead quality the printer stops operating before it is completely out of ink Therefore a small amount of ink remains in the ink cartridge to be replaced To get good printing results use up each ink...

Page 80: ...emove the empty ink cartridge 4 Take out the ink cartridges from the package Then remove the packing materials Do not touch the ink outlet and terminal to prevent soiling of the surrounding work area...

Page 81: ...ispose of the old ink cartridge according to federal state and local laws after packing it in a plastic bag and placing the bag in the box Replacing the Maintenance Cartridge When the maintenance cart...

Page 82: ...ut the maintenance cartridge slowly When removing the maintenance cartridge full of ink take care not to incline or drop it The spilled or scattered ink may stain the floor or clothing 3 Insert a new...

Page 83: ...ation area rewind the roll Then close the roll cover 3 Launch the QL 120 Maintenance Utility From the Windows Start Menu choose Start All Programs QuickLabel QL 120 QL 120 Maintenance Utility A langua...

Page 84: ...ng nozzles 8 Touch the tip of cleaning stick on nozzles that have non discharge and then hold for five seconds to absorb ink Caution Do not touch cut section of cleaning stick on face of Printhead Do...

Page 85: ...ing occurs use the Light cleaning procedure in the Cleaning tab Cleaning the Inside Edge of the Printhead If label adhesive has adhered to the inside upstream edge of the printhead print quality issue...

Page 86: ...he purge unit print quality issues may result Use this procedure to clean the purge unit blade Note Wear protective gloves to prevent ink from staining your hands during this procedure Note Use only a...

Page 87: ...leaning stick to wipe the top surface of the blade A B C and D in the directions indicated by the arrows 4 After wiping the top surface wipe the face surface of the blade A B C and D Then wipe the bac...

Page 88: ...d a message displays in Printer Driver Status Monitor If QL 120 Maintenance Utility is active an error code consisting of 4 alphanumeric characters appears in Printer Status window along with a descri...

Page 89: ...act Technical Support 0109 Title Printhead 24V was not turned OFF correctly Remedy Contact Technical Support 010A Title VHTM of the fuse is blown Remedy Contact Technical Support 010B Title Cutter bra...

Page 90: ...ail code 0211 to 0215 is removed the same error code is displayed when Printer is restarted as long as the retained error has not been cleared When replacing parts be sure to use the appropriate part...

Page 91: ...d position error Remedy Contact Technical Support 0542 Title Printhead position error Remedy Contact Technical Support 0543 Title Printhead position error Remedy Contact Technical Support 0545 Title P...

Page 92: ...ition error Remedy Contact Technical Support 06 Purge Unit Position Error 0620 Title Purge Unit position error Remedy Contact Technical Support 0621 Title Purge Unit position error Remedy Contact Tech...

Page 93: ...pport 065E Title Purge Unit position error Remedy Contact Technical Support 0663 Title Purge Unit position error Remedy Contact Technical Support 0664 0665 0666 0667 0668 0669 Title Purge Unit positio...

Page 94: ...upport 0731 Title Supply Valve error Remedy Contact Technical Support 0732 Title Supply Valve error Remedy Contact Technical Support 0733 Title Supply Valve error Remedy Contact Technical Support 0734...

Page 95: ...Title Supply Valve error Remedy Contact Technical Support 08 Bubble Removing Valve Error 0820 Title Bubble Removing Valve error Remedy Contact Technical Support 0821 Title Bubble Removing Valve error...

Page 96: ...itle Bubble Removing Valve error Remedy Contact Technical Support 0837 Title Bubble Removing Valve error Remedy Contact Technical Support 0838 Title Bubble Removing Valve error Remedy Contact Technica...

Page 97: ...air Remedy Contact Technical Support 091A Title Pressure does not become lower Remedy Contact Technical Support 0922 0923 0924 0925 1 Title Pressure does not change Remedy Contact Technical Support 09...

Page 98: ...tus error when driving Pump dragging Remedy Contact Technical Support 0951 0952 0953 0954 0955 0956 0957 0958 0959 095A 095B 3 Title Supply Valve status error when driving Pump dragging Remedy Contact...

Page 99: ...ven on Ink Level Sensor detection C 4 Driven on Ink Level Sensor detection M 5 Driven on Ink Level Sensor detection Y 6 Driven on Ink Level Sensor detection BK 7 Driven on Ink Level Sensor detection C...

Page 100: ...d while Ink Lower Limit Sensor did not Remedy Contact Technical Support 11 Printhead Subheater Error 1101 1102 1103 1104 1105 1106 1107 1108 1109 110A 110B 110C 110D 110E 110F 4 Title Specified temper...

Page 101: ...120E 120F 4 Title Printhead connection error Remedy Contact Technical Support 13 Printhead Data Error 1301 1302 1303 1304 1305 1306 1307 1308 1309 130A 130B 130C 130D 130E 130F 4 Title Printhead EEPR...

Page 102: ...t installed Remedy Contact Technical Support 15 Ink Leakage 1501 Title Ink is leaking Remedy Contact Technical Support 17 Purge Unit life 1701 Title Purge Unit life Remedy Replace Purge Unit 18 Blade...

Page 103: ...emperature Sensor is damaged Remedy Contact Technical Support 1B Printhead Flexible Cable Connection Error 1B01 1B02 1B03 1B04 1B05 1B06 1B07 1B08 1B09 1B0A 1B0B 1B0C 1B0D 1B0E 180F 4 Title Printhead...

Page 104: ...ate Sensor is not connected Remedy Contact Technical Support 25 Paper Suction Fan Error 2501 Title Paper Suction Fan is faulty or not connected Remedy Contact Technical Support 26 Power Supply Fan Err...

Page 105: ...Support 2921 Title Wipe Valve position error Remedy Contact Technical Support 2922 Title Wipe Valve position error Remedy Contact Technical Support 2923 Title Wipe Valve position error Remedy Contact...

Page 106: ...Technical Support 2F Cutter 2F01 Title Cutter unit malfunction Remedy Contact Technical Support 2F02 Title Cutter unit malfunction Remedy Contact Technical Support F0 System Error F001 F002 F003 F004...

Page 107: ...C Y 0B Bk C Y 0C M Y 0D Bk M Y 0E C M Y 0F Bk C M Y Error Code Detail Code Item Description 01 Upper Unit Open 0101 Title Upper Unit is opened Remedy Close Upper Unit 02 Ink Cartridge Door Open 0201...

Page 108: ...ed Remedy 1 Load paper with correct size and close Paper Guides error cleared 2 Cancel the job in the QL 120 Status Monitor 1103 Title Paper of a size smaller than print data is loaded Remedy 1 Load p...

Page 109: ...1305 Title Cutter TOF Sensor could not detect the next TOF mark or label gap Remedy 1 Remove jammed paper around Cutter TOF Sensor 2 Load paper with correct size 3 Close Paper Guide error cleared 1306...

Page 110: ...el the job in the QL 120 Status Monitor 1403 Title TOF Sensor could not detect the leading edge of paper Remedy 1 Load paper with correct gap and mark lengths and close Paper Guides error cleared 2 Ca...

Page 111: ...spond Remedy Remove jammed paper from Transport Unit or Roll Drive Unit set paper and close Paper Guide error cleared 1D0B Title Paper is folded around Delivery Port Remedy Remove jammed paper around...

Page 112: ...Ink Cartridge 2 Close Ink Door error cleared 21 Ink Cartridge Installation Error 2101 2102 2103 2104 2105 2106 2107 2108 2109 210A 210B 210C 210D 210E 210F 1 Title Ink Cartridge is not installed corre...

Page 113: ...a new Maintenance Cartridge 2 Close all doors error cleared 24 Maintenance Cartridge Installation Error 2401 Title Maintenance Cartridge is not installed correctly Remedy 1 Install Maintenance Cartri...

Page 114: ...Ink Cartridge Type Error 2701 2702 2703 2704 2705 2706 2707 2708 2709 270A 270B 270C 270D 270E 270F 1 Title Correct Ink Cartridge is not installed Remedy 1 Replace with a correct Ink Cartridge 2 Close...

Page 115: ...03 2E04 2E05 2E06 2E07 2E08 2E09 2E0A 2E0B 2E0C 2E0D 2E0E 2E0F 1 Title Correct Ink Cartridge is not installed Remedy 1 Replace with a correct Ink Cartridge 2 Close all doors error cleared 2F Maintenan...

Page 116: ...ancel the job in the QL 120 Status Monitor Ensure vertical and horizontal baseline settings are correct Ensure vertical and horizontal offset settings are correct Ensure bleed control settings are cor...

Page 117: ...09 Bk Y 0A C Y 0B Bk C Y 0C M Y 0D Bk M Y 0E C M Y 0F Bk C M Y 37 Remaining Ink Detection Error 3701 3702 3703 3704 3705 3706 3707 3708 3709 370A 370B 370C 370D 370E 370F 1 Title Proper Ink Cartridge...

Page 118: ...Close all doors warning cleared 04 Maintenance Cartridge Warning 0401 Title Maintenance Cartridge soon full Remedy 1 Replace with a new Maintenance Cartridge 2 Close all doors warning cleared 05 Repl...

Page 119: ...arks Blade Cleaner Replacement is issued in advance if Blade Cleaner Replacement is expected within 1 month when Purge Unit Replacement is issued 0A Inappropriate Current Printing Speed 0A01 Title Pri...

Page 120: ...Paper Jam If a paper jam occurs during printing an error message will be displayed and printing will be suspended 1 Power off the printer 2 Open the roll cover 3 Press down the upper unit open lever...

Page 121: ...ut paper in the direction opposite to the transport direction 5 Close the upper unit and then close the roll cover Note When closing the upper unit take care not to touch the interface at the back wit...

Page 122: ...er is not connected to the computer Check the USB cable and make sure that it is connected to the printer and the computer The USB cable is too long Avoid using USB cables longer than 16 4 feet 5 mete...

Page 123: ...Label Support The problem is occurring on the computer Shut down the computer and switch it on again Then try to print Be sure to cancel the print job if it remains after the computer is restarted Che...

Page 124: ...printer driver Status tab and then click Launch Monitor Set the details after the Status Monitor starts Check whether the printer and computer can communicate interactively If the printer and compute...

Page 125: ...printing the specified number of copies In such a case specify the number of copies on the printer driver side Print speed is set to a lower speed Set the print speed in the Layout tab of the printer...

Page 126: ...is poor Use only QuickLabel media for the printer Otherwise a media jam or failure may result Image is too bright or too dark Check the image in your design application If necessary make adjustments i...

Page 127: ...ansport assembly They help keep the media flat to avoid jamming during printing and ensure the media receives the ink correctly Causes As media passes through the transport assembly these gears come i...

Page 128: ...ent nozzles from clogging when not in constant use Cause As media passes through the transport assembly nozzles that are not firing based on the position and the label content being printed will fire...

Page 129: ...emble specified label content but rather abstract patterns of ink with varying ink dispersion Cause The print module is obstructed and did not fully lower into a printing position The distance between...

Page 130: ...ng at various points indicating a smearing Cause Media is physically coming into contact with the printhead surfaces as it passes through the transport assembly Possible Solutions Reload the media ens...

Page 131: ...evere mottled look across the printable web Ink unable to be absorbed further Ink may exhibit signs of cracking across the top of the media Cause Using unapproved media type or using wrong media profi...

Page 132: ...ther marks related to handling the media before printing are visible after the label has been printed Cause Contaminants on the label surface can cause undesirable defects or anomalies because it inte...

Page 133: ...s highlights the various scuff marks scratches dull and or mottled area of the label material Cause Inherent flaws in the surface of a media can become more visible after printing solid color fills Po...

Page 134: ...is is fundamentally different from a nozzle that could work but doesn t This typically will only occur in printheads being used beyond their life expectancy Possible Solutions Running a printhead clea...

Page 135: ...ozzle in the printhead is clogged by debris dried ink or an air bubble Possible Solutions Running a printhead cleaning routine from the maintenance utility will attempt to resolve the clog Running a p...

Page 136: ...of color Cause Multiple contiguous nozzles in the printhead are clogged by debris Possible Solutions Running a heavy printhead cleaning routine from the maintenance utility will attempt to resolve the...

Page 137: ...de Voids in Print Description Wide areas across one or more printheads are not printing Cause The printheads are not correctly seated in the print module and data is being lost as a result Possible So...

Page 138: ...density change across the web Cause Too much torque is causing the label roll to get pulled during printing Possible Solutions Lower rewinder torque Move the rewinder closer further from the label exi...

Page 139: ...tion Smear marks on media surface after printing Cause Media is physically coming into contact with surfaces before ink is dried Possible Solutions Handle media with care post printing Ensure media is...

Page 140: ...ifting label content Cause As the ink is being sprayed in the printer the media moves faster or slower than intended and a print defect results Possible Solutions If a rewinder is in use ensure the re...

Page 141: ...ut after performing a physical cleaning Cause Introduction of ink from one printhead into a different printhead with use of a cleaning stick has contaminated the printhead in question Possible Solutio...

Page 142: ...ion of Windows In Windows 7 choose Start Devices and Printers In Windows 8 access the Search option by pointing to the upper right corner of the screen Search for Control Panel and click the Control P...

Page 143: ...Troubleshooting QL 120 User Guide 143 5 Choose Change Driver Settings The drivers will become available for removal...

Page 144: ...iver package Then choose OK A confirmation message will appear Choose Yes to continue The Remove Driver Package window will open 7 Choose Delete 8 Delete all other QL 120 drivers displayed in the Driv...

Page 145: ...er Guide 145 10 Type regedit at the prompt Press Enter The Registry Editor window will open 11 In the Registry Editor window browse to the following location HKEY_LOCAL_MACHINE SYSTEM CurrentControlSe...

Page 146: ...ation message will appear Choose Yes to continue The selected registry key will be deleted 13 Return to the command prompt window Type net stop spooler at the prompt Press Enter The print spooler serv...

Page 147: ...d and then connect the printer to your PC via the USB cable If you connected the USB cable before running the installation wizard Windows 7 8 10 will not recognize the printer correctly In this case t...

Page 148: ...QuickLabel QL 120 in the Unspecified list Then choose Properties The QuickLabel QL 120 Properties window will open Choose the Hardware tab 3 Select AstroNova IncQuickLabel QL 120 and choose Properties...

Page 149: ...4 Choose Change Settings Then choose the Driver tab 5 Choose Update Driver When you are prompted select the Search automatically for updated driver software option Windows will locate the driver on y...

Page 150: ...t be sturdy and stable enough to support the weight of the printer and the rewinder Do not turn the rewinder mandrel by hand to rewind the media Turning the mandrel by hand can result in rewinder dama...

Page 151: ...anguage and the QL 120 series printer you want to connect to Choose OK 7 Choose the Cleaning tab Then choose the Moving button This utility will prepare the printer for lifting and moving onto the bra...

Page 152: ...er QL 120 User Guide 152 9 Ensure the printer sits level on the alignment brackets as illustrated below 10 Plug the power jack into the power slot on the rewinder Insert the power plug into an AC powe...

Page 153: ...the rewinder is in the off position 2 Turn the rewinder mandrel adjustment knob 4 counterclockwise to loosen the mandrel 3 Remove the outer flange 2 from the mandrel 4 Load an empty label core on the...

Page 154: ...ots until the media is squarely aligned with the inner flange Then tighten the thumb nuts 7 Fasten the end of the media to the core with tape Ensure the printed side faces out 8 Adjust the spring coll...

Page 155: ...by hand to unwind the media Turning the mandrel by hand can result in unwinder damage Installing the Unwinder 1 Ensure the power switch on the unwinder is in the off position 2 Arrange the unwinder a...

Page 156: ...ing button This utility will prepare the printer for lifting and moving onto the brackets 8 Holding the handles at the bottom of the printer lift the printer and then place it on the connected R and U...

Page 157: ...er QL 120 User Guide 157 9 Ensure the printer sits level on the alignment brackets as illustrated below 10 Plug the power jack into the power slot on the unwinder Insert the power plug into an AC powe...

Page 158: ...sult in unwinder damage 1 Ensure the power switch 3 on the unwinder is in the off position 2 Turn the unwinder mandrel adjustment knob 4 counterclockwise to loosen the mandrel 3 Remove the outer flang...

Page 159: ...1 Unwinder QL 120 User Guide 159 6 Open the roll cover 7 Remove the roll holder from the printer The roll holder is unnecessary when using the unwinder 8 Push the lever of the paper guide to open the...

Page 160: ...UW 5 1 Unwinder QL 120 User Guide 160 9 Open the transport guide right and slide it rightward until it stops...

Page 161: ...gap media cut the media between labels as illustrated by the dashed red line below The arrow indicates the direction of media feed into the printer If you are using reflective mark media cut the media...

Page 162: ...he feeder slot Media at the roller in the feeder slot is automatically pulled in slightly 14 If the media is not squarely aligned in the feeder slot adjust the position of the unwinder as needed Loose...

Page 163: ...th of the media Note Do not press the transport guide right strongly against the media edge A paper jam can result 16 Slowly close the transport guide right to lock it 17 Slowly push the paper guide d...

Page 164: ...and humidity Never place the printer on a slanted or unstable stand or table If the printer is dropped or slides off this could cause personal injury Also never place a heavy object on top of the prin...

Page 165: ...nally disconnect the power cord from the printer and the power supply and use a soft dry cloth to clean the cord connectors and the connection points Leaving the cord plugged in and not cleaned for a...

Page 166: ...mble or repair the printer Never insert or drop any metal objects into the printer when it is open This could cause a fire or serious electrical shock or damage the printer If something falls into the...

Page 167: ...the proper preparation could subject it to shocks and vibrations which could damage the printer and cause a fire Caution Before moving the printer use the appropriate procedures to drain ink from the...

Page 168: ...water immediately If irritation persists consult a physician If ink comes into contact with your skin rinse it off with flowing water immediately If irri tation persists consult a physician Never dro...

Page 169: ...ner Printhead 5 124 nozzles number of effective nozzles Media Gloss Paper Matte Paper Synthetic Pressure Sensitive Paper Tag Stock Media size Width 25 4 115 0mm Length 6mm 762mm Media thickness 145 25...

Page 170: ...233W Printer Reference value 268W with cutter unit Average power consumption When printer is switched ON 22Wh When printer is in sleep mode 8 5Wh When the software switch is turned OFF 0 4Wh Dimension...

Page 171: ...backfeeding function Torque Self regulating for QL 120 Power Universal 100 240V 1 8A 50 60Hz Accessories Includes adjustable printer and winder alignment plates Dimensions 15 8 402mm H x 12 6 320mm W...

Page 172: ...d Labels Planning 65 G Gap Media 64 H Holder Stopper 59 Holder Stopper Screw 59 I Ink Cartridge Door 56 Ink Cartridge Installation 26 Ink Cartridges Replacing 79 Ink Filling 28 Ink Warning LEDs 60 Ins...

Page 173: ...nting Labels 67 R Rating Plate 57 Rear Feeder S lot 57 Reflective Mark Media 63 Rewinder 150 153 Roll Cover 56 Roll Cover Handle 56 Roll Holder 58 Roll Holder Mounting Brackets 58 RS232C Port 57 RW 5...

Reviews: