Installation and Setup
35
Epica DGX 144 Instruction Manual
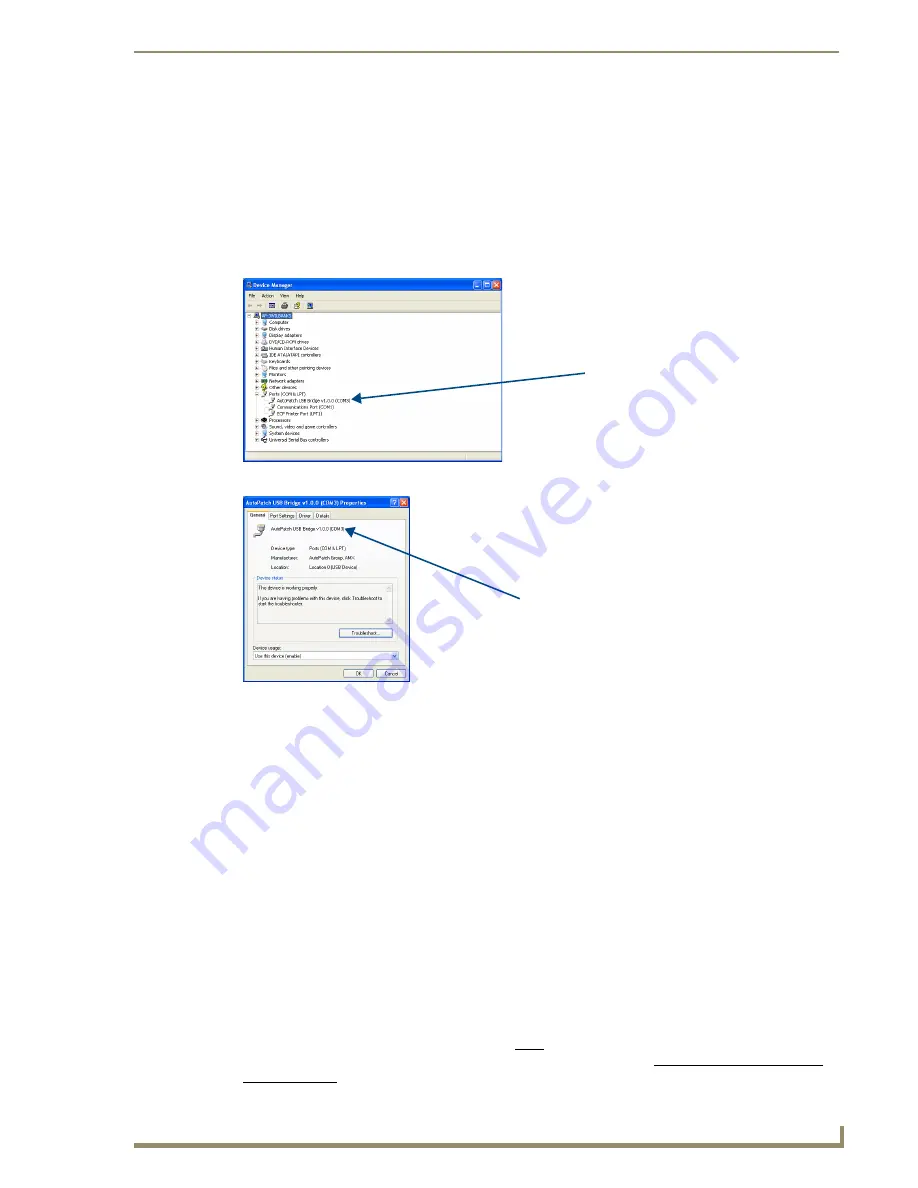
To identify the virtual Com port:
1.
Open the Windows
®
Device Manager (Start/Settings/Control Panel/System/System Properties/
Hardware tab/Device Manager button) and expand Ports by clicking on the “+”.
(The Device Manager may have a different location depending on the operating system and theme
selected.)
2.
If the port specifies the Com number, go to Step 4.
If the port does not specify the Com number, right-click AutoPatch USB Bridge, select Properties,
and complete all remaining steps.
3.
In the AutoPatch USB Bridge Properties dialog box, select the General tab.
4.
Note the Com port assigned to the AutoPatch USB Bridge.
This port number
must
be entered when
setting a connection in a software program or a terminal emulation program. The PC will always
associate a specific USB connector with the assigned virtual Com port. The PC will not recognize
the Epica DGX 144 if you disconnect and reconnect using a different Com port on the PC. However,
it will attempt to install a new virtual Com port using the new port. If completed, the new port will
be assigned a different Com number.
5.
Set up and run the desired method of control:
AMX control devices
– For control programming information, see the instruction manual for the
specific interface.
APControl 3.0
– Install and open the latest version of the program (located on the
AMX AutoPatch
CD
). Follow the setup wizard, which will discover the system’s configuration information and open
the Launchbar.
Terminal emulation
– Open the program. Check to be sure the Communications Port option is set
for the port determined in Step 3 above. Set the settings to match the default ones in the
Serial Port Settings table on page 32. Click OK. A short splash screen appears.
6.
Execute a test switch to be sure the Epica DGX 144 is working properly (see “Executing a Test
Switch,” page 41).
Note:
If power is cycled, the USB connection must be reestablished. Remove the USB cable and
close the software application in use. Then reconnect the USB cable to the same USB connector
used previously and reopen the communication software.
Assigned port number
(if not displayed, complete
all remaining steps)
Com port number to enter when setting
connection in terminal emulation program
Summary of Contents for Epica DGX 144
Page 10: ...Notices 6 Epica DGX 144 Instruction Manual ...
Page 20: ...Overview and General Specifications 16 Epica DGX 144 Instruction Manual ...
Page 48: ...Installation and Setup 44 Epica DGX 144 Instruction Manual ...
Page 54: ...Epica DGX 144 SC Fiber Boards 50 Epica DGX 144 Instruction Manual ...
Page 72: ...Appendix A EDID Programmer 68 Epica DGX 144 Instruction Manual ...
Page 82: ...Appendix B Managing Configuration Files 78 Epica DGX 144 Instruction Manual ...
Page 106: ...Appendix E Board Replacement 102 Epica DGX 114 Instruction Manual ...


