62
USING PHOTOSHOP LIGHTROOM 2
Managing catalogs and files
Convert photos to DNG
Lightroom lets you convert camera raw files to DNG for archiving and taking advantage of DNG features. When
photos are converted to DNG, the DNG files replace the originals in the catalog. You have the option of deleting or
preserving the originals on disk after the conversion.
1
Select one or more photos in the Grid view, or select a single photo in the Filmstrip in Loupe, Compare, or Survey
view. Then, choose Library > Convert Photo(s) To DNG.
Note:
If more than one photo is selected in the Filmstrip in Loupe, Compare, or Survey view, only the active photo is
converted to DNG.
2
In the Convert Photo(s) To DNG dialog box, select any of the following conversion options:
Only Convert RAW Files
Ignores photos that are not camera raw files. Deselecting this option converts all selected
photos, including JPEGs, TIFFs, and PSDs.
Delete Originals After Successful Conversion
Deletes the original photo file after the conversion process ends.
Deselecting this option preserves the original file on disk.
File Extension
Makes the file extension .dng or .DNG.
Compatibility
Specifies the versions of Camera Raw and Lightroom that can read the file. Use the tool tips to help you
choose.
JPEG Preview
Determines whether the exported JPEG preview is full sized, medium sized, or not created.
Embed Original Raw File
Stores all of the original camera raw data in the DNG file.
More Help topics
“
File formats
” on page 31
Open a file in Explorer or Finder
❖
Select the photo and choose Photo
> Show In Explorer (Windows) or Show In Finder (Mac
OS).
The file is selected in an Explorer or Finder window.
Create virtual copies
You can have multiple versions of photos by applying different adjustment settings to
virtual copies
of the original
(master) photos. Virtual copies don’t exist as actual photos, but are metadata in the catalog that stores the different sets
of adjustments.
You create a virtual copy of a photo and then apply adjustment settings to it. If you want another version of the master
photo, you create another virtual copy and apply the new settings to it. You can create as many virtual copies of a master
photo as you wish. You can even make one of the virtual copies a master, making the previous master a virtual copy.
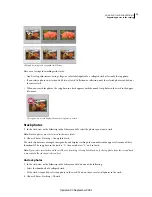
Once created, virtual copies are automatically stacked with the master photo. In the Grid view or the Filmstrip, the
master photo displays the number of images in the upper-left corner of the thumbnail. The virtual copies display page-
turn icons on the left side of their thumbnails.
Updated 03 September 2009


