


138
C
HAPTER
5: P
LANNING
THE
3C
OM
M
OBILITY
S
YSTEM
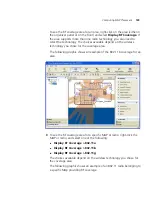
Moving a Third-Party
AP Icon to its Floor
Location
If you added a third-party access point while using the Configuration tool
bar option, the access point is on the Objects to Place tab.
1
In RF Planning, navigate to the floor plan.
2
In the Organizer panel, click
Objects to Place
.
3
Select the icon or description of the AP.
4
On the floor plan, click on the location where you want to place the AP.
You must click in a coverage area.
3WXM removes the AP from the Objects to Place list and places an icon
for it on the floor plan.
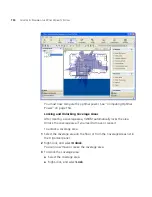
Creating and Placing
an Icon for a
Third-Party Access
Point
1
In RF Planning, navigate to the floor plan.
2
In the Task List panel, click
Tools
.
3
In the Coverage Area task group, under Wiring Closet/Misc, click the
(Insert Third-Party AP) icon
4
On the floor plan, click where you want the third-party access point to be
placed. The Create Third-Party AP wizard appears.
Summary of Contents for OfficeConnect WX4400
Page 74: ...74 CHAPTER 4 WORKING WITH NETWORK PLANS...
Page 92: ...92 CHAPTER 5 PLANNING THE 3COM MOBILITY SYSTEM Origin point...
Page 164: ...164 CHAPTER 5 PLANNING THE 3COM MOBILITY SYSTEM...
Page 244: ...244 CHAPTER 6 CONFIGURING WX SYSTEM PARAMETERS...
Page 298: ...298 CHAPTER 7 CONFIGURING WIRELESS PARAMETERS...
Page 344: ...344 CHAPTER 8 CONFIGURING AUTHENTICATION AUTHORIZATION AND ACCOUNTING PARAMETERS...
Page 410: ...410 CHAPTER 14 MANAGING ALARMS...
Page 500: ...500 CHAPTER A CHANGING 3WXM PREFERENCES...
Page 516: ...516 CHAPTER B CHANGING 3WXM SERVICES PREFERENCES...
Page 522: ...522 APPENDIX C OBTAINING SUPPORT FOR YOUR 3COM PRODUCTS...
Page 528: ...528 INDEX WX WX security enabling 67 X X 509 certificate types 383...


