background image

3-9 Project Properties 

 21


Builder 

Chapter 3    Operating the Project File 

3-9 Project Properties 

Sets the project parameters. 
The items that can be set with this function are as follows. 


Item Contents 

Title 

Sets the project title (within 64 characters). 

Switch Label 

Specifies  the  number of labels (1 to 16) and the label names 
(within 15 characters). 

Macro 

Registers the macro to use in the project. 


Procedures 

The following are operations common to each item in the project 
properties. 


1.  Select [Project Properties] from the [Settings] menu. 


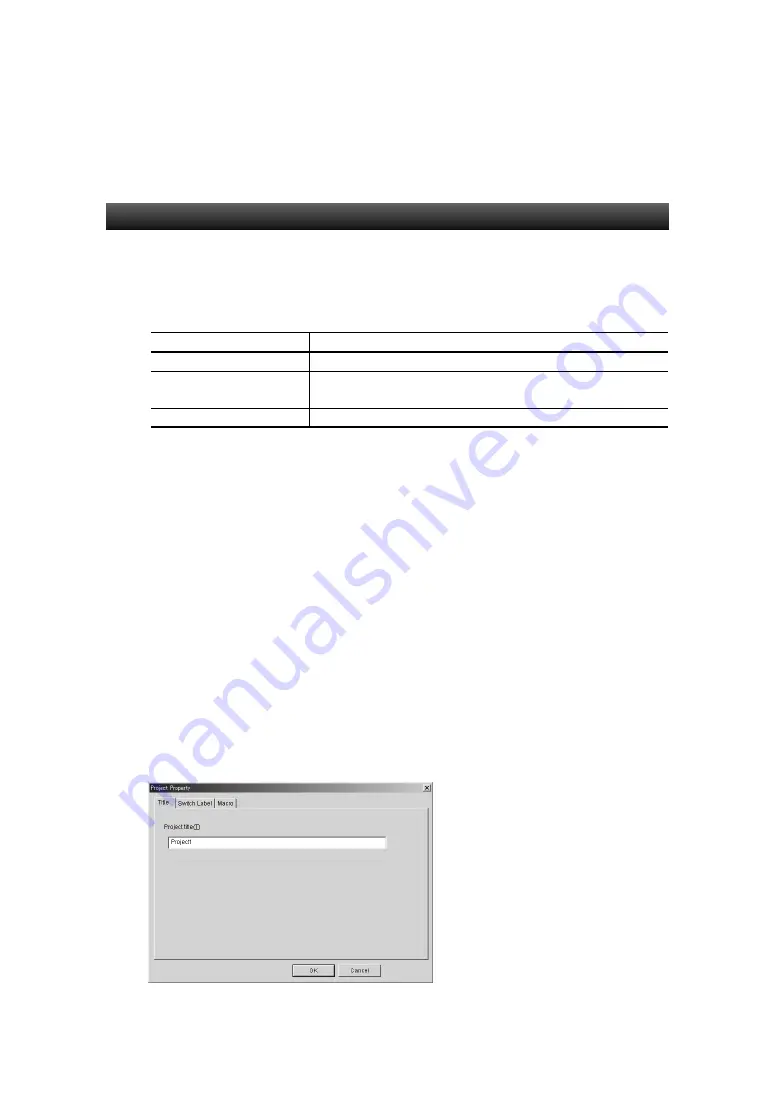
2.  The [Project Properties] dialog box is displayed. 


3.  Click the [OK] button after setting the necessary items. 


The following describes how to set each item. 


Title 

Select the [Title] tab. 
Specify a title, within 64 characters. 


Содержание mp2500

Страница 1: ...YASKAWA Machine Controller MP2500 USER S MANUAL YASKAWA MANUAL NO SIEP C880752 03A Drawing Tools for MotionScreen Builder...

Страница 2: ...any consequences resulting from the use of this software and the manual The specifications of this software and the topics described in this manual are subject to change without notice Microsoft MS MS...

Страница 3: ...Screen Tutorial Manual SIEPC88075202 Drawing Tools for Machine Controller MP2500 MotionScreen User s Manual Macro Function SIEPC88075204 Drawing Tools for Machine Controller MP2500 MotionScreen User s...

Страница 4: ...the Caution heading may depending on the situation have severe consequences All of the safety precautions contain very important information Make sure to follow those directions carefully Keep the man...

Страница 5: ...tion regarding operation descriptions and settings is provided M M ME E EM M MO O O IMPORTANT This gives the user important information regarding handling that is required for ensuring safety Importan...

Страница 6: ...necessary when using this product are described below MEMO Additional information regarding operation descriptions and settings is provided M M ME E EM M MO O O IMPORTANT This gives the user importan...

Страница 7: ...iting Builder 2 1 How to Start Builder 2 1 2 2 How to Exit Builder 2 2 2 3 User Interface 2 3 Chapter 3 Operating the Project File 3 1 About Project 3 1 3 2 Creating a New Project 3 3 3 3 Opening an E...

Страница 8: ...s 5 12 5 3 Pop up Menus 5 18 5 4 Edit Operations 5 19 5 5 Layout Functions 5 34 5 6 Color Setting 5 49 5 7 Address Setting 5 50 5 8 Listing Searching Functional objects 5 58 5 9 List of Functional Obj...

Страница 9: ...2 7 3 History Setting 7 5 7 4 Option Setting 7 6 7 5 Extensive Communication Setting 7 8 7 6 Setting Cyclic Communications Range 7 9 Chapter 8 Test 8 1 Test Function 8 1 8 2 Test Tool 8 5 8 3 Shared...

Страница 10: ...orting a CSV File 11 7 Chapter 12 Editing the Background 12 1 Background 12 1 12 2 Starting the Background Editor 12 2 12 3 Screen Configuration and Menus 12 4 12 4 File 12 5 12 5 Graph 12 7 12 6 Sele...

Страница 11: ...Builder Appendixes Appendix 1 List of Available Drawings Appendix 1 Appendix 2 List of Shortcut Keys Appendix 4 Appendix 3 About MotionScreen Appendix 5 Appendix 4 Error Messages Appendix 6...

Страница 12: ...escribes for new MotionScreen users what Builder can accomplish including an introduction of its specifications and functions 1 1 About MotionScreen 1 1 1 2 Requirements for Builder 1 4 1 3 Builder Co...

Страница 13: ...oduct consists of the following two applications y Builder Tool for creating screen data Builder creates screen data based on the graphical interface and operations of Windows 98 NT 2000 XP therefore...

Страница 14: ...Selection Thumbwheel Switch View Label Analogue Meter Level Meter Bitmap Broken line Graph Broken line Graph Data Log Data Log Graph System Clock Date Time Alarm Alarm Event Display Event Alarm Event...

Страница 15: ...1 1 About MotionScreen 1 3 Builder Chapter 1 Overview User Screen Sheet Sheet object Object types Functional object Overlap Frame Functional object Functional object Table...

Страница 16: ...nded memory 32MB or more recommended Hard disk availability 50MB of free space or more recommended CD ROM drive Required for installing Builder Display A 1024 768 pixel resolution or higher is recomme...

Страница 17: ...1 2 Requirements for Builder 1 5 Builder Chapter 1 Overview MOUSE Use a mouse supported by the OS OS Microsoft Windows 98 2000 XP Windows 3 1 is not supported...

Страница 18: ...in the screen By registering created shapes to the library they can be used in multiple locations across multiple screens Functional objects Objects that interface with MP2500 or shared memory which...

Страница 19: ...eral pages each containing functional objects that can change their display status according to the status of shared memory or MP2500 Shapes functional objects and tables can be placed in a frame By r...

Страница 20: ...is the register of the MP2500 to communicate to The address that can be allocated to a device depends on the selected destination The destination is selected in the New Project Wizard that is displaye...

Страница 21: ...oints bit 64K points up to 64K points of bit memory System CB System bit memory Predetermined usage Occupies 32 bit points from the CB number The default is CB4000 to CB4031 SB System bit memory Prede...

Страница 22: ...re displayed in Run Screen type Contents User Screen Used for normal operations Up to 256 screens can be used Base Screen Displays basic screen when executing Run Pop up Screen Displays a screen on to...

Страница 23: ...s 1 11 Builder Chapter 1 Overview Object types This section describes the various objects that can be placed in a screen Shape The following are the different types of shapes Rectangle Circle Oval Str...

Страница 24: ...evels 0 to 9 Numeral Display Input Numerally displays the word data of the address and enable data input via the ten keypad String Display Input Displays the string of the address word data and enable...

Страница 25: ...Graph Displays the trend of changes in the address word data Data Block Table Lists the data of the specified file and enables input to the displayed data Data Block Selector Displays the top of the d...

Страница 26: ...pter 1 Overview Tables Icon Name Contents Table Displays functional objects in a table Table User Expansion Adds user expansion functions to a table User definition Area Icon Name Contents User defini...

Страница 27: ...re various properties of each functional object at onetime and automatically allocate addresses specifying offset values For details refer to Creating with a table in 5 1 Creating a Functional object...

Страница 28: ...in 5 5 Layout Functions Object library This function registers an object along with its properties as one object By registering created objects to the library they can be used in multiple locations ov...

Страница 29: ...e different types of display changes are as follows Changing screen display y Changing Frame Page Moves back and forth between the edited frame pages For details refer to Switching frame in 4 4 Frames...

Страница 30: ...ror objects under Changing object display items in 4 1 Common Operations y Displaying sheet objects Displays the sheet objects laid on the base screen For details refer to Displaying sheet objects und...

Страница 31: ...object when ON For details refer to Displaying ON status under Changing object display items in 4 1 Common Operations OFF Status ON Status y Displaying addresses Displays the address of each function...

Страница 32: ...and Functions 1 20 Builder Chapter 1 Overview Data log Graphically displays the record data of the specified address A maximum of 32 groups can be registered in 1 project A maximum of 16 addresses can...

Страница 33: ...this function can issue alarm notifications from that address This can also be used for displaying events such as starting the operation With alarm functional objects occurred alarms events can be di...

Страница 34: ...splayed or partially displayed as well as modified Run Data Block Table Displays a list of the data Data Block Command Reads Writes data Data Block Selector Displays ths start of the data 45 mm 30 29...

Страница 35: ...ion to Builder to configure the properties of each functional object at once For details refer to Chapter 11 Importing Exporting CSV Files Error check Based on the error check items this function chec...

Страница 36: ...rties This dialog box is automatically displayed when a new project is created or by selecting Settings Screen Properties Open screen This dialog box is automatically displayed when a new project is c...

Страница 37: ...n to the current project Open Screen Opens an existing screen of the current project Close Screen Closes the current screen Save Screen Saves the current screen Save All Overwrites all data in the cur...

Страница 38: ...ber of vertical or horizontal copies of the selected object View Item Functions Toolbar Toggles the show hide settings of the toolbar Standard Functional object Shapes Operation Fonts Colors Address S...

Страница 39: ...r Starts creating a screen by selecting the Level Meter Broken line Graph Starts creating a screen by selecting the Broken line Graph Bitmap Starts creating a screen by selecting the Bitmap Alarm Even...

Страница 40: ...h functional object without opening the Properties dialog box Change Settings at Once Edits the basic properties of the selected functional objects all at once in a table format Functional objects can...

Страница 41: ...oups the grouped objects Grid Sets the grid Tools Item Functions Screen Maintenance Changes copies and deletes the title of the screen as well as changes the screen page numbers Sheet Maintenance Chan...

Страница 42: ...apter 1 Overview Window Item Functions Cascade Cascades the screens Tile Displays the screens in tiles Arrange Icons Arranges the minimized screen icons Help Item Functions About MotionScreen Displays...

Страница 43: ...hapter 2 Starting and Exiting Builder Builder is an HMI construction tool that runs on Windows 98 2000 XP This chapter describes the procedures for starting and exiting Builder 2 1 How to Start Builde...

Страница 44: ...k on the Windows Start button and select Program MotionScreen MotionScreen Builder The displayed items may vary depending on the program folder specified during the installation When Builder is starte...

Страница 45: ...upper right of the main screen y Double click the Builder icon on the upper left of the main screen y Click the Builder icon on the upper left of the main screen select Close from the displayed contr...

Страница 46: ...the Builder operation screen and the names functions of each section Title bar Displays the application name and project name Menu bar Groups each function with related functions The name of each grou...

Страница 47: ...OFF Button Command Button Word Lamp Numeral Display Input List Selection Analogue Meter Broken line Graph Thumb Wheel Switch Level Meter Word Button Bit Lamp Text Combo Box Bitmap Alarm Event Display...

Страница 48: ...unctions in the View and Tools menus Rectangle Straight Line Polygon Arc Circle Oval Polyline Sector Address Cross Reference List Up Functional Object Used Show ID Bring to Front Previous Frame Page F...

Страница 49: ...alog box each time 1 Select the functional object or drawing whose color you wish to copy 2 Clicking the Copy Paste Color button copies the color and the cursor changes to the following 3 Click the fu...

Страница 50: ...t setting of the functional object characters Use the Copy Paste font button to copy the character attributes of a functional object and paste them to another functional object or drawing With this me...

Страница 51: ...object to which you wish to paste the character attributes This displays the Paste Text Attribute dialog box To paste the character attributes to multiple functional objects use the mouse to encircle...

Страница 52: ...modify the address setting ON OFF buttons M M ME E EM M MO O O You can set the address directly via the keyboard or by clicking the Settings button and using the displayed Address Setting dialog box...

Страница 53: ...ng Color Address Status Bar Select View Status Bar The mark before each item indicates it is displayed You can move the toolbar to any position Displays function information regarding the icons for th...

Страница 54: ...s are made in the dialog box Edit box Enter the text If there is a spin button use the buttons to change the numbers Radio button These are the items preceded by a Only one of the multiple options can...

Страница 55: ...er Interface 2 12 Builder Chapter 2 Starting and Exiting Builder List view Select from the list Check box These are the items preceded by a Enable disable the item by selecting it Selected items have...

Страница 56: ...n handling projects which store the data for creating screens 3 1 About Project 3 1 3 2 Creating a New Project 3 3 3 3 Opening an Existing Project 3 8 3 4 Saving a Project 3 9 3 5 Saving a Project Und...

Страница 57: ...ile xxx bmp xxx jpg xxx dwg Bitmap JPG file for backgrounds and DWG file xxx ini Start setting file DataFile xxx bmp xxx jpg Bitmap JPG file for backgrounds and bitmap object displays xxx txt DWG file...

Страница 58: ...PO O OR R RT T TA A AN N NT T T When moving or copying a project to media such as a floppy disk select both the project folder and the project file Because the project consists of data from both sourc...

Страница 59: ...reating a new project to starting screen editing 1 Select New Project from the File menu or click the New Project button in the toolbar 2 The New project wizard is displayed Follow the instructions pr...

Страница 60: ...one to be used for communications If the MP2500 register has been set to MP2100 MP2500 2 slots select two of the MP2100 ports as the ones to be used for communications 3 Screen property setting 4 Lab...

Страница 61: ...following functional object properties Store in SMEM S in the List selection Store in SMEM S in the combo box For details on the settings for the functional object properties in the Shared memory box...

Страница 62: ...re used to store project data are set to read only the history files that can usually be saved in the Run program cannot be saved In this case select a folder for which users have read write permissio...

Страница 63: ...ory files of alarms and events History files of the Operation Log History files of macro errors If making project data store these files in the DataFile folder under the project folder If the check bo...

Страница 64: ...ating the Project File 3 3 Opening an Existing Project 1 Select Open Project from the File menu or click the Open Project button from the toolbar 2 A dialog box for selecting a project is displayed Se...

Страница 65: ...section describes how to save a project 1 Select Save Project from the File menu or click the Save Project button from the toolbar M M ME E EM M MO O O If the project was edited and has not yet been...

Страница 66: ...a New Name 1 Select Save Project As from the File menu 2 The Save Project As dialog box is displayed Specify the folder and file name then click the Save button M M ME E EM M MO O O If a project name...

Страница 67: ...t File 3 6 Opening Recent Projects The four most recently used projects can be directly opened 1 Select Recent Projects from the File menu 2 The recent projects are displayed along with their director...

Страница 68: ...using a certain screen from a project or if creating a project that contains a collection of frequently used screens The following flow chart shows the operation flow for specifying a template project...

Страница 69: ...plate project Flow chart 1 1 Select Template from the File menu 2 A dialog box for selecting a project is displayed Select the project to use as a template then click the Open button M M ME E EM M MO...

Страница 70: ...ow Chart 4 1 Click the Cancel button to not recycle a screen The normal operation for creating a new screen is returned Flow Chart 4 2 2 Click the Open button 3 The selected screen is reused as the ne...

Страница 71: ...project Backup Backs up the specified project FD 1 44MB Specified Folder Restore Restores the backup project data Procedures The following are operations common to each item 1 Select Project Maintena...

Страница 72: ...project file name of the destination project 3 Click the Execute button A confirmation dialog box will be displayed Click the Yes button to duplicate the project M M ME E EM M MO O O An existing proj...

Страница 73: ...h for the project to be deleted 3 Click the Execute button A confirmation dialog box will be displayed Click the Yes button to delete the project M M ME E EM M MO O O Projects that are being edited ca...

Страница 74: ...is selected In this case prepare the specified number of 1 44MB floppy disks Saves the backup file to the selected folder when Folder is selected Creates the file ProjectName XXX where XXX 000 001 at...

Страница 75: ...Restore tab 2 Select the project to restore Number Item Contents 1 Restore Source Restores the backup files stored in the floppy disk when Floppy Disk is selected Restores the backup files stored in t...

Страница 76: ...layed Click the Yes button to back up the project 4 If Restore Designation is a floppy disk change the disks when prompted by a message on the screen M M ME E EM M MO O O An existing project file can...

Страница 77: ...the number of labels 1 to 16 and the label names within 15 characters Macro Registers the macro to use in the project Procedures The following are operations common to each item in the project proper...

Страница 78: ...Item Contents 1 No of Labels Sets the number of labels that can be switched within a range from 1 to 16 2 Switch No Specifies the number of the switch to be set 3 Label Name Sets the name of each lab...

Страница 79: ...tions Chapter 4 Screen Types and Operations This chapter describes the screens that are displayed in Run and the basic operations for each of the screens 4 1 Common Operations 4 1 4 2 Creating and Sav...

Страница 80: ...creen within 64 characters Size Pop up Sets the screen types base screen pop up screen and the screen size displayed in Run Background Others Settings related to the compression of the screen data fil...

Страница 81: ...ons 4 2 Builder Chapter 4 Screen Types and Operations Screen title 1 Select the Title tab 2 Specify a title within 64 characters Size Pop up 1 Select the Size Pop up tab 2 Set the screen size and pop...

Страница 82: ...the position of the pop up screen to be displayed in Run Select a position Center of Screen Top Left of Screen Bottom Left of Screen Top Right of Screen Bottom Right of Screen Custom For custom posit...

Страница 83: ...olor as the default the next time you create a screen 2 Background File Specifies the background image file Select File Name Specifies the image file for the screen background The file specifications...

Страница 84: ...M M ME E EM M MO O O Other than DWG files which are created by the provided editor standard Screens bitmap BMP and JPEG files can be set for the background Macro 1 Select the Macro tab 2 Register the...

Страница 85: ...display the Grid dialog box Number Item Contents 1 Display Grid Displays grid Use the grid for positioning functional objects 2 Snap to Grid Enables grid Enabling the grid allows you to move function...

Страница 86: ...ctional object when the address value is ON is displayed in the edited screen By default the OFF status is displayed OFF Status ON Status 1 Select Simulate ON OFF from the View menu or click the ON St...

Страница 87: ...tions Displaying ID Displays the ID number allocated to objects other than the table ID numbers are automatically allocated to the objects of each screen in the order they are created ID Display 1 Sel...

Страница 88: ...he Show ID button in the toolbar again ID numbers can be displayed in small font The procedures are as follows 1 Select Options from the Tools menu 2 Click the Edit Disp tab 3 Check the Use small font...

Страница 89: ...abel LBL0000 to LBL9999 Level Meter LEV0000 to LEV9999 Bitmap BMP0000 to BMP9999 Analogue Meter ANA0000 to ANA9999 Display Broken line Graph LIG0000 to LIG9999 Alarm Event Display ALM0000 to ALM9999 A...

Страница 90: ...ess from the View menu or click the Show Address button Toolbar M M ME E EM M MO O O The mark before the Show Address menu indicates that the address is currently displayed To return to the OFF status...

Страница 91: ...he following format CB100 W CB101 R1 CB102 R2 ON OFF Button W Write Address R1 Display Address 1 R2 Display Address 2 Displays Write Address in the following format CW100 Word Button Command Button Di...

Страница 92: ...GE CW100 W Fixed PAGE display W Page Write Address y Switches page return PAGE CW100 W Switch Screen Fixed PAGE display W Page Write Address Hard Copy HCOPY Button Fixed HCOPY display Exit y Exits Run...

Страница 93: ...display address in the following format Bit Lamp CB100 Displays the display address in the following format CW100 Lamp Word Lamp Displays the display address in the following format CW100 Numeral Dis...

Страница 94: ...ng format y Shared memory CW100 y Files Combo Box LIST l Display Level Meter Analogue Meter Displays the boundary values in the following format CW120 M 1000 X CW100 0A CW101 1A 0 N M X 0 1 N XA 0A 1A...

Страница 95: ...he following format ERR bmp Data Block Data Block Command Displays the settings in the following format y Reads data file CSV LOAD Fixed CSV LOAD display y Writes data file CSV SAVE Fixed CSV SAVE dis...

Страница 96: ...on Example Error check item Are there any overlapping function items Are the functional objects within the screen frame 1 Select Show Error Object from the View menu or click the Show Error Object but...

Страница 97: ...Objects 1 Select Show Sheet Object from the View menu or click the Show Sheet Object button Toolbar M M ME E EM M MO O O The mark before the Show Sheet Object menu indicates that the sheet objects ar...

Страница 98: ...switch the screen display Cascade Screen Cascade Stacks the open screens on top of each other with the active screen on top Tile Screen Tile Lines up the open screens like tiles Arrange icons Screen...

Страница 99: ...s screen Displays the screen of the previous page number 1 Select Previous Screen from the View menu or click the Previous Screen button Toolbar Next screen Displays the screen of the next page number...

Страница 100: ...itches between the labels when multiple labels are registered Switching between labels 1 Clicking the Previous Label Next Label button in the toolbar switches the labels Toolbar Switching to a certain...

Страница 101: ...Builder Chapter 4 Screen Types and Operations 3 Select the label name to display then click the OK button 4 Click the OK button M M ME E EM M MO O O For instructions on setting multiple labels refer...

Страница 102: ...e sheet is adjusted to fit the current screen size 1 Select Zoom from the View menu 2 The Zoom dialog box is displayed 3 Select a ratio then click the OK button When Fit is selected Refreshing screens...

Страница 103: ...creen from the File menu or click the New Screen button 2 The New Screen dialog box is displayed M M ME E EM M MO O O After creating a new project and exiting the New Project Wizard the New Screen dia...

Страница 104: ...1 Select Reuse Existing Screen then click the OK button The Reuse Existing Screen dialog box is displayed Select the project containing the screen you wish to reuse 2 The Open Screen dialog box is dis...

Страница 105: ...ber Contents 1 Displays an asterisk in the pop up screen 2 Displays an asterisk for pages where an error was detected by the error check 3 Displays a preview of the selected screen 4 Displays an aster...

Страница 106: ...1 Select Save Screen from the File menu or click the Save Screen button from the toolbar Toolbar M M ME E EM M MO O O The shortcut key is Ctrl S If the screen has been edited and has not yet been sav...

Страница 107: ...zed Screen Display Maximized Screen Display Save all Save entire project Saves not only the open screen but the entire project 1 Select Save All from the File menu 2 When saved a message is displayed...

Страница 108: ...form maintenance on the following items Item Contents Change Screen Title Changes screen title Duplicate Screen Duplicates the specified screen Delete Screen Deletes the specified screen Resort Screen...

Страница 109: ...he following dialog box Delete Click the Delete button Change Screen Title Enter a new title in the title field 5 Click the OK button M M ME E EM M MO O O If the number of the screen page to be copied...

Страница 110: ...e basic sheet operations Sheets are screens that can displayed on top of multiple user screens For example by creating common screen objects such as the date time or screen switches on a sheet just a...

Страница 111: ...om the File menu 3 The Open Sheet dialog box is displayed Select the sheet page number then click the OK button 4 A message asking whether or not you wish to create a new screen is displayed Click the...

Страница 112: ...Open Sheet dialog box is displayed Select a sheet then click the OK button Number Contents 1 Displays an asterisk in sheets where an error was detected by the error check 2 Displays a preview of the s...

Страница 113: ...e screen Minimized Screen Display Maximized Screen Display Saving a sheet 1 Select Save Screen from the File menu or click the Save Screen button from the toolbar Toolbar M M ME E EM M MO O O The shor...

Страница 114: ...t you wish to apply a sheet to 2 Select Open Sheet from the Apply Sheet menu 3 The Apply Sheet dialog box is displayed 4 Apply the sheet to a screen 1 Select a screen 2 Check the sheet page number to...

Страница 115: ...heets resorts sheet page numbers and changes sheet titles Procedures The sheet maintenance operations are as follows 1 Select Sheet Maintenance from the Tools menu 2 The remaining operations are the s...

Страница 116: ...for switching the display contents The following objects can be placed in a frame y Shapes y Functional objects y Tables 1 Select Frame from the Functional Objects menu or click the Frame button in t...

Страница 117: ...e pages and frame pages to edit No of Frames Specifies the number of displays to switch Page No Edited Specifies the frame page number to design Sets the address that specifies the frame page number t...

Страница 118: ...es disables all object input within the frame or it is indirectly specified by the address Display Shows hides all objects within the frame or it is indirectly specified by the address M M ME E EM M M...

Страница 119: ...istance of frame s upper left corner from the screen s upper left corner Y Sets the horizontal distance of frame s upper left corner from the screen s upper left corner 6 Click the OK button after set...

Страница 120: ...ll appear on a tab position in the frame M M ME E EM M MO O O If a message indicating that it is prohibited to overlap objects is displayed select Tools Options select the Edit Disp tab and then remov...

Страница 121: ...Builder Chapter 4 Screen Types and Operations Switching to a specified frame page Displays a specified frame page 1 The Frame Setting dialog box is displayed 2 Specify the number of page to edit 3 Cli...

Страница 122: ...us 5 18 5 4 Edit Operations 5 19 5 5 Layout Functions 5 34 5 6 Color Setting 5 49 5 7 Address Setting 5 50 5 8 Listing Searching Functional objects 5 58 5 9 List of Functional Objects Used 5 65 5 10 F...

Страница 123: ...cursor changes as shown below 3 Move the cursor to the starting position of the functional object 4 Drag the mouse to the ending position of the functional object Drag M M ME E EM M MO O O Dragging wh...

Страница 124: ...ion the cursor on the functional object and double click it y Select the functional object and select Object Properties from the Settings menu y Select the functional object and right click it to disp...

Страница 125: ...g box after placing the functional object 1 Select Options from the Tools menu 2 Select the Edit Disp tab then check the Open property dialog automatically after pasting an object box The properties o...

Страница 126: ...ct or click the OK button 5 The dialog box for setting properties of the selected object is displayed M M ME E EM M MO O O The object IDs for shapes are shown below Rectangle RECTxxxx Circle Oval OVAL...

Страница 127: ...iple numbers of functional objects can be created at once using a table The following functional objects can be created using a table y ON OFF Button y Word Button y Command Button y Bit Lamp y Word L...

Страница 128: ...n below 3 Move the cursor to the starting position of the table 4 Drag the mouse to the ending position of the table s display area Drag Table properties The functional objects for the table to create...

Страница 129: ...terval Vertical or horizontal allocation of the address can be selected Example Starting address CB100 Direction Horizontal Interval 2 2 Item Name and No of Items Sets the positions and number of item...

Страница 130: ...ects in a the row or column to edit their properties 2 Right click to display the pop up menu then select Batch Setting of Table Unit Setting of Column Unit Setting of Row 3 The Table Setting dialog b...

Страница 131: ...e table can be changed in units of rows or columns To adjust height and width of individual rows and columns Adjust the height and width without changing the table size 1 If the cursor is brought near...

Страница 132: ...t and width are equally adjusted 1 If the cursor is moved near one of the table s corners the cursor changes to a double headed arrow 2 Drag the cursor in the direction of the arrows to adjust the siz...

Страница 133: ...for user functions Also refer to User Functions in 3 1 Common Functions of Functional Objects of the reference manual 1 Select Table User Expansion from the Functional Objects menu or click the Table...

Страница 134: ...ating new shapes To create a new shape select a shape from the Fixed Objects menu or click an icon from the Fixed Objects toolbar Rectangle Circle Oval and Straight line 1 Move the cursor to the start...

Страница 135: ...ng position of the polygon or polyline then left click the mouse 2 Drag the cursor to the next point then left click Repeat this process for each point of the polygon or polyline Left click Left click...

Страница 136: ...sition of the sector or arc then left click the mouse 2 Drag the mouse to draw the circle or oval 3 A appears to the right of the circle or oval you just drew 4 Place the cursor on the and when it cha...

Страница 137: ...ides of equal length Dragging the mouse vertically or horizontally while pressing the Ctrl key equally adjusts the shape size vertically or horizontally Removing the check from the Prohibit functional...

Страница 138: ...y Position the cursor on the shape and double click it y Select the shape and select Object Properties from the Settings menu y Select the object and right click to display the pop up menu then selec...

Страница 139: ...ts M M ME E EM M MO O O Perform the following procedures to view the Property setting box immediately after creating a shape 1 Select Options from the Tools menu 2 Select the Edit Disp tab then check...

Страница 140: ...p up Menus A pop up menu containing the edit and layout functions from each menu can be displayed in Builder The pop up edit menu can be displayed by selecting an object and right clicking it The item...

Страница 141: ...e operations involved in editing Undo Removes up to ten of the previous changes and restores the conditions that existed before the changes The changes can be undone in two ways y Select Undo from the...

Страница 142: ...he Edit menu or click the Redo button Toolbar To redo more use the Redo function again M M ME E EM M MO O O The Redo shortcut key is Ctrl Y Cut Deletes the selected portion and saves it to the clipboa...

Страница 143: ...g the Shift key 2 Use the cursor to enclose the objects Perform the following setting if a confirmation dialog box is not necessary every time the Cut function is used 1 Select Options from the Tools...

Страница 144: ...Copy Copies the selected object and saves it to the clipboard 1 Select an object Select multiple objects to copy them simultaneously 2 Select Copy from the Edit menu or click the Copy button in the to...

Страница 145: ...the copy or cut function to another position or screen Normal paste Copies the object with the same setting as the original 1 Display the screen to paste to 2 Select Paste from the Edit menu or click...

Страница 146: ...ulates the offset value and pastes it to the address for a functional object 1 Display the screen to paste to 2 Select Offset Paste from the Edit menu 3 The Offset Paste dialog box is displayed Specif...

Страница 147: ...key is Delete To delete all functional objects shapes from the screen use the Select All option in the Edit menu Perform the following setting if a Delete function confirmation dialog box is not neces...

Страница 148: ...ddresses click the Set button after selecting the object to display the Address Setting dialog box Enter the address to find in the Find What field For comments and labels enter the comments labels to...

Страница 149: ...g box is displayed 5 Select a functional object from the search results then double click it or click the Jump button The screen where the selected functional object is located is displayed with the o...

Страница 150: ...10 Address in the Alarm Event Settings on the Setting menu ALMSET0001 to ALMSET5000 Auxiliary information in the Alarm Event Settings on the Setting menu ALMOPT1 to ALMOPT3 Data Log Settings on the Se...

Страница 151: ...layed Number Item Contents 1 Range of Address Replacement Specifies the range of address replacement Relatively replaces the Start Address to End Address from the Replace With Start Address Replace CB...

Страница 152: ...sses can be changed Flicker Settings on the Setting menu Alarm Event Settings on the Setting menu Data Log Settings on the Setting menu Data Block Settings on the Setting menu RUN Parameter Setting on...

Страница 153: ...shapes Selects all objects in the screen 1 Select Select All All Functional Objects Fixed Objects from the Edit menu Functional objects of the same type Selects all objects of the same type as the cu...

Страница 154: ...jects to duplicate them simultaneously 2 Select Repeat from the Edit menu 3 The Repeat dialog box is displayed 4 Click the OK button after setting the necessary items Duplicating 3 times in the horizo...

Страница 155: ...5 4 Edit Operations 5 33 Builder Chapter 5 Operating Objects M M ME E EM M MO O O If an offset is cut and then pasted into a bit register offset values are added to the bit numbers...

Страница 156: ...ject to resize 2 When the cursor is closed to the on the four corners the cursor changes as shown below 3 Drag the cursor in the direction of the arrows to adjust the size Drag M M ME E EM M MO O O Dr...

Страница 157: ...sor changes as shown below drag the object to the desired position Drag Placement and alignment Aligns and arranges multiple objects vertically and horizontally Example Align with top object 1 Select...

Страница 158: ...ft edge Center in a Column Aligns with the centerline between the right and left edges Align Right Aligns with the right edge Align Top Aligns with the top edge Center in a Row Aligns with the centerl...

Страница 159: ...5 5 Layout Functions 5 37 Builder Chapter 5 Operating Objects Function Content Distribute Vertically Equally spaces the distance between midpoints...

Страница 160: ...Objects Making same size Uniforms the width and height of the selected objects Example Align the size of the objects to the narrowest object 1 Select all the objects to have their widths aligned 2 Sel...

Страница 161: ...low Functions Contents Smallest Width Resizes to the narrowest width Largest Width Smallest Height Resizes to the shortest height Largest Height Resizes to the tallest height Table Column Width Resize...

Страница 162: ...Changes the display order of the overlapping objects Bring to Front Send to Back 1 Select an object to reorder 2 Select Bring to Front Send to Back Order from the Layout menu or click the Bring to Fr...

Страница 163: ...e dot at a time in any direction When the grid is active the object moves according to the set grid unit 1 Select an object to nudge 2 Select Nudge from the Layout menu then select the direction to mo...

Страница 164: ...the center coordinates of the object However the label of the object is not rotated or flipped 1 Select the object to flip or rotate 2 Select Rotate Flip from the Layout menu then select the directio...

Страница 165: ...es of the screen frame 1 Select the object to rotate or flip 2 Select Rotate Flip from the Layout menu then select the direction to rotate flip the object Functions Contents Rotate Left 90 Degrees Aro...

Страница 166: ...shapes The node of polylines and polygons can also be removed or added Editing nodes 1 Select an object to modify 2 Select Modify Edit Node from the Layout menu 3 The node of the shape is displayed 4...

Страница 167: ...hape object you want to add a node to 2 Select Modify Add Node from the Layout menu 3 The node of the shape is displayed 4 Placing the cursor on the border of the object changes it as shown below 5 Cl...

Страница 168: ...elect the shape object you want to delete a node from 2 Select Modify Remove Node from the Layout menu 3 The node of the shape is displayed 4 When the cursor is the near the node it changes as shown b...

Страница 169: ...es to group 2 Select Group from the Layout menu M M ME E EM M MO O O The shortcut key for the Group function is Ctrl G Tables and frames cannot be grouped Object properties cannot be set when grouped...

Страница 170: ...g This disassociates the functional objects and shapes from the group 1 Select the group to ungroup 2 Select Ungroup from the Layout menu M M ME E EM M MO O O The shortcut key for the Ungroup function...

Страница 171: ...ons under the Tools menu For details refer to 5 15 Option Settings The following are the instructions for displaying the Colors dialog box For details on operating the dialog box refer to 3 1 Common F...

Страница 172: ...s in Run the display status of the objects can be changed and operations such as controlling or notifying the status of MP2500 can be performed Communications destination Select an object that will be...

Страница 173: ...ister M 0 to 65534 Global register Register classification Select the register type Classification Explanation B Bit W Word 2Byte F Float 4Byte L Long 4Byte Register type Address Select an address Bit...

Страница 174: ...r Example CB10 SB20 CW10 SW30 y For bit access of word memory A bit position in the word shared memory CW can be specified and monitored Memory name Number Example CW10 5 The fifth bet of CW10 The thr...

Страница 175: ...ddress Setting dialog box where the address can be set For details on how to operate it refer to Address Setting in 3 1 Common Functions of Functional Objects of the reference manual Using the toolbar...

Страница 176: ...f each functional object the functional object s display can change according to the communication status and issue write commands to the specified address when the object is clicked For example in th...

Страница 177: ...pecified address Addresses can automatically be allocated by adding the value of the index to the address 10 types of indexes I0 to I9 are available The value of the address or any number can be speci...

Страница 178: ...onds to the values of SW256 to SW265 Example Address CB0I0 If SW256 10 then the address is CB10 If SW256 20 then the address is CB20 The address used for the communication automatically changes by the...

Страница 179: ...ard in slot 1 or 2 CP2 motion card in slot 2 2 Type select Select the classification type for the communications address 3 High speed access If using high speed communications select the ON check box...

Страница 180: ...tion of the specified functional object can be made 1 Select Functional Object List from the Tools menu 2 The Functional Object List dialog box is displayed 1 2 Number Item Contents 1 Range Selects on...

Страница 181: ...bjects 5 59 Builder Chapter 5 Operating Objects 3 Click the Display button after setting the necessary items 4 The Functional Object List dialog box is displayed Property items Displays the property s...

Страница 182: ...can be sorted in ascending descending order of the property items 1 Select the entire column by clicking the property item to sort by in the title bar 2 Click the Ascending Order or Descending Order b...

Страница 183: ...5 8 Listing Searching Functional objects 5 61 Builder Chapter 5 Operating Objects Sorting the addresses descending Sorting is performed by string which places CB101 in this position...

Страница 184: ...by clicking its number 2 Click the Jump button or double click the selected line 3 The screen where the selected functional object is located is displayed with the object blinking M M ME E EM M MO O...

Страница 185: ...ts Saving a file Saves the contents of the Functional Object List screen to a CSV file 1 Click the Save to File button in the Functional Object List screen 2 The Save Used Functional Objects List dial...

Страница 186: ...unctional objects 5 64 Builder Chapter 5 Operating Objects Redisplaying the list Click the Display button in the Functional Object List screen to change the display range of the list or update it with...

Страница 187: ...Perform the following to display the usage of the functional objects 1 Select Functional Object Used from the Tools menu 2 The List Up Functional Objects Used dialog box is displayed 1 Number Item Co...

Страница 188: ...s that have functional objects are displayed in green and screens that do not have any are displayed in red Number Contents 1 Displays the screen page number 2 Displays the number of functional object...

Страница 189: ...e You can jump to a screen table or frame specified in the list dialog box 1 Select the screen table or frame to jump to by clicking it Click here 2 Click the Jump button 3 The selected screen is disp...

Страница 190: ...sly are as follows y Comment y Label y Address Functional objects can also be added or deleted from the list Property setting of each functional object The properties of each functional object can be...

Страница 191: ...displayed 4 Turn on the input mode of the cell of the property to set by double clicking it Input mode 5 Enter the setting 6 Click the OK button M M ME E EM M MO O O Addresses can also be set from the...

Страница 192: ...By adding a line in the Change Settings at Once dialog box a new functional object can be added 1 Select a row by clicking it Click here 2 Click the Add line button 3 A new line is added right below t...

Страница 193: ...ctional Object Batch Setting 5 71 Builder Chapter 5 Operating Objects 4 Click the OK button The newly added functional object is displayed in the upper left corner of the screen New functional object...

Страница 194: ...ing it Click here 2 Click the Delete line button 3 A confirmation message is displayed Click the Yes button to delete 4 The line is deleted A line is deleted 5 Click the OK button The functional objec...

Страница 195: ...s of each cell can be cut copied or pasted 1 Click the cell containing the information to be cut or copied Select the item to be copied 2 Right click the selected cell to display a pop up menu then se...

Страница 196: ...ht click 5 The cut copied setting is pasted to the cell M M ME E EM M MO O O More than one object can be copied or pasted When pasting select all of the cell to paste to The shortcut key for the Cut f...

Страница 197: ...Repeating Repeats the setting of the selected cell Address or string that include values can be duplicated with offset values 1 Click the setting to repeat Click the setting item to repeat 2 Right cl...

Страница 198: ...are created String Type Character replaces the numbers in the text of comments or labels Address replaces the numbers for addresses Example Character type Button 1 Button 2 Button 3 Address CB0 CB1 C...

Страница 199: ...menu 2 The List Up Addresses Used dialog box is displayed 1 2 3 Number Item Contents 1 Search Sets the search conditions of the address Address Sets the first address of the address search range No of...

Страница 200: ...ed not used White displays number of points used M M ME E EM M MO O O If the Range is set to include the Whole Project a search can be conducted for the following addresses Flicker Settings on the Set...

Страница 201: ...a CSV file 1 Click the Save to File button 2 The Save Used Addresses List dialog box is displayed Specify the directory and file name 3 Click the Open button 4 A dialog box is displayed when the file...

Страница 202: ...s displayed 3 Click the OK button after setting the necessary items 4 A dialog box is displayed when the printing is completed Click the OK button M M ME E EM M MO O O An example of a printout Searchi...

Страница 203: ...pecified address 1 To view the usage of functional objects for an address first click the cell of the address 2 Click the Details button or double click the selected cell Double click 3 A list of func...

Страница 204: ...1 Select a destination object 2 Click the Jump button or double click the selected line 3 The screen where the selected functional object is located is displayed with the object blinking M M ME E EM...

Страница 205: ...erform the following to search and display the usage of the addresses and functional objects 1 Select Address Cross Reference from the Tools menu 2 The Address Cross Reference screen is displayed Set...

Страница 206: ...01 S3 the ON OFF Button on sheet page 3 M M ME E EM M MO O O If the Range is set to include the Whole Project a search can be conducted for the following addresses Flicker Settings on the Setting menu...

Страница 207: ...perating Objects Replacing Perform the following procedures to simultaneously replace the allocated addresses of each functional object 1 Click the Replace button 2 The Replace dialog box is displayed...

Страница 208: ...ng a file Saves the search results to a CSV file 1 Click the Save to File button 2 The Save Cross Reference dialog box is displayed Specify the directory and file name 3 Click the Save button M M ME E...

Страница 209: ...int button 2 The Print dialog box is displayed 3 Click the OK button after setting the necessary items 4 A dialog box is displayed when the printing is completed Click the OK button M M ME E EM M MO O...

Страница 210: ...ect is located y ID number y Comment y Label 1 To view the details first select the address 2 Click the Details button 3 The Search Result dialog box is displayed Jumping to a functional object A jump...

Страница 211: ...s Grouped objects can also be registered to the library Library objects are used to as a single object in other projects or screens Registering to the library This registers an object along with its p...

Страница 212: ...rary configuration Click the to view the categories under it 2 Category Organizes registered library objects and facilitates management 3 Preview Displays a preview of the library object registered in...

Страница 213: ...x is displayed Set the title of the object to register then click the OK button 7 When finished registering click the Close button I IIM M MP P PO O OR R RT T TA A AN N NT T T Highlighting an object a...

Страница 214: ...re as follows 1 Select Use Library from the Tools menu or click the Use Library button in the toolbar 2 The Library dialog box is displayed 3 Specify the category and select the library object to reus...

Страница 215: ...stration are all performed in the Library dialog box Select Use Library from the Tools menu or click the Use Library from the toolbar to display the dialog box Adding a new category 1 Select a categor...

Страница 216: ...e Delete Category button 3 A message confirming the deletion is displayed Click the Yes button I IIM M MP P PO O OR R RT T TA A AN N NT T T Deleting a category also deletes the library objects registe...

Страница 217: ...the library to cut or copy 2 Click the Cut or Copy button 3 Select the category where you wish to paste the object 4 Click the Paste button Deleting a library object This deletes a library object fro...

Страница 218: ...en click the OK button Update Updates the Library dialog box with the latest information 1 Click the Update button Max view This opens a separate dialog box and displays an enlarged preview of the lib...

Страница 219: ...ject as well as the shapes or all shapes can be registered Registering default settings Registers a default value for a specific property settings The next time a new object is created the registered...

Страница 220: ...as default settings to the initial Builder settings 1 Select Reset Defined Default from the Settings menu then select Functional Objects Fixed Objects 2 A message confirming your wish to reset the val...

Страница 221: ...ngs of the Builder 1 Select Options from the Tools menu 2 The Options dialog box is displayed Color dialog Select the type of dialog box to display when selecting colors When selecting User Palette up...

Страница 222: ...pasting an object Opens the property dialog box right after placing a functional object 2 Prohibit functional objects from overlapping Prevents functional objects from being placed on top of each oth...

Страница 223: ...xecution file of the editor to be used for editing text files 2 Image Editor Specifies the execution file of the editor to be used for editing bitmap files 3 Click the OK button after setting the nece...

Страница 224: ...is a user defined program that is added to a project screen or functional object Unique functions which initially are not supported such as arithmetic operations file processing and the decision maki...

Страница 225: ...an error detection refer to 6 2 Error Messages The editing of a macro is not complete until all errors have been resolved 1 2 3 4 Number Item Contents 1 Execution Condition Displays the execution con...

Страница 226: ...cription When Loading a Project Executes immediately before opening the project and loading the initial screen When Unloading a Project Executes immediately before exiting the project Fix cycle Execut...

Страница 227: ...ommunication can disrupt and lengthen the intervals of the Fix cycle or Fix cycle from the specified time options of the execution condition Therefore perform processes that require short and precise...

Страница 228: ...es immediately before opening and displaying the screen When Unloading a Screen Executes immediately before closing the screen and switching a page Fixed Cycle Executes in specified intervals The inte...

Страница 229: ...ct This section describes how to register a macro to a functional object 1 Display the properties dialog box of the functional object in which the macro is to be registered 2 Check Display Expansion T...

Страница 230: ...ly after sending the numeral and string input to an address When changed string numeral Executes when the value of the address changes When Pressing an Alarm Display Area Executes the moment the displ...

Страница 231: ...riting string numeral When list is selected After data block selected When bit field was touched ON OFF Button Word Button Command Button Bit Lamp Word Lamp Numeral Display Input String Display Input...

Страница 232: ...of Position of is incorrect A comma is located in an invalid location Function argument error Wrong function argument was used e g word memory was set where only bit memory is allowed command error A...

Страница 233: ...procedures for setting the parameters Run operation parameters communication parameters etc required for executing Run 7 1 Common Procedures 7 1 7 2 Run Parameter Setting 7 2 7 3 History Setting 7 5...

Страница 234: ...7 1 Builder Chapter 7 Run Parameter Setting 7 1 Common Procedures 1 Select Run parameter setting from the Settings menu 2 The Run Parameter dialog box is displayed 3 Click the OK button after setting...

Страница 235: ...ing 7 2 Builder Chapter 7 Run Parameter Setting 7 2 Run Parameter Setting Sets the parameters operation parameters communication conditions etc required for executing Run Initial setting Click the Ini...

Страница 236: ...starts 1 Full screen Displays in full screen without the screen frame 2 Window Displays the normal screen size The show hide settings of the menus and title bar can be set 3 Maximize Displays the scr...

Страница 237: ...art of system SMEM Sets the CB and CW memory range used for storing the bit word information of the system Specifies the top number of the CB and CW 32 bit CB points 32 units of bit memory and 32 word...

Страница 238: ...ccurs is added to the same file overwriting the oldest log The file name is Operat csv If the option is unchecked when the number of records hits the specified value in Record number of history new lo...

Страница 239: ...r not to exit the communication application CM which runs simultaneously with Run when exiting 3 Change window style Enables disables the switching of the screen style Full screen Window Maximize in R...

Страница 240: ...the CBn 5 on if no input events e g screen touch are detected within a specified number of seconds The detection time can be set between 0 to 32767 seconds The specified detection time is set to the s...

Страница 241: ...yed Specify within the range of 1 to 1 000 3 Time out when switching screen Establishes message communication only with the devices set in the displayed screen Message communication is the communicati...

Страница 242: ...register For example if allocating CW0 to CW9 and 1 MW0 to 1 MW9 for cyclic communications the value of CW0 is rewritten to 1 MW0 If the value of CW9 is changed the value of 1 MW9 is rewritten to CW9...

Страница 243: ...e 7 10 Builder Chapter 7 Run Parameter Setting Setting cyclic communications range Select a range of shared memory and the MP2500 register which executes the cyclic communications 1 Select Device set...

Страница 244: ...ster If CB is selected as the register enter the values as a multiple of 16 4 End No Displays the last bit of the address which is used to read write files to and from the MP2500 register 5 Target no...

Страница 245: ...on is clicked Even if the MP2500 register is a bit register a bit number cannot be selected Execute cyclic communications from the 0 bit of the address by using words Select Layout points and Start No...

Страница 246: ...r 8 Test Chapter 8 Test This chapter describes the shared memory batch monitor and how to execute tests 8 1 Test Function 8 1 8 2 Test Tool 8 5 8 3 Shared Memory Batch Monitor 8 8 8 4 Restrictions of...

Страница 247: ...he Shared memory batch monitor and Test screen simultaneously For details refer to 8 3 Shared Memory Batch Monitor 2 Minimize Builder Minimizes Builder when executing the test function 3 Start from th...

Страница 248: ...style set in the Initial Setting tab in Run parameter setting Changing the screen display style Double click a clear area of the test screen to change the display style of the screen in the following...

Страница 249: ...cts the screens to display Quit Exits the test Display Item Functions Title Toggles shows hides the title bar of the test screen Menu Toggles shows hides the menu of the test screen Full screen Switch...

Страница 250: ...o methods for exiting the test are as follows y Select Quit from the File menu y Click the button located in the upper right corner of the test tool 2 A message confirming your wish to exit the test i...

Страница 251: ...isplay type Select one of the following five display format for the address values y DEC Signed y DEC Unsigned y HEX y OCT y BIN Procedures y Select the display format from Display item in the View me...

Страница 252: ...Device in the View menu y Select the display content from the Display device combo box I IIM M MP P PO O OR R RT T TA A AN N NT T T Display item and Display device can be changed from the pop up menu...

Страница 253: ...1 to the address Click the RESET button to write 0 to the address For a word address Enter the value then click the OK button 3 The mark of the address with the changed value changes to I IIM M MP P...

Страница 254: ...he operation of objects with shared memory set Screen configuration The configuration of the batch monitor screen is as follows Number Item Contents 1 Menu Click each menu to perform various operation...

Страница 255: ...buttons Switches the monitor screen to the next previous page 2 Display item Changes the display item of word memory 3 Data type Changes the display data type of word memory M M ME E EM M MO O O Displ...

Страница 256: ...the Online menu 2 The Memory Setting dialog box is displayed Specify the start number of the address to be displayed in the monitor screen 3 The monitor screen is displayed Bit memory monitor screen W...

Страница 257: ...rently open are automatically opened next time the shared memory batch monitor is activated Select Start Stop from the Monitor menu to start or stop the monitoring Select Monitor communication interva...

Страница 258: ...The Jump screen is displayed Specify the start number of the address to be displayed then click the OK button Display radix Select Decimal Hexadecimal Binary or ASCII from Display item in the View men...

Страница 259: ...pecified bit memory ON 2 RESET button Turns the specified bit memory OFF 3 Number of point Specifies the number of points to change simultaneously Example If CB0 is selected and 10 is specified for th...

Страница 260: ...to change 2 Number of point Specifies the number of points to change simultaneously Example If CW0 is selected and 10 is specified for the Number of point then ten points CW0 to CW9 are changed simult...

Страница 261: ...nd of the string Example If ab H6261 is stored in CW0 the results of writing c is as follows y Without check H0063 c is stored to CW0 y Checked H6263 cb is stored to CW0 3 Start from upper byte Writes...

Страница 262: ...e following functions will not operate when they are clicked y Hard copy y Exit 3 Operation of data log graph In the test function no log file history file will be created even if the Save to File ico...

Страница 263: ...er 7 Storage folder for reading and writing files Each functional object such as the data block function lists combo boxes labels and Bitmaps execute the reading and writing for the csv lst txt bmp th...

Страница 264: ...ter 9 Validation This chapter describes functions that check for errors in screen data and display lists of detected errors based on the set error check items 9 1 Setting Validation 9 1 9 2 Validation...

Страница 265: ...r the OK button on the Validation dialog box has been clicked Select either Current Screen or Whole Project as the range for performing validation Before saving screens Performs validation before savi...

Страница 266: ...ter validation is completed the following dialog box is displayed If errors were detected 1 After validation is completed the Validation Result dialog box is displayed Information regarding objects in...

Страница 267: ...will brink M M ME E EM M MO O O The Validation Result dialog box will not close until the Close button or the mark in the upper right corner is clicked Even after the Validation Result dialog box is...

Страница 268: ...tination exists Checks if the screen switch destinations which are specified by screen switch buttons created from command buttons exist 6 Check if specified files BMP TXT etc exist Checks if the file...

Страница 269: ...Contents Builder Chapter 10 Printing Chapter 10 Printing This chapter describes the print function 10 1 Printing Project Information 10 1 10 2 Printing Page Information 10 5 10 3 Preview 10 9...

Страница 270: ...le list Prints a list of registered units scales To only print registered items check the Print Set Items Only Password setting Prints a list of registered passwords System data Labels and Run paramet...

Страница 271: ...Print box is checked 4 Click the OK button 5 The Print dialog box is displayed 6 Click the OK button to commence printing Print image The print images are as follows Project information Top of each p...

Страница 272: ...10 1 Printing Project Information 10 3 Builder Chapter 10 Printing Alarm setting list Units Scale setting list Password setting...

Страница 273: ...10 1 Printing Project Information 10 4 Builder Chapter 10 Printing System Data Labels and Run parameter...

Страница 274: ...tem Contents Screen hard copy Makes a hard copy of the screen Functional object list Prints a list of the functional objects on each screen Property setting Prints a list of the functional object prop...

Страница 275: ...ailed information to be printed 2 Print Range Selects one of the following print ranges All Prints the information of all screens being used Pages Prints the information of specified page 3 Print item...

Страница 276: ...OK button 5 The Print dialog box is displayed 6 Click the OK button to commence printing Print Image The print images are as follows Page information Top of each page The screen page number screen ti...

Страница 277: ...re the printout may require a lot of pages of information To effectively view the settings of the objects it is recommended you use the Functional Object List function This list can be saved to a CSV...

Страница 278: ...e Preview button 3 The following preview screen is displayed The operations of the preview screen are the same as the Windows standard preview screen Example Preview of Page Information 4 Click the Cl...

Страница 279: ...le The exported CSV file can be edited with spreadsheet software and then the file can be imported to set the properties of the functional objects at the same time The following settings can be edited...

Страница 280: ...CSV file 1 Select Export CSV File from the File menu 2 The Export CSV File dialog box is displayed Specify the export range then click the OK button 3 A dialog box for specifying the destination of t...

Страница 281: ...t Comments Address for each label List Selection Comments Address for each label File Name for each label Combo Box Comments Address for each label File Name for each label Thumbwheel Switch Comments...

Страница 282: ...ting a CSV File 11 3 Builder Chapter 11 Importing Exporting CSV Files M M ME E EM M MO O O The following is an example of an exported CSV file which counts the settings of each object viewed from a sp...

Страница 283: ...it CSV file after exporting box is checked when exporting the CSV file the application to which the CSV file is associated to is executed If not execution file is associated to the CSV file the follow...

Страница 284: ...V file If the Edit CSV file after exporting box is checked when exporting the spreadsheet software is automatically executed and the CSV file is read Example 1 Changing the address of the ON OFF Butto...

Страница 285: ...be added deleted in the CSV file When closing the file the Some changes may be lost when saving the file in this format message is displayed This message can be disregarded because it does not apply...

Страница 286: ...project or screen An error check is performed on the CSV file when importing it 1 Select Import CSV File from the File menu 2 The Import CSV File dialog box is displayed Specify the import range then...

Страница 287: ...imported CSV file is read M M ME E EM M MO O O If the following operations are performed while editing the CSV file an error can occur during the import 1 Deleting rows or columns 2 Adding rows or co...

Страница 288: ...ings 1 Check if the address is set outside the memory points range set in Run parameter setting 2 Check if the format of the address is correct 2 Invalid format of imported CSV file Check if the impor...

Страница 289: ...ame is Test Test 2 The screen file name is specified in column C of second row of screen information However row 2 of the CSV file contains the project file name Therefore the first screen file name i...

Страница 290: ...Edit Arrange Palette View Window and Option 12 1 Background 12 1 12 2 Starting the Background Editor 12 2 12 3 Screen Configuration and Menus 12 4 12 4 File 12 5 12 5 Graph 12 7 12 6 Selecting and Re...

Страница 291: ...kground 12 1 Background The picture displayed in the background of each screen in Run is referred to as the background A bitmap file JPEG file or an image file created by the Background Editor DWG fil...

Страница 292: ...opening the Background Editor Via the Screen Property dialog box 1 Select Screen Properties from the Settings menu or right click and select Screen Properties from the pop up menu to display the Scree...

Страница 293: ...e background image check Select File Name of the Screen Property dialog box click the Select button then select the created DWG file If a background file is already set it is read when activating the...

Страница 294: ...ine Indicates the positions of objects placed on the screen 5 Status bar Displays the command currently being executed and related comments M M ME E EM M MO O O When creating a new background the scre...

Страница 295: ...xit the tool Item Contents New Creates a new background file Open Opens an existing background file Save Saves to the original background file Save As Saves to the specified background file Close Clos...

Страница 296: ...Open Save As Close 1 Select Close from the File menu 2 A confirmation message is displayed if the shape data has not been saved Exiting the Background Editor 1 Select Exit from the File menu 2 A conf...

Страница 297: ...a rectangle Circle Oval Draws a circle oval Polygon Draws a polygon Polyline Draws a polyline Sector Draws a sector String Inserts string Change Shape Property The properties color size etc of the sha...

Страница 298: ...the Background Procedure Line Rectangle and Circle Oval 1 Select Rectangular Oval Poly Line Arc or String from the Graph menu 2 Pick the starting point of the shape 3 Drag the mouse until you have th...

Страница 299: ...hift key and create a line 0 45 90 135 180 225 270 315 135 225 270 90 45 315 180 Press down the Ctrl key and create a line 0 30 90 150 180 210 270 330 150 210 270 90 30 330 180 Shift Rectangular creat...

Страница 300: ...he same procedure while pressing the Ctrl key 3 Drag the cursor to the next point then left click again Repeat this process for each point of the polygon For polyline perform the same procedure while...

Страница 301: ...small floating rectangle 4 Left click the node adjacent to the line that is to be curved then drag it to a new location The line becomes a curve Left click Drag 5 Right click to end the procedure Pre...

Страница 302: ...the mouse until you have the desired shape 4 Drag the marker displayed at the tip of the radius on the right of the circle until you have the desired shape 5 Right click or press Esc to select the sh...

Страница 303: ...IFE System and 12 14 The IFE Editor Item Contents Select Part Displays the data of the IFE object file in the screen Resister Part Registers the shape data to the IFE file Resister BMP Part Registers...

Страница 304: ...er Select Part 1 Select Select Part from the File menu 2 Click the Ref button then specify the IFE file 3 Select an object from the object list The object is displayed in the right side of the screen...

Страница 305: ...s 5 The Register Part dialog box is displayed again This time select the bitmap file to register M M ME E EM M MO O O objects with the same name cannot be saved in a single IFE object file Up to 100 s...

Страница 306: ...edo of the selected shape diagonally below it to the right Repeat Creates a copy of the selected shape in a vertical or horizontal direction Move Shape Moves shape Select Multiple Shapes Selects multi...

Страница 307: ...e same operation can be performed by selecting Cut Copy Paste from the pop up menu displayed when right clicking the selected shape The handles displayed when an item is selected are indicated by the...

Страница 308: ...he repeat direction times and interval Number Item Contents 1 Direction Sets the direction for the Repeat function 2 Times Sets the count for the Repeat function 3 Interval Sets the interval or spacin...

Страница 309: ...1 Click the first shape then click other shapes while pressing down the Shift key Another option is to drag the mouse to enclose the shapes you want to select Changing shape size 1 Select a shape 2 P...

Страница 310: ...r To make a shape unselected select another shape or click an open area in the screen When multiple objects are selected click the object you wish to release while pressing the Shift key to make that...

Страница 311: ...smooth curves with nodes Adjust the angle of arc Adjusts the center angle of fan arc shapes Align Aligns the positions of multiple shapes Procedure Bring to front Send to back 1 Select a shape 2 Sele...

Страница 312: ...ayed when right clicking the selected shape Macro groups i e a group of groups can also be created All commands in the Background Editor are executed for individual shapes multiple shapes that are sel...

Страница 313: ...a shape 2 Select Turn over or Rotate from the Arrange menu Flip Rotate Horizontal Vertical M M ME E EM M MO O O The same operation can be performed by selecting Arrange Turn over Rotate from the pop u...

Страница 314: ...M MO O O The same operation can be performed by selecting Arrange Change poly s shape from the pop up menu displayed when right clicking the selected shape Adjust the angle of arc 1 Select an arc or s...

Страница 315: ...om Align in the Arrange menu Distribute vertically Align horizontal center Align top Align vertical center Align left Align right Align bottom Distribute horizontally M M ME E EM M MO O O The same ope...

Страница 316: ...ting item Contents Color Pattern Changes the color and pattern of shapes not images Line Type Changes the line style of all shapes other than string and images Font Sets the font for the string Defaul...

Страница 317: ...tern is selected 2 Background Color button Displays the Colors dialog box Select the background color 3 Transparent button Does not paint the shape 4 Pattern menu Displays the available patterns Click...

Страница 318: ...ect it 2 Sample Displays a sample of the selected combination 3 Line Color button Displays the Colors dialog box Select a line color If text is selected this changes the text color 4 Width Specifies t...

Страница 319: ...k a size to select it 5 Font Color button Displays the Colors dialog box Select the text color If an object other than text is selected the line color is selected 6 Background Color button Displays th...

Страница 320: ...the toolbar Status bar Toggles the show hide settings of the status bar Procedure Toolbar 1 Select Toolbar from the View menu A checkmark is displayed next to this command when the toolbar is display...

Страница 321: ...e minimized screens The minimized screens are arranged at the bottom of the application aligned from the left to right M M ME E EM M MO O O To change the screen size select Setup Window Size from the...

Страница 322: ...Builder Chapter 12 Editing the Background Tile 1 Select Tile from the Window menu Arrange icons 1 Select Arrange Icons from the Window menu M M ME E EM M MO O O This function is not available when th...

Страница 323: ...s from the screen and corrects any distortions Change Paper Color Changes the paper color background color Change Guide Color Changes the color of the guide lines that display the positions of the fun...

Страница 324: ...id Number Item Contents 1 Display grid Toggles the show hide settings of the grid 2 Grid valid Toggles the enable disable settings of the grid 3 X Sets the grid spacing for the X axis 4 Y Sets the gri...

Страница 325: ...e currently selected color 4 Color Displays the available colors 5 Sample pattern Changes the display method of the sample pattern to Color Number or Gradation Color Number allows you to select from t...

Страница 326: ...existing background image file is read If there is no background image file a new background file is created The size is the same as the screen size when displayed in Run Display Fit Screen Size Displ...

Страница 327: ...t from scratch Using the Select Part Register Part functions of the Background Editor any image data or vector shape can be collected from each file and an object collection can be customized The foll...

Страница 328: ...ng graphics from them as well as display the registered contents The objects referred to in this section are not the functional objects or shapes created in Builder but the objects created by the Back...

Страница 329: ...urrently open IFE file 2 Ref button Displays the Select Part dialog box for specifying the IFE file 3 Graph File Displays the name of the shape file that is storing the displayed object 4 Object shape...

Страница 330: ...e file which stores the object shapes used in the background image data is recorded in the IFE file When the IFE file is opened the shape file is searched based on the given file name and path name Th...

Страница 331: ...scroll bar to scroll through the list of objects 4 Shape display area Displays up to three objects stored in the shape file Click the displayed shape to select the object to add 5 Index Displays the i...

Страница 332: ...yed click the Rename button The Rename dialog box is displayed Number Item Contents 1 Enter the New Name Specifies the new object name The object name can be up to 20 single byte characters in length...

Страница 333: ...l A String Ctrl T Edit Undo Ctrl Z Cut Ctrl X only when object is selected Copy Ctrl C only when object is selected Paste Ctrl V Delete Ctrl D only when object is selected Redo Ctrl R only when object...

Страница 334: ...hapter describes references useful for Builder Refer to these as necessary Appendix 1 List of Available Drawings Appendix 1 Appendix 2 List of Shortcut Keys Appendix 4 Appendix 3 About MotionScreen Ap...

Страница 335: ...rawings Appendix 1 Builder Appendixes Appendix 1 List of Available Drawings Drawing category Object type Form Switch DIP Switch horizontal DIP Switch vertical Seesaw 1 Seesaw 2 Seesaw 3 Selector Micro...

Страница 336: ...h Push Button round The form changes depending on the ON OFF status of the address When ON When OFF Push Button square The form changes depending on the ON OFF status of the address When ON When OFF L...

Страница 337: ...Appendix 1 List of Available Drawings Appendix 3 Builder Appendixes Drawing category Object Type Form Other Frame 1 Frame 2 Actuator Graph Conveyer Dialog Box Robot 1 Robot 2 Other...

Страница 338: ...PageUp Next Screen Shift PageDown Previous Frame Page PageUp only when frame is selected Next Frame Page PageDown only when frame is selected Refresh F9 Setting Object Properties Enter only when funct...

Страница 339: ...Appendix 5 Builder Appendixes Appendix 3 About MotionScreen Displays the version information 1 Select About MotionScreen from the Help menu 2 The About Intacore dialog box is displayed Click the OK b...

Страница 340: ...Set the address of the Replace With Start Address field within range Address setting is not correct Specify the correct address Address type of start address and end address is not the same Set the S...

Страница 341: ...of the CSV file xx you tried to import and try again Currently edited project can not be deleted Open another project or restart Builder and then try again E End address setting is not correct Specif...

Страница 342: ...r a file is reading only or not Or the file may be broken Delete CM INI from a project folder and then execute the save for project CM INI is newly made File check sum error The file is corrupted Recr...

Страница 343: ...ue is larger than the upper limit value Set upper limit and lower limit values correctly Incorrect project is specified Select correct project Correctly specify an existing file name in the project ma...

Страница 344: ...n existing file name in the project maintenance Project of the same name exists Can not create new project Specify or create another folder then save the project file Please enter an integer Enter an...

Страница 345: ...Functional Object Used The setting is not completed This item must be set When the OK button in the message dialog box is clicked the cursor will jump to the item whose property needs to be set The s...

Страница 346: ...SIEP C880752 03A Printed in Japan July 2005 05 7 C Date of printing Date of original publication Date of Printing Rev No Section Revised Content July 2005 First edition Based on Japanese user s manua...

Страница 347: ...ct in devices or systems including but not limited to the following fields vehicle medical equipment aerospace related nuclear related electric power generation and relays stations of a sub marine cab...

Страница 348: ...0 Phone 55 11 5071 2552 Fax 55 11 5581 8795 YASKAWA ELECTRIC EUROPE GmbH Am Kronberger Hang 2 65824 Schwalbach Germany Phone 49 6196 569 300 Fax 49 6196 569 312 YASKAWA ELECTRIC UK LTD 1 Hunt Hill Orc...

Отзывы: