background image

X - R i t e   e X a c t ™   I n s t r u m e n t  

47


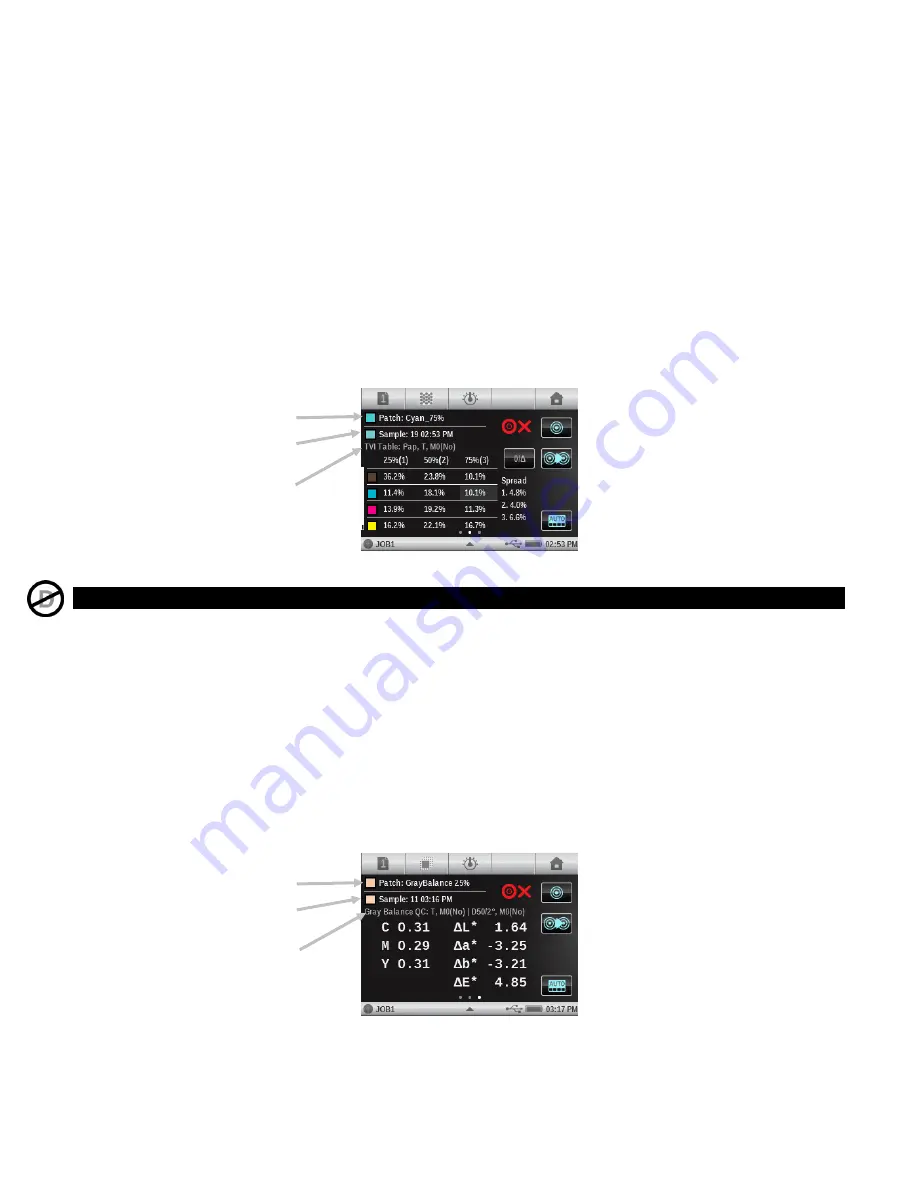
Spread is calculated by subtracting the largest TVI value from the smallest TVI value across the 
Process color Inks (CMY) at a given screen % (i.e., 50%). The smaller the spread, the better the 

gray balance. G7 and PSO differ slightly in how they calculate spread. 
G7 Spread: Calculates a separate spread value for every defined tint patch. 
PSO Spread: Only calculates spread for the tint patch that is closest to 50% (halftone). 

TVI Table Function Setting 

(Job only)


Tap the TVI Table button and set the mode the results are displayed. Options are: Halftone and 

All. The TVI function settings also impact the TVI Table function configuration. 

TVI Measurement 

1.


Measure solid patches. 

2.


Measure tint patches. 

3.


View results. 


Gray Balance QC 

(Job tools only, Gray Balance functions)


This job function provides on the left half of the screen C, M, and Y density values of the current 

sample and on the right colorimetric data. 

Gray Balance QC Function Setting 

(Job only)


Tap the Gray Balance QC button and set the method the results are displayed. Options are:  

Δ

L*a*b*, 

Δ

E*: The right half displays Delta Lab values. This is used by PSO. 

Δ

L*, 

Δ

E*, 

Δ

F: The right half displays Delta L, Delta E, and Delta F (combination of Delta a* and 

Delta b*) values. This is used by G7. 

Gray Balance QC Measurement 

1.


Measure gray balance patch. 

2.


View results. 


Simulated patch standard 

Function, status, and 

Measurement Condition 

selected 

Simulated color of sample 

Simulated patch standard 

Function, status, illum/obs, 

and Measurement Condition 

selected 

Simulated color of sample 

Содержание eXact

Страница 1: ...Instrument User Guide ...

Страница 2: ......

Страница 3: ...l environment This equipment generates uses and can radiate radio frequency energy and if not installed and used in accordance with the instruction manual may cause harmful interference to radio communications Operation of this equipment in a residential area is likely to cause harmful interference in which case the user will be required to correct the interference at his own expense Industry Cana...

Страница 4: ...nd used in accordance with the instructions may cause harmful interference to radio communication However there is no guarantee that interference will not occur in a particular installation If this equipment does cause harmful interference to radio or television reception which can be determined by turning the equipment off and on the user is encouraged to try to correct the interference by one or...

Страница 5: ...anying documentation published specifications and standard industry practice ii using the device in an operating environment outside the recommended specifications or failure to follow the maintenance procedures in X Rite s accompanying documentation or published specifications iii repair or service by anyone other than X Rite or its authorized representatives iv the failure of the warranted goods...

Страница 6: ...AN AN OFFICER OF X RITE IS AUTHORIZED TO MAKE ANY WARRANTY IN ADDITION TO THE FOREGOING IN NO EVENT WILL X RITE BE LIABLE FOR ANY OF BUYER S MANUFACTURING COSTS OVERHEAD LOST PROFITS GOODWILL OTHER EXPENSES OR ANY INDIRECT SPECIAL INCIDENTAL OR CONSEQUENTIAL DAMAGES BASED UPON BREACH OF ANY WARRANTY BREACH OF CONTRACT NEGLIGENCE STRICT TORT OR ANY OTHER LEGAL THEORY IN ANY EVENT OF LIABILITY X RIT...

Страница 7: ...gating the Screen 17 Opening Tools 17 Viewing Menus 17 Viewing the Functions 17 Scrolling through Options 18 Accessing Current Options 18 Naming Screen 19 Icon Descriptions 19 Main Measurement Screen 23 Initial Wizard Setup 24 Measuring a Sample 25 Calibration 26 Performing a Calibration 26 Measurement Tool Setup 27 Active Functions 27 Settings 28 Change Name 28 Restore Tool Default Settings 28 Co...

Страница 8: ...cteristics Function Setting 35 Print Characteristics Measurement 36 Contrast Function 36 Contrast Measurement 36 Hue Error and Grayness Function 37 Hue Error and Grayness Measurement 37 Colormetric Functions 37 CIE L a b 37 CIE L C h 37 CIE XYZ 38 CIE Yxy 38 Colormetric Measurement 38 Paper Indices Function 38 Paper Indices Function Setting 38 Paper Indices Measurement 39 Opacity Function 39 Opaci...

Страница 9: ...y Tint functions 46 TVI Table Function Setting Job only 47 TVI Measurement 47 Gray Balance QC Job tools only Gray Balance functions 47 Gray Balance QC Function Setting Job only 47 Gray Balance QC Measurement 47 Measurement Tool Option Icons 48 Paper icon 48 Function icon 48 Measure Standard icon Compare tool only 49 Sheet Selection icons Job tools only 49 Patch Type icons Job tools only 50 Color M...

Страница 10: ...72 Instrument 73 Diagnostics Tool 74 Calibration Summary 74 Regional Settings 74 Instrument Summary 75 Instrument Condition 75 Battery Summary 75 Appendices 76 Information 76 Recertification 76 Warranty Registration 76 Service 76 Support 76 Cleaning the Instrument 77 General Cleaning 77 Cleaning the Touch Display 77 Cleaning the Target Window 77 Cleaning the Optics 77 Cleaning Calibration Plaque 7...

Страница 11: ...O standards M0 M1 M2 M3 full M1 part 1 offering true D50 measurement BestMatch function to quickly and easily determines if satisfactory matches on press can be achieved Integrated tools to determine if prints are within variety of standards ISO JPMA G7 PSO as well as in house standards processes Full solution including software to manage instrument and transfer measurement data Target window Powe...

Страница 12: ...ing symbols This symbol indicates that the function or option is NOT available on the X Rite eXact Densitometer instrument This symbol indicates that the function or option is NOT available on the X Rite eXact Densitometer and X Rite eXact Standard instruments Packaging Your instrument packaging should contain all the items listed below If any of these items are missing or damaged contact X Rite o...

Страница 13: ...ents are activated from the software application Measurement Conditions Selection A switch is available to select the measurement conditions To set multi mode measurements multiple spectra out of one measurement M0 M2 and M3 measurement conditions slide the switch to the back position 0 until it stops To set M1 measurement condition slide the switch to the forward position 1 until it stops M0 Refl...

Страница 14: ...powered up the instrument goes through a diagnostics test displays a splash screen before the main menu screen appears Note Main menu tools may vary depending on model Splash Screen Main Menu For the very first power up the instrument displays a setup wizard screen after the splash screen Refer to the User Interface section for information on completing the Setup Wizard Splash Screen 1st Setup Wiz...

Страница 15: ...act instruments and transfer the data directly to an application such as Microsoft Excel NOTE You should install the software applications before connecting the instrument to your computer System Requirements Windows XP SP3 32 bit RAM 1 GB Windows Vista SP2 32 or 64 bit RAM 2 GB Windows 7 32 or 64 bit RAM 2 GB Monitor screen resolution of 1024 x 768 4 GB hard disk free Installing the Software IMPO...

Страница 16: ...tion Refer to Connecting the Power Supply later in this section Battery Lifespan Expectations Lithium ion batteries typically decay to 80 capacity after 400 charge cycles see chart below A charge cycle can be defined as several partial charges equaling 100 Partial charge and discharge cycles will help maintain the life of the battery It is best to avoid full discharge and charge cycles After rough...

Страница 17: ...2 5A Instrument Connection 1 Insert the small plug from the power supply into the input connector on the instrument 1 2 Plug the detachable line cord in the power supply and plug the line cord into the wall receptacle Docking Station Connection 1 Turn the docking station over and feed the small plug from the power supply through the strain relief 1 in the middle of the station 2 Plug the small plu...

Страница 18: ... of the instrument 1 3 Plug the USB cable into an available port on your computer Bluetooth Wireless Mode If available the instrument uses Bluetooth technology and can communicate wirelessly with your computer Data from the application can be transmitted to from the instrument Connecting a USB cable to the instrument disables the wireless connection Many PCs have built in Bluetooth capability If t...

Страница 19: ... around the icon when it is tapped Tapping the Home icon in the upper right corner returns the screen back to the main menu Viewing Menus Switch between main menu screens by swiping the screen to the right or to the left using your finger You can tell what main menu screen you are currently on by the row of dots at the bottom center of the screen The left dot highlighted indicates you are at the m...

Страница 20: ... be swiped up or down to select the desired illuminant Accessing Current Options The triangle icon located in the status bar at the bottom of the screen is used to access the instrument settings for the selected user or selected tool At the main menu level instrument settings appear when the triangle icon is tapped When the triangle icon is tapped at a tool screen tool setup and instrument setting...

Страница 21: ...tion defaults operating language and other instrument settings Diagnostics View instrument conditions and run various instrument checks Basic Make simple measurements where no standards are used Compare Make measurements and compare with a standard Search Make measurements and search for the closest color within a color library Auto Patch Make simple measurements with automatic patch recognition w...

Страница 22: ...elected measurement or option are displayed There are also certain icons for optional functions which may not be installed on your instrument These icons are only available if the optional function has been purchased and installed Navigation Bar Measure Standard Measure the standard Paper Measurement Measure the paper white for densitometric functions Sheet Selection with number Job is in Producti...

Страница 23: ...d Search tools or Change Patch for Job tools Change the selection in case the automatic recognition assigned the measurement to the wrong standard or patch Back Go back to the previous screen Auto Color Indicates auto color or auto patch is selected Also used to access the color mode or patch recognition screen Color Access the color mode or patch recognition screen Delta Absolute Switch between D...

Страница 24: ...on information and options Regional Setting Access to regional setup option for the instrument Information View instrument type serial number firmware version and more Hardware Diagnostics Starts the hardware diagnostic routine and used to obtain an error log Battery information View current battery condition and options Message Information Alert Indicates an alert error message Measuring Indicati...

Страница 25: ... screen are used to change data views or enable further settings These icon s color changes based on the tool being used This helps to quickly identify what tool is currently active Magenta indicates the Basic tool orange indicates the Compare tool green indicates the Search tool and cyan indicates the Job tool Status Bar 4 The status bar displays the current function selected connection method US...

Страница 26: ...the instrument settings screen for the current user or tool Time Displays the current time Initial Wizard Setup Upon initially startup the eXact instrument requires you to specify some basic settings The settings can be individually changed at a later time 1 Tap the desired language in the list that you want the instrument to operate in Tap OK to set and continue 2 Tap the left or right hand icon ...

Страница 27: ... area If the item to be measured is smaller than the target base you may want to make a platform at the same height as the item for the rest of the instrument s target base to sit on Basic Measurement Procedure 1 Clear the sample surface of any dirt dust or moisture 2 Select the tool and function 3 Position the target window over the sample to measure If possible place the entire instrument on the...

Страница 28: ...lso occur when the measurement condition switch is changed and a calibration has not been performed in that position or has timed out The calibration plaque is located directly below the optics when the instrument is in the open position not locked When a measurement is taken the calibration plaque swings back out of the way of the optics Performing a Calibration When a calibration is required and...

Страница 29: ...setup screens are accessed and edited in the same manner NOTE The tool settings can also be accessed by tapping the triangle icon in the status bar when the tool is selected OR Delete Used to delete the current tool icon from the main menu Copy Used to make a copy of the current tool with all its settings on the main menu Move Used to move the current tool icon on the main menu to the next availab...

Страница 30: ...turn to the tool edit screen Settings Tap the Settings button to access the tool settings options This screen consists of Change Name Restore Tool Default Settings Color Settings and Function Settings A scroll bar on the left indicates that additional color and function settings are available Swipe the screen up or down to view the additional settings When finished with settings tap the Back icon ...

Страница 31: ... density functions lf you select Paper as white base all subsequent measurements will refer exclusively to the printed ink layer while the paper color effect will not be included lf you select Absolute besides the printed ink layer the measurement will also include the paper effect To select a paper measurement requirement for all densitometric functions select the Paper check box To select no pap...

Страница 32: ... Tool section for additional information Function Settings Function settings that appear depend on the Active Function selected for a particular tool For example BestMatch will not appear as a selectable function setting if BestMatch is not selected as an Active Function To edit a function setting tap the function button and select the desired parameters Information on Function Settings can be fou...

Страница 33: ...f the density values of up to the last ten readings taken towards a particular density color response A delta button is available in certain tools to allow you to switch between viewing the absolute delta density per reading An overall average for that particular density color response is shown at the top for all readings taken in the trend graph even if more than 10 readings are taken Basic Tool ...

Страница 34: ...the value for the density balance The value can range from 0 01 to 0 99 CMY Balance Measurement On the left side of the results are the absolute CMY density values for the sample If an arrow appears next to the number it indicates which direction to correct the density value for that ink to match the standard s target density values On the right half of the results area is a bar graph indicating t...

Страница 35: ...ere you set the coefficients Tap the Tone Value button and make selection NOTE The Yule Nielsen formula should only be used in special cases i e to determine the physical area coverage Tone Value Dot Area Measurement Displays tone value for the selected color The procedure requires one solid and one tint measurement 1 Select Tone Value function 2 Select Color option if required 3 Measure paper Onc...

Страница 36: ...aining data 1 Select Tone Value increase Dot Gain function 2 Select Color option if required 3 Measure paper Once paper is measured it is not required until there is a new substrate or every time the tool is entered 4 Measure the solid patch 5 Measure tint patch that corresponds to the measured solid You can either follow the measurement sequence on the screen or manually touch the tint patch on t...

Страница 37: ... is a new substrate 3 Measure 1st ink down patch 4 Measure 2nd ink down patch 5 Measure overprint patch 6 View data 7 Continue with additional trap measurements Print Characteristics Function This function plots out a series of tone value measurements made against a step wedge target This function can be configured for a tint patch each 5 10 20 or 25 from 0 to 100 You start out reading the solid a...

Страница 38: ...e shadow areas The contrast is calculated from the measured values of the solid ink density and the screen ink density in the shadow area This function allows two auto color response settings Auto and Spot or you can manually set the color response to one of the process colors Contrast Measurement Displays the measured values of the solid ink density and the screen ink density in the shadow area 1...

Страница 39: ...r Grayness function 2 Measure paper if required 3 Measure solid patch 4 View data Colormetric Functions CIE L a b This function is derived from the CIE 1931 XYZ color space in an effort to be perceptually uniform The L dimension related to Lightness while a red green and b yellow blue are for color Perceptually uniform means that a change of the same amount in a color value should produce a change...

Страница 40: ...ess and CIE Tint Depending on the function settings 1 to 4 lines of data can be shown Up to 4 of the following formulas can be chosen for displaying in this function Whiteness E313 98 Berger Stensby Yellowness E313 98 D1925 CIE Tint and Brightness Difference values will show up on the right half of the display when a valid standard is present Paper Indices Function Setting Tap the Paper Indices bu...

Страница 41: ...y transparent 100 completely opaque This function is not available in the Job Tool Opacity Measurement The Opacity function displays the percent opacity of a drawn down sample on an opacity card 1 Measure the sample over the black portion of the opacity card 2 Measure the sample over the white portion of the opacity card 3 View data Printing Plate Function This function is used to determine the do...

Страница 42: ... on the left of the screen and measure another solid patch Reflectance Graph Function This function displays a visual reflectance curve for measured data Sample and standard are displayed with different colors sample in white standard in blue Reflectance Graph Function Setting Tap the Reflectance Graph button and set the Y Axis Range for reflectance measurements Options are 0 100 and 0 00 1 00 Ref...

Страница 43: ...achieved by adjusting ink thickness or concentration BestMatch Function Setting Tap the BestMatch button and set the type of substrate that is used for BestMatch measurements Options are Uncoated and Coated BestMatch Measurement A BestMatch measurement displays the color difference of a sample to a standard with and without BestMatch corrections applied 1 Select BestMatch function 2 Measure paper ...

Страница 44: ...achieve the desired color quality E Trend Function This function plots the Delta E uses the active delta E method setting value of the current and past samples that have been measured to the current standard The graph will show up to 10 of the latest readings Color coding for bar graphs White past sample to a standard that doesn t have any active Pass Fail tolerances Blue latest sample reading No ...

Страница 45: ...ap the Metamerism button and set the illuminant observer combinations for metamerism function measurements By determining the metamerism index you define the mutual color modification of two colors when the illuminant changes You can set a maximum of three test illuminants Tap the observer icon to alternate between 2 and 10 Swipe the illuminant wheel up or down to select the desired illuminant Set...

Страница 46: ... Color Strength 2 Measure paper if required 3 Measure the sample 4 View data Relative Color Strength Function The relative color strength DS is a measure which compares the concentration of a color with the concentration of a standard DS is the ratio between the absolute color strength K S of a sample and the absolute color strength K S of the standard color The relative color strength DS indicate...

Страница 47: ...lect Relative Color Strength 2 Measure paper if required 3 Select or measure a standard 4 Measure the sample 5 View data Paper QC Function Job tools only This function is designed to check the appearance of the substrate when running a job The left side of the screen displays CMYK density values and the right side either ΔLab E values or LCH E depending on the user configuration Paper QC Function ...

Страница 48: ...ks QC Job tools only Overprint and Solid functions This is a job function where the left half of the display is the density response s of the current ink for the patch being measured For solid inks only a single density will be shown For an overprint density responses for each ink of the patch will be shown The right half displays Delta Lab values as well as the configured Delta E value Inks QC Me...

Страница 49: ...rement 1 Measure solid patches 2 Measure tint patches 3 View results Gray Balance QC Job tools only Gray Balance functions This job function provides on the left half of the screen C M and Y density values of the current sample and on the right colorimetric data Gray Balance QC Function Setting Job only Tap the Gray Balance QC button and set the method the results are displayed Options are ΔL a b ...

Страница 50: ...If a current function uses a minus paper reference it will be shown in the screen just below the sample patch row Pap appears along with other parameters such as illuminant observer density status M3 etc If a measurement is started in a function that requires a paper reference but has not been measured a popup window appears describing that the paper needs to be measured first You can tap the canc...

Страница 51: ...g this screen to go in and out of Production Mode Make Ready Mode Make Ready Mode Troubleshooting taking readings without storing samples to allow for adjustments as required Production Mode Sample Storage On ready to collect readings for further analysis in software for certification or other type of record keeping Sheet control allows you to separate a collection of readings for a particular tes...

Страница 52: ... values in order to recreate a gray patch or match a neutral print density patch a black tint Color Mode icons or The Color icon is used to access color mode for the Basic Search and Compare tools When using a Job tool it is used to access the auto recognition screen When AUTO appears in the Color icon this indicates that auto color or auto patch is selected Basic Search and Compare tools Density ...

Страница 53: ...for the current standard For reflectance based standards the color information is provided in Lab and CMYK values parameters used will match the current tool s settings IllumObs Density Status etc If a standard is based on color values no reflectance curves available then the dots at the bottom indicate how many sets of color values exist for that standard Tap the color library icon to access the ...

Страница 54: ...asures sample Note If you change the patch during a job with auto patch is active whatever color was selected will not remain active Change Standard or Patch icon For the compare and search tools this icon is used to access the change standard screen where you can quickly select a different standard that is close in color to the current standard For the job tools this icon is used to access the ch...

Страница 55: ...ecting and using the option icons refer to Measurement Tool Option Icons section earlier in this manual Tap the Basic Tool icon to access the measurement screen The dots at the bottom of the screen represent how many function are currently active for the tool You can switch to another function screen by swiping the screen to the right or left Measurement screen icons for the Basic tool appear mage...

Страница 56: ...ol For additional information on the navigation and measurement screen option icons refer to the Measurement Tool Options section earlier in this manual Basic Compare Measurement 1 Tap the Compare Tool icon to access the measurement screen 2 Tap the Measure Standard icon to access the standard screen 3 Measure the standard 4 Tap the Back icon to return to the measurement screen 5 Tap the Paper ico...

Страница 57: ...active tolerance it will also get a colored circle next to it which indicates a particular tolerance passed warning failed status NOTE Pass Fail Indication must be activated before a pass fail measurement can be performed Refer to Settings in the Measurement Tool Setup section earlier in this manual for procedure 1 Select the tool and function for the pass fail measurement 2 Measure paper if requi...

Страница 58: ...ent the instrument displays 1 of 3 in the screen indicating two more measurement are required for results NOTE You can exit averaging sequence at anytime if you want by tapping the Done button that appears in the Averaging popup screen This causes the instrument to only average the measurements taken up to the point the button was tapped 4 Position the instrument on the second area of the sample a...

Страница 59: ...ent Tool Options section earlier in this manual Search Measurement 1 Tap the Search Tool icon to access the measurement screen 2 Tap the Standard icon and select standard from the color library 3 Tap the Paper icon and measure paper if required 4 Tap the Function icon and select the function for measurement 5 Tap the Color icon and select the color if required 6 Measure sample that is used for the...

Страница 60: ...p the Change Standard icon and manually choose the standard needed The standards are listed in dE order 1 Tap the Change Standard icon 2 Swipe the screen up and down to search for the desired standard 3 Tap the standard to highlight it once it is located 4 Tap the checkmark icon to select the new standard The display returns back to the measurement screen ...

Страница 61: ...ocess colors C M Y K Below is the list of patch types supported by the Auto Patch Tool Paper 4 solids Cyan Magenta Yellow Black 3 Overprints CY CM MY order depending on Ink order settings under color settings affect which ink goes down first 1 3 tint patches per solid depending on the TVI function setting under function settings 1 3 Gray Balance patches depending on the Gray Balance setting under ...

Страница 62: ...later time to continue a measurement sequence if required Job Templates Job templates are collections of color standards specifically grouped to run a printing job It includes tolerances measurement parameters and contains the standard values for the different patch types Solids Tints Overprints Gray Balance and or Paper Job templates can contain the standards for industry standard printing proces...

Страница 63: ...wnloaded to the instrument 1 Tap and hold the Job tool icon on the main menu screen to access the tool edit screen NOTE The tool settings can also be accessed by tapping the triangle icon in the status bar when the tool is selected OR 2 Tap the Active Functions button to review edit functions that are available during a measurement 3 Swipe the screen to the left or right to access the active funct...

Страница 64: ...ber appearing over the Sheet control button in the Navigation bar All samples measured will be stored to the current indicated sheet until the sheet is cleared or a new sheet is started Clear Sheet button This permanently deletes all samples that may have been stored to the current sheet and the job mode will operate like no measurements have been made need to start with reading the paper patch ag...

Страница 65: ...an individual function directly instead swiping through a list of functions on the main measurement screen Tap the Function icon to access the Select a Function screen Active functions for the selected patch appear Color Icon This icon is used to select to what patch type the next measurement s shall be assigned Tap the Color icon and select Auto Patch or manually select a patch Auto Patch If this...

Страница 66: ...it will move that last sample from what it previously thought was correct The previous reading in that first detected patch is restored to what it was before the latest reading Running a Job The general operation and workflow is basically the same for all job tools The following is an example of a G7 job procedure 1 Tap the desired Job tool icon on the main menu screen 2 Tap the Select Job Name bu...

Страница 67: ...other available functions for the paper patch 8 Measure solid patches for the job 9 Measure other patches as defined for the selected job 10 When changing from Make Ready to Production Mode tap the Sheet icon 11 When finished exit the job by tapping the Home icon NOTE Any measurements made towards the current sheet in Make Ready Mode will be gone if the current job is exited and continued at anoth...

Страница 68: ...r u m e n t 66 Production Mode for the current sheet of the job will be restored automatically if the job is exited and continued at another time 12 Tap the Home button again to continue or tap the Back button to return to the job ...

Страница 69: ...Add Tool icon to access the Add a new Tool screen 3 Tap the tool icon that you would like to add to the main menu screen 4 Configure the tool as required Additional Tool Options Touch and hold the tool on the main menu until the tool setup screen appears Delete Deletes the selected tool from the main menu screen Copy Creates a copy of the selected tool in the next empty Tool slot six slots max per...

Страница 70: ...a new user New user profiles created with the Add icon here start out with default settings and tools for the current region the instrument is set to 3 Enter in the desired name for the new user profile Tap OK when finished 4 Continue adding additional users or advance to the Editing a User section to set specific parameters for each user profile Editing a User 1 Tap the Users icon from the main m...

Страница 71: ...ot change any settings This user can execute jobs and take measurements However they cannot change settings on any tool or edit any other user account settings Low The current user can only change settings that affect the current user profile They will not be able to restore factory defaults clear the current user profile change regional settings or create remove other user profiles Off No securit...

Страница 72: ...user account profile is deleted a new profile is created in its place and settings revert back to the default settings of the current region settings One profile always remains in the instrument Copy The Copy icon is used to make a copy of the current user The copy will be added to the Users menu screen with the same name and number appending it ...

Страница 73: ...the bottom status bar of the main screen and select the Log Out button Then tap the desired user OR The default settings can be modified for each logged in user Refer below for information on my default settings screen Account This option is used to modify the icon name password and security setting Refer the Account Settings in the previous section for specific information on these options Langua...

Страница 74: ...r Settings section earlier in the manual for specific information on all of the Color Setting options Function Defaults This option is used to set the function defaults for the selected user These default function settings are used for any new tools created Any changes to settings here will not change the settings in tools already created NOTE Not every tool uses every setting listed in these defa...

Страница 75: ...lay on time and to the right to increase the display on time The scale ranges from 1 minute to 3 hours Screen Direction set at what direction the instrument screen appears Options include Left and Right Bluetooth activate Bluetooth in the instrument When set to on the instrument will search for a Bluetooth connection This option only appears if the instrument is Bluetooth equipped NOTE An installa...

Страница 76: ...bration option displays the calibration status for the current measurement condition You can view the other measurement condition calibration status by swiping the screen to the left The Calibration button on this screen is used to manually trigger a new calibration which takes you to the calibration sequence Regional Settings The instrument maintains a set of configuration settings that exist out...

Страница 77: ...ies samples job names and job templates When the instrument restarts the setup wizard screen appears Instrument Condition The instrument condition option is used to run a self diagnostics routine on the instrument s systems Battery Summary This option provides a more detailed description of the current battery Such as number of full charges the battery has current battery voltage and time date of ...

Страница 78: ...flows Because of this we are making the following on line and free support tools available to registered users These support tools are found at www xrite com support exact Free and unlimited access to the eXact interactive training video available within the eXact package too Free and unlimited access to the X Rite on line Help Desk which includes detailed and helpful support articles related to f...

Страница 79: ...ter or isopropyl alcohol Cleaning the Target Window The target window should only be cleaned with a cotton cloth dampened not wet in water Cleaning the Optics The optics should be cleaned once a week in a normal environment If the instrument is used in a dirty or dusty environment more frequent cleaning may be required 1 Carefully lift the instrument and open the target base 2 Rotate the reference...

Страница 80: ...olvents or cleaners of any kind The calibration tile is embedded in the underside of the reference holder 1 Rotate the reference holder 1 towards the back and hold 2 Blow short bursts of clean dry air 2 onto the calibration tile This should remove any accumulated debris 3 Carefully return the calibration holder to its normal position 1 2 ...

Страница 81: ...y pressing in on the locking tab and unplugging the connector Do not disconnect by pulling on the battery wires 4 Remove the old battery pack 3 from the battery compartment 5 Insert the new battery pack into the battery compartment with the connector facing upwards 6 Plug the battery into the connector Press in until the connector is properly seated 7 Insert the back edge of the access cover into ...

Страница 82: ...nd corner of your display Windows will automatically install the correct driver 2 After installation click the Bluetooth logo in your toolbar 3 In the next window click the Add button Note you may simply see a list of options instead of a window as shown below This depends on your version of Windows XP in either case select Add 4 You will be prompted to make sure that your instrument is turned on ...

Страница 83: ...to continue 6 Click the Use the passkey found in the documentation option and enter the word default into the open field Click Next to continue 7 Windows will add the instrument and display a confirmation window This may also look different depending on your Windows operating system Click OK or Finish 8 Launch your eXact software and begin using the instrument ...

Страница 84: ...n click the Bluetooth logo in your toolbar or go to the Control Panel and select Devices and Printers 3 Click Add a device at the top of the Window Note you may simply see a list of options instead of a window as shown below This depends on your version of Windows 7 in either case select Add a device 4 The device should be listed as eXact_xxxxxx xxxxxx serial number Select the device and click Nex...

Страница 85: ... R i t e e X a c t I n s t r u m e n t 83 6 Enter the pairing code default into the field and click Next to continue 7 After pairing is successful you are now ready to use the instrument in wireless mode ...

Страница 86: ...on not activated Activate Bluetooth wireless connection in the device Refer to the Bluetooth Installation section for information Activate Bluetooth wireless connection on your computer Refer to the manufacturer s manual of your computer Close and restart the software application If this does not work reboot the computer Calibration procedure fails Calibration plaque is dirty or damaged Clean the ...

Страница 87: ...site patch Below is a list of typical prerequisite patch measurements Paper First reading of the Job always needs to be paper If a different patch is detected first a popup message will occur Solids After Paper measurement solids should be measured as it is a prerequisite for tint and overprint measurements Tints Paper and solid patches need to be measured first Overprint Paper and both solid patc...

Страница 88: ...rence Inter instrument agreement Average 0 25 ΔE ab Max 0 45 ΔE ab M3 0 55 ΔE ab Measurements using X Rite manufacturing standards at a temperature of 23 C 1 C 40 60 RH for all measurement modes on 12 BCRA color tiles and a white ceramic reference D50 2 Short term repeatability White 0 05 ΔE ab standard deviation White BCRA Error compared to mean value of 10 measurements every 5 seconds Short term...

Страница 89: ... P N SE15 44 Lithium Ion 7 4VDC 2200mAh Physical Dimensions 3 0 H 7 6 cm 3 1 W 7 8 cm 7 1 L 18 cm Weight 1 6 lbs 0 7 kg ENVIRONMENTAL Usage Indoor only Altitude 2000m Pollution Degree 2 Overvoltage Category II ACCESSORIES PROVIDED USB cable Power Supply CD with software and documentation Docking Charging Station Quick Start Guide Carrying case Design and specifications subject to change without no...

Страница 90: ......

Страница 91: ... 803 2705 European Headquarters X Rite Europe GmbH Althardstrasse 70 8105 Regensdorf Switzerland Phone 41 44 842 24 00 Fax 41 44 842 22 22 Asia Pacific Headquarters X Rite Asia Pacific Limited 36th Floor No 169 Electric Road Hong Kong China Phone 852 2568 6283 Fax 852 2885 8610 Please visit www xrite com for a local office near you P N eXact_Manual_EN Rev C ...

Отзывы: