Wohler AMP1-16V-MD Скачать руководство пользователя страница 32

8 2 1 6 9 7 :

A M P1 -1 6 V   S e r i e s   U s e r   G u i d e

©   2 0 1 3   Wo h l e r   Te c h n o l o g i e s ,   In c .   A l l   r i g h t s   r e s e r ve d .

24

Ch a p t e r  2  

T he   “ H o w   D o   I . . . ”   C ha p t e r

F r e q u en t l y   A sk e d  Q ue s t i o n s

How Do I Sync Internal Speaker Audio with an 
External Video Monitor?

Audio from all input sources can be delayed before it gets to the 
internal speakers by up to 170 ms. Typically, this can be done to 
compensate for video processing delays a video monitor that may be 
used in conjunction with the AMP1-16V-MD. Adjust the 

Main Screen


controls so that you are viewing the video and hearing the associated 
audio. Then adjust the 

Audio Delay

 in 1 ms increments in the 

Monitor Mixer Configuration Menu

.

1.

Press the 

Audio Delay

 button.

2.

Turn the 

Balance

 knob while listening to the audio and watching 

the video. Adjust until that they appear to be synchronized.

3.

The 

Audio Delay

 control will then show you how much delay it 

needed to add.

4.

If you need to set a specific delay, you can of course do that by 
simply adjusting the 

Audio Delay

 control to that amount.
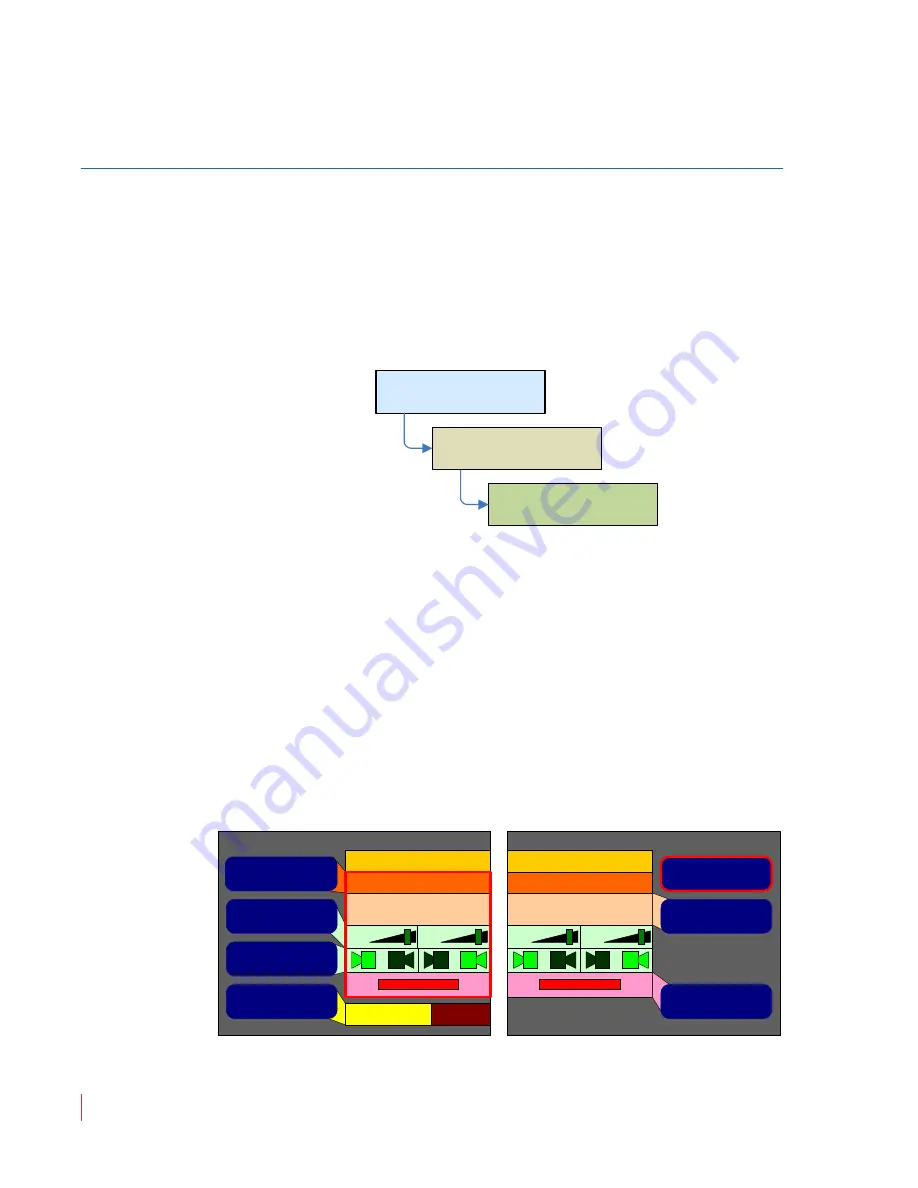
Figure 2–11

Monitor Mixer Configuration Menu

Monitor Mixer Config Menu

Configuration Selection 

Menu

Main Screen

Menu

Monitor Menu

Monitor Mixer Configuration Menu

160 mS 

Audio Delay

Monitor Pair 1

Pair 1

AES In Pair 1

+0

+0

Monitor Pair 2Chan 3

Pair 2

SDI In Pair 2

+0

+0

R

L

R

L

R

L

R

L

Speaker Assign

Monitor Channel 

Trim

Select Monitor Pair

Select Source Pair

Phase LED On/Off

Mute Speakers

w/ Headphone

Always

USO 

RESTRITO

Содержание AMP1-16V-MD

Страница 1: ...AMP1 16V Series AMP1 16V MD AMP1 E16V MD 1RU 3Gb s 16 Channel Audio and Video Monitor User Guide Software Version 3 2x Part Number 821697 Revision P USO RESTRITO...

Страница 2: ...pment and software and reviewed the documentation Wohler Technologies Inc makes no warranty or representation either express or implied with respect to software documentation their quality performance...

Страница 3: ...ipation 3 Power 3 Compliance 4 FCC 4 IC ECES 003 4 Using the Monitor 4 Front Panel 5 Back Panel 6 Getting Started 7 Configuring the System 9 Chapter 2 The How Do I Chapter 11 Introduction 11 Overview...

Страница 4: ...Use Presets to Change Inputs 25 How Do I Quickly Recall Presets from the Main Screen 26 How do I Display the Loudness of a Cluster of Channels 27 How do I Display Dolby Metadata instead of Video 29 Ho...

Страница 5: ...sets 52 Overview 52 Saving Presets 52 Recalling Presets 52 Naming or Renaming 53 Clearing a Preset 54 Recalling a Preset On Power Up 55 Hot Keys 55 Overview 55 Mutes and Solos 55 Defining Modifying a...

Страница 6: ...by Setup Menu 74 Hardware Configuration Menu 75 Label Menu Screen 77 Loudness Configuration Menu Screen 78 Main Screen 79 Main Screen Hot Key Button Configuration Menu 81 Meter Configuration Menu 82 M...

Страница 7: ...ndards 108 Specifications 108 Technical Functional Overview 110 Appendix 9 Establishing Connectivity 113 Introduction 113 Overview 113 Topics 113 Connectivity Options 114 Connecting to a LAN 114 Launc...

Страница 8: ...821697 AMP1 16V Series User Guide 2013 Wohler Technologies Inc All rights reserved viii Overview 131 Topics 131 Navigating to the Unit Information Menu 132 Enabling FTP Access 133 USO RESTRITO...

Страница 9: ...1RU 16 channel 3G audio video monitors These units come with three 2 4 video screens and an easy to use configuration interface that provides flexible audio metering video monitoring and other data di...

Страница 10: ...h 8 Protect the power cord from being walked on or pinched particularly at plug s source on the equipment and at the socket 9 Use only the attachments accessories specified by the manufacturer 10 Unpl...

Страница 11: ...above temperature is not exceeded If the product must be operated in an environment with an elevated temperature allow a 1RU 1 75 44 45mm space above and below the unit for air circulation Power The...

Страница 12: ...an radiate radio frequency energy and if not installed and used in accordance with the instruction manual may cause harmful interference to radio communications Operation of this equipment in a reside...

Страница 13: ...cond time mutes the internal speakers entirely Pressing it a third time brings the internal speaker volume back to normal Turning the knob to increase the volume increases it from the current volume w...

Страница 14: ...s DB 25F connector provides eight channels of balanced analog outputs The source of these signals is controlled by the setup menus The pin out of this connector is shown in Table 3 3 on page 43 AES Ou...

Страница 15: ...d display on the video monitor after a few seconds Figure 1 3 Video Monitor Display Left To begin any procedure on the AMP1 16V MD or the AMP1 E16V MD powering up the system should display the video i...

Страница 16: ...menu is displayed it is used to adjust settings The actual audio balance does not change while the Balance knob is being used for setting up the product Generally to make changes press the button next...

Страница 17: ...1 Quick Start Configuring the System Configuring the System The functional descriptions fall under the following categories Configuring Audio and Metering Chapter 3 on page 35 Configuring Video and D...

Страница 18: ...821697 AMP1 16V Series User Guide 2013 Wohler Technologies Inc All rights reserved 10 Chapter 1 Quick Start Configuring the System USO RESTRITO...

Страница 19: ...onitor a Dolby Bitstream Continued 15 How do I Cluster Meter Pairs Together for Easy Readability 16 How do I Customize the Meter Scales 17 How do I Configure a Hot Key to Solo a Cluster 18 How do I Co...

Страница 20: ...a i r 5 P a i r 6 P a i r 7 P a i r 8 Solo Pair 8 22 Solo Pair 3 Solo Pair 1 0 60 50 40 30 10 20 P a i r 1 P a i r 2 P a i r 3 P a i r 4 Solo Pair 4 Solo Pair 2 Configuration Selection Menu Monitor Me...

Страница 21: ...the channel pair on which you want the input to be monitored Note that the channel pairs scroll right and left as you turn the Balance knob so that you can select any one of the eight channel pairs 2...

Страница 22: ...channels The first step involves configuring the Dolby decoder card 1 Press the Decoder Source control button and then turn the Balance knob to the AES or SDI channel pair that contains the Dolby bits...

Страница 23: ...coded Dolby pair to reside on Note that the channel pairs scroll right and left as you turn the Balance knob so that you can select any one of the eight channel pairs 2 Press the Select Source Pair co...

Страница 24: ...ility of the meters After setting up the meter clusters you can set up hot keys to solo each cluster You can cluster the meters together from the Cluster Configuration Screen 1 Press the Select Cluste...

Страница 25: ...6V MD contains a number of commonly used meter scales You can set the meter scale in the Meter Configuration Menu 1 Press the Scale control and then turn the Balance knob to select your choice of mete...

Страница 26: ...nnel cluster and a hot key is set up for each But when other clusters are configured such as a 5 1 channel Dolby cluster it makes sense to set up a Solo hot key for that Setting up Solo hot keys is do...

Страница 27: ...can set this up in the Main Screen Hot Key Button Configuration Menu 1 Press the hot key you want to be used to become a Mute button Turn the Balance knob to highlight the type of hot key and then Mai...

Страница 28: ...nize later Now on the Main Screen that same control will mute the channels you selected Figure 2 8 Main Screen Hot Key Button Configuration Menu 5 You can name the Mute hot key by turning the Balance...

Страница 29: ...n the example below we show the AES Output Configuration Menu but the steps equally apply to the Analog Output Configuration Menu Figure 2 9 AES Output Configuration Menu in Selected Sources Mode 1 Pr...

Страница 30: ...the channel pairs scroll right and left as you turn the Balance knob so that you can select any one of the eight channel pairs or 4 analog channel pairs 6 Press the Affected by Solos Mutes button to t...

Страница 31: ...nalog Output Menu as shown 1 Press the upper left Output selector button Then press the Balance knob to select AES or Analog Output Monitor Channels 2 Press the Channel Pair button Note that the chann...

Страница 32: ...tor Mixer Configuration Menu 1 Press the Audio Delay button 2 Turn the Balance knob while listening to the audio and watching the video Adjust until that they appear to be synchronized 3 The Audio Del...

Страница 33: ...x of channels you sometimes need If there are other input sources you sometimes need to monitor you could set up preset system configurations for each scenario up to a total of eight presets Using the...

Страница 34: ...ion Menu pressing Recall Preset hot keys on the Main Screen is an even more direct and quick way to do it This is set up in the Hot Key Configuration Menu 1 Press the hot key that you want to be used...

Страница 35: ...ith the channels that are to be monitored Set up the channel clusters using the Monitor Menu before setting up the loudness measurement The Loudness Configuration Menu Main Screen Hot Key Button Confi...

Страница 36: ...selection For a cluster consisting of simply a stereo channel pair select Front For a Dolby 5 1 cluster select Front Center Rear or None as appropriate The LFE channel should be set to None 5 Repeat...

Страница 37: ...m displaying video to displaying Dolby metadata press the Format button to light the Data indicator 2 Press the Left Screen button 3 Press the Displayed Data button and turn the Balance knob to highli...

Страница 38: ...ta Text Color button and turn the Balance knob to select the color of the text to be displayed 4 Press the Data Field Color button and turn the Balance knob to select the color of the background of th...

Страница 39: ...hours or it may be turned off The brightness of each screen may be adjusted individually to suite the studio environment It may be that one brightness setting may be optimum for the video screen while...

Страница 40: ...ave one and only one termination This termination should physically be located at the last destination of an AES coax cable If the AMP1 16V MD is the last connection in a series of AES connection then...

Страница 41: ...oftware Version Information Occasionally when speaking with a customer service representative it is necessary to locate the software versions of the software in the AMP1 16V MD The Unit Information Sc...

Страница 42: ...USO RESTRITO...

Страница 43: ...he AMP1 16 Series monitors are primarily designed to monitor audio and video Configuration options include specifying channels to monitor phase indicators setting audio delay and individual channel vo...

Страница 44: ...u can route the digital audio signals at the inputs of the AMP1 16V MD Series monitors to the front panel speakers or to the outputs depending on your needs The internal routing paths are controlled b...

Страница 45: ...ration Menus as described below 3G SDI Input 1 3G SDI Input 2 3G SDI Output AES Inputs Analog Outputs AES Outputs Monitor Amplifiers Speakers Headphone Jack 8 De embedded SDI Pairs 8 AES Pairs 5 Dolby...

Страница 46: ...ify whether the outputs should be affected by A The Solo and Mute hot keys available per channel pair by pressing the Affected by Solos and Mutes button B The front panel Volume control available per...

Страница 47: ...the button or the button to display the Configuration Menu 2 From the Configuration Menu select either the AES Output Configuration Menu or the Analog Output Configuration Menu depending on the output...

Страница 48: ...he Input 6 You can repeat this procedure on other AES or analog outputs if you need additional duplicate monitor mix outputs Press the button twice to return to the Main Screen AES Output Configuratio...

Страница 49: ...that these menus adjust are as follows 1 You can map either or both of these output ports pair wise either to the channel pairs that are metered and audibly monitored or to a selection of the SDI and...

Страница 50: ...2 below Table 3 1 Available Signal Types Channels Signal Sources Available Channel Pairs SDI 1 through 8 AES 1 through 8 Dolby 1 through 5 Monitor Mix 1 through 8 Off Table 3 2 Unbalanced AES Output...

Страница 51: ...4 Non inverted Balanced Analog Output 8 Ground Channel 4 Shield 9 Channel 3 Inverted Balanced Analog Output 10 Channel 2 Non inverted Balanced Analog Output 11 Ground Channel 2 Shield 12 Channel 1 Inv...

Страница 52: ...and their outputs Figure 3 6 Meter Routing Diagram 3G SDI Input 1 3G SDI Input 2 3G SDI Output AES Inputs Right Screen Middle Screen Left Screen 8 AES Pairs 8 De embedded SDI Pairs Configuration Sele...

Страница 53: ...ation Menu The phase indicators are also enabled or disabled in this menu 2 The meter scale ballistics limits reference level as well as segment colors and transition points are set in the Meter Confi...

Страница 54: ...USO RESTRITO...

Страница 55: ...ies Inc All rights reserved 47 CHAPTER 4 Video and Data Introduction Overview This chapter describes how to configure the AMP1 16V MD and AMP1 E16V MD to display both video and data Topics Topics Page...

Страница 56: ...ns Figure 4 1 illustrates the menus used to modify the video signals the various signal inputs the menus used to configure them and their outputs Figure 4 1 Video Routing Diagram 3G SDI Input 1 3G SDI...

Страница 57: ...on Options Video Menus The display of the level meters and related visual indicators is determined as follows 1 Select the SDI source for video from the Configuration Selection Menu 2 Select the forma...

Страница 58: ...USO RESTRITO...

Страница 59: ...This chapter describes the processes of creating presets and hot keys These features allow you to configure the AMP1 16V MD and AMP1 E16V MD and then save those settings for immediate recall Topics T...

Страница 60: ...e to have two presets that are largely the same except for certain settings set up one of them first and save it to the first preset Then make the changes that differentiate the two presets and save t...

Страница 61: ...eys surrounding the Main screen to become a selectable preset To use this hot key press it rotate the Balance knob to select the desired preset then press the Balance knob This selected preset will th...

Страница 62: ...you do not need to press the Select button a second time simply rotate the Balance knob until the y is highlighted 7 Press the Balance button to select it Repeat this process for each character of th...

Страница 63: ...the Balance knob Hot Keys Overview Hot keys allow you to make immediate configuration changes at the touch of a button without using the menu system Hot keys can be Solos Mutes Preset changers or Off...

Страница 64: ...off 5 Pressing the Balance knob selects the function displayed off mute solo or pre 6 Once the function you want is highlighted rotate the Balance knob again to sequence the highlight through each of...

Страница 65: ...in until you highlight Channel 8 7 When Channel 8 is highlighted press the Balance knob to select it 8 Use this same procedure to unselect any channels that are selected that you do not want to mute 9...

Страница 66: ...w Preset Files A preset file contains all eight presets and all other saved settings of the current system configuration whether saved as a preset or not of an AMP1 16 Series monitor Hot Key Naming Ex...

Страница 67: ...he button or the button to display the Configuration Selection Menu B When the Configuration Selection Menu appears press the Screen Display Menu button to display the Screen Display Menu C When the S...

Страница 68: ...number Continue on to Backing Up the Saved Presets immediately below Otherwise if one or more of the lines in Step 2 is not the same then this procedure will not work You can do one of two things Man...

Страница 69: ...maintain two parts of the filename both of which are case sensitive The word Presets plural must appear in the filename The file s extension must be S19 7 Once the file is copied disconnect the AMP1 1...

Страница 70: ...puts and Outputs GPI Os The AMP1 16V MD contains eight General Purpose Inputs GPIs and two General Purpose Outputs GPOs The inputs GPIs are detected as DC voltages between 12 and 24 VDC Their action r...

Страница 71: ...splay the Screen Display Menu 2 Press the Options Menu button to display the Options Configuration Menu Table 5 1 GPIO Connector Pin Out Pin Function Use 1 GPO 1 N O Normally Open and Normally Closed...

Страница 72: ...r Guide 2013 Wohler Technologies Inc All rights reserved 64 Chapter 5 Efficiency Enhancements Turning Active Help On or Off 3 Press the Active Help button to toggle the help display on the video monit...

Страница 73: ...ed alphabetically for easy reference Topics Topics Page Menu Navigation Overview 66 AES Output Configuration Menu 68 Analog Output Configuration Menu 70 Configuration Selection Menu 72 Cluster Configu...

Страница 74: ...uttons also either the Save and Exit or the Cancel and Exit Context sensitive active help appears automatically on the left hand screen for any function The configuration menus shown in Figure 6 1 on...

Страница 75: ...6 7 Dolby 8 Loudness Config Menu Loudness Cfg 1 Channel Sel 2 Loud Contrib 3 Loud Window 4 GPO Activate 5 Cluster Sel 6 7 Clr Loudness 8 Hot Key Config Menu Hot Key 1 Cfg 1 Hot Key 2 Cfg 2 Hot Key 3...

Страница 76: ...ecoded output pairs are added Affected by Solos Mutes This option is only available when the AES output is set to monitor channels When it is not available it is disabled and the options are set to No...

Страница 77: ...e selected pair Affected by Volume Control This option is only available when the AES output is set to Monitor Channels When it is not available it is disabled and the options are set to No When it is...

Страница 78: ...decoded output pairs are added Affected by Solos Mutes This option is only available when the analog output is set to monitor channels When it is not available it is disabled and the options are set t...

Страница 79: ...her controls on this menu affect the selected pair Affected by Volume Control This option is only available when the analog output is set to monitor channels When it is not available it is disabled an...

Страница 80: ...er outputs Screen Display Menu Progresses to another menu screen which contains access to other menus to configure what is displayed on the Main Screen Preset Configuration Menu Progresses to a menu t...

Страница 81: ...side of the blue bracket to select the starting channel of a cluster Pressing the Balance knob sets the new cluster Edit Cluster Label Pressing this control proceeds to the Label Menu to allow you to...

Страница 82: ...source of the Dolby CAT 552 card The source choices include all AES input pairs and all SDI de embedded pairs Pro 16 Mode Channel Pressing this control and then rotating the Balance knob selects the...

Страница 83: ...er Pressing this button and then rotating the Balance knob allows the user to select from any of the delay times before the screen saver engages Minutes 5 minutes to 119 minutes Hours 2 hours to 24 ho...

Страница 84: ...nob is not pressed again within five seconds the request will be canceled Otherwise if you press the Balance knob within the time out window all user presets and other user configurable settings such...

Страница 85: ...us label and allows you to continue editing Select Existing Text When this screen is entered the most recently used label text is displayed This allows you to start with a similar label and then use t...

Страница 86: ...ight as necessary Loudness Contribution Pressing this button and then rotating the Balance knob moves the yellow dot among the radio buttons to select this channel s contribution to the loudness measu...

Страница 87: ...a time Press this button and then rotate the Balance knob to select the desired cluster In the Loudness Off mode this control doesn t function If a cluster already has channel contributions assigned...

Страница 88: ...rammable set of channels Table 6 1 below shows the color schemes for each When you press a solo or mute hot key the speaker symbol above the corresponding level meter s will change to either bright bl...

Страница 89: ...ics and scale and assign the meter color scheme The Loudness Configuration Menu is used to turn on and configure the phase and loudness indicators Main Screen Hot Key Button Configuration Menu Figure...

Страница 90: ...ghted selects it and deselects any other preset that was already selected Meter Configuration Menu Figure 6 14 Meter Configuration Menu Meter Scale Rotating the Balance knob after pressing this button...

Страница 91: ...s the top and bottom limits of the meter Middle Segment Color Rotating the Balance knob after pressing this button cycles the middle color of the displayed sample level meter color through a wide vari...

Страница 92: ...and then rotating the Balance knob moves the red selection box from side to side selecting the channel pair to configure Note that the eight pairs 16 channels will scroll on and off the screen as you...

Страница 93: ...elay Pressing this button and then rotating the Balance control knob changes the global audio delay The range is 0 to 170 mS in 1 mS increments The actual audio delay to the monitor speakers changes d...

Страница 94: ...e Monitor Channel Trim controls on the Monitor Configuration Menu AES Output Configuration Menu and the Analog Output Configuration Menu When this is enabled the values set on the trims in these menus...

Страница 95: ...he Balance knob allows you to select from any of the eight presets Pressing the Balance knob proceeds to a text entry menu to select a new name for the Preset Note When exiting this menu be sure to us...

Страница 96: ...n and then rotating the Balance knob allows you is to select from any of the presets plus the last known state of the unit Thus on a power failure or when the unit is unplugged the unit can either sta...

Страница 97: ...details Screen Information Setup Menu Figure 6 19 below shows some of the metadata that can be displayed on the screens of the AMP1 16 The Dolby Decoder supplies all but one of the metadata parameter...

Страница 98: ...ed unless the Left Screen button is pressed Rotating the Balance knob after pressing this button cycles the color of the data field background through a wide variety of colors This is displayed in the...

Страница 99: ...processor cards that are present in the monitor This is the information that appears when you first enter the Unit Information Menu Serial Ethernet Info Pressing this button changes this menu to show...

Страница 100: ...S W Update Ethernet Port Configuration IP Address 0 0 0 0 MAC Address 00 03 f4 02 97 55 Serial RS 232 Port Configuration Baud Rate 115200 Parity None Data Bits 8 Stop Bits 1 Handshaking None Network...

Страница 101: ...te the AMP1 16V s firmware through that Ethernet connection These steps will be described in detail in the following Topics Topics Note It may prove useful to reprint this chapter every time you need...

Страница 102: ...oth the host computer and the units are connected with standard Ethernet patch cables or a crossover cable to connect the host computer directly to the AMP1 16V Using the LAN and DHCP is the preferred...

Страница 103: ...e screen of the AMP1 16V Note any versions that are out of date in the lines below The AMP1 16V cannot report its video FPGA version If you are doing any other updates please include the video FPGA as...

Страница 104: ...the NetBurner AutoUpdate utility found in the update package in the Utilities Folder Click on the Find button You should see something similar to Figure 7 1 below Figure 7 1 Find Netburners Dialog 2...

Страница 105: ...e the AMP1_16_Vx xx_APP s19 file in the S19 Files folder of the update package The x s will be replaced with the software version Write the IP Address here __________________________________ 4 Check t...

Страница 106: ...w software Upgrading the Sub Processor Firmware 1 Power the AMP1 16V and navigate to its Unit Information Menu From the Main Screen press the checkmark button to get to the Configuration Selection Men...

Страница 107: ...exactly as noted For example enter ftp 192 168 0 2 7 You will see something similar to the following screen shot in Figure 7 6 if the folders are set to detail view The filename folder name and file...

Страница 108: ...o it means the FTP connection failed Try power cycling the AMP1 16V and restarting the host computer Then repeat the steps above When you get back to this point press the F5 key to refresh the window...

Страница 109: ...following steps since Windows caches the file and folder information If any of the files change Windows will report the previous information from its cache rather than the current information Refresh...

Страница 110: ...User Guide 2013 Wohler Technologies Inc All rights reserved 102 Chapter 7 Firmware Updates Upgrading the Sub Processor Firmware Figure 7 9 File Transfer Figure 7 7 above shows a sub processor being p...

Страница 111: ...has been reprogrammed wait about 15 seconds and press F5 to refresh the window The window will now appear like the one shown in Figure 7 11 Figure 7 11 Refreshed Window 12 When all the sub processors...

Страница 112: ...821697 AMP1 16V Series User Guide 2013 Wohler Technologies Inc All rights reserved 104 Chapter 7 Firmware Updates Upgrading the Sub Processor Firmware USO RESTRITO...

Страница 113: ...s Inc All rights reserved 105 CHAPTER 8 Features and Specifications Introduction Overview This chapter lists the features and specifications of the AMP1 16V MD and AMP1 E16V MD Topics Topics Page Intr...

Страница 114: ...re the system to your needs for any given production Near field audio monitors are often placed in a signal path The re clocked output of the SDI signal and demux outputs for eight AES pairs on unbala...

Страница 115: ...es 1RU case for space savings 1 8 3 5 mm stereo front panel headphone jack Dual selectable 3G HD SD SDI inputs Fixed or variable room surround monitoring outputs Eight Unbalanced AES pairs on HD15 x 2...

Страница 116: ...cations Specification Values Domains Power requirements 100 V to 240 V AC 10 50 60Hz Power consumption 65 Watts Dimensions H x W x D 1 75 x 19 x 11 4 5mm x 483mm x 30mm Weight 10 05 lbs Space Required...

Страница 117: ...og Dynamic Range 96dB 20 to 20kHz Level Meters 180 segments Level Meter Scales Selectable AES VU Ext VU BBC EBU Nordic and DIN Level Meter Characteristics Selectable Meter thresholds Reference Segment...

Страница 118: ...AES EBU Input Sampling Rate 32 48kHz Auto detecting Hum and Noise Better than 68dB below full output Electrical Distortion 0 15 at any level below limit threshold Acoustic Distortion 8 or less worst c...

Страница 119: ...821697 AMP1 16V Series User Guide 2013 Wohler Technologies Inc All rights reserved 111 Chapter 8 Features and Specifications Technical Functional Overview Figure 8 1 AMP1 16 Block Diagram USO RESTRITO...

Страница 120: ...USO RESTRITO...

Страница 121: ...blish an Ethernet link between a Windows host computer and an AMP1 16V by two different methods Either method may be used Topics Topics Page Introduction 113 Connectivity Options 114 Connecting to a L...

Страница 122: ...tically The alternative is to set up a direct connection between the host computer and the unit through a crossover cable Connecting to a LAN Launching the Setup Tool 1 Connect the unit and your host...

Страница 123: ...ns and networks it may also be desirable to have a static Ethernet configuration in the unit If you desire to use a static Ethernet configuration AND connect to a LAN you MUST first obtain an address...

Страница 124: ...ately 30 seconds If the NetBurner module does not appear with the new address press the Search Again button The window should now look like the one shown in Figure 9 3 below Figure 9 3 NetBurner IPSet...

Страница 125: ...P see requirements in next section or compatible static IP addresses must be used in both the computer and the unit See Setting a Static Ethernet Configuration on page 115 to set the unit and refer to...

Страница 126: ...icon in the system tray that indicates the state of the network connection These icons mean the computer is trying to establish a connection Windows XP Windows 7 8 You must wait until the connection...

Страница 127: ...connection to the internet will take precedence over one that does not such as the direct connection between the unit and your computer 16 If you still do not see the AMP1 16V ensure that the network...

Страница 128: ...oth the unit and the computer must be connected to a LAN This will allow you to set a static IP as shown in the instructions which begin on Page 114 Once the unit has a static IP does not report an IP...

Страница 129: ...the upper left corner click on the text Change adapter settings 4 You should see a window similar to the one in Figure 9 4 Figure 9 4 Windows XP Network Connections 5 Disable all network adapters exce...

Страница 130: ...2 Appendix 9 Establishing Connectivity Setting a Static IP in a Windows XP Computer Figure 9 5 Windows XP Local Area Connection Properties 7 Right click on the Internet Protocol Version 4 text and cho...

Страница 131: ...tting a Static IP in a Windows XP Computer Figure 9 6 Windows XP IP Properties 8 If there is any information in the fields above write it here so the settings can be restored later 9 Set the window as...

Страница 132: ...ws XP IP Properties 10 Press OK and close all other windows 11 Shut down the computer 12 Unplug the power to the AMP1 16V 13 Connect the crossover cable between the computer s Ethernet port and the un...

Страница 133: ...changes to this one 18 The exclamation point on the icon is OK This simply signifies that the computer is not connected to the internet which should be true if this adapter is connected directly to t...

Страница 134: ...Sharing Center 3 You should find a sub heading titled LAN or High Speed Internet The window will look similar to Figure 9 8 Figure 9 8 Windows 7 Network Connections 4 Disable all network adapters exce...

Страница 135: ...d 127 Appendix 9 Establishing Connectivity Setting a Static IP in a Windows 7 Computer Figure 9 9 Windows 7 PCI Card Properties 6 Click on Internet Protocol TCP IP 7 Click on the Properties button Ano...

Страница 136: ...Internet Protocol Properties 8 If there is any information in the fields above write it here so you can restore the settings later 9 Set the window with the settings shown in Figure 9 10 above 10 Pre...

Страница 137: ...true if this adapter is connected directly to the unit 19 Open the IP Setup Utility 20 You should see your unit listed in the Select a Unit window 21 If not close the IP Setup Utility wait a few minut...

Страница 138: ...821697 AMP1 16V Series User Guide 2013 Wohler Technologies Inc All rights reserved 130 Appendix 9 Establishing Connectivity Setting a Static IP in a Windows 7 Computer USO RESTRITO...

Страница 139: ...ction Overview This appendix explains how to set up the AMP1 16V MD Series monitor to transfer files to or from a PC through an Ethernet connection See Appendix 9 on page 113 for establishing connecti...

Страница 140: ...__________________________________________ 4 If the AMP1 16V s graphics screens remain black after the unit has had power applied for more than thirty seconds you will need to get the IP address and m...

Страница 141: ...evious page exactly as noted For example enter ftp 192 168 0 2 4 You will see something similar to the following screen shot in Figure 10 2 if the folders are set to detail view The filename folder na...

Страница 142: ...Failed FTP Connection Figure 10 4 FTP Window 7 Press the F5 key to refresh the window Important You must refresh the file window after each file transfer since Windows caches the file and folder infor...

Отзывы: