page 5 – 70
WheatNet-IP BLADE 3
/ July 2018
W H E A T N E T - I P N A V I G A T O R G U I
Silence Detect Tab
The fifth tab is the “Silence Detect” tab. One of the very powerful features of the
WheatNet‑IP system is that every single audio output channel can be programmed with a
silence detection and automatic switch over function. This capability can go a long way to
maintaining smoother, more reliable operation to your radio stations when an unexpected
problem happens. Careful planning of alternate and back up audio paths for crucial con‑
nections can keep you on the air.
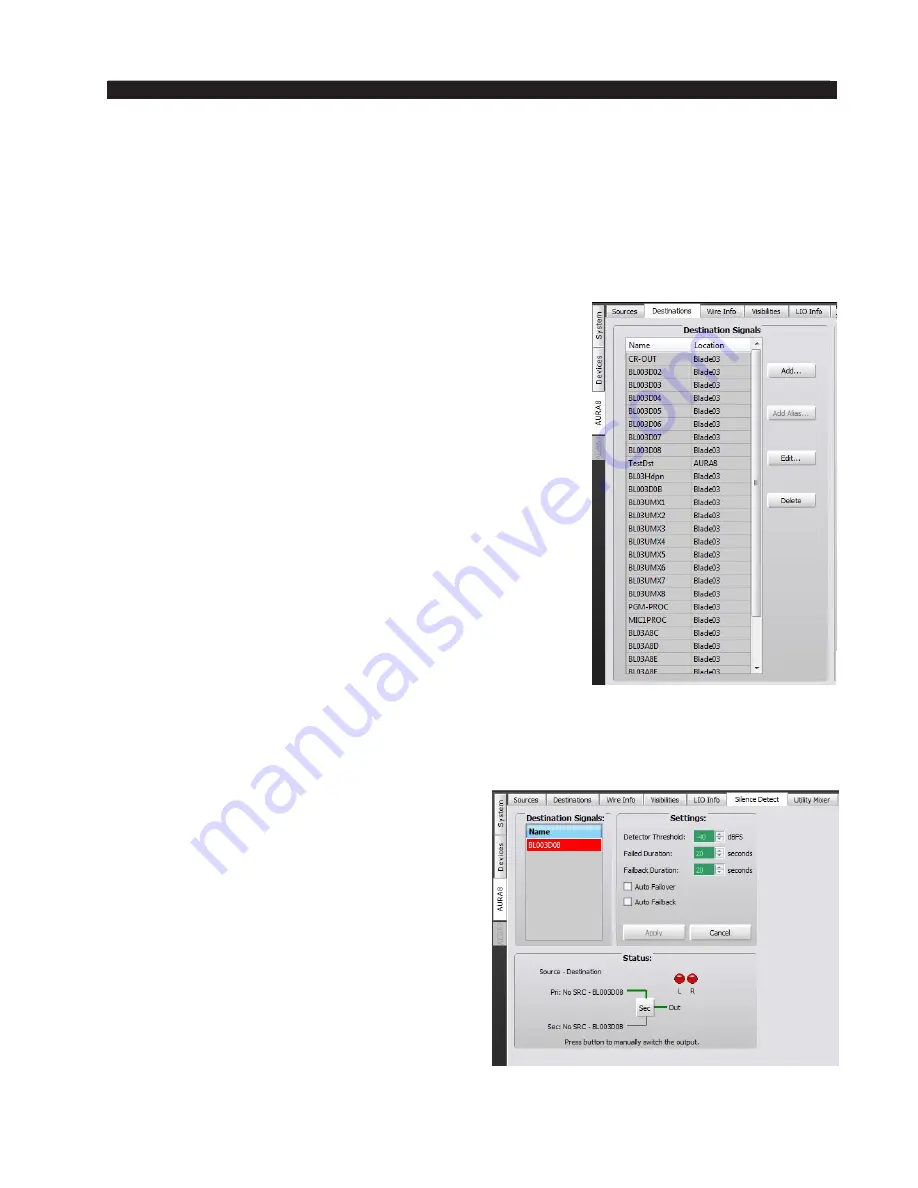
While the silence detect function is available for every
destination signal in each BLADE 3, it is not automatically
enabled. Many of the signals in a typical system do not
need this function. To enable silence detect for a particular
destination signal, you must click on the Destinations tab
for the BLADE in which the signal is located, click on the
desired signal to highlight it, and then click on the
Edit...
button to open the familiar “Destination Signal Wizard”
window. You will notice the Silence Detect check box; if it
has not been checked, silence detection will not be enabled
for this audio channel.
When you click on the silence detect check box and finish
the signal wizard, several things happen.
First, the silence detect function is enabled. Second the
silence detect alarm logic signal (default name is “XXXL”
where XXX is the name of the destination signal you are
working on) is automatically created as a Source Signal to
generate messages in the “Alarms” pane of the GUI and to
allow connection to a physical logic output port to activate
an alarm device. Finally, a new audio destination signal is
automatically added into the BLADE (and the system). This
signal is created with a default name of “XXXB” (where XXX is the name of the signal
you are working on) and represents the secondary audio path that can be used for automatic
failover of your source connection upon detecting silence. Create a back up signal path
by making a source connection from your back
up source to this secondary “B” connection (it
will show on the crosspoint grid).
Clicking on the Silence Detect tab for a
BLADE opens up a three part window.
The upper left hand window part is labeled
“Destination Signals” and shows a list of any
destinations that have been set up for silence
detection. The upper right hand window part is
labeled “Settings” and shows the particular level
and duration parameters that have been chosen
(or the standard default settings). The bottom
window part, called “Status” shows details about
the current state of the silence detect function.
Содержание WheatNet-IP BLADE3
Страница 2: ...Technical Manual Wheatstone Corporation Jan 2016 Audio Over IP Network WheatNet IP BLADE3 ...
Страница 16: ...Quick Start 12 WheatNet IP BLADE 3 Jan 2016 Figure 4 ...
Страница 274: ...page A 48 WheatNet IP BLADE 3 Jan 2016 A P P E N D I C E S Contents Appendix 4 External Controllers A 49 ...
Страница 290: ...page A 61 WheatNet IP BLADE 3 Jan 2016 A P P E N D I C E S Click Next Click Install ...
Страница 336: ...page A 107 WheatNet IP BLADE 3 Jan 2016 A P P E N D I C E S Contents Appendix 9 Introduction to Screen Builder A 108 ...
Страница 338: ...page A 109 WheatNet IP BLADE 3 Jan 2016 A P P E N D I C E S ...
Страница 365: ...WheatNet IP BLADE 3 June 2018 page A 136 A P P E N D I C E S Some Screen Shots of Various Vendors Configuration Screens ...
Страница 366: ...WheatNet IP BLADE 3 June 2018 page A 137 A P P E N D I C E S ...


