VITEK Industrial Video Products – Transcendent Series NVRs
125
The configuration steps of the above-mentioned alarm linkages are as follows.
Duration:
Refers to the interval time between the adjacent motion detections. For instance, if the
duration time is set to 10 seconds, once the system detects motion, it will go to alarm and would
not detect any other motion (specific to camera) for 10 seconds. If there is another motion
detected during this period, it will be considered as continuous movement; otherwise it will be
considered as a single motion.
Record
: Check it and then the “Trigger Record” window will pop up automatically (you can also
click the “Configure” button to pop up the window). Select camera on the left side and then click
to set the camera as the trigger camera. Select trigger camera on the right side and then
click
to cancel the trigger camera. Click “OK” to save the settings. The trigger cameras
will record automatically when the sensor alarm is triggered.
Snapshot
: Check it and then the “Trigger Snapshot” window will pop up automatically.
Configure the trigger camera in the window. The trigger cameras will capture images
automatically when the sensor alarm is triggered.
Push:
Check it and choose ON or OFF. If it is ON, the system will send messages when the
sensor alarm is triggered.
Alarm-out:
Check it and then the “Trigger Alarm-out” window will pop up automatically.
Configure the trigger alarm-out in the window. The system will trigger the alarm-out
automatically when the sensor alarm is triggered. You need to set the delay time and the schedule
of the alarm outputs. See 11.5.1 Alarm-out for details.
Preset:
Check it and then the “Trigger Preset” window will pop up automatically. Configure the
trigger preset of each camera. To add presets, please see 6.2 Preset Setting for details.
Buzzer:
If enabled, the system will begin to buzz when the sensor alarm is triggered. To set the
delay time of the buzzer, please see 11.5.4 Buzzer for details.
Pop-up Video:
After camera setting, the system will pop up the corresponding video
automatically when the sensor alarm is triggered. To set the duration time of the video, please
see 11.5.3 Display for details.
Pop-up Message Box
: If enabled, the system will pop up the corresponding alarm message box
automatically when the sensor alarm is triggered. To set the duration time of the message box,
please see 11.5.3 Display for details.
E-mail:
If enabled, the system will send an e-mail when the sensor alarm is triggered. Before
you enable the email, please configure the recipient’s e-mail address first (see 13.1.5 E-mail
Configuration for details).
11.2 Motion Alarm
Motion Alarm
: When motion appears in the specified area, it will trigger the alarm. You should
enable the motion of each camera first and then set the alarm handling of the camera to complete
the whole configuration of motion alarm.
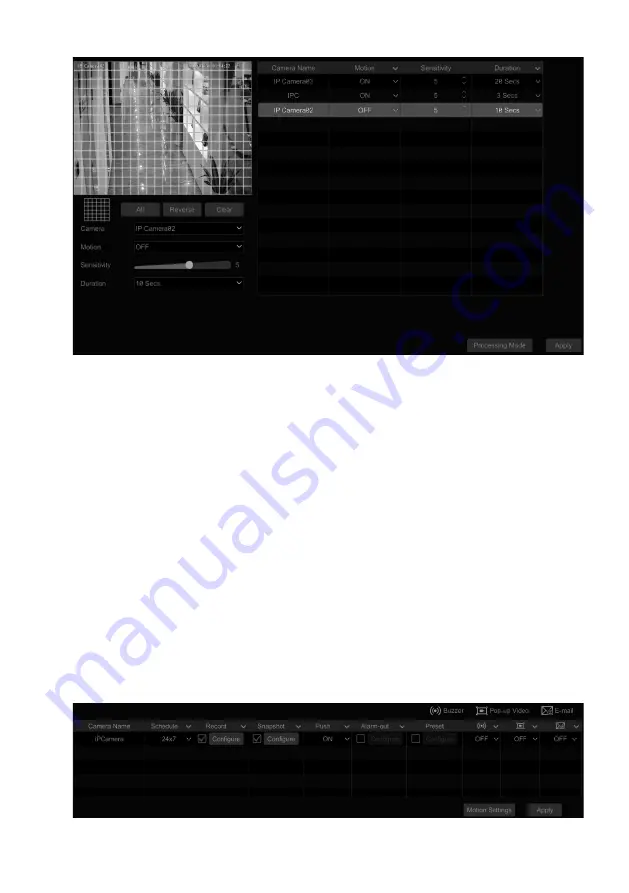
11.2.1 Motion Configuration
①
Click Start
à
Settings
à
Camera
à
Motion Settings to go to the following interface.
VITEK Industrial Video Products – Transcendent Series NVRs
126
②
Select the camera, enable the motion, and set the sensitivity and duration of the camera.
Sensitivity
: The higher the value is, the more sensitive it is to motion. You should adjust the value
according to the practical conditions since the sensitivity is influenced by color and time (day or
night).
Duration
: Refers to the interval time between the adjacent motion detections. For instance, if the
duration time is set to 10 seconds, once the system detects motion, it will go to alarm and would
not detect any other motion (specific to camera) for 10 seconds. If there is another motion
detected during this period, it will be considered as continuous movement; otherwise it will be
considered as a single motion.
③
Drag the camera image to set the motion area. You can set more than one motion area. Click
“All” to set the whole camera image as the motion area. Click “Reverse” to swap the motion area
and the non-motion area. Click “Clear” to clear all the motion areas.
④
Click “Apply” to save the settings. Click “Processing Mode” to go to the alarm handling
configuration interface of the motion alarm.
11.2.2 Motion Alarm Handling Configuration
①
Click Start
à
Settings
à
Alarm
à
Motion Alarm to go to the following interface.
Содержание VT-TNR1646PF
Страница 185: ...NOTES ...


