VITEK Industrial Video Products – Transcendent Series NVRs
97
②
Select the camera, enable tripwire detection by IPC and set the duration.
Note
: Some models may support tripwire detection by NVR.
③
Select the direction.
Direction
: A<->B, A->B and A<-B optional. It is the crossing direction of the target that crosses
over the alert line.
A<->B
: the alarm triggers when the target crosses over the alert line from B to A or from A to B.
A->B
: the alarm triggers when the target crosses over the alert line from A to B.
A<-B
: the alarm triggers when the target crosses over the alert line from B to A.
④
Draw line. Refer to the interface as shown above. Check “Draw line” and then drag the
mouse in the image to draw an alert line. Uncheck the “Draw line” if you finish the drawing.
Click the “Clear” to delete the alert line.
⑤
Click “Detection Target” to choose the detection target and the sensitivity. The detection
target includes people, vehicle, and non-vehicle. Only some IPCs can detect human or vehicle
separately. If the camera does not support this function, please skip this step.
⑥
Click “…” to choose “Save original picture” or “Save target picture” on the SD card of the
camera. (If your camera does not support this function, please skip this step).
⑦
Click “Trigger Mode” to configure tripwire alarm linkage items.
l
Enable or disable “Record”, “Snapshot”, “Push”, “Alarm-out”, “Preset”, “Buzzer”, “Pop-up
Video” and “E-mail”. The alarm linkage settings are the same as the face detection alarm (see
9.1.1 Face Detection Settings for details).
l
Enable “IPC Audio” or “IPC Light” as needed (only some IPCs support these two functions).
To set the IPC voice and its times and volume, please refer to 11.5.6 Audio for details. To set the
light flashing time and frequency of the IPC, please refer to 11.5.7 Light for details.
⑧
Click “Apply” to save the settings.
VITEK Industrial Video Products – Transcendent Series NVRs
98
9.4 Intrusion Detection
Intrusion Detection Configuration
:
Alarms will be triggered if the people or vehicles intrude into the pre-defined area.
①
Click Start
à
Settings
à
AI/Event
à
AI Event
à
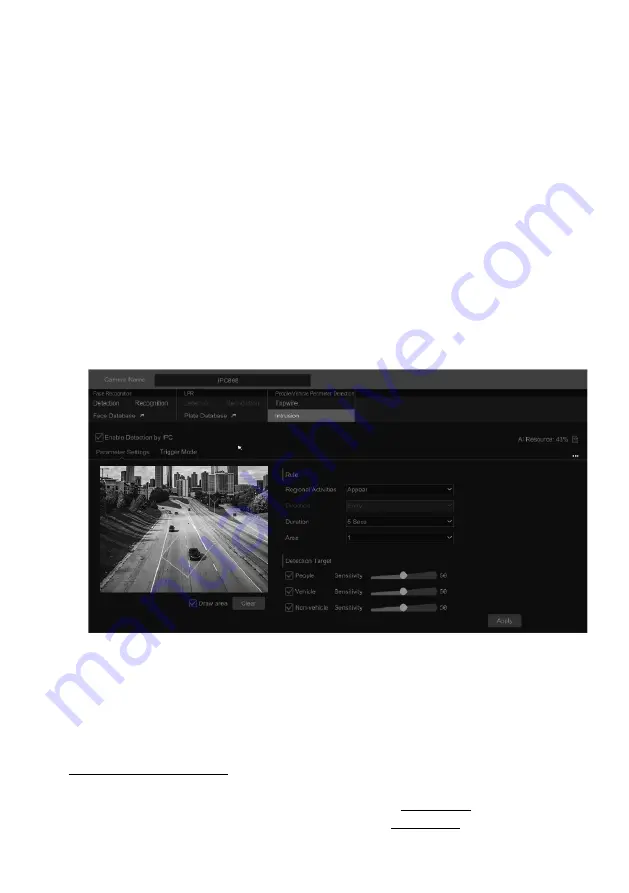
Intrusion to go to the following interface.
②
Select the camera, enable the intrusion detection by IPC and set the duration.
Note
: Some models may support tripwire detection by NVR.
③
Select regional activities. “Appear” or “Cross” can be selected (if your camera doesn’t
support region entrance/exiting detection, “Cross” will not be enabled). If “Cross” is selected,
you can choose the crossing direction.
④
Select the alarm area. Up to 4 alarm areas can be set up.
⑤
Draw the alarm area of the intrusion detection. Refer to the interface as shown below. Check
“Draw Area” and then click around the area where you want to set as the alarm area in the image
(the alarm area should be a closed area). Uncheck the “Draw Area” if you finish the drawing.
Click the “Clear” to delete the alarm area.
⑥
Click “Detection Target” to choose the detection target and the sensitivity. The detection
target includes people, vehicle and non-vehicle.
⑦
Click “Trigger Mode” to configure intrusion detection alarm linkage items.
l
Enable or disable “Record”, “Snapshot”, “Push”, “Alarm-out”, “Preset”, “Buzzer”, “Pop-up
Video” and “E-mail”. The alarm linkage settings are the same as the face detection alarm (see
9.1.1 Face Detection Settings for details).
l
Enable “IPC Audio” or “IPC Light” as needed. (only some IPCs support these two functions).
To set the IPC voice and its times and volume, please refer to 11.5.6 Audio for details. To set the
light flashing time and frequency of the IPC, please refer to 11.5.7 Light for details.
⑧
Click “Copy To” to copy all settings to other cameras.
Содержание VT-TNR1646PF
Страница 185: ...NOTES ...


