25
ELECTRICAL POWER
The electrical installation must be per-
formed by a
qualified electrician
in accor-
dance with all applicable electrical codes.
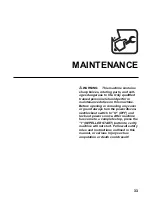
Refer to Figure 18 and proceed as follows:
1.
Connect the outside power source
to
the terminals on top of the disconnect in
the starter enclosure. The hazard alert
label on the front of the starter enclosure
specifies proper voltage for this machine.
NOTE:
If voltage is not at least 95%
of specified voltage, the motor may
become overloaded during operation.
To maintain the watertight feature of
the starter enclosure, use “liquid tight” or
rigid conduit and appropriate fittings at
the power source entry point on the side
of the starter enclosure.
NOTE:
Additional holes added to
the starter enclosure may lessen the
water-tight features of the enclosure and
lead to electrical failures. Electrical com-
ponents that have failed due to water or
chemical contamination will not be cov-
ered under the warranty.
2.
Connect grounding conductor (green
or green and yellow striped wire)
to the
earth termination point located on back
panel inside the starter enclosure.
WARNING:
This machine can be
electrified with voltages dangerous to
life if not properly grounded! Always
maintain an earth ground to the earth
termination point on this machine.
3.
Connect the wiring
so that the impeller
turns
clockwise
. Rotation of impeller
motor shaft can be viewed by looking
through the opening in the fan shroud at
the rear of the impeller motor.
4.
Securely tighten screws
on the starter
enclosure door when finished with instal-
lation.
INSTALLATION
Electrical Power
Figure 18 — Interior of starter enclosure (NEMA
components, top, CE components, bottom).
Connect outside power source to the terminals on
the power disconnect/lockout switch; connect
grounding conductor to the earth termination point.
(1) Circuit Breaker, (2) Power Source Entry Point,
(3) Earth Termination Point
1
1
2
3
3
2
Содержание COMITROL 2100
Страница 2: ......
Страница 28: ...Addendum A 26 This page intentionally left blank...
Страница 84: ...6 This page intentionally left blank...
Страница 94: ...16 This page intentionally left blank...
Страница 95: ...17 GENERAL INFORMATION...
Страница 101: ...23 INSTALLATION...
Страница 104: ...26 This page intentionally left blank...
Страница 110: ...32 This page intentionally left blank...
Страница 131: ...53 PARTS...
Страница 132: ...54 This page intentionally left blank...
Страница 134: ...56 PARTS Tools See the Addendum for updated information...
Страница 138: ...60 PARTS Agitator Feed Screw See the Addendum for updated information...
Страница 140: ...62 PARTS Cutting Assembly 8 3 4 5 2 5 1 6 7 9 12 11 10 14 16 26 25 24 23 22 21 17 18 19 20 13 15...
Страница 146: ...PARTS Motor and Drive Parts 68 See the Addendum for updated information...
Страница 148: ...PARTS Electrical Assembly NEMA 70 See the Addendum for updated information...
Страница 150: ...PARTS Electrical Assembly NEMA 72 59 58 57 17 16 15 1 14 See the Addendum for updated information...
Страница 152: ...PARTS Electrical Assembly CE compliant 74 See the Addendum for updated information...
Страница 156: ...78 PARTS Electrical Assembly Switches See the Addendum for updated information...
Страница 165: ......


