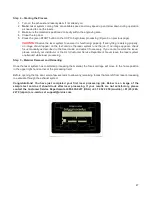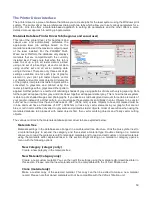
3D mode:
This mode affects raster elements of your image. In this mode, instead of a dither pattern being applied to
all raster data, the laser power level is varied on the fly in accordance with the grayscale levels in the
image (multicolor bitmaps are converted to grayscale first). Lighter parts of the image will receive less
laser power and darker parts more laser power. This mode is for very specific applications. If you select
3D mode, you can adjust how the grayscale levels are mapped to laser power levels using the SETUP
button. You can contact our applications lab at Universal Laser Systems for more information on use of
the 3D mode.
Rubber stamp mode:
This mode is specifically for rubber stamp creation and is used for creating shoulders on characters when
processing rubber stamps. If you select rubber stamp mode, you can adjust the shoulder settings for the
rubber stamp mode using the SETUP button.
Reduction Mode:
This mode is specifically for barcode engraving and adjusts the barcode elements for readability. If you
select reduction mode, you can adjust the reduction settings by using the SETUP button.
Material Thickness
You must enter the thickness of the material to be processed. This value is used by the materials database to
calculate the vector cutting job settings to ensure that the laser cuts all the way through the material. This
value is also used to by the laser system to move the Z axis to the proper focus height when using the auto Z
mode. Using a caliper or similar measuring device, measure the thickness of your material and enter it into
the Material Thickness box.
Merge Pages
This setting allows you to treat multipage documents in different ways. By default, multipage documents are
treated as separate jobs with each page having to be selected in the UCP and run individually. This setting
allows you to change that behavior. Selecting this setting once will merge the pages with auto-start, meaning
the pages will all be printed one after another as one job. This is useful if you want all the graphic images to
print on one piece of material, but you want to control the order in which they are applied. Selecting this
setting again will merge the pages with manual start, meaning the pages will all be printed one after another
as one job, but with the laser system pausing in between each page. This is useful if you need to load new
material in between each page.
Print Direction
This setting specifies whether raster objects are processed from the top down or bottom up. On some
materials it is advantages to process rasters from the bottom up to prevent smoke from marring the previously
marked or engraved surfaces.
Vector performance
This setting allows you to adjust vector performance from Standard to Throughput or Quality. This affects how
small geometry and curves in your graphic are processed. The Quality mode will increase job completion
time, but improve vector quality. Throughput mode will decrease job completion time, but may have an
adverse effect on vector quality.
Units
This section allows you to switch between Metric and English units.
1-Touch Laser Photo
This switch is automatically selected when printing photos from Universal Laser Systems 1-touch Photo laser
photo printing software. This switch also be selected when printing a photo processed by 1-Touch Photo and
then imported into other software before printing. This switch optimizes settings for best results with 1-Touch
Photo images.
52
Содержание PLS4.75
Страница 1: ...PLS User Guide PLS4 75 PLS6 75 PLS6 150D PLS6MW www ulsinc com Revision August 2012...
Страница 5: ...Chapter 1 Specifications 5...
Страница 8: ...Chapter 2 Safety 8...
Страница 14: ...Tamper Proof Labels Safety Labels...
Страница 15: ...ULS Fiber Laser Cartridge Labels 15...
Страница 16: ......
Страница 17: ...PLS4 Back View 17...
Страница 18: ...PLS6 Front View 18...
Страница 19: ......
Страница 22: ...Chapter 3 Installation 22...
Страница 40: ......
Страница 48: ...Chapter 4 Operation 48...
Страница 83: ...Chapter 5 Accessories 83...
Страница 99: ...Example Connection for PNP mode Example Connection for NPN mode 99...
Страница 111: ...Chapter 6 Maintenance 111...
Страница 119: ...www ulsinc com...


